- Page 1 and 2: i 11 SeRleOsA3ciJ Ei 1P I eNGINes 3
- Page 3 and 4: l rjr F 1 S IENTI IC I UBLI ATIONS
- Page 5 and 6: d ENGINE COOLING SYSTEM FUEL SYSTEM
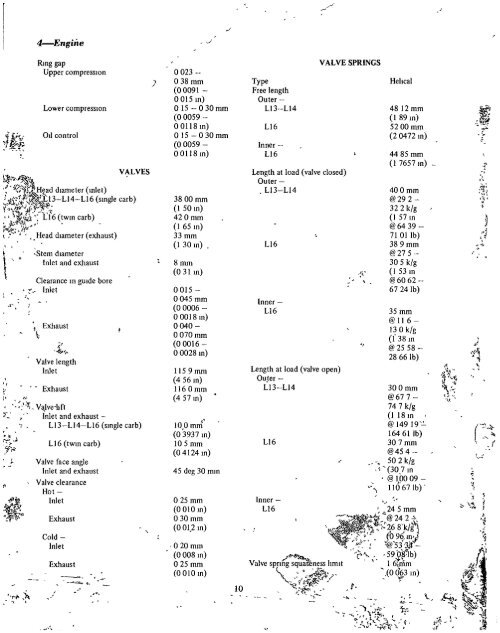
- Page 7 and 8: Engllle type Engllle models Fmng or
- Page 9: Thud U S o 250 mm Fourth UIS 0010 I
- Page 13 and 14: RIght Hand SIde V ew of 1600 Engone
- Page 15 and 16: TO CHECK Engine Rocker Cover Remove
- Page 17 and 18: Section of Cylinder Head Showing Ex
- Page 19 and 20: 1i t TO ASSEMBLE Assembly IS a reve
- Page 21 and 22: Q TO DISMANTLE I Withdraw the dnve
- Page 23 and 24: Ensure that the F front marking on
- Page 25 and 26: TO REMOVE 9 CRANKSHAFT AND MAl BEAR
- Page 27 and 28: I I I NOTE If the crankshaft rear f
- Page 29 and 30: r h Qj t NOTCHES 9 i I 1 I t V 3 j
- Page 31 and 32: J tI E L Ij v BOLTS NOTE When insta
- Page 33 and 34: INLET MANIFOLD Smgle Apphcatlon I D
- Page 35 and 36: TO INSTAL I With a new gasket mstal
- Page 37 and 38: Engme wdl not start by normal crank
- Page 39 and 40: 10 Apparent maIO beanng noise PossI
- Page 41 and 42: or foreign matter that may have acc
- Page 43 and 44: 2 Check the beanng for looseness m
- Page 45 and 46: Coolant leakage external Possible c
- Page 47 and 48: Float level using gauge Float lever
- Page 49 and 50: CHOKE LINK THROTTLE LEVER TO SERVIC
- Page 51 and 52: ET SCREWS GASKET e SCREW METAL l a
- Page 53 and 54: l TO ASSEMBLE 1 Assemble the flange
- Page 55 and 56: l To Adjust Idling Speed and MIXtur
- Page 57 and 58: f COVE REWS t SPRING DIAPHRAGM CHAM
- Page 59 and 60: CHOKE CONNECTING ROD 072MM 0 Il2B I
- Page 61 and 62:
mamfolds If necessary scrape the ga
- Page 63 and 64:
3 Remove the Jet adJustmg nut and s
- Page 65 and 66:
3 Remove the piston and needle asse
- Page 67 and 68:
TO CLEAN AND CHECK 1 Wash all compo
- Page 69 and 70:
TO REMOVE AND INSTAL container 1 Dr
- Page 71 and 72:
Type OperatIOn Type of dnven plate
- Page 73 and 74:
from flywheel and pressure plate Ma
- Page 75 and 76:
4 Place the pIston return spnng ove
- Page 77 and 78:
When fitting the bearing to the bea
- Page 79 and 80:
I Qutch shppmg a Insufficient pedal
- Page 81 and 82:
5 sizes for Idler gear From 1 I to
- Page 83 and 84:
Manual Transmission 4 J SPRING Gear
- Page 85 and 86:
HUB SHIFT PLATE SP NGS tfi It SH I
- Page 87 and 88:
THRUST WASHER BU E I Y NG PIN t t B
- Page 89 and 90:
TO ADJUST I Check that the tranSmIS
- Page 91 and 92:
16 Remove the nut and lock plate fr
- Page 93 and 94:
REVERSE GEAR I Nl 0 0 LOCK P E I RE
- Page 95 and 96:
SPRING PLU DETENT BALL INTERLOCK PL
- Page 97 and 98:
GEARBOX PART 4 1 DIffIcult gear cha
- Page 99 and 100:
Type Rfl If OperatIOn RatIOS Low i
- Page 101 and 102:
If TO ADJUST This IS not a normal s
- Page 103 and 104:
11 Increase the engIne speed by 500
- Page 105 and 106:
No dnve In D range a Low flUid leve
- Page 107 and 108:
Carner bearing retainer bolts Pilot
- Page 109 and 110:
d Mount a dial mwcator gauge on the
- Page 111 and 112:
Exploded View of Drive Pinion Compo
- Page 113 and 114:
jNGWASH C I FLAT WASHER t SEAL 0 TH
- Page 115 and 116:
een adJusted correctly the area of
- Page 117 and 118:
2 Check the dnve shaft for wear or
- Page 119 and 120:
NOTE Before dIsmantling the dIffere
- Page 121 and 122:
Q TliRUST WASHER VI PINION LOCK PIN
- Page 123 and 124:
Y TO REMOVE drum 1 RaISe the rearof
- Page 125 and 126:
a b c d e Q 1 c POSSIble cause f Lo
- Page 127 and 128:
Each front suspensIOn umt compnses
- Page 129 and 130:
TO REMOVE i9i SPACER WASHER 6 SUSI
- Page 131 and 132:
DIsmantled VIew of Lower SuspensIon
- Page 133 and 134:
1f 2 Check the front wheel ahgnment
- Page 135 and 136:
REAR SUSPENSION PART I SED N SI ECI
- Page 137 and 138:
Right Hand Rear Suspension Arm and
- Page 139 and 140:
TO REMOVE 6 IU 8 AX SIIAFT WK I HK
- Page 141 and 142:
TO ASSEMBLE AND INSTAl I Instal the
- Page 143 and 144:
Type Ratio Pre load adJustment Worm
- Page 145 and 146:
TO ASSEMBLE 1 Fit the ball nut to t
- Page 147 and 148:
LOWER JACKET 3 assembly Remove the
- Page 149 and 150:
g jI 4 Front wheel wobble or shImmy
- Page 151 and 152:
DRUM BRAKES The four wheel hydrauhc
- Page 153 and 154:
3 Slide the compressIOn spnng follo
- Page 155 and 156:
Left Hand Rear Brake Shoe Assembly
- Page 157 and 158:
acking plate and posItion the wheel
- Page 159 and 160:
TO REMOVE AND INSTAL BRAKE CALIPER
- Page 161 and 162:
TO REMOVE AND INSTAL BRAKE DISCS PI
- Page 163 and 164:
TO REMOVE AND lNSTAL Drum Brakes I
- Page 165 and 166:
TO ADJUST REAR BRAKE SHOES All Mode
- Page 167 and 168:
Type Capacity USA Canada PolarIty J
- Page 169 and 170:
JAPANESE PRODUCTION Early models Ma
- Page 171 and 172:
PULLEY BEARliG DIODE HEAT SINK TERM
- Page 173 and 174:
Nd WASHER PULLEY SoI FAN DRIVE END
- Page 175 and 176:
FRAME PILOT LAMP RELAY the regulato
- Page 177 and 178:
screw of the upper contdct pomt bla
- Page 179 and 180:
SOLENOID BRUSH PLATE BRACKET SHIM S
- Page 181 and 182:
speclficatJons Cso add or subtract
- Page 183 and 184:
v lr bracket bush can be removed by
- Page 185 and 186:
NOTE If new pomts are bemg fitted s
- Page 187 and 188:
TO ASSEMBLE Showing Distributor Dri
- Page 189 and 190:
3 AdJust the engme Idle speed to sp
- Page 191 and 192:
DESCRIPTION 1 MEDALlON SCREW SPONGE
- Page 193 and 194:
bracket untIl ItS threaded stem IS
- Page 195 and 196:
amount and recheck repeat the opera
- Page 197 and 198:
BATTERY AND ALTERNATOR SYSTEM a 14
- Page 199 and 200:
g ZZ lkf Y Ui 1 rDJ l I m tfIfrJ l
- Page 201 and 202:
1 2 3 4 5 6 7 B 9 10 11 12 13 14 15
- Page 203 and 204:
I I A L l a nGt C L 1 W OR 1 J f Y
- Page 205 and 206:
F 1 1 p 2 J I 1 n L f L iaI I G r 1
- Page 207 and 208:
1 2 3 4 5 6 7 8 11 9 10 12 13 14 15
- Page 209 and 210:
1 2 3 4 5 6 7 8 9 10 11 12 13 14 15
- Page 211 and 212:
Wiring Diagram for Model P l 510 U
- Page 213 and 214:
A rn p W E L r OL t T rrTl rn H r r
- Page 215 and 216:
1 2 3 4 5 6 7 8 9 10 11 12 13 14 15
- Page 217 and 218:
TO REMOVE I Cover the bonnet and sc
- Page 219 and 220:
219 SLIDE Body 3 Front Door wIth Tr
- Page 221 and 222:
i 4 Remove the retaIn1l1g chp for t
- Page 223 and 224:
Rear Door Lock Removed TO REMOVE PI
- Page 225 and 226:
Luggage Compartment Lock and Strike
- Page 227 and 228:
TO REMOVE I Jack up the vehicle and
- Page 229 and 230:
Abnormal wear on both sides of trea
- Page 231 and 232:
LUBRICATION AND MAINTENANCE LUHUICA
- Page 233 and 234:
IgllltlOn tImIng Engllle Idle speed
- Page 235 and 236:
I HOSE AIR CLEANER TO VALVECOVER DI
- Page 237 and 238:
HOUSING COVER SHOE SPRING ROTOR RIN
- Page 239 and 240:
3 With the engllle at rest dJsconne
- Page 241 and 242:
ange of 35 deg from Idle and the TH
- Page 243 and 244:
NEUTRAL GEAR SWITCH Tl To Test I Ch
- Page 245 and 246:
then the solenOid valve assembly IS
- Page 247 and 248:
wl AUTOMATIC TRANSMISSION EXCEPT PI
- Page 249 and 250:
Emission Control 17 4 EXHAUST CONTR
- Page 251 and 252:
k l FROM AIR CLEANER FROM VALVE COV
- Page 253 and 254:
Mister CylInder 1600 Series 1300 Se
- Page 255 and 256:
GLOSSARY OF ENGINE SLAVE CYLINDER a
- Page 258:
jl 7 I L I J F 1 S I t I I I f I j