Workshop Manual Datsun 510, 1300-1600, L13 ... - Datsun510.com
Workshop Manual Datsun 510, 1300-1600, L13 ... - Datsun510.com
Workshop Manual Datsun 510, 1300-1600, L13 ... - Datsun510.com

Create successful ePaper yourself
Turn your PDF publications into a flip-book with our unique Google optimized e-Paper software.
J<br />
R<br />
propeller shaft rear flange and WIthdraw the shaft from the<br />
transmISSion<br />
NOTE To remove the propeller shaft It may be necessary<br />
to disconnect the rear handbrake cable where It runs under<br />
the rear seetlOn of the propeller shaft<br />
22 Detach the handbrake cable from ItS retammg clIp<br />
at the transmission rear crossmember<br />
23 Remove the two transmISSIOn rear crossmember<br />
to mountmg secunng bolts<br />
24 Interpose a wooden block between the<br />
transmiSSIOn and a Jack and take the weight of the rear<br />
engme and transmISSIOn assembly<br />
25 Remove the four bolts which attach the rear<br />
transmISSIOn crossmember to the underbody and remove<br />
the crossmember<br />
26 Instal a sUitable IIftmg cable or cham to the IIftmg<br />
hooks which are posItIoned at the front and the rear of the<br />
engme cylmder head and With sUitable IIftmg tackle take<br />
the weight of the engme assembly<br />
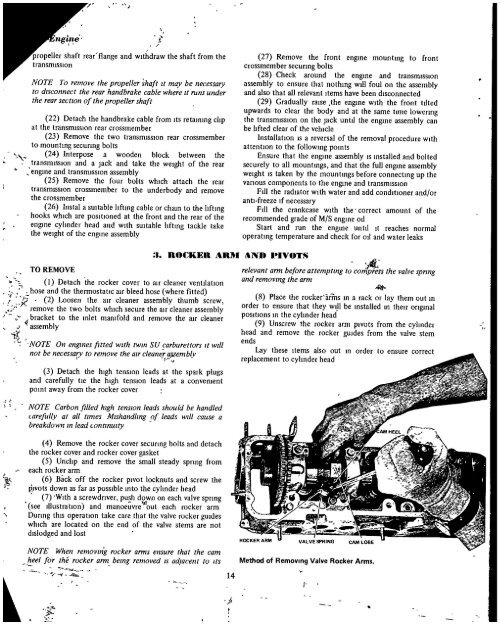
I ROCKER AR f ND IIVOTS<br />
relevant arm before attemptmg to co rf kss the valve sprmg<br />
and removmg the arm<br />
8 Place the rocker arms m a rack or lay them out m<br />
TO REMOVE<br />
I Detach the rocker cover to atr cleaner ventIlatIOn<br />
hose and the thermostatIc au bleed hose where fitted<br />
2 Loosen the au cleaner assembly thumb screw<br />
remove the two bolts whIch secure the atr cleaner assembly<br />
0 bracket to the mlet manIfold and remove the au cleaner<br />
assembly<br />
t e NOTE On engines fitted With twm SU carburettors ItWill<br />
not be necessafY to remove the arr cleaner ssembly<br />
3 Detach the hIgh tensIOn leads at the spark plugs<br />
and carefully tIe the hIgh tensIOn leads at a convement<br />
pomt away from the rocker cover<br />
NOTE Carbon filled high tensIOn leads should be handled<br />
carefully at all times Mlshandlmg of leads Will cause a<br />
breakdown m lead wntmUlty<br />
4 Remove the rocker cover secunng bolts and detach<br />
the rocker cover and rocker cover gasket<br />
5 UnclIp and remove the small steady spnng from<br />
each rocker arm<br />
6 Back off the rocker pivOt locknuts and screw the<br />
PIvOtS down as far as possible mto the cylInder head<br />
7 With a screwdnver push down on each valve spnng<br />
l<br />
see IllustratIon and manoeuvre out each rocker arm<br />
Dunng this operatIon take care that the valve rocker gUides<br />
which are located on the end of the valve stems are not<br />
dIslodged and lost<br />
NOTE When removlIIg rocker arms ensure that the cam<br />
el for the rocker arm bel1lg removed IS adjacent<br />
t t<br />
1t<br />
to Its<br />
14<br />
1<br />
order to ensure that they wIll be mstalled m theu ongmal<br />
pOSItIons m the cylInder head<br />
9 Unscrew the rocker arm PIvOtS from the cylInder<br />
head and remove the rocker guides from the yalve stem<br />
ends<br />
27 Remove the front engme mountmg to front<br />
crossmember secunng bolts<br />
28 Check around the engme and transmISSIOn<br />
assembly to ensure that notlung will foul on the assembly<br />
and also that all relevant Items have been disconnected<br />
29 Gradually taIse the engme WIth the front tuted<br />
upwards to clear the body and at the same tune lowenng<br />
the transmiSSIOn on the jack untu the engme assembly can<br />
be lIfted clear of the vehicle<br />
InstallatIon IS a reversal of the removal procedure With<br />
attentIon to the followmg pomts<br />
Ensure that the engme assembly IS mstalled and bolted<br />
securely to all mountmgs and that the full engme assembly<br />
weIght IS taken by the mountmgs before connectmg up the<br />
vanous components to the engine and transmission<br />
FIll the radiator With water and add condItIoner and or<br />
antI freeze If necessary<br />
FIll the crankcase With the correct amount of the<br />
recommended grade of M S engine ou<br />
Start and run the engme untu It reaches normal<br />
operatmg temperature and check for ou and water leaks<br />
Lay these Items also out m order to ensure correct<br />
replacement to cylmder head<br />
Method of RemOVing Valve Rocker Arms<br />
J