Motorized Metal 2-Slice Toaster - Cuisinart.com
Motorized Metal 2-Slice Toaster - Cuisinart.com
Motorized Metal 2-Slice Toaster - Cuisinart.com

Create successful ePaper yourself
Turn your PDF publications into a flip-book with our unique Google optimized e-Paper software.
INSTRUCTION<br />
BOOKLET<br />
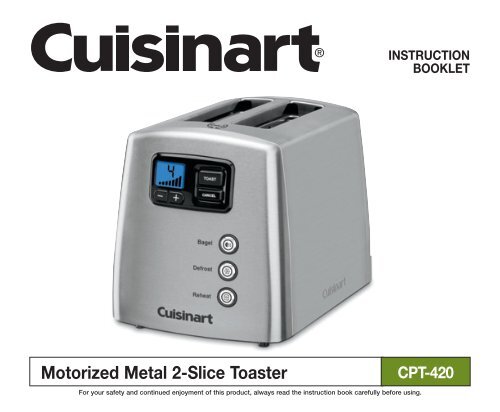
<strong>Motorized</strong> <strong>Metal</strong> 2-<strong>Slice</strong> <strong>Toaster</strong> CPT-420<br />
For your safety and continued enjoyment of this product, always read the instruction book carefully before using.
IMPORTANT SAFEGUARDS<br />
When using an electrical appliance, basic safety precautions should<br />
always be followed, including the following:<br />
1. Read all instructions.<br />
2. Do not touch hot surfaces. Use handles or knobs.<br />
3. To protect against electrical shock, do not place any part of the<br />
toaster in water or other liquid. See instructions for cleaning.<br />
4. This appliance should not be used by or near children, or<br />
individuals with certain disabilities.<br />
5. Always unplug from outlet when not in use and before cleaning.<br />
Allow to cool before cleaning or handling.<br />
6. Do not operate any appliance with a damaged cord or plug, or after<br />
the appliance has malfunctioned or has been dropped or damaged<br />
in any way, or if it is not operating properly. Return the toaster to the<br />
store or retailer where purchased for examination or repair.<br />
7. The use of accessory attachments not re<strong>com</strong>mended by <strong>Cuisinart</strong><br />
may cause injury.<br />
8. Do not use outdoors.<br />
9. Do not let cord hang over the edge of the table or countertop<br />
or touch hot surfaces.<br />
10. Do not place toaster on or near a hot gas or electric burner or<br />
in a heated oven.<br />
11. Do not use this toaster for other than intended use.<br />
12. Oversize foods, metal foil packages or utensils must not be inserted<br />
in the toaster, as they may involve a risk of fi re or electric shock.<br />
13. A fi re may occur if the toaster is covered or touching fl ammable<br />
materials, such as curtains, draperies or walls, when in operation.<br />
Do not operate under wall cabinets.<br />
14. Do not attempt to dislodge food when the toaster is plugged into<br />
electrical outlet.<br />
15. To avoid possibility of fi re, do not leave toaster unattended<br />
during use.<br />
16. To disconnect, push the cancel button, then remove plug from wall.<br />
2<br />
17. Do not operate your appliance in an appliance garage or under a wall<br />
cabinet. When storing in an appliance garage, always unplug the<br />
unit from the electrical outlet. Not doing so could create a risk<br />
of fi re, especially if the appliance touches the walls of the garage<br />
or the door touches the unit as it closes.<br />
SAVE THESE INSTRUCTIONS<br />
FOR HOUSEHOLD USE ONLY<br />
SPECIAL CORD SET INSTRUCTIONS<br />
A short power-supply cord is provided to reduce the risks resulting from<br />
be<strong>com</strong>ing entangled in or tripping over a longer cord. Longer extension<br />
cords are available and may be used if care is exercised in their use.<br />
If a long extension cord is used, the marked electrical rating of the<br />
extension cord should be at least as great as the electrical rating of the<br />
appliance, and the longer cord should be arranged so that it will not<br />
drape over the countertop or tabletop where it can be pulled on by<br />
children or tripped over unintentionally.<br />
NOTICE: This appliance has a polarized plug (one blade is wider than<br />
the other). As a safety feature, this plug will fi t in a polarized outlet<br />
only one way. If the plug does not fi t fully in the outlet, reverse the<br />
plug. If it still does not fi t, contact a qualifi ed electrician. Do not<br />
attempt to defeat this safety feature.<br />
CONTENTS<br />
Important Safeguards. . . . . . . . . . . . . . . . . . . . . . . . . . . . . . . . . . . . 2<br />
Features and Benefits . . . . . . . . . . . . . . . . . . . . . . . . . . . . . . . . . . . 3<br />
Use and Care . . . . . . . . . . . . . . . . . . . . . . . . . . . . . . . . . . . . . . . . . . 4<br />
Cleaning and Maintenance . . . . . . . . . . . . . . . . . . . . . . . . . . . . . . . 5<br />
Warranty . . . . . . . . . . . . . . . . . . . . . . . . . . . . . . . . . . . . . . . . . . . . . . 6
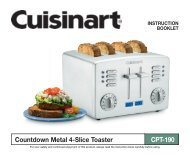
FEATURES AND BENEFITS<br />
1. 1½" Toasting Slots<br />
Wide toaster slots toast a wide variety of items.<br />
2. Browning Control Buttons +/ -<br />
Set desired toast color from light<br />
to dark, with seven browning levels.<br />
3. Toast Button<br />
Activates the toasting cycle.<br />
4. Bagel Button<br />
Reduces the heat on the outside<br />
of each toasting slot, to perfectly<br />
toast the cut side of the bagel.<br />
LED lights when selected.<br />
4a. Bagel Icon<br />
Shows the proper placement<br />
for bagel toasting.<br />
5. Defrost Button<br />
Defrosts and toasts frozen bread.<br />
LED lights when selected.<br />
6. Reheat Button<br />
Reheats without browning or toasting.<br />
LED lights when selected.<br />
7. Cancel Button<br />
Interrupts toasting process.<br />
8. LCD Countdown Window<br />
Blue backlit LCD screen displays<br />
the shade setting selected, and<br />
provides a countdown so you<br />
know when your toast is ready.<br />
9. Slide-out Crumb Tray (not shown)<br />
Pulls out to clean crumbs that<br />
collect in bottom of toaster.<br />
10. Cord Storage (not shown)<br />
Takes up excess cord and<br />
keeps countertop neat.<br />
11. Audible Tone (not shown)<br />
Lets you know when toasting is fi nished.<br />
12. BPA Free (not shown)<br />
All materials that <strong>com</strong>e in contact<br />
with food are BPA free.<br />
3<br />
1<br />
4a<br />
8<br />
3<br />
7<br />
2<br />
4<br />
5<br />
6
USE AND CARE<br />
Unwind the power cord. Check that the crumb tray is in place and that<br />
there is nothing in the toaster slot(s). Plug power cord into the wall outlet.<br />
1. Insert slice(s) of bread.<br />
2. Set the browning control + / -<br />
Press browning control buttons (+ -) to select desired toast shade:<br />
Browning Control Setting Shade<br />
1-2 light<br />
3-5 medium<br />
6-7 dark<br />
Some notes on browning<br />
Toasting is a <strong>com</strong>bination of cooking and drying the bread. Therefore,<br />
differences in moisture level from one bread to another can result in<br />
varying toasting times.<br />
• For slightly dry bread, use a lower setting than you normally would.<br />
• For very fresh bread or whole wheat bread, use a higher setting than<br />
normal.<br />
• Breads with very uneven surfaces (such as English muffi ns) will require<br />
a higher toast setting.<br />
• Thickly cut pieces of bread (including bagels) will take longer to toast,<br />
sometimes signifi cantly longer, since more moisture must be evaporated<br />
from the bread before toasting can occur. Very thick pieces may<br />
require two cycles.<br />
• When toasting raisin or other fruit breads, remove any loose raisins, etc.<br />
from the surface of the bread before putting into the toaster. This will<br />
help prevent fruit pieces from falling into the toaster or sticking to the<br />
guide wires in the slot.<br />
• Before toasting bagels, slice each bagel into two equal halves.<br />
Single slice toasting<br />
If you are toasting a single slice of bread, set the heat selector to a lighter<br />
setting than you normally would. The toaster is designed to heat the<br />
whole toasting chamber for two slices. By lowering the heat for a single<br />
slice, you won't overtoast.<br />
4<br />
Frozen waffl es, pancakes, french toast and frozen bagels<br />
These breads and pastries should be warmed using the Defrost button.<br />
<strong>Toaster</strong> pastries<br />
Exercise caution with toaster pastries; the fi lling can be<strong>com</strong>e quite hot<br />
long before the surface of the pastry be<strong>com</strong>es browned. Never leave<br />
toaster pastries unattended while toasting or warming.<br />
3. To begin toasting<br />
Press the toast button to lower the carriage into the toasting<br />
chamber.<br />
4. To stop toasting<br />
When the toasting cycle is fi nished, the toast will be raised.<br />
If you wish to stop the cycle before it is fi nished, simply press<br />
the Cancel button.<br />
Tips<br />
• Never force foods into the toasting slot. Foods should fi t freely<br />
between the guide wires.<br />
• Do not place buttered breads or pastries with fi llings or frostings in the<br />
toaster, as this could create a fi re hazard.<br />
• Uneven toasting is usually due to bread slices of uneven thickness.<br />
• After use, unplug your toaster from the electrical outlet.<br />
Defrost button<br />
The Defrost button is designed to fi rst defrost and then toast the bread,<br />
which extends the toasting cycle slightly.<br />
1. Insert slice(s) of bread.<br />
2. Set the browning control<br />
Settings 1-2<br />
For refrigerated breads and thinner frozen items such as<br />
frozen pancakes.<br />
Settings 3-5<br />
For toaster pastries, frozen waffl es and (thin) French toast,<br />
and refrigerated bagels.<br />
Settings 6-7<br />
For thicker frozen items such as bagels, hand-cut bread and<br />
thick French toast.
3. Press the Defrost button. Blue LED indicates feature is<br />
activated.<br />
4. Press the toast button to start.<br />
To stop cycle<br />
When the defrost cycle is <strong>com</strong>plete, the toaster will raise the bread.<br />
If you wish to stop the cycle before it is fi nished, simply press the<br />
Cancel button to interrupt.<br />
After use, unplug the toaster from the electrical outlet.<br />
Reheat button<br />
The reheat feature allows you to reheat bread without browning<br />
or toasting it.<br />
1. Insert slice(s) of bread.<br />
2. Press the Reheat button. Blue LED indicates feature is activated.<br />
3. Press the toast button to start.<br />
To stop cycle<br />
When the reheat cycle is <strong>com</strong>plete, the toaster will raise the<br />
bread. If you wish to stop the cycle before it is fi nished, simply press<br />
the Cancel button to interrupt.<br />
Bagel button<br />
The bagel feature reduces heat on one side of the toasting slot.<br />
This toasts the cut side of the bagel slightly more than the other side.<br />
An embossed icon located on the top of the toaster,<br />
just above the control panel, shows you the right way<br />
to insert your bagel. (The cut side should always face<br />
toward the center of the toaster.)<br />
1. Insert slice(s) of bread or halved bagels.<br />
2. Press the Bagel button. Blue LED indicates feature is activated.<br />
3. Press the toast button to start.<br />
To stop cycle<br />
When the bagel cycle is <strong>com</strong>plete, the toaster will raise the bagel(s).<br />
If you wish to stop the cycle before it is fi nished, simply press the<br />
Cancel button to interrupt.<br />
5<br />
Fail-Safe<br />
• Should the unit sense that it is over-heating it is designed to<br />
activate a “Fail-Safe” to ensure it can cool down quickly<br />
and be able to return to a safe, usable state.<br />
• When the Fail-Safe is activated all the LCD and LED lights<br />
will <strong>com</strong>e on and the unit will sound (3) one-second audible<br />
tones. The LCD and LED lights will remain on until the unit is<br />
unplugged and re-plugged into the outlet.<br />
CLEANING AND MAINTENANCE<br />
Always allow the toaster to cool <strong>com</strong>pletely before cleaning.<br />
1. Always unplug the toaster from the electrical outlet before cleaning.<br />
2. Do not use abrasive cleansers. Simply wipe the exterior with a clean<br />
damp cloth and dry thoroughly. Apply any cleansing agent to a cloth,<br />
not to the toaster, before cleaning.<br />
3. To remove crumbs, slide out the crumb tray and discard crumbs.<br />
Wipe clean and replace. Never operate the toaster without the crumb<br />
tray in place.<br />
4. To remove any pieces of bread remaining in the toaster, turn the<br />
toaster upside down and gently shake. Never insert any hard or<br />
sharp instruments into the slot, as this could damage the toaster and<br />
cause a safety hazard.<br />
5. Never wrap the cord around the outside of the toaster. Use the cord<br />
storage cleats on the underside of the toaster.<br />
6. Any other servicing should be performed by an authorized service<br />
representative.
WARRANTY<br />
LIMITED THREE-YEAR WARRANTY<br />
This warranty is available to consumers only. You are a consumer if you<br />
own a <strong>Cuisinart</strong> ® <strong>Motorized</strong> <strong>Metal</strong> 2-<strong>Slice</strong> <strong>Toaster</strong> that was purchased at<br />
retail for personal, family or household use. Except as otherwise required<br />
under applicable law, this warranty is not available to retailers or other<br />
<strong>com</strong>mercial purchasers or owners.<br />
We warrant that your <strong>Cuisinart</strong> ® <strong>Motorized</strong> <strong>Metal</strong> 2-<strong>Slice</strong> <strong>Toaster</strong> will<br />
be free of defects in materials and workmanship under normal home<br />
use for 3 years from the date of original purchase.<br />
We re<strong>com</strong>mend that you visit our website, www.cuisinart.<strong>com</strong> for a<br />
fast, efficient way to <strong>com</strong>plete your product registration. However, product<br />
registration does not eliminate the need for the consumer to maintain<br />
the original proof of purchase in order to obtain the warranty benefits.<br />
In the event that you do not have proof of purchase date, the purchase date<br />
for purposes of this warranty will be the date of manufacture.<br />
If your <strong>Cuisinart</strong> ® <strong>Motorized</strong> <strong>Metal</strong> 2-<strong>Slice</strong> <strong>Toaster</strong> should prove to be<br />
defective within the warranty period, we will repair it, or if we think<br />
necessary, replace it. To obtain warranty service, simply call our toll-free<br />
number 1-800-726-0190 for additional information from our Customer<br />
Service Representatives, or send the defective product to Customer<br />
Service at <strong>Cuisinart</strong>, 7811 North Glen Harbor Blvd., Glendale, AZ 85307.<br />
To facilitate the speed and accuracy of your return, please enclose $10.00<br />
for shipping and handling of the product.<br />
Please pay by check or money order (California residents need only supply<br />
proof of purchase and should call 1-800-726-0190 for shipping<br />
instructions).<br />
NOTE: For added protection and secure handling of any <strong>Cuisinart</strong> ® product<br />
that is being returned, we re<strong>com</strong>mend you use a traceable, insured delivery<br />
service. <strong>Cuisinart</strong> cannot be held responsible for<br />
in-transit damage or for packages that are not delivered to us. Lost<br />
and/or damaged products are not covered under warranty. Please be<br />
sure to include your return address, daytime phone number, description<br />
of the product defect, product model number (located on bottom of<br />
product), original date of purchase, and any other information pertinent<br />
to the product’s return.<br />
CALIFORNIA RESIDENTS ONLY:<br />
California law provides that for In-Warranty Service, California residents<br />
have the option of returning a nonconforming product (A) to the store where<br />
6<br />
it was purchased or (B) to another retail store which sells <strong>Cuisinart</strong><br />
products of the same type.<br />
The retail store shall then, at its discretion, either repair the product,<br />
refer the consumer to an independent repair facility, replace the product, or<br />
refund the purchase price less the amount directly attributable to the<br />
consumer’s prior usage of the product. If the above two options do not<br />
result in the appropriate relief to the consumer, the consumer may then<br />
take the product to an independent repair facility if service or repair can be<br />
economically ac<strong>com</strong>plished. <strong>Cuisinart</strong> and not the consumer will be<br />
responsible for the reasonable cost of such service, repair, replacement, or<br />
refund for nonconforming products under warranty.<br />
California residents may also, according to their preference, return<br />
nonconforming products directly to <strong>Cuisinart</strong> for repair, or if necessary,<br />
replacement, by calling our Consumer Service Center toll-free at<br />
1-800-726-0190.<br />
<strong>Cuisinart</strong> will be responsible for the cost of the repair, replacement,<br />
and shipping and handling for such products under warranty.<br />
BEFORE RETURNING YOUR CUISINART ® PRODUCT<br />
If you are experiencing problems with your <strong>Cuisinart</strong> ® product, we<br />
suggest that you call our <strong>Cuisinart</strong> ® Service Center at 1-800-726-0190<br />
before returning the product for service. If servicing is needed,<br />
a Representative can confirm whether the product is under warranty<br />
and direct you to the nearest service location.<br />
Your <strong>Cuisinart</strong> ® <strong>Motorized</strong> <strong>Metal</strong> 2-<strong>Slice</strong> <strong>Toaster</strong> has been manufactured<br />
to the strictest specifications and has been designed for use only in<br />
120-volt outlets and only with authorized accessories and replacement<br />
parts. This warranty expressly excludes any defects or damages caused<br />
by attempted use of this unit with a converter, as well as by use with<br />
accessories, replacement parts or repair service other than those<br />
authorized by <strong>Cuisinart</strong>. This warranty does not cover any damage<br />
caused by accident, misuse, shipment or other than ordinary household<br />
use. This warranty excludes all incidental or consequential damages.<br />
Some states do not allow the exclusion or limitation of these damages,<br />
so these exclusions may not apply to you. You may also have other rights,<br />
which vary from state to state.<br />
Important: If the nonconforming product is to be serviced<br />
by someone other than <strong>Cuisinart</strong>’s Authorized Service Center,<br />
please remind the servicer to call our Consumer Service Center<br />
at 1-800-726-0190 to ensure that the problem is properly diagnosed,<br />
the product is serviced with the correct parts,<br />
and the product is still under warranty.
NOTES:<br />
7
Coffeemakers Blenders Juicers Cookware Tools and<br />
Gadgets<br />
<strong>Cuisinart</strong> offers an extensive assortment of top quality products to make life in the kitchen<br />
easier than ever. Try some of our other countertop appliances, cookware, tools and gadgets.<br />
Any other trademarks or service marks of third parties used herein are<br />
the trademarks or service marks of their respective owners.<br />
www.cuisinart.<strong>com</strong><br />
©2012 <strong>Cuisinart</strong><br />
150 Milford Road<br />
East Windsor, NJ 08520<br />
Printed in China<br />
11CE125198<br />
N IB-10775
Version no: N CPT420 IB-10775<br />
SIZE: 216mm(W)X178mm(H)<br />
Pages: 8pp<br />
Paper:<br />
Cover:157GSM MATT ARTPAPER<br />
Inside:120GSM GLOSS ARTPAPER<br />
Color: Cover:4c+1c<br />
Inside:1c+1c<br />
Coating: Gloss varnishing in cover<br />
Conair: By Astor You<br />
Date: 08/11/2011<br />
SUN HING PRINTING CO., LTD.