Electric Switch Mechanisms - Magnetrol International
Electric Switch Mechanisms - Magnetrol International
Electric Switch Mechanisms - Magnetrol International

Create successful ePaper yourself
Turn your PDF publications into a flip-book with our unique Google optimized e-Paper software.
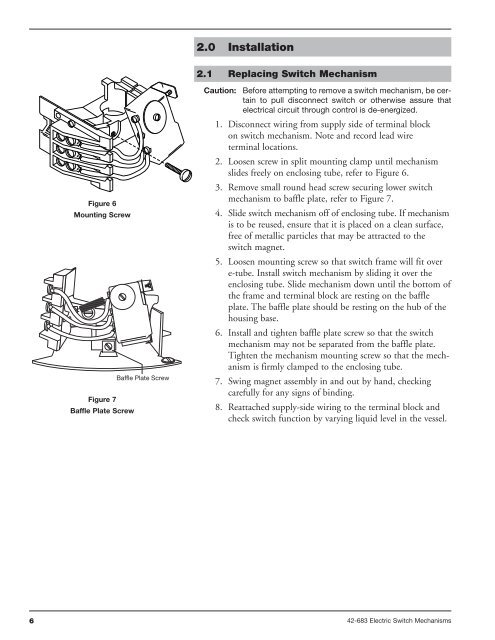
Figure 6<br />
Mounting Screw<br />
Figure 7<br />
Baffle Plate Screw<br />
Baffle Plate Screw<br />
2.0 Installation<br />
2.1 Replacing <strong>Switch</strong> Mechanism<br />
Caution: Before attempting to remove a switch mechanism, be certain<br />
to pull disconnect switch or otherwise assure that<br />
electrical circuit through control is de-energized.<br />
1. Disconnect wiring from supply side of terminal block<br />
on switch mechanism. Note and record lead wire<br />
terminal locations.<br />
2. Loosen screw in split mounting clamp until mechanism<br />
slides freely on enclosing tube, refer to Figure 6.<br />
3. Remove small round head screw securing lower switch<br />
mechanism to baffle plate, refer to Figure 7.<br />
4. Slide switch mechanism off of enclosing tube. If mechanism<br />
is to be reused, ensure that it is placed on a clean surface,<br />
free of metallic particles that may be attracted to the<br />
switch magnet.<br />
5. Loosen mounting screw so that switch frame will fit over<br />
e-tube. Install switch mechanism by sliding it over the<br />
enclosing tube. Slide mechanism down until the bottom of<br />
the frame and terminal block are resting on the baffle<br />
plate. The baffle plate should be resting on the hub of the<br />
housing base.<br />
6. Install and tighten baffle plate screw so that the switch<br />
mechanism may not be separated from the baffle plate.<br />
Tighten the mechanism mounting screw so that the mechanism<br />
is firmly clamped to the enclosing tube.<br />
7. Swing magnet assembly in and out by hand, checking<br />
carefully for any signs of binding.<br />
8. Reattached supply-side wiring to the terminal block and<br />
check switch function by varying liquid level in the vessel.<br />
6 42-683 <strong>Electric</strong> <strong>Switch</strong> <strong>Mechanisms</strong>