Y-IM-Single Package AC and Single Package Gas/Electric Units ...
Y-IM-Single Package AC and Single Package Gas/Electric Units ...
Y-IM-Single Package AC and Single Package Gas/Electric Units ...

Create successful ePaper yourself
Turn your PDF publications into a flip-book with our unique Google optimized e-Paper software.
INSTALLATION<br />
INSTALLATION SAFETY INFORMATION<br />
Read these instructions before continuing this appliance<br />
installation. This is an outdoor combination heating <strong>and</strong> cooling<br />
unit. The installer must assure that these instructions are<br />
made available to the consumer <strong>and</strong> with instructions to<br />
retain them for future reference.<br />
1. Refer to the furnace rating plate for the approved type of<br />
gas for this furnace.<br />
2. Install this furnace only in a location <strong>and</strong> position as<br />
specified on Page 13 of these instructions.<br />
3. Never test for gas leaks with an open flame. Use commercially<br />
available soap solution made specifically for<br />
the detection of leaks when checking all connections, as<br />
specified on Pages 8, 32, 33 <strong>and</strong> 66 of these instructions.<br />
4. Always install furnace to operate within the furnace's<br />
intended temperature-rise range with the duct system<br />
<strong>and</strong> within the allowable external static pressure range,<br />
as specified on the unit name/rating plate, specified on<br />
Page 68 of these instructions.<br />
5. This equipment is not to be used for temporary heating<br />
of buildings or structures under construction.<br />
FIRE OR EXPLOSION HAZARD<br />
Failure to follow the safety warning exactly could<br />
result in serious injury, death or property damage.<br />
Never test for gas leaks with an open flame. use a<br />
commercially available soap solution made specifically<br />
for the detection of leaks to check all connections.<br />
A fire or explosion may result causing property<br />
damage, personal injury or loss of life.<br />
PRECEDING INSTALLATION<br />
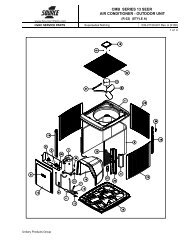
1. Remove the two screws holding the brackets in the front,<br />
rear <strong>and</strong> compressor side fork-lift slots.<br />
Bracket<br />
Screws<br />
Turn down<br />
FIGURE 1 - UNIT SHIPPING BR<strong>AC</strong>KET<br />
167690-Y<strong>IM</strong>-B-0606<br />
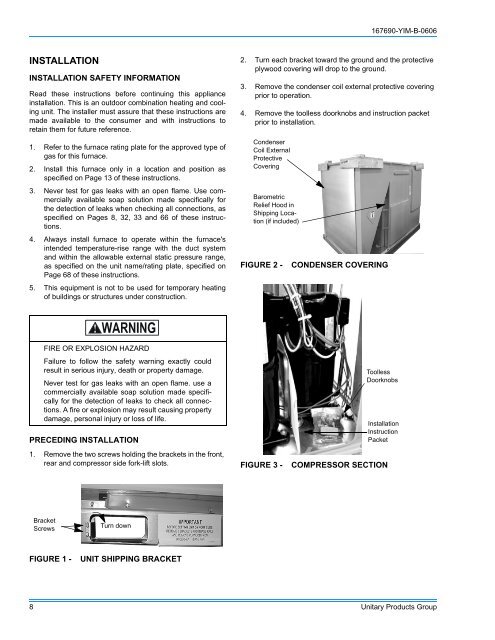
2. Turn each bracket toward the ground <strong>and</strong> the protective<br />
plywood covering will drop to the ground.<br />
3. Remove the condenser coil external protective covering<br />
prior to operation.<br />
4. Remove the toolless doorknobs <strong>and</strong> instruction packet<br />
prior to installation.<br />
Condenser<br />
Coil External<br />
Protective<br />
Covering<br />
Barometric<br />
Relief Hood in<br />
Shipping Location<br />
(if included)<br />
FIGURE 2 - CONDENSER COVERING<br />
Toolless<br />
Doorknobs<br />
Installation<br />
Instruction<br />
Packet<br />
FIGURE 3 - COMPRESSOR SECTION<br />
8 Unitary Products Group