Download PDF - Fine Woodworking
Download PDF - Fine Woodworking
Download PDF - Fine Woodworking

Create successful ePaper yourself
Turn your PDF publications into a flip-book with our unique Google optimized e-Paper software.
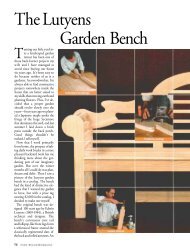
dadoes that house the banding using either<br />
a router or hand tools (for more on<br />
this process, see FWW #180, p. 106). Each<br />
section of banding is mitered using a 45°<br />
guide block and chisel; the block also is<br />
used to miter the door beading (see top<br />
right photo, p. 45). After the banding is<br />
glued in place, level the sections with a<br />
block plane, then plane a tapered toe from<br />
the cuff to the floor (see photos, p. 39).<br />
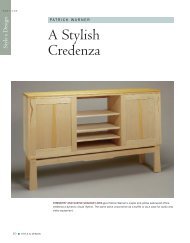
Assemble the side and rear aprons<br />
one of the most challenging aspects of<br />
this design is planning for the inevitable<br />
seasonal movement of the 13 1 ⁄2-in.-wide<br />
aprons. Cherry boards that wide will move<br />
significantly, increasing the potential for<br />
cracking the case, opening a gap where<br />
they meet the top, and pinching a drawer<br />
or a door.<br />
A simple and attractive solution is to make<br />
each apron in three parts: a top and bottom<br />
rail and a center panel, joined with cherry<br />
splines but no glue. The tenons of the rails<br />
are glued into the legs, while the stub tenons<br />
of the panel float in their mortises. As<br />
a decorative element, and to disguise small<br />
gaps that will open during the dry winter<br />
months, I cut beads in the center panel<br />
where it meets the rails (see bottom side<br />
rail detail, p. 40).<br />
The most accurate way to cut the tenons<br />
and shoulders on the three parts of each<br />
apron is to dry-assemble them with the<br />
splines and cut them all at once, holding<br />
the pieces together with masking tape.<br />
Clean up the shoulders with a shoulder<br />
plane, then take apart the assembly and<br />
trim the center panel tenons down to 1 ⁄4 in.<br />
long. Now, cut the miters and haunches in<br />
the longer tenons of the rails. Finally, cut<br />
a groove in the bottom rail to accept the<br />
tongue of the bottom board.<br />
Fit the front rail and stretcher<br />
when the aprons have been fitted, it’s time<br />
to cut, shape, and fit the bottom front rail.<br />
Also, cut the slot in the rail for the spline<br />
that connects it to the bottom board, and<br />
scratch the bead along the bottom edge.<br />
The front stretcher is dovetailed into the<br />
top of the front legs, and into the top of<br />
both side aprons just behind the legs (see<br />
photos, p. 41). For accuracy, dry-assemble<br />
the case and place the rail in position.<br />
Lay out the location of the shoulders and<br />
dovetails, and then cut them. Place the<br />
rail back in position, mark the dovetail<br />
www.<strong>Fine</strong>Woodwor k i n g.com<br />
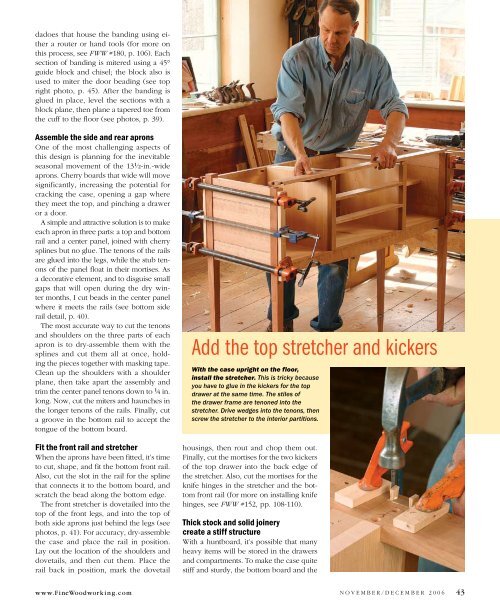
Add the top stretcher and kickers<br />
With the case upright on the floor,<br />
install the stretcher. This is tricky because<br />
you have to glue in the kickers for the top<br />
drawer at the same time. The stiles of<br />
the drawer frame are tenoned into the<br />
stretcher. Drive wedges into the tenons, then<br />
screw the stretcher to the interior partitions.<br />
housings, then rout and chop them out.<br />
Finally, cut the mortises for the two kickers<br />
of the top drawer into the back edge of<br />
the stretcher. Also, cut the mortises for the<br />
knife hinges in the stretcher and the bottom<br />
front rail (for more on installing knife<br />
hinges, see FWW #152, pp. 108-110).<br />
Thick stock and solid joinery<br />
create a stiff structure<br />
with a huntboard, it’s possible that many<br />
heavy items will be stored in the drawers<br />
and compartments. To make the case quite<br />
stiff and sturdy, the bottom board and the<br />
N o V E M B E r / d E C E M B E r 2 0 0 6 43