Download PDF - Fine Woodworking
Download PDF - Fine Woodworking
Download PDF - Fine Woodworking

You also want an ePaper? Increase the reach of your titles
YUMPU automatically turns print PDFs into web optimized ePapers that Google loves.
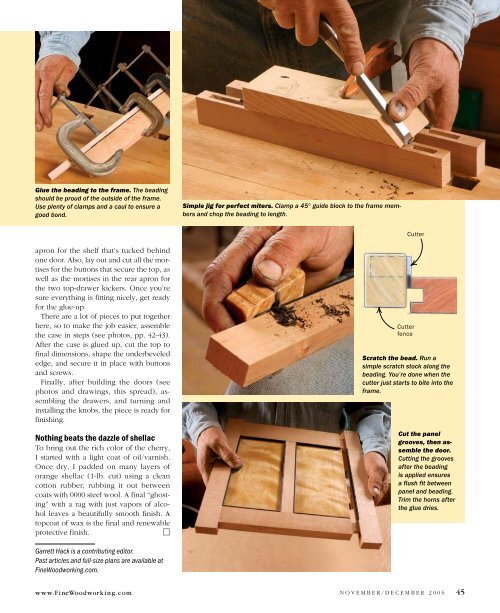
Glue the beading to the frame. The beading<br />
should be proud of the outside of the frame.<br />
Use plenty of clamps and a caul to ensure a<br />
good bond.<br />
apron for the shelf that’s tucked behind<br />
one door. Also, lay out and cut all the mortises<br />
for the buttons that secure the top, as<br />
well as the mortises in the rear apron for<br />
the two top-drawer kickers. once you’re<br />
sure everything is fitting nicely, get ready<br />
for the glue-up.<br />
There are a lot of pieces to put together<br />
here, so to make the job easier, assemble<br />
the case in steps (see photos, pp. 42-43).<br />
After the case is glued up, cut the top to<br />
final dimensions, shape the underbeveled<br />
edge, and secure it in place with buttons<br />
and screws.<br />
Finally, after building the doors (see<br />
photos and drawings, this spread), assembling<br />
the drawers, and turning and<br />
installing the knobs, the piece is ready for<br />
finishing.<br />
Nothing beats the dazzle of shellac<br />
To bring out the rich color of the cherry,<br />
I started with a light coat of oil/varnish.<br />
once dry, I padded on many layers of<br />
orange shellac (1-lb. cut) using a clean<br />
cotton rubber, rubbing it out between<br />
coats with 0000 steel wool. A final “ghosting”<br />
with a rag with just vapors of alcohol<br />
leaves a beautifully smooth finish. A<br />
topcoat of wax is the final and renewable<br />
protective finish. M<br />
Garrett Hack is a contributing editor.<br />
Past articles and full-size plans are available at<br />
<strong>Fine</strong><strong>Woodworking</strong>.com.<br />
www.<strong>Fine</strong>Woodwor k i n g.com<br />
Simple jig for perfect miters. Clamp a 45° guide block to the frame members<br />
and chop the beading to length.<br />
Cutter<br />
fence<br />
Cutter<br />
Scratch the bead. Run a<br />
simple scratch stock along the<br />
beading. You’re done when the<br />
cutter just starts to bite into the<br />
frame.<br />
Cut the panel<br />
grooves, then assemble<br />
the door.<br />
Cutting the grooves<br />
after the beading<br />
is applied ensures<br />
a flush fit between<br />
panel and beading.<br />
Trim the horns after<br />
the glue dries.<br />
N o V E M B E r / d E C E M B E r 2 0 0 6 45