Print PDF with the instructions - Husqvarna Viking
Print PDF with the instructions - Husqvarna Viking
Print PDF with the instructions - Husqvarna Viking

Create successful ePaper yourself
Turn your PDF publications into a flip-book with our unique Google optimized e-Paper software.
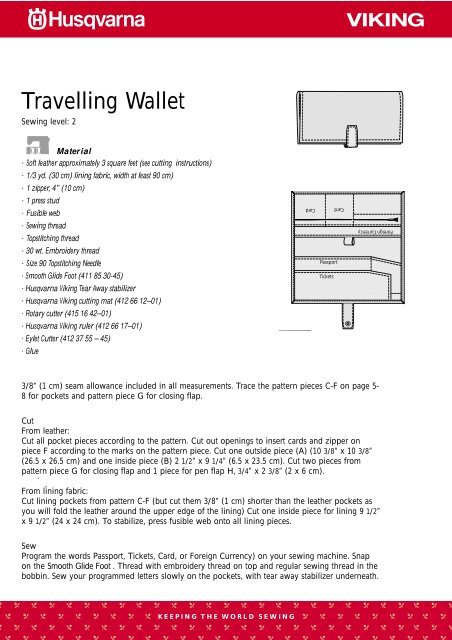
Travelling Wallet<br />
Sewing level: 2<br />
Material<br />
. Soft lea<strong>the</strong>r approximately 3 square feet (see cutting <strong>instructions</strong>)<br />
. 1/3 yd. (30 cm) lining fabric, width at least 90 cm)<br />
. 1 zipper, 4” (10 cm)<br />
. 1 press stud<br />
. Fusible web<br />
. Sewing thread<br />
. Topstitching thread<br />
. 30 wt. Embroidery thread<br />
. Size 90 Topstitching Needle<br />
. Smooth Glide Foot (411 85 30-45)<br />
. <strong>Husqvarna</strong> <strong>Viking</strong> Tear Away stabilizer<br />
. <strong>Husqvarna</strong> <strong>Viking</strong> cutting mat (412 66 12–01)<br />
. Rotary cutter (415 16 42–01)<br />
. <strong>Husqvarna</strong> <strong>Viking</strong> ruler (412 66 17–01)<br />
. Eylet Cutter (412 37 55 – 45)<br />
. Glue<br />
KEEPING THE WORLD SEWING<br />
Card<br />
Passport<br />
Tickets<br />
Card<br />
Foreign Currency<br />
3/8” (1 cm) seam allowance included in all measurements. Trace <strong>the</strong> pattern pieces C-F on page 5-<br />
8 for pockets and pattern piece G for closing flap.<br />
Cut<br />
From lea<strong>the</strong>r:<br />
Cut all pocket . pieces according to <strong>the</strong> pattern. Cut out openings to insert cards and zipper on<br />
piece F according to <strong>the</strong> marks on <strong>the</strong> pattern piece. Cut one outside piece (A) (10 3/8” x 10 3/8”<br />
(26.5 x 26.5 cm) and one inside piece (B) 2 1/2” x 9 1/4” (6.5 x 23.5 cm). Cut two pieces from<br />
pattern piece G for closing flap and 1 piece for pen flap H, 3/4” x 2 3/8” (2 x 6 cm).<br />
.<br />
.<br />
From lining fabric:<br />
Cut lining pockets from pattern C-F (but cut <strong>the</strong>m 3/8” (1 cm) shorter than <strong>the</strong> lea<strong>the</strong>r pockets as<br />
you will fold <strong>the</strong> lea<strong>the</strong>r around <strong>the</strong> upper edge of <strong>the</strong> lining) Cut one inside piece for lining 9 1/2”<br />
x 9 1/2” (24 x 24 cm). To stabilize, press fusible web onto all lining pieces.<br />
Sew<br />
Program <strong>the</strong> words Passport, Tickets, Card, or Foreign Currency) on your sewing machine. Snap<br />
on <strong>the</strong> Smooth Glide Foot . Thread <strong>with</strong> embroidery thread on top and regular sewing thread in <strong>the</strong><br />
bobbin. Sew your programmed letters slowly on <strong>the</strong> pockets, <strong>with</strong> tear away stabilizer underneath.
Lining: Place <strong>the</strong> lea<strong>the</strong>r inside piece centered on <strong>the</strong> lining inside<br />
piece. Rethread <strong>with</strong> topstitching thread on top and regular<br />
sewing thread in <strong>the</strong> bobbin. Adjust stitch length to 3.5 and adjust<br />
thread tension to a higher number. Topstitch in place.<br />
Illustration A<br />
Passport pocket (C): Place lining and lea<strong>the</strong>r wrong sides<br />
toge<strong>the</strong>r, lower edges aligned. Clip in <strong>the</strong> seam allowance on <strong>the</strong><br />
bias cut edge seam allowance and fold <strong>the</strong> upper edge to <strong>the</strong><br />
lining. Topstitch <strong>the</strong> upper edge. Place <strong>the</strong> piece to <strong>the</strong> right on<br />
<strong>the</strong> lining back piece and topstitch through all layers for an extra<br />
pocket.<br />
Illustration B<br />
Ticket pocket (D): Repeat in <strong>the</strong> same way as on pocket C but<br />
continue topstitching down on <strong>the</strong> side. Put a little glue in <strong>the</strong><br />
lower corners and place this pocket on top of pocket C, raw<br />
edges aligned.<br />
Illustration C<br />
KEEPING THE WORLD SEWING<br />
4" (10 cm) 4" (10 cm)<br />
Passport<br />
Passport<br />
Tickets<br />
Illustration A.<br />
Illustration B.<br />
Illustration C.
Foreign Currenency pocket (E): Place lining and lea<strong>the</strong>r wrong sides toge<strong>the</strong>r,<br />
lower edges aligned. Fold <strong>the</strong> upper edge of <strong>the</strong> lea<strong>the</strong>r 3/8 (1 cm) to <strong>the</strong><br />
lining. Fold <strong>the</strong> 3/4” x 2 3/8” (2 x 6 cm) piece double and place it centered<br />
under <strong>the</strong> upper edge. Topstitch along <strong>the</strong> upper edge backstitch over <strong>the</strong><br />
pen flap to reinforce <strong>the</strong> seam. Place this pocket to <strong>the</strong> left of <strong>the</strong> lining back<br />
piece.<br />
Illustration D<br />
Card and zipper pocket (F): Place <strong>the</strong> zipper under <strong>the</strong> zipper opening. Adjust<br />
needle position to <strong>the</strong> right and stitch <strong>the</strong> zipper in place. Place lining and<br />
lea<strong>the</strong>r piece wrong sides toge<strong>the</strong>r and fold <strong>the</strong> upper edge 3/8” (1 cm)<br />
around <strong>the</strong> lining. Topstitch <strong>the</strong> upper edge. Topstitch through all layers to<br />
divide <strong>the</strong> card pocket and <strong>the</strong> zipper pocket. Place this pocket on top of<br />
pocket E, raw edges aligned <strong>with</strong> a little glue in <strong>the</strong> corners.<br />
Illustration E<br />
Closing flap (G): Mark 5/8” (1 1/2 cm) in from <strong>the</strong> bias short side one of <strong>the</strong><br />
lea<strong>the</strong>r pieces G for closing flap. Place a small piece of cardboard on <strong>the</strong><br />
wrong side to stabilize <strong>the</strong> lea<strong>the</strong>r and make a hole <strong>with</strong> <strong>the</strong> eylet cutter.<br />
Attach <strong>the</strong> press stud. Place it <strong>with</strong> <strong>the</strong> second piece G wrong sides toge<strong>the</strong>r<br />
<strong>with</strong> a little glue in between and topstitch all around <strong>with</strong> Tear Away Stabilizer<br />
underneath to prevent marks from <strong>the</strong> feed teeth. Attach <strong>the</strong> opposite part of<br />
<strong>the</strong> press stud centered on an outside lea<strong>the</strong>r piece side 1 5/8” (4 cm) from<br />
<strong>the</strong> edge.(for extra strength, put a small piece of lea<strong>the</strong>r underneath)<br />
Illustration F<br />
KEEPING THE WORLD SEWING<br />
Passport<br />
Card Card<br />
Passport<br />
Foreign Currency<br />
Illustration D.<br />
Card Card<br />
Foreign Currency<br />
Illustration E.<br />
Illustration F..
Place <strong>the</strong> lining piece <strong>with</strong> all <strong>the</strong> pockets on <strong>the</strong> wrong side of <strong>the</strong><br />
lea<strong>the</strong>r back piece <strong>with</strong> edges extending approx. 1/2” (12 mm) on<br />
all sides. Cut <strong>the</strong> corners and fold around <strong>the</strong> edges as illustrated.<br />
Instead of pinning, put a little glue to attach <strong>the</strong> edges before you<br />
sew. Be sure <strong>the</strong> glue is outside <strong>the</strong> area where you will be<br />
sewing.<br />
Illustration G<br />
Cut a small hole on <strong>the</strong> outside of <strong>the</strong> wallet and insert <strong>the</strong> closing<br />
flap between <strong>the</strong> layers.<br />
Illustration H<br />
Place tear away stabilizer underneath <strong>the</strong> lea<strong>the</strong>r and topstitch all<br />
edges and <strong>the</strong> closing flap in place.<br />
Illustration I<br />
KEEPING THE WORLD SEWING<br />
Card<br />
Passport<br />
Tickets<br />
Card<br />
Foreign Currency<br />
Illustration G..<br />
Illustration H.<br />
Illustration I.
Passport<br />
C
D<br />
Tickets
E<br />
Foreign Currency
F Card Card<br />
VSM Group AB • 561 84 Huskvarna, Sverige<br />
www.husqvarnaviking.com<br />
G