Product End-of-Life Disassembly Instructions - HP
Product End-of-Life Disassembly Instructions - HP
Product End-of-Life Disassembly Instructions - HP

You also want an ePaper? Increase the reach of your titles
YUMPU automatically turns print PDFs into web optimized ePapers that Google loves.
<strong>Product</strong> <strong>End</strong>-<strong>of</strong>-<strong>Life</strong> <strong>Disassembly</strong> <strong>Instructions</strong><br />
<strong>Product</strong> Category: Workstations<br />
Marketing Name / Model<br />
[List multiple models if applicable.]<br />
<strong>HP</strong> xw4600 Workstation<br />
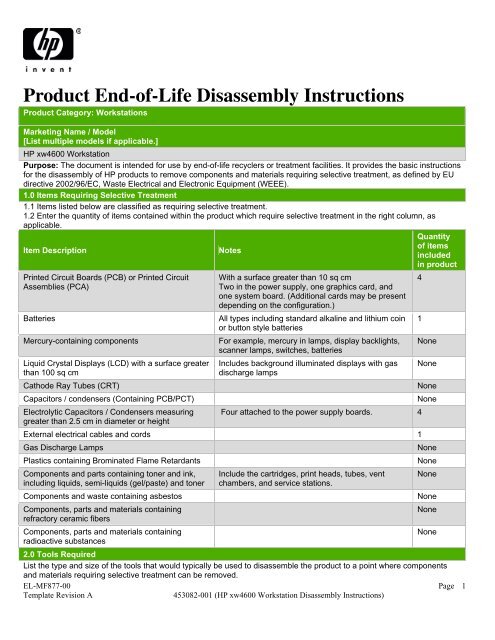
Purpose: The document is intended for use by end-<strong>of</strong>-life recyclers or treatment facilities. It provides the basic instructions<br />
for the disassembly <strong>of</strong> <strong>HP</strong> products to remove components and materials requiring selective treatment, as defined by EU<br />
directive 2002/96/EC, Waste Electrical and Electronic Equipment (WEEE).<br />
1.0 Items Requiring Selective Treatment<br />
1.1 Items listed below are classified as requiring selective treatment.<br />
1.2 Enter the quantity <strong>of</strong> items contained within the product which require selective treatment in the right column, as<br />
applicable.<br />
Quantity<br />
<strong>of</strong> items<br />
Item Description Notes<br />
included<br />
in product<br />
Printed Circuit Boards (PCB) or Printed Circuit<br />
Assemblies (PCA)<br />
With a surface greater than 10 sq cm<br />
Two in the power supply, one graphics card, and<br />
one system board. (Additional cards may be present<br />
depending on the configuration.)<br />
Batteries All types including standard alkaline and lithium coin<br />
or button style batteries<br />
Mercury-containing components For example, mercury in lamps, display backlights,<br />
scanner lamps, switches, batteries<br />
Liquid Crystal Displays (LCD) with a surface greater<br />
than 100 sq cm<br />
Includes background illuminated displays with gas<br />
discharge lamps<br />
Cathode Ray Tubes (CRT) None<br />
Capacitors / condensers (Containing PCB/PCT) None<br />
Electrolytic Capacitors / Condensers measuring<br />
greater than 2.5 cm in diameter or height<br />
Four attached to the power supply boards. 4<br />
External electrical cables and cords 1<br />
Gas Discharge Lamps None<br />
Plastics containing Brominated Flame Retardants None<br />
Components and parts containing toner and ink,<br />
including liquids, semi-liquids (gel/paste) and toner<br />
Include the cartridges, print heads, tubes, vent<br />
chambers, and service stations.<br />
Components and waste containing asbestos None<br />
Components, parts and materials containing<br />
refractory ceramic fibers<br />
Components, parts and materials containing<br />
radioactive substances<br />
2.0 Tools Required<br />
List the type and size <strong>of</strong> the tools that would typically be used to disassemble the product to a point where components<br />
and materials requiring selective treatment can be removed.<br />
EL-MF877-00 Page 1<br />
Template Revision A 453082-001 (<strong>HP</strong> xw4600 Workstation <strong>Disassembly</strong> <strong>Instructions</strong>)<br />
4<br />
1<br />
None<br />
None<br />
None<br />
None<br />
None
Tool Description Tool Size (if<br />
applicable)<br />
Assorted Torx drivers, screwdrivers and a diagonal cutter<br />
3.0 <strong>Product</strong> <strong>Disassembly</strong> Process<br />
3.1 List the basic steps that should typically be followed to remove components and materials requiring selective treatment:<br />
(See instructions below in sections 3.2 and 3.3.)<br />
EL-MF877-00 Page 2<br />
Template Revision A 453082-001 (<strong>HP</strong> xw4600 Workstation <strong>Disassembly</strong> <strong>Instructions</strong>)
3.2 Workstation <strong>Disassembly</strong> Procedures<br />
1. Remove/disengage any security devices that prohibit opening the workstation.<br />
2. Disconnect the power cord from the electrical outlet and then from the workstation.<br />
3. Disconnect all peripheral device cables from the workstation.<br />
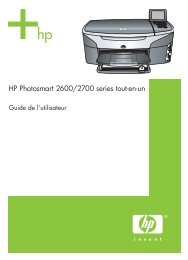
4. Remove the access panel. Pull up on the handle (1) and lift <strong>of</strong>f the cover (2).<br />
5. Disconnect all internal cables from system board, power supply, and other components.<br />
6. Remove the system battery. Press on the release tab <strong>of</strong> the battery holder. Rotate the battery<br />
beyond the latch (1) and lift it straight up (2).<br />
Battery<br />
EL-MF877-00 Page 3<br />
Template Revision A 453082-001 (<strong>HP</strong> xw4600 Workstation <strong>Disassembly</strong> <strong>Instructions</strong>)
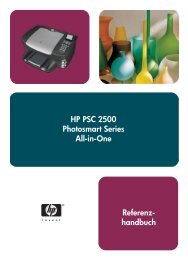
7. Remove the graphics card and any other expansion cards. Open the PCI card retainer (1),<br />
release the PCI slot latch (2) (if necessary), and lift the card from the chassis (3).<br />
8. Remove the power supply from the chassis. Disconnect or cut electrical connections to the<br />
power supply. Remove the four screws securing the power supply to the workstation chassis<br />
(1). Slide the power supply toward the front, then lift up to remove it from the chassis (2).<br />
EL-MF877-00 Page 4<br />
Template Revision A 453082-001 (<strong>HP</strong> xw4600 Workstation <strong>Disassembly</strong> <strong>Instructions</strong>)
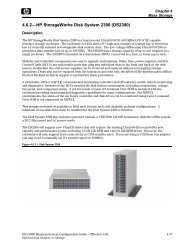
9. Remove the system board. Press the release tab (1). Slide the system board toward the front<br />
<strong>of</strong> the chassis and then lift it out <strong>of</strong> the chassis (2).<br />
10. Dispose <strong>of</strong> all removed components according to regulatory requirements.<br />
EL-MF877-00 Page 5<br />
Template Revision A 453082-001 (<strong>HP</strong> xw4600 Workstation <strong>Disassembly</strong> <strong>Instructions</strong>)
3.3 Power Supply <strong>Disassembly</strong> Procedures<br />
1. Refer to the Items Requiring Selective Treatment table to identify all components<br />
to be removed.<br />
2. Cut the two cable ties at the rear <strong>of</strong> the unit. Cut the single cable tie at the side.<br />
3. Remove the four power supply chassis screws—two from each side.<br />
EL-MF877-00 Page 6<br />
Template Revision A 453082-001 (<strong>HP</strong> xw4600 Workstation <strong>Disassembly</strong> <strong>Instructions</strong>)
4. Slide the chassis housing from the power supply unit.<br />
5. Remove the four screws from the corners <strong>of</strong> the large PCB card. Remove the large<br />
PCB card from the unit.<br />
EL-MF877-00 Page 7<br />
Template Revision A 453082-001 (<strong>HP</strong> xw4600 Workstation <strong>Disassembly</strong> <strong>Instructions</strong>)
6. Ensure that all capacitors are safely discharged. Use a diagonal cutter to remove the<br />
desired components from both PCB cards. (Note that some components may need to be<br />
unsoldered if a diagonal cutter does not fit between the component and the PCB card.)<br />
7. Dispose <strong>of</strong> all removed components according to regulatory requirements.<br />
EL-MF877-00 Page 8<br />
Template Revision A 453082-001 (<strong>HP</strong> xw4600 Workstation <strong>Disassembly</strong> <strong>Instructions</strong>)