
You also want an ePaper? Increase the reach of your titles
YUMPU automatically turns print PDFs into web optimized ePapers that Google loves.
WARRANTY<br />
This Tent is covered by a 12 month warranty. The Company undertakes to replace or repair, free of charge, any defect<br />
which the Company considers to be due to faulty workmanship or material within 12 months of the purchase date,<br />
except for:<br />
• Damage caused by failure to replace the protective transit bags onto each captive pole receiver, when packing away.<br />
• Defects arising from neglect, misuse or unauthorised modifications.<br />
• Damage caused by storm, abuse, misuse, dropping or other similar damage caused by or as a result of failure to<br />
follow storage or erection instructions.<br />
• Unauthorised alterations, additions or repairs.<br />
• Transportation or shipment costs to and from the Manufacturer or their recognised agents, for repair or assessment<br />
against a warranty claim.<br />
• Damage caused due to UV degradation.<br />
• Materials and/or labour costs to renew, repair or replace components due to fair wear and tear or condensation.<br />
• Tents used on permanent sites or displays.<br />
THIS DOES NOT AFFECT YOUR STATUTORY RIGHTS.<br />
The Manufacturer and/or their recognised agents, directors, employees or insurers will not be held liable for<br />
consequential or other damages, losses or expenses in connection with or by reason of or the inability to use the tent<br />
for any purpose.<br />
NOTE; Any claim(s) arising due to missing parts or faulty goods MUST be made before use. The manufacturer will not<br />
be responsible for any claims regarding missing parts or faulty items where the product has not been checked by the<br />
user prior to use.<br />
Sunnflair Ltd, Chelmsford, Essex CM3 5XJ. www.sunnflair.com<br />
Design, artwork and layout by Textwrite Publications Limited • www.textwritepublications.co.uk • © Textwrite Publications Ltd 2008 Version 2<br />
PARTS LISTING<br />
Your <strong>Travel</strong> <strong>Cabin</strong> Tent consists of the following items<br />
and you should check everything is present before<br />
setting off.<br />
Tent Flysheet 1<br />
Porch Poles 2<br />
Poles Shocked Corded with Angles 2<br />
Steel Corner Legs 4<br />
Tent Peg Bag 1<br />
Repair Kit 1<br />
Tent Carry-Bag 1<br />
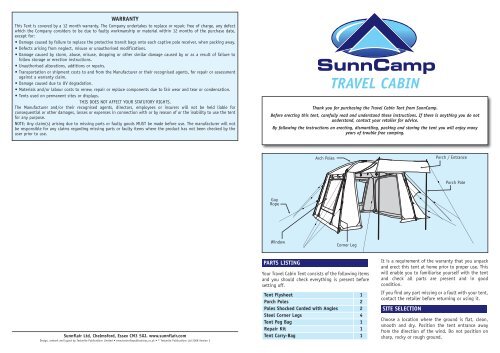
TRAVEL CABIN<br />
Thank you for purchasing the <strong>Travel</strong> <strong>Cabin</strong> Tent from SunnCamp.<br />
Before erecting this tent, carefully read and understand these instructions. If there is anything you do not<br />
understand, contact your retailer for advice.<br />
By following the instructions on erecting, dismantling, packing and storing the tent you will enjoy many<br />
years of trouble free camping.<br />
Guy<br />
Rope<br />
Window<br />
Arch Poles<br />
Corner Leg<br />
It is a requirement of the warranty that you unpack<br />
and erect this tent at home prior to proper use. This<br />
will enable you to familiarise yourself with the tent<br />
and check all parts are present and in good<br />
condition.<br />
If you find any part missing or a fault with your tent,<br />
contact the retailer before returning or using it.<br />
SITE SELECTION<br />
Porch / Entrance<br />
Porch Pole<br />
Choose a location where the ground is flat, clean,<br />
smooth and dry. Position the tent entrance away<br />
from the direction of the wind. Do not position on<br />
sharp, rocky or rough ground.
GETTING STARTED GUY ROPES<br />
Unpack the tent and place the carry-bag somewhere<br />
safe. Separate all components and check that<br />
everything is present.<br />
You should now ensure that all entrances to the tent<br />
are closed with all zips fully secured. If this is not<br />
done now, the tent will be out of alignment when<br />
fitting the tent pegs.<br />
POLES<br />
Steel Corner Legs simply slot together.<br />
The Shock Corded Poles are folded down to aid<br />
storage. When fitting the pole sections together,<br />
make sure that the pole body is fully inserted into its<br />
adjoining ferrule.<br />
Each steel corner leg is inserted into one of the four<br />
angles fitted to the ends of the shock corded poles.<br />
TENT FLYSHEET<br />
Lay the tent out on the selected ground area with<br />
the entrance correctly positioned.<br />
Insert the two shock corded poles into the crossover<br />
sleeves on the top of the tent. Now insert a corner<br />
leg into the angle end of each shock corded pole,<br />
raising the tent as each is inserted, then attach the<br />
pole clips.<br />
Pole<br />
This process is made easier<br />
End Ferrule<br />
with the assistance of<br />
another person, each taking<br />
one corner per side.<br />
Pin<br />
Each pole end is held<br />
Ring<br />
Strap<br />
captive by a pin on a ring<br />
fitted to the end of a fixed<br />
length webbing strap. The<br />
ring is also used as the securing point for the tent<br />
peg.<br />
TENT PEGS<br />
Starting with the four corners, secure the inner tent<br />
to the ground using the tent pegs.<br />
Secure the tent to the ground using the tent pegs.<br />
This process is made easier<br />
Peg<br />
with the assistance of<br />
another person supporting<br />
the tent from inside.<br />
45° Each pole end is held captive<br />
by a pin on a ring fitted to<br />
the end of a fixed length<br />
webbing strap. The ring is also used as the securing<br />
point for the tent peg.<br />
Secure each guy rope, positioning its<br />
tent peg at a suitable distance from<br />
the tent.<br />
Once in position, tighten the ropes<br />
equally to bring the tent into its<br />
natural shape. DO NOT over tighten. To tighten, Hold<br />
the rope above the slider and pull the slider up. To<br />
release, again hold the rope above the slider and pull<br />
the slider down.<br />
Remember that all guy ropes are<br />
a trip hazard especially in the<br />
dark.<br />
Pegs that are used to secure an<br />
entrance or door opening can be<br />
left slightly raised. This will allow easy hooking and<br />
unhooking when opening or closing the door.<br />
ENTRANCE<br />
Porch<br />
Side<br />
Skirt<br />
Guy<br />
Rope<br />
The entrance can be<br />
rolled up out of the way<br />
or raised to create a<br />
porch. When closed, the<br />
zip cover/baffle must be<br />
carefully pressed into<br />
place ensuring the Velcro<br />
tabs are aligned and the<br />
skirt correctly<br />
positioned, secured by<br />
tent pegs, to avoid water<br />
ingress should it rain.<br />
The tent is supplied with two porch poles which<br />
simply slot together.<br />
When used as a porch, insert the spike end of the<br />
porch poles into the entrance’s corner eyelets then<br />
hook a guy rope over the spike and secure to the<br />
ground with a tent peg. Adjust each guy rope<br />
tension to bring the porch square.<br />
WINDOWS<br />
SAFETY<br />
Porch Pole<br />
Spike<br />
The windows have curtains which can<br />
be closed and are secured in place<br />
with hook and loop tape or side zips.<br />
When open, carefully roll the curtain<br />
and secure with toggle and loop.<br />
It is advisable to have a ‘Fire’ bucket filled with<br />
water, placed outside the tent. Hopefully it will<br />
never be needed, but if it is, you will be glad you<br />
made the effort.<br />
The tent’s fabric is fire retardant, NOT fire proof and<br />
therefore you must not smoke or use a naked flame<br />
in or near the tent. This includes the traditional<br />
‘camp fire’.<br />
Guy ropes can cause a trip hazard and should be<br />
marked so that passers by can see them.<br />
Tent pegs are also a trip hazard and should not be<br />
left ‘half in’.<br />
CLEANING, STORING AND REPAIRS<br />
Cleaning…<br />
Both inside and outside of the tent should only be<br />
cleaned using fresh clean water and a damp cloth.<br />
Do not use detergents or chemical cleaners.<br />
The inner ground sheet can be washed with a mild<br />
detergent.<br />
Storing…<br />
The tent is best stored in its original carry-bag,<br />
however, if the tent is dismantled when wet, you<br />
MUST not leave it stored until it has been thoroughly<br />
dried. After a wet pack-up, erect the tent as soon as<br />
possible and allow to fully dry naturally before<br />
repacking in the carry-bag.<br />
If stored when wet, the tent will suffer from mildew<br />
and will become unusable.<br />
Repairs…<br />
Repairs to the tent should only be made by the<br />
manufacturer’s recommended agents. Repairs made<br />
by an unauthorised party will make the<br />
manufacturers warranty void.<br />
STORM AND WEATHER SUITABILITY<br />
This tent is designed for light use in normal weather<br />
conditions. It is not suitable for storms, gales, sub<br />
zero or tropical conditions.<br />
UV DETERIORATION<br />
Prolonged exposure to direct sunlight can weaken<br />
the fabric of the tent. To avoid the risk of UV<br />
Deterioration, site the tent in a shaded area, where<br />
it will be protected from exposure to strong sunlight.<br />
MOISTURE<br />
Moisture collecting on the inside of the tent fabric is<br />
condensation caused by the occupier. It is NOT a sign<br />
of leakage.<br />
Note that condensation or damage caused by it, is<br />
NOT covered by the manufacturer’s warranty.<br />
SEAMS<br />
This tent has all its main seams hot air taped to help<br />
prevent leakage. The remaining seams should be<br />
treated with a seam sealant to maximize the tents<br />
weatherproofing.<br />
Seam sealant should also be applied to main seams<br />
where the tape has lost adhesion or has been<br />
damaged (tie points or suspension points for<br />
example).<br />
Seam sealant is available from your SunnCamp<br />
stockist.<br />
DISMANTLING<br />
To dismantle the tent, simply reverse the erection<br />
procedure.<br />
All poles must be dismantled and the tent should be<br />
carefully rolled prior to placing back in the carrybag.