Route Guide for Rock Climbing Blyde River Canyon ... - Climb ZA
Route Guide for Rock Climbing Blyde River Canyon ... - Climb ZA
Route Guide for Rock Climbing Blyde River Canyon ... - Climb ZA

Create successful ePaper yourself
Turn your PDF publications into a flip-book with our unique Google optimized e-Paper software.
BLYDEPOORT<br />
BLYDEPOORT<br />
Ian McMaster on “Cactus Dykes”, Lake View Crags<br />
<strong>Route</strong> <strong>Guide</strong> <strong>for</strong> <strong>Rock</strong> <strong><strong>Climb</strong>ing</strong><br />
<strong>Blyde</strong> <strong>River</strong> <strong>Canyon</strong><br />
Mpumalanga<br />
By Gareth Frost<br />
2009
INTRODUCTION<br />
Mpumalanga, one of SA’s top tourist destinations, is filled with beautiful scenery and quaint towns that date<br />
back to the voortrekker times. There is something else in this picturesque area that, until recently, had been<br />
mostly overlooked by climbers.<br />
While the development of trad climbing areas like Manoutsa were taking place, just around the corner some<br />
classic crags were left untouched right under the noses of bus loads of tourists visiting the Three<br />
Rondawels’ lookout stop.<br />
Here is a place where you can climb five star routes all weekend and still leave some <strong>for</strong> the next time.<br />
<strong>Climb</strong>ers can enjoy good camping at the nearby Aventura resort and cragging with short walk-ins on<br />
marvelous “Black Reef” quartzite cliffs overlooking some really spectacular panoramas.<br />
I hope you enjoy the climbing at <strong>Blyde</strong>poort as much as I have.<br />
Gareth Frost<br />
DIRECTIONS<br />
Take a drive out to Lydenburg in Mpumalanga if you are coming from JHB or Pretoria. From Lydenburg<br />
head out North to Ohristad on the R36. Drive through Ohrigstad and continue until you reach the R532 right<br />
turn to Graskop, this will be shortly after the Echo Caves left turn. Drive until you reach the Forever Resorts<br />
<strong>Blyde</strong> <strong>Canyon</strong> resort on the left.<br />
ACCOMMODATION<br />
The Aventura resort offers various facilities <strong>for</strong> accommodation. The camping is good but chalets are also<br />
available <strong>for</strong> those with deeper pockets. Please remember to book ahead if you want a chalet or intend<br />
going over the holidays.<br />
The resort also has a pool, pony trails and great walks <strong>for</strong> any non-climbers tagging along on your trip.<br />
A map of the resort’s layout is available at reception.<br />
Contact reservations: 013-7698005 or http://www.<strong>for</strong>eversa.co.za/blyde_canyon/blydepoort.htm<br />
WEATHER<br />
Because the crags lie on the escarpment, clouds tend to collect around this area so you could expect rain<br />
in the summer months but generally the weather is good. There is a chance of mist early in the day but it<br />
tends to clear by mid-morning. Temperatures can get quite hot in the summer time but nice breezes blow<br />
around the cliffs that cool things down while climbing. Winter is a pleasant time <strong>for</strong> climbing but the<br />
evenings get cooler so bring along some warm clothes.<br />
ETHICS<br />
This is a traditional climbing venue and placing of bolted protection is strictly prohibited. Consider wisely the<br />
use of pegs.<br />
Please try to stay on existing paths where possible and respect the habitat of the fauna and flora with whom<br />
we share these crags.<br />
EMERGENCIES<br />
There are no major hospitals close to <strong>Blyde</strong>poort. A basic first aid station is located at the resort reception.<br />
For climbing related emergencies the following services can be contacted:<br />
Mountain Rescue: 011-3150203<br />
Paramedics: 112 (cellular) or 10177<br />
Closest Major Hospital: Nelspruit<br />
2
THE CRAGS<br />
The cliffs at <strong>Blyde</strong>poort have been broken down into two main areas where most development has taken<br />
place over the past couple of years.<br />
The Aventura Complex are the crags within the resort which are easily approached from the lookout<br />
points.<br />
Treasure Island (N facing)<br />
Take a drive past the resort restaurant to the lower lookout point and park there under the trees. Walk back<br />
up the road <strong>for</strong> a bit until you reach the exit of one of the trails on the left (Tufa trail). Follow this trail across<br />
the river then up onto a plateau. Walk until the trail starts heading down again, Treasure Island can be seen<br />
across on the right. After a short distance on the downhill a vague path leading off to the right can be found<br />
(old hiking trail, marked with a beacon). Follow this path to the base of the crag.<br />
OK Corral (S facing)<br />
Take a drive towards the lower lookout point and park where the road makes its first hair-pin bend to the<br />
right. The grey crag on the left, with a prominent pinnacle in front, is OK Corral. Walk up the hill through the<br />
bush to the base of the cliff.<br />
Breakfast Buttress (SE facing)<br />
Located at the upper lookout point on a buttress immediately below the lookout.<br />
Loslyf Crag (S facing)<br />
Park at the upper lookout point and follow the Leopard hiking trail along to the base of some grey, south<br />
facing cliffs.<br />
The Jungle Book (E facing)<br />
This is the most eastern of the crags within the Aventura complex. Park at the upper lookout point and<br />
follow the Leopard hiking trail past Loslyf Crag. At the right hand arête of Loslyf Crag, leave the trail and<br />
follow the cliff band to the left where a short hike in the bush will take you to the base of these east facing<br />
cliffs.<br />
Star Wars Wall (N Facing)<br />
An imposing cliff around the corner to the north of The Jungle Book crag. Approached via the track going<br />
past the landing strip up to the “Academy” complex where a short walk after parking the car leads to the<br />
descent gully or to an abseil point on the NE arête of the cliff band.<br />
The Library (SE facing)<br />
This crag, dominated by large open books, faces Star Wars Wall and is accessed from the bushy ramp on<br />
the right hand side of the crag.<br />
3
Important Access Note:<br />
<strong>Climb</strong>ers wishing to visit the Rondawel Complex are advised that access to this area is sensitive and are at<br />
risk of trespassing on Mpumalanga Parks property.<br />
The Rondawel Complex are the crags below the Three Rondawels lookout point. Drive south out of the<br />
resort towards Graskop, turn left after a little way to the lookout point. Park at the cul-de-sac where the<br />
tourists go (toilets and water available here).<br />
Three sections are found here and all are gained from the same gully. Walk in a north-westerly direction<br />
towards the Aventura resort following some beacons that lead to the edge of the cliff band. Here a descent<br />
gully is found through a hole under a boulder at the cliff edge.<br />
Rondawel View Crags (NE facing)<br />
These cliffs are on the eastern side of the lookout complex overlooking the Three Rondawels and consist of<br />
quite large walls directly below the tourist lookout plat<strong>for</strong>ms.<br />
Lake View Crags (N facing)<br />
These crags are on the northern side of the lookout complex overlooking the <strong>Blyde</strong> <strong>River</strong> dam and consist<br />
of various buttresses and pinnacles to the left and right of the descent gully.<br />
Mutiny Crag (N facing)<br />
This short section of crag is situated at the top of the ramp between the Spring Pinnacle of Lake View<br />
Crags and the large red wall of The Bounty Crag. The best approach is from the descent gully that<br />
accesses Lake View Left and Spring Pinnacle, just keep walking around past the pinnacle, heading <strong>for</strong> The<br />
Bounty.<br />
The Bounty (N facing)<br />
This impressive crag is found to the east of the descent gully and overlooks Treasure Island. Previously this<br />
crag was approached from the top of Treasure Island until an easier route was found from the bottom of the<br />
Lake View Crags. Descend the gully then walk in a southerly direction along the base of the crags. After<br />
some distance a steep ramp is reached on the right of some larger cliffs with steep red walls and a<br />
distinctive triangular roof on the right higher up. Descend the ramp to the base of the cliff.<br />
Prospector Crag (S facing)<br />
Close to the entrance of the Rondawel View Lookout point, a large gully on the eastern side of the road can<br />
be seen with some good rock walls. This is accessed by descending the gully where a vague path leads the<br />
way down. Park at the guard hut and cross the road to the gully.<br />
Golf Club Terrace (N facing)<br />
These cliffs are further to the east of the Prospector Crag, on the North Facing aspect and look over the<br />
valley on the eastern side of the Rondawel Complex massif.<br />
It can be accessed from the Prospector Gully but a better descent is found by scrambling down a grassy<br />
ramp that leads down from the cliff edge further out along the crag from where the gully starts.<br />
Taxi Crag (N facing)<br />
These cliffs are situated between the Rondawel Lookout massif and the <strong>Blyde</strong> <strong>Canyon</strong> Lookout spot. They<br />
are North Facing and characterized by a large, narrow gully running the full height towards the left of the<br />
crag, big enough to park two taxi’s end to end.<br />
These are accessed from the smaller, <strong>Blyde</strong> <strong>Canyon</strong> tourist lookout, further along the Graskop road (R532)<br />
past the Rondawel Lookout point. Park at the lookout and walk back towards the Rondawel View lookout,<br />
round the first gully on the right and continue walking outwards on the peninsular, above the crags that face<br />
Swadini and find the distinctive Taxi Gully.<br />
4
The Eden Complex are a rather seclude section of crags situated on the R532 road between the <strong>Blyde</strong><br />
<strong>Canyon</strong> Forever Resort and the “T” junction with the R36. When driving back towards Ohrigstad from the<br />
resort, the road winds down past a subsidiary canyon seen to the right (north) of the road. At this point the<br />
road is lined with a stone wall and is going through some sharp S-curves.<br />
Find the nearest lay-by and park, or better still, get dropped off. It might not be safe to leave cars parked<br />
here.<br />
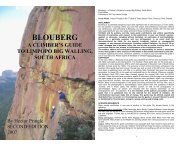
Only leave the road at the point when you can see into the kloof (GPS Coordinates S 24°32’58.8” / E<br />
30°43’46.7”). Bundu bash to get to the edge of the upper wall (north facing, true right) of the kloof. All the<br />
routes to date are on this wall, although there is plenty of scope <strong>for</strong> routes on the other (south-facing, true<br />
left) wall. It will, however, be a bit of a mission to get to the true left wall.<br />
From the road to the edge of the true right cliffs is around 500m.<br />
The true right cliffs are bound on their downstream (east) end by a gulley from a (usually) dry riverbed. It is<br />
possible, although much further, to walk out along this riverbed, which eventually comes very close to the<br />
road.<br />
The true right cliff has many large paper-bark trees along its rim. These provide easy, 50m abseil points to<br />
get down to the climbs. It is a good idea to use a tree as close as possible to the intended route, because<br />
walking along the base of the cliff is a bit of a bundu bash.<br />
Note that because this crag is lower in altitude than the other <strong>Blyde</strong> crags, and further inland, it is likely to<br />
be dry when it is raining at <strong>Blyde</strong>. It is a good few degrees warmer here than at the other <strong>Blyde</strong> crags.<br />
R532<br />
(downhill)<br />
GPS Coordinates<br />
S 24°32’58.8”<br />
E 30°43’46.7”<br />
R532 to<br />
<strong>Blyde</strong><br />
Forever<br />
Resorts<br />
(uphill)<br />
Bundu<br />
bash to<br />
rim<br />
SP<br />
Paper-bark trees<br />
along true right rim<br />
Dry riverbed<br />
5<br />
TOB<br />
Eden Kloof<br />
Steep gulley
CONTENTS<br />
INDEX TO CLIMBS<br />
The climbs appear in this guide from left to right as if the crag was looked up at from below.<br />
KEY:<br />
Good to excellent quality climbing.<br />
☺ Average to good quality climbing.<br />
Poor to average quality climbing or routes with inadequate protection.<br />
CLIMBS AT THE AVENTURA COMPLEX<br />
ROUTE NAME GRADE KEY CODE<br />
TREASURE ISLAND Pg 11<br />
MAIDEN VOYAGE 20 ☺ MV<br />
SILVER LONG JOHNS 15 ☺ SLJ<br />
CANNON BALL 19 ☺ CB<br />
METROSEXUAL PIRATES 18 MP<br />
THE LEGEND OF JOHNNY SEPTEMBER 19 LJS<br />
THE LUCKY BUCCANEERS 19 TLB<br />
SHARK ATTACK 23 SA<br />
DIGGING FOR TREASURE 19 DFT<br />
STOLEN TREASURE 23 ST<br />
BURIED TREASURE 20 BT<br />
A JOLLY RODGERING 19 AJR<br />
WALKING THE PLANK 18 ☺ WTP<br />
AMPHIBIAN INSOMNIA 20 AO AI<br />
FIRST BLOOD 17 ☺ FB<br />
ONE SMALLER THAN GREEN 16 ☺ STG<br />
THE CAPTAIN’S SUNDOWNER 22/19 A0 TCD<br />
LIFE’S A BEACH 16 LAB<br />
SWINGING FROM THE YARDARM 16 ☺ SFY<br />
SUMMON THE CRACKEN 15 STC<br />
YO, HO, HO AND A CRACK FULL OF RUM 15 CFR<br />
TREASURE CHEST 15 TC<br />
RED RACKHAM’S TREASURE 15 RRT<br />
MAIN MAST BUTTRESS Pg 18<br />
CAPTAIN JACK 20 CJ<br />
CAPTAIN MORGAN 16 ☺ CM<br />
JAMAICAN ME CRAZY 15 JMC<br />
BEN GUNN 15 BG<br />
PIRATES OF THE CARABINERS 18 POC<br />
CAT-O-NINE TAILS 17 CNT<br />
CHALK & CHEESE BUTTRESS Pg 20<br />
MOUSE TRAP 18 ☺ MT<br />
10 X 10 10 ☺ TBT<br />
6
INDEX TO CLIMBS - continued<br />
ROUTE NAME GRADE KEY CODE<br />
OK CORRAL Pg 21<br />
SAWN-OFF SHOT GUN 19 (18 A0) ☺ SSG<br />
WANTED: DEAD OR ALIVE 22 ☺ WDA<br />
LYNCH MOB POSSE 19 ☺ LMP<br />
THE GOOD, THE BAD AND THE BABY 16 ☺ GBB<br />
TOMBSTONE PINNACLE Pg 23<br />
GUNFIGHT 23 GF<br />
SUNDANCE KID 19 SD<br />
COWBOYS DON’T CRY 18 CDC<br />
BREAKFAST BUTTRESS Pg 25<br />
OATSO EASY 12 OE<br />
LOSLYF CRAG – Last Chance Buttress Pg 26<br />
HUNTING FOR MORE 17 ☺ HFM<br />
LOSLYF CRAG – The Pound Crag Pg 27<br />
DOGGY STYLE 15 DS<br />
AINT NOTHIN’ BUT A HOUND DOG 16 NHD<br />
MANS’ BEST FRIEND 14 MBF<br />
AINT NOTHIN’ LIKE A HIND LEG 14 NHL<br />
HANG ON SNOOPY 13 HOS<br />
HOWLING SPIDER PIG 17 HSP<br />
VROU KOOK HOND 13 ☺ VKH<br />
LOSLYF CRAG – Main Crag Pg 30<br />
CENTERFOLD KLINGONS 21 CK<br />
BUSH DIVING 21 BD<br />
GREEN BOTTLE 20 A0 GB<br />
BUTCHERS REVENGE 22 ☺ BR<br />
PRELUDE TO LUKA 20 ☺ PTL<br />
THE YOUNG AND THE BREASTLESS 17 YAB<br />
TITS ON FIRE 19 TOF<br />
THE SWEET TRANSVESTITE 19 TST<br />
GOODBYE LENIN 16 ☺ GL<br />
ISOLATION CHIMNEY 14 R ☺ IC<br />
THE LEOPARD SKIN LINE 16 R ☺ LSL<br />
BRING ON THE GIMP 20 X BOG<br />
SLIPPERY SNATCH 19 SS<br />
ADVOCATE BARBIE 17 ☺ AB<br />
SECOND HAND LIONS 19 ☺ SHL<br />
KNOTTED KNICKERS VARIATION 16 SHL<br />
PIMP MY CRACK 20 A2 (23 R) PMC<br />
CHASY LANE 19 ☺ CL<br />
7
INDEX TO CLIMBS - continued<br />
ROUTE NAME GRADE KEY CODE<br />
THE JUNGLE BOOK Pg 40<br />
JUNGLE BOEP 15 ☺ JBF<br />
MAN’S RED FLOWER 19 ☺ MRF<br />
THE BOOK OF BALOO 21 (20 A1) BOB<br />
WHAT DO YOU WANNA DO 21 WYWD<br />
THREE VULTURE FEAST 20 TVF<br />
KING LOUIS’ LAYBACK 19 KLL<br />
THE BEAR NECESSITIES 21 TBN<br />
MOTHER NATURE’S RECIPES 18 MNR<br />
MOTHER NATURE’S NECESSITIES 19 MNR<br />
SHER KAHN-AGE 18 SK<br />
STAR WARS WALL Pg 46<br />
JEDI MIND TRICKS 17 JMT<br />
SPACE BALLZ 24 SB<br />
CHEWBACCA’S TRAVERSE 16 CT<br />
CHEWBACCA’S MUSTACHE 19 CM<br />
HANGING GARDENS 19 ☺ HG<br />
THE PHANTOM MENACE 20 A1 ☺ PM<br />
DARK SPADER 18 DS<br />
REVENGE OF THE SMURF 19 RS<br />
STAR WHORES 21 SW<br />
THE DAFT SIDE OF THE FARCE 19 DSF<br />
YOUR ROYAL HARNESS 18 ☺ YRH<br />
BANTHA FODDER 17 BF<br />
MAY THE CHEESE BE WITH YOU 16 ☺ MCY<br />
LEIA’S MANTLE 19 LM<br />
PARTY AT JUBBAH’S 18 PAJ<br />
THE LIBRARY Pg 54<br />
PAPERBACK ROMANCE 18 PR<br />
8
CLIMBS AT THE RONDAWEL COMPLEX<br />
ROUTE NAME GRADE KEY CODE<br />
RONDAWEL VIEW Pg 55<br />
ASHEN AWARENESS 18 ☺ AA<br />
GET ON TOP 18 GOT<br />
DOWNWARD BOUND 19 DB<br />
NO FAIRIES HERE 19 NFH<br />
CRACK TEST DUMMIES 21 CTD<br />
BURNING BRIDGES 21 A0 ☺ BB<br />
SQUATTING TIGER PANTING PENGUIN 22 A1 ☺ STPP<br />
BUGGERED WITHOUT THE BUSH 22 ☺ BWB<br />
MOJO RISING 18 MR<br />
VAGABOND PRINCES 18 ☺ VP<br />
THE GARDEN ROUTE 17 ☺ TGR<br />
LAKE VIEW RIGHT Pg 62<br />
BLUE MERCURY 20 BM<br />
SUNDAY EXPRESS 18 SE<br />
WASSANME 18 W<br />
SEPARATE REALITY 17 SR<br />
I TJEKED AN ALIEN IN MY COFFIN 17 ☺ AIMC<br />
HORROR SHOW GROODIES 20 ☺ HSG<br />
MY SORRY CARCASS 20 MSC<br />
CALLING ELVIS 20 A1 CE<br />
FUDGE LAKE 17 ☺ FL<br />
DAS ROLLENDE HOTEL 16 ☺ DRH<br />
MUCH MORE MUNTER 20 MMM<br />
LASERATION – PROJECT ? ? L<br />
SLIPPERY WHEN WET 14 ☺ SWW<br />
I LIKE DIRT 15 ☺ ILD<br />
LAKE VIEW LEFT Pg 68<br />
THE SILVER RIBBON 18 SR<br />
CACTUS DYKES 20 CD<br />
MYTHICAL BEAST 22 A1 MB<br />
DO YA FEEL LUCKY 23 DYFL<br />
THE LONG SHADOW SHIMMY 15 LSS<br />
THE IRON CURTAIN 24 TIC<br />
THE GAY CACTUS 21 TGC<br />
ELEVEN AND A HALF ARMADILLOS 16 EHA<br />
NOT TOO SHABBY HEY FOREST 15 ☺ NTSF<br />
SPRING PINNACLE Pg 72<br />
ROOF MEAN CUBED 21 RMC<br />
A SPRING IN THE TAIL 22 SITT<br />
9
INDEX TO CLIMBS - continued<br />
ROUTE NAME GRADE KEY CODE<br />
MUTINY CRAG Pg 73<br />
SLAVE TRADER 20 ☺ ST<br />
THE BOUNTY Pg 74<br />
THE CROWS NEST 21 TCN<br />
PIECES OF EIGHT 19 POE<br />
STORM VOYAGE 22 SV<br />
DAVEY JONES’ LOCKER 21 DJL<br />
BLACKBEARD’S TREASURE 22 ☺ BBT<br />
HERE BE MONSTERS 17 ☺ HBM<br />
DEAD MAN’S CHEST 17 ☺ DMC<br />
BLISTERING BARNACLES 17 BB<br />
PROSPECTOR CRAG Pg 78<br />
CLIMB ON YOU CRAZY DIAMOND 20 A1 ☺ YCD<br />
GOLF CLUB TERRACE Pg 79<br />
FAIRWAY TO HEAVEN 18 ST<br />
TAXI CRAG Pg 80<br />
ESCAPE VELOCITY 21 ☺ EV<br />
UNDER THE INFLUENCE 22 ☺ UTI<br />
CLIMBS AT THE EDEN COMPLEX<br />
ROUTE NAME GRADE KEY CODE<br />
EDEN CRAG Pg 81<br />
A THING OF BEAUTY 18 TOB<br />
LABOR PAINS 20 AO ☺ LP<br />
SPLENDOR 17 SP<br />
MAPS, PHOTOS & TOPOS<br />
BLYDE MAP Pg 83<br />
CRAG PHOTOS Pg 84<br />
TOPO SKETCHES Pg 96<br />
10
TREASURE ISLAND<br />
TO GET THERE<br />
Take a drive past the resort restaurant to the lower lookout point and park there under the trees. Walk back<br />
up the road <strong>for</strong> a bit until you reach the exit of one of the trails on the left (Tufa trail). Follow this trail across<br />
the river then up onto a plateau. Walk until the trail starts heading down again, Treasure Island can be seen<br />
across on the right. After a short distance on the downhill a vague path leading off to the right can be found<br />
(old hiking trail, marked with a beacon). Follow this path to the base of the crag.<br />
APPROACH TIME: 15-20 minutes<br />
DESCENT ROUTE<br />
From the top of the routes walk right, back towards the resort, until a gully with a good path in it is reached.<br />
MV MAIDEN VOYAGE 20 ☺<br />
APPROACH<br />
Walk along the base of the crag to the northern arête. Pass around the corner and continue on a little way<br />
to where a prominent pillar can be seen reaching half way up the face. Continue on <strong>for</strong> about another 100m<br />
to where a hand crack leading up from a rotten band lower can be found.<br />
1. ??m (20)<br />
<strong>Climb</strong> through rotten band to hand crack above. Follow crack to right facing corner. Traverse left here<br />
and belay.<br />
2. ??m (20)<br />
Continue up shallow corner to chimney on the left, continue to summit.<br />
FA: M. Burhardt, J. Niles 2007/11<br />
SLJ SILVER LONG JOHNS 15 ☺<br />
APPROACH<br />
Walk along the base of the crag to the northern arête. Pass around the corner and continue on a little way<br />
to where a prominent pillar can be seen reaching half way up the face. Start at the base of a chimney on<br />
the left hand side of the pillar.<br />
3. 20m (13)<br />
<strong>Climb</strong> up the chimney behind the pillar and exit through the upper most slot to a ledge just below the<br />
top of the pillar.<br />
4. 25m (15)<br />
<strong>Climb</strong> the short face on the main wall up to a good traverse ledge. Traverse leftwards to a wide crack<br />
with a tree. <strong>Climb</strong> the wide crack moving leftwards onto the face, to avoid a blocky obstacle a couple of<br />
meters above the tree, then move back into the crack where a series of straddle moves upwards gain<br />
the top of the crag.<br />
FA: G. Frost, D. Margetts 2006/11/05<br />
CB CANNON BALL 19 ☺<br />
APPROACH<br />
Walk along the base of the crag to the arête. Just around the corner a prominent crack can be seen in the<br />
face. Start at the blocky pillar below the crack.<br />
1. 40m (19)<br />
<strong>Climb</strong> up on blocks to a chimney behind the pillar. Continue up on blocks to above the chimney to gain<br />
the crack. <strong>Climb</strong> the crack to a sloping ledge on the left. Continue up the crack to the top.<br />
FA: N. McKenzie, G. Frost, S. Newman 2000/01<br />
11
MP METROSEXUAL PIRATES 18 <br />
APPROACH<br />
Pass the steep bushy gully the left of LJS to the base of a wide, recessed crack system with a small roof<br />
half way up the route. Start at the base of the wide crack behind a tree.<br />
1. 30m (18)<br />
<strong>Climb</strong> up the wide, recessed crack to where a ledge gives access to the right-hand arête. <strong>Climb</strong> the<br />
short crack and face leading up the arête then tend leftwards back towards the crack above the small<br />
roof. Continue directly upwards, passing a blocky section higher, to the top of the crag.<br />
FA: G. Frost, R. Nathan, C. Ziranek 2007/09/23<br />
LJS THE LEGEND OF JOHNNY SEPTEMBER 19 ☺<br />
APPROACH<br />
Walk along the base of the crag to the second last buttress be<strong>for</strong>e the arête. This route climbs the first<br />
obvious crack in the face to the right of the steep bushy gully and to the left of the pillar block climbed in<br />
TLB.<br />
1. 45m (19)<br />
<strong>Climb</strong> up the face to a ledge then follow the crack system, past another small ledge, to the top of the<br />
crag.<br />
FA: K. Thrash, I. McMaster 2000/?<br />
TLB THE LUCKY BUCCANEERS 19 <br />
APPROACH<br />
Walk along the base of the crag to the second last buttress be<strong>for</strong>e the arête, to where an obvious block<br />
<strong>for</strong>ming a pillar against the face can be seen. The right hand corner of the pillar also <strong>for</strong>ms the start of a<br />
crack that continues up towards the top of the crag. Start at the base of the pillar below the crack.<br />
1. 35m (19)<br />
<strong>Climb</strong> the corner on the right hand side to the top of the pillar. Continue up to where a large block<br />
obstructs the crack. Carefully pass the block and continue to an off-width section which is climbed to<br />
the top of the crag.<br />
Note: The obstructing block halfway up the route is loose and poses a potential hazard <strong>for</strong> climbers.<br />
FA: G. Frost, J. Viljoen 2007/12/15<br />
SA SHARK ATTACK 23 <br />
APPROACH<br />
Near the middle of the crag just up from the trail three very direct cracks quite close to each other can be<br />
seen the follow up to the top of the crag. Just to the left of the crack climbed in DFT a faint crack line in the<br />
face can be seen that starts as a jam crack lower down to the right of a block. Start on top of the block.<br />
1. 35m (23)<br />
Step rightwards off the block to the crack. Continue up moving rightwards higher to gain another thin<br />
crack. Continue up to the top passing a pointy flake jutting out of the face below a ledge.<br />
Note: The opening ascent was done using pre-placed protection as placing gear on lead makes <strong>for</strong> a very<br />
taxing climb.<br />
FA: K. Thrash, G. Frost 2004/12/16<br />
12
DFT DIGGING FOR TREASURE 19 <br />
APPROACH<br />
Near the middle of the crag just up from the trail three very direct cracks quite close to each other can be<br />
seen that follow up to the top of the crag. This route climbs the left hand crack that goes up to a tree.<br />
1. 45m (19)<br />
<strong>Climb</strong> the crack directly up to the tree. Pass the tree into the corner behind and ascend to the top of the<br />
crag.<br />
FA: K. Thrash, K. Binedell 2000/01<br />
ST STOLEN TREASURE 23 <br />
APPROACH<br />
Near the middle of the crag just up from the trail three very direct cracks quite close to each other can be<br />
seen the follow up to the top of the crag. This route climbs the middle crack that goes directly up to a tree.<br />
1. 45m (23)<br />
<strong>Climb</strong> the crack directly up to the tree. Pass the tree into the corner behind and ascend to the top of the<br />
crag.<br />
FA: K. Thrash, I. McMaster 2004/10/17<br />
BT BURIED TREASURE 20 <br />
APPROACH<br />
Near the middle of the crag just up from the trail three very direct cracks quite close to each other can be<br />
seen the follow up to the top of the crag. This route takes the right hand crack which is a shallow open<br />
book.<br />
1. 45m (20)<br />
<strong>Climb</strong> the corner to a small rest ledge. Continue up the face to the top or move left below the pedestal<br />
into a short gully then climb to the top.<br />
FA: G. Frost, N. McKenzie, S. Newman 2000/01<br />
AJR A JOLLY RODGERING 19 <br />
APPROACH<br />
To the right of BT around the arête is a large, obvious open book corner that continues to the top of the<br />
crag. Start at the base of the corner.<br />
1. 35m (19)<br />
<strong>Climb</strong> the broken corner until clean rock on the left wall. A finger/hand crack is climbed, to the left of an<br />
off-width, until a step leftwards can be made to a foot ledge. Hand traverse rightwards on good holds,<br />
above the off-width, into the corner. <strong>Climb</strong> the right hand wall of the corner to a ledge with a tree.<br />
Traverse left and climb the steep finger crack and then a squeeze chimney to the top.<br />
FA: H. Pringle, N. Hemphill, K. Thrash 2004/12/17<br />
13
WTP WALKING THE PLANK 18 ☺<br />
APPROACH<br />
On the right of BT is a large open book with a steep face on its right. There are some thin crack lines in the<br />
face. To the right of the thin cracks a more prominent crack can be seen.<br />
1. 40m (18)<br />
Start on the face below the prominent crack and continue up the crack to the top of the crag.<br />
FA: K. Thrash, K. Binedell 2000/01<br />
AI AMPHIBIAN INSOMNIA 20 A0 <br />
APPROACH<br />
Start about 10m to the left of FB where a break in the steep face takes a crack line to a ledge with a tree<br />
about 10m up from the ground.<br />
1. 15m (19 A0)<br />
<strong>Climb</strong> the right hand break directly below the ledge up to the tree and belay on the ledge below the<br />
open book at the back.<br />
2. 35m (20 A0)<br />
<strong>Climb</strong> the open book up to an overhang and pull through using the crack to the left to below another<br />
smaller overhang. Continue up the crack to gain a small ledge on the left. <strong>Climb</strong> the face to the left to<br />
another small ledge. <strong>Climb</strong> the face to a ledge on the left of a steep corner. <strong>Climb</strong> the face on the left to<br />
the top of the crag.<br />
Note: pitch 2 could be grade 21 without aid.<br />
FA: G. Frost, D. Margetts 2004/10/17<br />
FB FIRST BLOOD 17 ☺<br />
APPROACH<br />
Near the middle of the West facing section on Treasure Island crag a huge roof with a big corner below is<br />
seen. To the left of this feature an open book in darker rock with an overhang below can be seen. Start in<br />
the clearing to the left of the open book below the overhang.<br />
1. 45m (16)<br />
<strong>Climb</strong> up a short face to a blocky ledge below the overhang and traverse right over a large block then<br />
up to the base of the open book. <strong>Climb</strong> the open book to a ledge. Continue up a short face to the top of<br />
the crag.<br />
FA: S. Newman, N. McKenzie, G. Frost 2000/01<br />
STG ONE SMALLER THAN GREEN 16 ☺<br />
APPROACH<br />
Near the middle of the West facing section on Treasure Island crag a huge roof with a big corner below is<br />
seen. This route starts at the bottom of this feature.<br />
1. 45m (16)<br />
<strong>Climb</strong> up on easy blocks to a chossy ledge below the corner. <strong>Climb</strong> the corner passing right of a<br />
boulder to a system of foot ledges. Traverse right to the arête and ascend a crack to a ledge. Follow the<br />
ledge to a chimney. <strong>Climb</strong> up and exit to the right to the top of the crag and tree belay<br />
FA: G. Frost, A. Lloyd 2003/12/15<br />
14
TCS THE CAPTAIN’S SUNDOWNER 22/19 A0 <br />
APPROACH<br />
About 30m to the right of STG, a recessed corner with a steep face directly above can be seen. Start in<br />
trees below the corner.<br />
1. 45m (22/19 A0)<br />
<strong>Climb</strong> up a block to the base of the corner. Continue up the corner then exit left under the steep face to<br />
below a narrow chimney. Traverse left around the arête then climb up to a small ledge. <strong>Climb</strong>/aid the<br />
steep open book exiting left onto a narrow ledge. Continue up the boulder face to the top.<br />
Note: An easier finish to the steep corner can be achieved by traversing left along the ledge to a broken<br />
face and climbing up to the top. Probably grade 17.<br />
FA: A. Porter, G. Frost 2002/03/02<br />
LAB LIFE’S A BEACH 16 <br />
APPROACH<br />
Close to the descent gully in the 2 nd large recessed open book to the left of the gully, a bushy corner above<br />
a triangular ledge about half way up the crag can be seen. There are two corners going up to either side of<br />
the ledge. Start at the base of the left hand corner behind a large block.<br />
1. 23m (15)<br />
<strong>Climb</strong> the corner to a ledge on the right. Continue up to the next ledge below the bushy corner.<br />
2. 10m (10)<br />
<strong>Climb</strong> up rightwards to a traverse ledge. Follow this rightwards around the arête to a stance in a niche<br />
below a wide crack.<br />
3. 20m (14)<br />
<strong>Climb</strong> the face, on good holds, just to the left of the stance to the top of the crag.<br />
FA: G. Frost, N. Hemphill, D. Margetts 2004/12/16<br />
SFY SWINGING FROM THE YARDARM 16 ☺<br />
APPROACH<br />
Close to the descent gully in the 2 nd large recessed open book to the left of the gully, a bushy corner above<br />
a triangular ledge about half way up the crag can be seen. There are two corners going up to either side of<br />
the ledge. Start at the base of the right hand corner.<br />
1. 35m (16)<br />
<strong>Climb</strong> up the corner passing a ledge on the right to a bushy ledge on the left. Move up to a traverse line<br />
on the right which is taken to the arête. <strong>Climb</strong> the arête moving right higher to a short vegetated recess<br />
and continue up to the top of the crag.<br />
FA: I. McMaster, K. Thrash 2004/10/17<br />
15
STC SUMMON THE CRACKEN 15 <br />
APPROACH<br />
On the right of the arête separating the 1st and 2nd recessed open<br />
books (i.e. on the arête between SFY and TC) is an obvious crack line<br />
which starts at a largish tree. The start of the crack is very steep but<br />
eases a couple of meters off the ground. Start on the tree below the<br />
crack.<br />
1. 30m (15)<br />
<strong>Climb</strong> onto the tree to bypass the steep start. Continue up the<br />
crack, passing some blocks breaking the line, to a grassy ledge.<br />
Continue up the arête to the top of the crag.<br />
FA: C. Ziranek, G. Frost, R. Nathan 2007/09/23<br />
CFR YO, HO, HO AND A CRACK FULL OF RUM 15 <br />
16<br />
Ron following “Summon The Cracken”<br />
APPROACH<br />
5m to the right of the arête separating the 1st and 2nd recessed open books (i.e. on the west face between<br />
SFY and TC) is a large chimney-like recess, which ends with a roof and a tree above it. The climb starts on<br />
the face 3m to the right of the recess.<br />
1. 30m (15)<br />
<strong>Climb</strong> onto the face then move left to gain the thin vertical crack with an aloe in it 1m to the right of the<br />
recess. <strong>Climb</strong> the crack until you reach a ledge and cubby-hole (12m). Stem the cubbyhole then move<br />
onto the left face and climb up past the tree onto a large ledge. From the ledge there are two cracks,<br />
take the thinner crack on the left with a couple of small trees half-way up.<br />
FA: G van Weele, L Maritz, A. Lloyd 2006/06/18
TC TREASURE CHEST 15 <br />
APPROACH<br />
In the 1 st recessed open book to the left of the descent gully, a crack in the face <strong>for</strong>med by a flake like<br />
feature on the right of the open book can be seen. Half way up is a ledge with a short corner on the left.<br />
Start below the crack.<br />
1. 30m (15)<br />
<strong>Climb</strong> the crack to below an overlap. Move left then climb a short face to the ledge. Continue up the<br />
face using a crack to the top of the crag.<br />
FA: G. Frost, N. Hemphill, D. Margetts 2004/12/16<br />
VARIATION<br />
1. 20m (15)<br />
<strong>Climb</strong> the crack to below an overlap. Move left then climb a short face to the ledge. Move left into a<br />
corner / cubby hole.<br />
2. 10m (16)<br />
<strong>Climb</strong> the corner straight up to the top of the crag.<br />
FA: U. Kiefer, K. van Graan 2006/06/16<br />
RRT RED RACKHAM’S TREASURE 15 <br />
Gareth on “Red Rackham’s Treasure”<br />
APPROACH<br />
On the very right hand side of the crag, just be<strong>for</strong>e the cliff band<br />
peters out into the descent gully, an obvious crack line on the left<br />
of an arête, going up to an overhang with a pillar higher up on the<br />
right, can be seen. Start at the base of the crack, near the large<br />
tree.<br />
1. 20m (15)<br />
<strong>Climb</strong> the crack to where it splits then continue up to the<br />
overhang. Traverse rightwards to climb up onto the pillar. Step off<br />
the pillar onto the final section of face and continue up on good<br />
holds to the top of the crag.<br />
FA: G. Frost, M. Sporen 2006/09/10<br />
17
MAIN MAST BUTTRESS<br />
This is the small buttress to the left of the Treasure Island descent gulley (going down). To get off the<br />
buttress, one can either go down via the gulley or abseil off a convenient tree.<br />
CJ CAPTAIN JACK 20 <br />
APPROACH<br />
On the lowest arête of the buttress, an obvious face with thin cracks on the right of the edge can be seen.<br />
Start below the face to the right of the arête.<br />
1. 25m (20)<br />
<strong>Climb</strong> up starting just to the right of the arête then move slightly rightwards to below a thin crack. Follow<br />
the crack to below an overlap then climb up to the ledge. Traverse leftwards to the arête and continue<br />
around to the recessed block at a tree. Continue up the face tending leftwards, following the crack, to a<br />
break with a tree. <strong>Climb</strong> the wide crack to the top of the buttress.<br />
FA: G. Frost, D. Margetts, J. Viljoen 2008/03/23<br />
CM CAPTAIN MORGAN 16 ☺<br />
APPROACH<br />
On the lowest arête of the buttress, an obvious face with thin cracks on the right of the edge can be seen.<br />
To the right of the face, climbed in CJ, an obvious break can be seen going up to a wide crack above a<br />
ledge. Start at the base of the break.<br />
1. 25m (16)<br />
<strong>Climb</strong> the break up to the ledge then continue up to the wide crack and follow this to the blocks at the<br />
top of the buttress.<br />
FA: G. Frost, D. Margetts, J. Viljoen 2008/03/23<br />
JMC JAMAICAN ME CRAZY 15 <br />
APPROACH<br />
Move around the base of the buttress from left to right from the descent gulley. A small recess can be found<br />
on the northern side. Start below a steep break to the left of the corner and the start of BG.<br />
1. 20m (15)<br />
<strong>Climb</strong> the steep break up to a ledge with a wide crack and the tree trunk. Follow the crack, exiting<br />
rightwards to the top of the buttress.<br />
FA: G. Frost, D. Margetts, J. Viljoen 2008/03/23<br />
BG BEN GUNN 15 <br />
APPROACH<br />
Move around the base of the buttress from left to right from the descent gulley. A small recess can be found<br />
on the northern side. BG ascends a crack line in a corner on the left of the recess.<br />
1. 20m (15)<br />
Ascend the corner and the face to a large ledge with a wide crack with a tree trunk above. Follow the<br />
crack, exiting rightwards to the top of the buttress.<br />
FA: M. Sporen, D. Margetts 2007/09/23<br />
18
POC PIRATES OF THE CARABINERS 18 <br />
APPROACH<br />
This climb ascends the off width crack approximately 4m to the right of BG.<br />
1. 20m (18)<br />
Ascend the crack then off width to a ledge. Continue up a short face to a crack line through a bulge on<br />
the right. Ascend the crack over the bulge to the top.<br />
FA: M. Sporen, D. Margetts 2007/09/23<br />
CNT CAT-O-NINE TAILS 17 <br />
APPROACH<br />
This climb ascends the face 6m to the right of POC. The climb follows the face to directly below a recess<br />
with a tree in it.<br />
1. 22m (17)<br />
Pull up into an overhanging recess. Move left following the face up to a ledge below an off width crack<br />
with a tree in it. Pass the tree on the right and continue to the top.<br />
FA: M. Sporen, D. Margetts 2007/09/23<br />
19
CHALK & CHEESE BUTTRESS<br />
This buttress is found about 50m to the right of Main Mast Buttress. The buttress is short (+/- 10m).<br />
Descend using the gulley behind buttress.<br />
MT MOUSE TRAP 18 ☺<br />
APPROACH<br />
This climb ascends the short face on the left-hand side of the buttress.<br />
1. 10m (18)<br />
<strong>Climb</strong> the short face and move left into a crack line and ascend <strong>for</strong> 3m be<strong>for</strong>e moving right onto the<br />
face. Move up the face and then back left to the top.<br />
FA: M. Sporen, D. Margetts 2007/09/23<br />
TBT 10 X 10 10 ☺<br />
APPROACH<br />
This climb ascends the arête on the right hand side of the Chalk and Cheese Buttress.<br />
1. 10m (10)<br />
Ascend the arête easily to the top.<br />
FA: M. Sporen, D. Margetts 2007/09/23<br />
20
OK CORRAL<br />
TO GET THERE<br />
Take a drive to the lower lookout point and park where the road makes its first hair-pin bend to the right.<br />
The grey, south facing crag on the left is OK Corral. Walk up the hill through the bush to the base of the<br />
cliff.<br />
APPROACH TIME: 5-10 minutes<br />
DESCENT ROUTE<br />
From the top of the routes walk straight up to the road that goes to the upper look out point. Follow the road<br />
back down to the resort and lower look out point.<br />
OR<br />
Scramble across to the left from the top of the crag then descend through the bush back down to the road.<br />
SSG SAWN OFF SHOT GUN 18 A0 ☺<br />
APPROACH<br />
Walk up from the road at the first right hand hair-pin bend on the way to the lower look out point. Follow the<br />
base of the crag to the right past a small pinnacle to where a large open book with a chimney at the bottom<br />
is seen. The route ascends this corner.<br />
1. 25m (18 A0)<br />
<strong>Climb</strong> up on blocks to the start of the chimney. Continue up the chimney and corner crack to an<br />
awkward move using aid to exit the corner on the left. Belay on the ledge.<br />
2. 20m (scramble)<br />
Scramble up the gully on the right of the belay stance.<br />
FA: G. Frost, I. Kotze 2003/12/13<br />
WDA WANTED: DEAD OR ALIVE 22 ☺<br />
APPROACH<br />
To the left of Tombstone Pinnacle is a portion of grey rock which is recessed back a bit. This route ascends<br />
the front of the first orange buttress to the left of this. I.e. about 15m left of a massive, scary looking grey<br />
stack-like buttress and just left of the big red overhangs at the top of the crag. Start below the obvious<br />
crack.<br />
1. 50m (22)<br />
<strong>Climb</strong> up on the right and step left across the recess. Crank through the bulge using a good crack. Step<br />
back right into the main recess. <strong>Climb</strong> the very thin corner crack to the bottomless crack through the<br />
bulge (crux). Crank through to a rest ledge. <strong>Climb</strong> up, tending slightly rightwards to a bushy ledge.<br />
Descent: Abseil off the tree on the right hand side of the ledge.<br />
Note:<br />
A #5 friend is recommended <strong>for</strong> the crux.<br />
The leader rested below the crux. This route still needs a free ascent.<br />
We found a #1 BD stopper and a quick-link below the crux. Obviously the route has been tried be<strong>for</strong>e.<br />
FA: I. Kotze, H. Pringle 2009/06/13<br />
21
LMP LYNCH MOB POSSE 19 ☺<br />
APPROACH<br />
<strong>Climb</strong>s the big corner to the right of WDA. Start below the corner.<br />
1. 50m (19)<br />
<strong>Climb</strong> the corner to a ledge beneath the off-width. Step right and climb the face (run out) to a thin rail.<br />
Traverse left into the corner (you are now above the off-width portion). <strong>Climb</strong> the corner till it is blocked<br />
by a big wedged block. Step right to a rest ledge. Continue up the right wall of the corner to the top. Exit<br />
slightly left, then up to a bushy ledge.<br />
Descent: Abseil off the tree on the right hand side of the ledge.<br />
Note:<br />
A set of small cams is useful <strong>for</strong> the occasional rail in the right hand wall.<br />
FA: I. Kotze, H. Pringle 2009/06/13<br />
GBB THE GOOD, THE BAD AND THE BABY 16 ☺<br />
APPROACH<br />
Walk past Tombstone Pinnacle and around the corner until below a section of red overhanging rock about<br />
two thirds of the way up the crag. Start on the other side of a fairly large bush/tree.<br />
1. 25m (14)<br />
<strong>Climb</strong> up to a slab. Once on the slab move rightwards to place gear, then back leftwards and up the<br />
knobby slab (run out but easy) to where it gets a lot steeper. Step leftwards across the gap and<br />
traverse 2m leftwards to a crack which is climbed to a good belay stance.<br />
2. 15m (16)<br />
<strong>Climb</strong> the face tending slightly leftwards, to below steeper rock. Traverse leftwards, around the corner<br />
to a tree and belay.<br />
3. 20m (8)<br />
<strong>Climb</strong> a short face and then continue up the grassy gully to the top.<br />
Note: The gear on pitch 2 is minimal and tricky to place on the traverse. Some micro nuts may be handy<br />
but the FA was made without any.<br />
FA: I. Kotze, L. Kotze 2006/11/05<br />
22
TOMBSTONE PINNACLE<br />
Standing prominently in the front of the OK Corral crag, is a large pinnacle with huge roofs on the lower,<br />
outward-facing wall.<br />
GF GUNFIGHT 23 <br />
APPROACH<br />
<strong>Climb</strong>s the steep recess on the side of Tombstone Pinnacle that faces the crag. Scramble to the highest<br />
point of the gulley at the back of the base of the pinnacle (scramble in from the right, looking up). Start just<br />
to the left of the highest point (looking up).<br />
1. 20m (19)<br />
<strong>Climb</strong> leftward-facing corner to a tree. Step right and climb rightward-facing corner to a roof. Step left<br />
and pull through to a crack. Up this to a ledge.<br />
2. 15m (23)<br />
<strong>Climb</strong> the crack above the stance to a ledge below the overhanging hand crack. <strong>Climb</strong> the crack to the<br />
top.<br />
Descent: An abseil point can be found on the left hand side of the pinnacle above a notch in the edge.<br />
Note: Opened with three rests. Still needs a free ascent. Doubles or even triples of Camalots # 1, 2 and 3<br />
are useful.<br />
FA: H. Pringle, I. Kotze 2008/12/17<br />
SD SUNDANCE KID 19 <br />
APPROACH<br />
Start at the highest point in the neck between the pinnacle and the<br />
crag, 5m right of GF. This is just left of a shattered-looking crack line.<br />
The first pitch ascends the face of the pinnacle which faces the crag<br />
(i.e. the NW face), to a stance on the western arête. The second pitch<br />
then traverses the SW face to the southern arête, then up the arête to<br />
the top. The entire second pitch is visible from the road. This is a very<br />
photogenic route.<br />
1. 25m (19)<br />
<strong>Climb</strong> edges <strong>for</strong> 2m until you can step down and rightwards to the<br />
jagged crack. <strong>Climb</strong> the crack, moving right at the top, then up to a<br />
rest ledge. Continue up and rightwards to the arête, then up to a<br />
ledge beneath a large corner crack (visible from the ground). <strong>Climb</strong><br />
the crack to a ledge on the left, then up the final 3m of big crack to<br />
a spectacularly exposed flat plat<strong>for</strong>m on the SW face.<br />
Ian on Pitch 2 of “Sundance Kid”<br />
2. 15m (15)<br />
Walk rightwards then step down to the lower ledge and traverse rightwards to an outrageous foot perch<br />
on the southern arête. <strong>Climb</strong> just right of the arête to the top. Use two ropes and keep one without gear<br />
to protect the second from above.<br />
Descent: An abseil point can be found on the left hand side of the pinnacle above a notch in the edge.<br />
Note:<br />
Small cams useful on pitch 1.<br />
A #5 friend is handy but not essential <strong>for</strong> the plat<strong>for</strong>m stance.<br />
FA Pitch1: H. Pringle, I. Kotze 2009/06/14<br />
FA Pitch2: H. Pringle, L. Watson 2009/06/13<br />
23
CDC COWBOYS DON’T CRY 18 <br />
APPROACH<br />
Approach the right hand side of the pinnacle to where an obvious break in the face can be seen to the right<br />
of the huge roofs. Start at a short open book with a blind crack ending in a rail that will give access to the<br />
break further above to the left.<br />
1. 32m (18)<br />
<strong>Climb</strong> the short open book to the rail then move leftwards and up into the break with a crack. Move<br />
leftwards again to the next portion of the break and climb up to below a steep open book. <strong>Climb</strong> the<br />
open book and subsequent easier break, continuing<br />
upwards to below an overhang where a short traverse<br />
rightwards onto the face and then a move up will gain<br />
a small grassy ledge and belay at a wide crack on the<br />
right.<br />
2. 15m (16)<br />
<strong>Climb</strong> up the corner on the left hand side of the<br />
stance, using the crack in the left hand face, up to a<br />
blocky ledge on the left. <strong>Climb</strong> up and rightwards to<br />
gain another larger ledge then ascend the corner on<br />
the left to the top of the pinnacle.<br />
Descent: An abseil point can be found on the left hand<br />
side of the pinnacle above a notch in the edge.<br />
Note: This route had a previous but unrecorded ascent a<br />
number of years prior to this description where a nut and<br />
abseil cord were left behind on the route.<br />
New Ascent: G. Frost, D. Margetts, M. Sporen<br />
2006/06/17<br />
24<br />
Gareth on “Cowboys Don’t Cry”, pitch 2
BREAKFAST BUTTRESS<br />
TO GET THERE<br />
Take a drive to the upper lookout point then follow the short path to the lookout where a buttress <strong>for</strong>ming a<br />
pinnacle on top can be seen standing just in front of the lookout looking towards the lake. Approach this<br />
buttress using a bushy gully that descends down the left hand side of the buttress, not the one directly<br />
below the lookout but the next gully further out.<br />
APPROACH TIME: 5 minutes<br />
DESCENT ROUTE<br />
Walk back across to the lookout point.<br />
OE OATSO EASY 12 <br />
APPROACH<br />
Descend the bushy gully and continue on passing under a huge roof and then past a couple of chimney<br />
features heading down towards the lowest portion of the buttress. A large grey slab feature can be seen at<br />
the bottom apex of the buttress that goes up to a blocky ledge above. Start at the right hand edge of the<br />
small, waist-height overhang at the bottom of the slab.<br />
1. 25m (10)<br />
Step up onto the slab after the waist-height overhang then continue up to the large boulders on the<br />
ledge above. <strong>Climb</strong> over the boulders to a stance below a short chimney in the wall on the right hand<br />
side.<br />
2. 10m (12)<br />
<strong>Climb</strong> up the short chimney that gives access to a ledge traversing rightwards below a steep face to the<br />
arête. Belay on the ledge around the arête and below a gnarly face above.<br />
3. 6m (10)<br />
<strong>Climb</strong> up the gnarly face, just to the right of the arête, to a ledge above.<br />
Descent: Traverse rightwards on the ledge to the lookout point.<br />
FA (solo): G. Frost, M. Sporen 2006/06/18<br />
25
LOSLYF CRAG – Last Chance Buttress<br />
TO GET THERE<br />
Park at the upper lookout point and follow the Leopard hiking trail along to when a small, isolated buttress<br />
can be seen, above and to the left of the path. This appears be<strong>for</strong>e reaching the main Loslyf Crag. A horror<br />
abrasive chimney splits the crag, capped by a giant sickle-shaped flake.<br />
APPROACH TIME: 5 minutes<br />
DESCENT ROUTE<br />
Walk off the buttress to the left.<br />
HFM HUNTING FOR MORE 17 <br />
APPROACH<br />
This route climbs the pleasant chicken-head face just around the arête to the left of the chimney.<br />
1. 10m (17)<br />
<strong>Climb</strong> the chicken-head face to a ledge on the right. Finish up on the arête to the big ledge on which the<br />
sickle flake rests.<br />
FA: H. Pringle, B. Spies 2008/06<br />
26
LOSLYF CRAG – The Pound Crag<br />
TO GET THERE<br />
Park at the upper lookout point and follow the Leopard hiking trail along to the base of some grey, south<br />
facing, cliffs.<br />
APPROACH TIME: 10-20 minutes<br />
DESCENT ROUTE<br />
From the top of the routes walk leftwards over the hill then down again back to the road that goes to the<br />
upper look out point.<br />
DS DOGGY STYLE 15 <br />
APPROACH<br />
Walk leftwards along the base of the crag from the corner at the start of CF to where the face almost seems<br />
to end and a second smaller crag can be seen behind. There is a blocky pinnacle to the left of the main wall<br />
with big chock stones wedged between the wall and the pinnacle. Walk past the pinnacle, continuing on to<br />
the left hand arête of the crag. Start below a crack to the right of the arête.<br />
2. 25m (15)<br />
<strong>Climb</strong> the crack to a small tree on the arête. Continue diagonally rightwards up the face to a crack that<br />
leads upwards to ledge below a niche. <strong>Climb</strong> up the corner in the niche, exiting leftwards on good holds<br />
to the block ledges above.<br />
FA: M. Sporen, G. Frost 2006/09/09<br />
NHD AINT NOTHIN’ BUT A HOUND DOG 16 <br />
APPROACH<br />
Walk leftwards along the base of the crag from the corner at the start of CF to where the face almost seems<br />
to end and a second smaller crag can be seen behind. Continue on towards the left hand arête. Start below<br />
a thin crack and subsequent face to the right of DS.<br />
1. 25m (16)<br />
<strong>Climb</strong> the thin crack and subsequent face up to a small ledge below a bulge with bushes above. <strong>Climb</strong><br />
the break on the left up to a ledge then continue up leftwards to the blocky ledges on top of the crag.<br />
FA: G. Frost, M. Sporen 2006/09/09<br />
MBF MANS’ BEST FRIEND 14 <br />
APPROACH<br />
Walk leftwards along the base of the crag from the corner at the start of CF to where the face almost seems<br />
to end and a second smaller crag can be seen behind. Continue on towards the left hand arête. Start below<br />
a crack system to the right of NHD, just to the left of a clump of trees.<br />
1. 25m (14)<br />
<strong>Climb</strong> the crack system, passing a tree on the right, up to a small ledge. Continue upwards following<br />
the left hand break to the blocky ledges above.<br />
FA: G. Frost, M. Sporen 2006/09/09<br />
27
NHL AINT NOTHIN’ LIKE A HIND LEG 14 <br />
APPROACH<br />
Walk leftwards along the base of the crag from the corner at the start of CF to where the face almost seems<br />
to end and a second smaller crag can be seen behind. Between the routes MBF and HOS is a narrow<br />
crack with a gnarly face going up to a ledge with a tree. Start below this crack.<br />
1. 25m (14)<br />
<strong>Climb</strong> up the gnarly face following the crack line to a small ledge with a tree about 5m below the top.<br />
Continue up following the recess behind the tree to the top of the crag.<br />
FA: G. Frost, D. Margetts, R. Nathan, J. Viljoen 2007/07/21<br />
HOS HANG ON SNOOPY 13 <br />
APPROACH<br />
Walk leftwards along the base of the crag from the corner at the start of CF to where the face almost seems<br />
to end and a second smaller crag can be seen behind. Continue on towards left hand arête. Start at a<br />
noticeable crack system to the right of MBF, to the right of a clump of trees.<br />
1. 25m (14)<br />
<strong>Climb</strong> the face on the left of the crack system up to where a step rightwards, below a bulge, gains a<br />
flake. <strong>Climb</strong> up into a niche. <strong>Climb</strong> up then move leftwards to gain a small ledge with a tree. Continue<br />
up to the top of the crag.<br />
FA: M. Sporen, G. Frost 2006/09/09<br />
HSP HOWLING SPIDER PIG 17 <br />
APPROACH<br />
Walk leftwards along the base of the crag from the corner at the start of CF to where the face almost seems<br />
to end and a second smaller crag can be seen behind. Continue on towards the left hand arête. From the<br />
clump of trees at the base of MBF, walk rightwards passing a wooded recess and the start of the second<br />
pitch of VKH, to where a gnarly looking face with a small overlap near the bottom can be seen. Start from<br />
the boulders at the base of the face just to left of the overlap.<br />
1. 25m (17)<br />
Step off the boulders to gain the face with a ridge on the left. Move rightwards to under the overlap then<br />
pull through on good holds to gain the gnarly face above. Continue up the face to reach a blocky finish<br />
at the top of the crag.<br />
FA: G. Frost, D. Margetts, R. Nathan, J. Viljoen 2007/07/21<br />
28
VKH VROU KOOK HOND 13 ☺<br />
APPROACH<br />
Walk leftwards along the base of the crag from the corner at the start of CF to where the face almost seems<br />
to end and a second smaller crag can be seen behind. There is a blocky pinnacle to the left of the main wall<br />
with big chockstones wedged between the wall and the pinnacle. Start at the gap between the wall and the<br />
pinnacle.<br />
1. 10m (11)<br />
<strong>Climb</strong> the front of the pinnacle to a big ledge close to the second wall.<br />
2. 25m (13)<br />
There is a wooded recess in this wall a little further along the ledge to the left. <strong>Climb</strong> the arête to the<br />
right of this recess to the top of the crag.<br />
FA: K. van Graan, U. Kiefer 2006/06/17<br />
29
LOSLYF CRAG – Main Crag<br />
CK CENTERFOLD KLINGONS 21 <br />
APPROACH<br />
From the boulder, with a bit of graffiti on, that overhangs the Leopard Trail, looking directly up at the crag an<br />
obvious open book, that runs the entire height of the crag, with a bushy ledge in the middle, can be seen.<br />
Start at the base of the big open book at the steep, clean corner on the right hand side below a ledge a few<br />
meters above.<br />
1. 30m (21)<br />
<strong>Climb</strong> the steep corner with a jam crack to the ledge. Continue up the big open book to the bushy<br />
ledge. Continue up onto the block above the ledge to a belay on a ledge below the next section of the<br />
open book.<br />
2. 25m (21)<br />
Continue up the open book to the top of the crag.<br />
Note: Observe the uniquely strange plants growing on the right hand face of the second pitch of the open<br />
book.<br />
FA: G. Frost, I. Kotze 2004/11/27<br />
BD BUSH DIVING 21 <br />
APPROACH<br />
From the boulder, with a bit of graffiti on, that overhangs the Leopard Trail, looking directly up at the crag an<br />
obvious open book, that runs the entire height of the crag, with a bushy ledge in the middle, can be seen.<br />
Start at the base of the big open book at the steep, clean corner on the right hand side below a ledge a few<br />
meters above.<br />
1. 25m (21)<br />
Start as <strong>for</strong> CK. <strong>Climb</strong> the nice layback crack to a ledge where CK goes left. Continue straight up the<br />
dirty crack to stance at a tree. Either traverse left to a ledge and rap off a tree or top out on CK.<br />
Note: Still need some cleaning.<br />
FA: H. Pringle, I. Kotze, L. Watson, C. Terrell 2009/06/14<br />
30
GB GREEN BOTTLE 20 A0 <br />
APPROACH<br />
Follow the Leopard hiking trail to where a large boulder hangs over the path. There is some graffiti on the<br />
boulder. Look straight ahead, you will see a buttress that <strong>for</strong>ms a pinnacle at the top. In the middle of the<br />
face on the buttress is a prominent crack. This is the second pitch of the climb. Head towards the base of<br />
the buttress. On the right hand end of the buttress are two obvious lines. The one on the left is an open<br />
book. Just around the corner is a chimney feature just behind a medium sized tree. You can start up either<br />
feature. The open book is better climbing. The grade is about the same.<br />
1. 15m (20 A0)<br />
<strong>Climb</strong> either the open book or the chimney to a ledge at<br />
5 meters. Then climb the off width chimney to a recess<br />
just right of the arête and belay.<br />
2. 30m (20)<br />
Traverse left from the stance <strong>for</strong> 4 meters to below a<br />
crack. <strong>Climb</strong> the crack to another rail. Traverse 2 meters<br />
left and follow the crack to the top. There is another<br />
crack that is more direct but appears much harder. Set<br />
up a belay on the pinnacle.<br />
Descent: Scramble down the ramp into the gully. Scramble<br />
about 10 meters down the gulley to a very prominent smooth<br />
barked tree. Abseil of this tree over a very large chock stone.<br />
Mind the loose rock in the gulley. Make sure the first<br />
climbers are out of the firing line be<strong>for</strong>e the next climbers<br />
start down.<br />
FA: I. Kotze, G. Terrell. R. van der Wiel 2004/11/21<br />
BR BUTCHERS REVENGE 22 ☺<br />
31<br />
Graham Terrell on “Green Bottle”, pitch 2.<br />
APPROACH<br />
This route essentially climbs the thinner, right hand crack of GB. Start the route at the open book on the left<br />
hand side of the base of the buttress.<br />
1. 15m (??)<br />
Start in the corner, climb this <strong>for</strong> 10 meters, be<strong>for</strong>e climbing rightwards (quite bold) to belay at the base<br />
of the crack.<br />
2. 30m (22)<br />
<strong>Climb</strong> the crack, taking the right branch, then the final chimney to the top of the pinnacle.<br />
FA: J. Roberts, G. Des<strong>for</strong>ges 2008/03/22
PTL PRELUDE TO LUKA 20 ☺<br />
APPROACH<br />
Start as <strong>for</strong> GB.<br />
1. 55m (20)<br />
Start with Green Bottle and instead of stepping left after the off width go straight up right leaning crack<br />
to roof above.<br />
FA: M. Burhardt, J. Niles 2007/11<br />
YAB THE YOUNG AND THE BREASTLESS 17 <br />
APPROACH<br />
Follow the Leopard hiking trail to where a large boulder hangs over the path. About 100m up the trail from<br />
the boulder an obvious, large grey slab, with two open books on either side going up to an overhang, can<br />
be seen. This route takes the large, left hand open book higher up (GL climbs the right hand open book).<br />
Below the open book is a bushy ledge with a short buttress below. Start at the break in the face to the left of<br />
the lower apex of short buttress.<br />
1. 33m (14)<br />
<strong>Climb</strong> the break moving rightwards below a small tree and overhang. Continue directly upwards to the<br />
grey slab on the left of a bushy ledge. <strong>Climb</strong> up the slab, following the arête, to a large ledge with an<br />
off-width crack in the right hand wall.<br />
2. 25m (16)<br />
<strong>Climb</strong> the short off-width to a ledge on the right then step down to a lower ledge. Traverse rightwards to<br />
the prominent open book. <strong>Climb</strong> the crack, moving rightwards occasionally to avoid grassy patches, to<br />
a small ledge on the right of the open book and about 6m below the roof.<br />
3. 15m (17)<br />
From the stance climb up and leftwards to another small ledge in the corner. <strong>Climb</strong> up the corner to a<br />
good rail below the roof (top most of 3 obvious rails). Traverse leftwards to the arête then climb up and<br />
tending leftwards follow a break and a series of small ledges to the top and tree belay.<br />
FA: G. Frost, H. Tillwick, G. Lowther 2005/06/16<br />
32
TOF TITS ON FIRE 19 <br />
APPROACH<br />
This line takes the thin seam that rises from the bottom left to top middle of the on-angle slab below some<br />
medium sized red roofs. It then traverses left at the top of the slab, up the corner then left again to the arête<br />
of the left buttress. It finishes straight up, to the left of the top roofs. Walk off to the car park or back down to<br />
the hiking trail, down the easy slope.<br />
1. 55m (19)<br />
Start at the large chimney at the left end of the slab. Use the tree to gain the left arête of the chimney,<br />
climb this until able to step across to the start of the seam. <strong>Climb</strong> the seam <strong>for</strong> 25m until it steepens,<br />
pull through (crux) and traverse off left to the tree. <strong>Climb</strong> the flake to the right of the tree and ascend<br />
diagonally left to the corner. <strong>Climb</strong> up to a semi-hanging stance in the corner, below the first rail left.<br />
2. 30m (18)<br />
<strong>Climb</strong> the corner to the first rail left. Rail to the arête (exposed) and climb the arête to the top.<br />
FA: G. Terrell, B. Spies, H. Pringle 2008/06<br />
TST THE SWEET TRANSVESTITE 19 <br />
APPROACH<br />
Follow the Leopard hiking trail to where a large boulder hangs over the path. About 100m up the trail from<br />
the boulder an obvious, large grey slab, with two open books on either side going up to an overhang, can<br />
be seen. Start in the open book on the left of the grey slab the goes diagonally up to a bushy ledge.<br />
1. 15m (17)<br />
<strong>Climb</strong> the grey open book up to a bushy ledge.<br />
2. 10m (14)<br />
<strong>Climb</strong> the corner at the back of the ledge to a smaller ledge on the right.<br />
3. 50m (17)<br />
<strong>Climb</strong> the crack system, on the right hand edge of the ledge, up to a tree. Pass the tree on the right up<br />
to a grassy crack. Continue up, climbing on the face, following the grassy crack to a clean crack<br />
system. Follow the clean crack system up to a traverse line right to a block and tree belay below the<br />
overhangs.<br />
4. 15m (19)<br />
<strong>Climb</strong> diagonally up rightwards to the corner break in the overhangs. Pull through to the face on the left<br />
and up to a large bushy ledge and belay.<br />
5. 20m (14)<br />
Continue up on the right hand face of the corner at the back of the ledge. Avoid a steep section higher<br />
by traversing rightwards to a bushy gully. Continue on the right of the gully to the top of the crag.<br />
FA: G. Frost, D. Margetts 2004/10/16<br />
33
GL GOODBYE LENIN 16 ☺<br />
APPROACH<br />
Follow the Leopard hiking trail to where a large boulder hangs over the path. About 100m up the trail from<br />
the boulder an obvious, large grey slab, with two open books on either side going up to an overhang, can<br />
be seen. This route ascends the right hand corner (YAB ascends the left hand corner). Start at a large flake<br />
on the right wall just under a large boulder pinnacle near the wall.<br />
1. 35m (16)<br />
<strong>Climb</strong> onto the flake and climb the corner above to a large tree. Continue up the corner to reach twin<br />
cracks. <strong>Climb</strong> these to where they steepen then step left onto the “chicken head” face moving back<br />
rightwards higher up to a tree in the corner. Continue up the corner to the next tree.<br />
2. 25m (17)<br />
<strong>Climb</strong> corner to the 3 rd tree and continue to a ledge. Step onto a face bearing leftwards (thin) towards a<br />
crack in the center of the face. Follow crack to a big ledge with a tree.<br />
3. 18m (14)<br />
Walk rightwards along broken ground to a corner and traverse rightwards over the slab around the<br />
arête to a corner. <strong>Climb</strong> the corner and broken ground above to the top of the crag.<br />
Note: 2 nd pitch is steep and thin; protection is sparse, but sufficient.<br />
VARIATION<br />
3. 12m (15?)<br />
Walk rightwards over broken ground to a corner. Pull up on excellent holds and follow a groove to a<br />
ledge then walk off to the left.<br />
Note: The variation was not climbed but there was a general vote <strong>for</strong> what seemed the easier exit. However<br />
the variation is well protected and the holds are excellent, it might be easier than the original, even if it is<br />
steeper.<br />
FA (pitch 1): H. Pringle, M. Ojdanic 2004/12/18<br />
FA: U. Kiefer, K van Graan, J van Graan 2006/06/17<br />
IC ISOLATION CHIMNEY 14 R ☺<br />
APPROACH<br />
From the look out point at car park there are 2 obvious off width looking cracks visible to the right of the<br />
Green Bottle buttress. This takes the left hand crack, which on closer inspection is a narrow chimney. It<br />
starts about 15 meters right of "Goodbye Lenin". You cannot miss it.<br />
1. 25m (14)<br />
<strong>Climb</strong> the narrow chimney up to a ledge.<br />
Descent: Abseil off a tree or scramble easily down the gully on the right of the buttress (looking up).<br />
FA: H. Pringle 2008/06<br />
34
LSL THE LEOPARD SKIN LINE 16 R ☺<br />
APPROACH<br />
From the look out point at car park there are 2 obvious off width looking cracks visible to the right of the<br />
Green Bottle buttress. This takes the left hand crack, which on closer inspection is a chimney. It starts<br />
about 15 meters right of "Goodbye Lenin". You cannot miss it.<br />
1. 25m (14 R)<br />
<strong>Climb</strong> the chimney (Isolation Chimney) to a ledge.<br />
2. 25m (15)<br />
<strong>Climb</strong> narrow rib/slab at back of the ledge, to the left of large crack, all the way to directly below huge<br />
overhangs.<br />
3. 15m (16)<br />
Take slightly rising traverse line to the right, underneath the overhangs, all the way to skyline. Stance<br />
on the arête.<br />
4. 40m (16)<br />
Step 3 meters right from stance and climb past tree, then do rising traverse, leftwards underneath the<br />
roof (careful of the loose flake) and follow incipient line to the top.<br />
Note: Pitch 3 is very good but gear is somewhat lacking in the chimney.<br />
FA: G. Terrell, I. Kotze, L. Watson 2008/06<br />
Ian Kotze and Linda Watson on the 3rd stance of “The Leopard Skin Line”<br />
35
BOG BRING ON THE GIMP 20 X <br />
Hector Pringle on “Bring on the Gimp”<br />
SS SLIPPERY SNATCH 19 <br />
APPROACH<br />
From the look out point at car park there are 2 obvious off width<br />
looking cracks visible to the right of the Green Bottle buttress.<br />
This takes the right hand crack, which on closer inspection is a<br />
horror off width. It starts about 20 meters right of "Goodbye<br />
Lenin". You cannot miss it.<br />
1. 25m (20 X)<br />
<strong>Climb</strong> the off width to the top of the pillar.<br />
Descent: Abseil off a tree or scramble easily down the gully on<br />
the right of the buttress (looking up).<br />
Note: The route was opened with 2 #4 Camalots and a #5<br />
Friend which makes the top bit completely unprotected. For<br />
peace of mind get some #6 Camalots or some big bros.<br />
FA: H. Pringle, B. Spies 2008/06<br />
APPROACH<br />
This route climbs the obvious break to the right of the huge red overhangs in the middle of the crag. The<br />
break appears as two converging recesses meeting halfway up the cliff. Start below the right hand recess.<br />
1. 22m (18)<br />
<strong>Climb</strong> the break on the right of the recess then continue up, moving left bypassing a tree, to a small<br />
ledge with a steep face above. <strong>Climb</strong> up the face then move rightwards into a corner continuing<br />
upwards to an overhang. Move rightwards to a large grassy ledge.<br />
2. 23m (16)<br />
<strong>Climb</strong> the short corner to the left of the stance. Continue up through a small overhang. Continue up<br />
the gully passing a series of grassy bulges to exit leftwards to a large ledge.<br />
3. 22m (19)<br />
Traverse rightwards from the stance to the base of a chimney. <strong>Climb</strong> up the chimney through the<br />
overhangs to exit rightwards at the top. Continue up a short break to a grassy ledge.<br />
4. 28m (17)<br />
<strong>Climb</strong> directly above the grassy ledge, passing an awkward bulge. Continue up non-descript rock to<br />
the top.<br />
FA: G. Frost, D. Margetts 2005/12/15<br />
36
AB ADVOCATE BARBIE 17 ☺<br />
APPROACH<br />
Towards the right hand arête of Loslyf Crag be<strong>for</strong>e the start of SHL, a grey face that breaks up higher on<br />
the cliff can be seen. To the right of the face is a large, vegetated gully/corner. Start below a leftward<br />
tending crack that goes up to a large tree.<br />
1. 25m (17)<br />
<strong>Climb</strong> the crack past some small trees, moving leftwards above the trees onto a thin face. <strong>Climb</strong> up to<br />
a ledge with a large tree below a recessed corner.<br />
2. 30m (15)<br />
<strong>Climb</strong> up the recess past the tree and chock to a small ledge. Continue up the crack moving left under<br />
a large block. Continue up the crack on the left on the left of the block up to a large ledge below a<br />
blocky recess/chimney.<br />
3. 20m (14)<br />
<strong>Climb</strong> the recess, taking care on the loose blocks, passing some boulders higher up to a bushy ledge<br />
on the left below a grassy gully.<br />
4. Scramble<br />
Scramble up the gully to the top of the crag.<br />
FA: G. Frost, D. Margetts 2005/02/20<br />
SHL SECOND HAND LIONS 19 ☺<br />
APPROACH<br />
Towards the right hand arête of Loslyf Crag where the leopard trail meets up with the base of the cliff face,<br />
an obvious open book corner with some trees at the bottom and an overhang to the right can be seen. Start<br />
on a ledge below the corner at the trees.<br />
1. 20m (14)<br />
<strong>Climb</strong> the corner behind the trees to where a rail going out right is reached a few meters above the<br />
ledge. Traverse rightwards about 2m then climb up to a small ledge. Continue traversing on a good<br />
rail around the arête to another small ledge with a tree.<br />
2. 20m (13)<br />
Continue traversing rightwards to a vegetated ledge below a break in the face. <strong>Climb</strong> the groove to a<br />
big, bushy ledge on the right below a steep open book.<br />
3. 30m (19)<br />
<strong>Climb</strong> the open book past a large tree. Continue up the narrow chimney. From the top of the chimney<br />
follow a vegetated ramp to a stance on a vegetated ledge.<br />
4. 30m (16)<br />
<strong>Climb</strong> the grassy ramp on the right of the ledge up to where a break in the face can be seen a few<br />
meters left of the right hand arête. Leave the ramp then climb the break, with a wide crack at its base,<br />
up to a blocky ledge and belay.<br />
5. 50m (Scramble)<br />
From the stance, traverse left along the ledge then scramble up towards the top of the crag.<br />
FA: G. Frost, A. Margetts, D. Margetts 2004/12/18<br />
37
SHL SECOND HAND LIONS – KNOTTED KNICKERS VARIATION 16 <br />
APPROACH<br />
Same as <strong>for</strong> SHL. This route however, takes the more aesthetic line directly up the face after the stance on<br />
the first pitch.<br />
1. 20m (14)<br />
<strong>Climb</strong> the corner behind the trees to where a rail going out right is reached a few meters above the<br />
ledge. Traverse rightwards about 2m then climb up to a small ledge. Continue traversing on a good<br />
rail around the arête to another small ledge with a tree.<br />
Darryl on “Second Hand Lions”, pitch 1<br />
FA: G. Frost, M. Sporen, D. Margetts 2005/10/08<br />
2. 25m (16)<br />
<strong>Climb</strong> up directly from the stance, through the small<br />
overhang, onto the face above. <strong>Climb</strong> up the face and<br />
subsequent slab, moving leftwards and rightwards to gain the<br />
best protection, to a belay on the left hand corner of a bushy<br />
ledge.<br />
3. 15m (13)<br />
Traverse rightwards on the ledge then climb the obvious<br />
break and subsequent grassy ramp to a ledge with large<br />
blocks and trees.<br />
4. 20m (15)<br />
From the stance climb up onto a sloping ledge below the<br />
face above and to the left of an obvious crack (climbed in<br />
SHL). Traverse leftwards on the ledge to an open book then<br />
climb up, continuing passed a couple of ledges to where the<br />
climbing eases and a good belay can be found.<br />
5. Scramble<br />
Scramble up to the top of the crag.<br />
38
PMC PIMP MY CRACK 20 A2 (23 R) <br />
APPROACH<br />
Continue following the base of the cliff, under the overhangs on the right of where SHL starts, then go up<br />
the ramp towards a bushy gully. Just to the left of the gully is a large chimney with a splitter crack higher up<br />
in the yellow lichen face on the left. Start on the small rock ledge below a short grey face on the left of the<br />
chimney.<br />
1. 10m (17)<br />
<strong>Climb</strong> the short face and subsequent crack to a ledge below the yellow lichen face.<br />
2. 40m (20 A2/23 R)<br />
<strong>Climb</strong> the shallow open book just to the left below the yellow face. Step rightwards onto the face to the<br />
crack line. <strong>Climb</strong> the face and crack (protection is thin at the start but improves higher up). Where the<br />
crack starts to peter out, a convenient foot ledge leads rightwards to another crack. <strong>Climb</strong> this crack to<br />
where it ends then step rightwards onto a gnarly face which is climbed up to a large ledge.<br />
3. 20m (16)<br />
Shared with SHL pitch 4.<br />
<strong>Climb</strong> up from the ledge to another ledge then ascend the break in the face up to a blocky ledge and<br />
belay.<br />
4. Scramble<br />
Scramble up the break on the left of the stance towards the top of the crag.<br />
Note: Although the first ascent was lead using aid on the second pitch, due to inadequate protection, the<br />
route can be free climbed but the start of the crack is rather run out.<br />
FA: G. Frost, G. Lowther 2005/04/17<br />
FFA: M. Burhardt, J. Niles 2007/11<br />
CL CHASY LANE 19 ☺<br />
APPROACH<br />
<strong>Climb</strong>s the thin and discontinuous crack up the grey slab just to the right of the gulley to the right of PMC.<br />
1. 30m (19)<br />
<strong>Climb</strong> the slab and cracks to a ledge. Up the blocks at the back of the ledge to a stance.<br />
2. Scramble to the top.<br />
Note: It is probably much better to abseil off after the first pitch. There seems to be a tree off to the right <strong>for</strong><br />
this, but check it out properly first.<br />
FA: H. Pringle, I. Kotze 2008/12/18<br />
39
THE JUNGLE BOOK<br />
TO GET THERE<br />
This is the most eastern of the crags within the Aventura complex. Park at the upper lookout point and<br />
follow the Leopard hiking trail along past the grey, south facing, cliffs of Loslyf Crag. Continue around to the<br />
East by leaving the trail and hiking a short distance in the bush following just below the cliff band.<br />
APPROACH TIME: 25-30 minutes<br />
OR<br />
From the main resort road, drive up to the “Academy” complex following the sign posts to the stables and<br />
airfield. Follow the track up the hill, passing the airfield on the left and the rubbish tip on the right to the<br />
dormitory complex and then park up at the top gate. Pass through the gate (which is sometimes locked),<br />
then follow the track up to the pony kraal. From the gate of the pony kraal, heading in the direction of the<br />
Swadini Wall in the distance, walk towards the NE arête of the buttress. Scramble down to a tree where an<br />
abseil reaches the base of the crag. The Jungle Book crag is to the south.<br />
APPROACH TIME: 15-20 minutes<br />
DESCENT ROUTE<br />
From the top of the routes walk up to a horse kraal on the summit and follow the track down to a fence with<br />
a gate.<br />
If the gate is open: follow the track past some buildings taking the left hand track down the hill back to the<br />
road that goes to the upper look out point.<br />
If the gate is locked: follow the fence leftwards through the bush back down the hill to the road that goes to<br />
the upper look out point.<br />
JBF JUNGLE BOEP 15 ☺<br />
APPROACH<br />
To the left of the dominating gully at the base of the crag, a bushy ramp going up to the left of a broken,<br />
vegetated buttress can be seen. Scramble up the ramp, going rightwards at the base of the rock band, to<br />
below a broken chimney in the right hand corner of the ledge.<br />
Sharlene on “Jungle Boep”, pitch 1<br />
1. 35m (15)<br />
<strong>Climb</strong> up the chimney <strong>for</strong> a few meters then move leftwards onto<br />
the gnarly face. <strong>Climb</strong> the face up to a ledge with a tree and recess<br />
on the left. Continue up the gnarly face to a stance on a blocky<br />
ledge.<br />
2. 20m (14)<br />
<strong>Climb</strong> the break to the left of the stance, past a thin slab under an<br />
overhang, then up to a bushy ledge.<br />
3. 20m (scramble)<br />
Scramble through the bushes to the left of the ledge then up a short<br />
gully to the top of the crag.<br />
Note: Although the face climbing on pitch 1 is easy, the gear is<br />
somewhat thin.<br />
FA: G. Frost, A. Margetts, D. Margetts 2005/02/19<br />
40
MRF MAN’S RED FLOWER 19 ☺<br />
APPROACH<br />
Jungle Book crag has a large gully present starting at the base of the cliff. At the head of the gully is an<br />
overhanging chimney. The route starts to the left, around the arête from the chimney and basically leads up<br />
to and follows the large groove higher up. Start below an overlap, a few meters off the ground, with parallel<br />
cracks in the face above.<br />
1. 40m (19)<br />
<strong>Climb</strong> up to below the overlap and using the parallel cracks pull up onto the face and climb up to a<br />
small ledge. <strong>Climb</strong> the corner and exit rightwards via a crack and up to a large ledge below a chimney.<br />
<strong>Climb</strong> the chimney then follow the right crack to the groove. Exit the groove on the right to a stance on<br />
the ledge.<br />
2. Scramble<br />
Scramble right, around the arête and into a bushy corner. Belay below the corner.<br />
3. 20m (16)<br />
<strong>Climb</strong> the corner then move left around an overhang onto a slab. Follow the break up to a blocky<br />
recess and climb up to a stance on top of a pillar.<br />
4. 30m (14)<br />
From the pillar step rightwards onto the face. Follow the break in the face avoiding the overhangs on<br />
the left and climb to the top of the crag.<br />
FA: G. Frost, N. Hemphill 2004/01/24<br />
BOB THE BOOK OF BALOO 21 (20 A1) <br />
APPROACH<br />
Cross over at the top of the gully to a blocky ledge on the right at the base of the cliff. The route starts<br />
below the face to the right of a large overhanging recess at the head of the gully.<br />
1. 30m (17)<br />
<strong>Climb</strong> up the face left of a tree and continue up tending leftwards to a crack. <strong>Climb</strong> up the crack to a<br />
ledge below a vegetated corner and belay.<br />
2. 25m (20)<br />
Step rightwards on the ledge and climb the second crack from the arête. Follow this crack system up<br />
past a small roof onto the face and belay on a small ledge on the arête.<br />
3. 20m (20 A1)<br />
Traverse right to an open book. <strong>Climb</strong> the crack in the corner, using aid, to a big ledge and belay.<br />
4. 25m (16)<br />
Continue up the open book above the ledge. At the top of the corner move left on a ledge to a tree and<br />
climb the face behind the tree to a big ledge and belay.<br />
5. Scramble tending rightwards to the top of the crag.<br />
FA: I. Kotze, G. Frost, A. Lloyd 2003/12/15<br />
FFA: M. Burhardt, J. Niles 2007/11<br />
41
WYWD WHAT DO YOU WANNA DO 21 <br />
APPROACH<br />
After crossing the gully and rounding the large boulders at the base of Jungle Book Crag, scramble up the<br />
grassy ramp to where the most obvious open book chimney system, which is capped with a large roof, can<br />
be seen in the middle of the crag. Scramble up to a ledge about 5m up and directly below the open book<br />
chimney.<br />
1. 45m (19)<br />
This pitch follows the crack system which is directly below the open book chimney which <strong>for</strong>ms pitch 2.<br />
<strong>Climb</strong> the crack system through a number of bulges to the base of the open book chimney.<br />
2. 40m (21)<br />
<strong>Climb</strong> the open book chimney system using the right hand wall were necessary till one is <strong>for</strong>ced into the<br />
chimney. <strong>Climb</strong> the chimney till below the roof. Traverse out right under the roof till the end and it is<br />
possible to climb onto the face above. <strong>Climb</strong> up tending rightwards <strong>for</strong> about 5m or so till the ledge at<br />
the base of a bushy open book. Belay on the ledge.<br />
3. 30m (16)<br />
<strong>Climb</strong> the left hand face as much as possible avoiding the bushy open book until it is possible to<br />
scramble off.<br />
FA: K. Thrash, I. McMaster 2005/02/20<br />
TVF THREE VULTURE FEAST 20 <br />
APPROACH<br />
After crossing the gully and rounding the large boulders at the base of Jungle Book Crag, scramble up the<br />
grassy ramp to where a crack line just to the right of a steep open book can be seen. The crack starts about<br />
midway in the section of the face between the boulders and a vegetated pinnacle further to the right. Start<br />
on a ledge about 3m up from the ground below the crack.<br />
1. 30m (20)<br />
<strong>Climb</strong> up on jugs to the thin crack just off the ledge. Continue up to an acute open book/off-width crack.<br />
<strong>Climb</strong> the crack up to where it eases below an overhang. Exit the overhang climbing rightwards and up<br />
following a crack to a small ledge and belay.<br />
2. 20m (20)<br />
<strong>Climb</strong> the right hand <strong>for</strong>k above the ledge following a jam crack to where it narrows into a thin crack at a<br />
short, shallow corner. <strong>Climb</strong> up the corner to where the crack widens again and eases below a small<br />
overhang. Move right under the overhang then up to a ledge and tree belay.<br />
3. 40m (16)<br />
<strong>Climb</strong> rightwards from the ledge up a short ramp to a leftwards tending curved crack. <strong>Climb</strong> the crack<br />
moving left higher up to gain a break in the face. A rightwards tending juggy face, just to the right of the<br />
arête, is followed to a blocky ledge and belay just below the top of the crag.<br />
FA: K. Thrash, G. Frost 2004/12/19<br />
42
KLL KING LOUIS’ LAYBACK 19 <br />
APPROACH<br />
On the left hand side of the grey face climbed in BN and MNR, a steep, vegetated gully can be seen. On<br />
the left of the gully a large pinnacle about half way up the face with an obvious open book on the right hand<br />
side can be seen. Start on the blocky ledge below and to the right of the open book which is gained by<br />
scrambling up the gully on the right of the ledge.<br />
1. 25m (19)<br />
<strong>Climb</strong> the short crack on the left hand edge of the blocky ledge then continue up on the face moving left<br />
higher to gain a ledge below the open book. <strong>Climb</strong> the face, using a crack, just to the right of the open<br />
book to a rail which is traversed leftwards to the open book. <strong>Climb</strong> the open book exiting right at the top<br />
to a large ledge with blocks and belay.<br />
Descent: An abseil can be made, using the largest block on the ledge as an anchor, to some trees below<br />
the ledge. A second abseil from the trees can be made to the blocky ledge at the start of the route.<br />
FA: G. Frost, I. Kotze 2004/11/28<br />
TBN THE BEAR NECESSITIES 21 <br />
APPROACH<br />
On the right hand side of the Jungle Book crag a large pinnacle with a grey face to the left can be seen.<br />
There is an obvious rightward tending crag, heading <strong>for</strong> some trees on the right hand arête, which makes a<br />
<strong>for</strong>k in the middle of the face. Start at the base of the crack.<br />
1. 22m (21)<br />
<strong>Climb</strong> the crack to a small stance on top of a block with a small tree and a good rail on the left.<br />
2. 28m (19)<br />
<strong>Climb</strong> just above the block then traverse left with the rail <strong>for</strong> feet to below an open book with a jam<br />
crack, to the right of a large detached pillar. <strong>Climb</strong> the open book to a ledge on the right below a small<br />
overhang.<br />
3. 22m (16)<br />
<strong>Climb</strong> up below the overhang then move left onto the arête. <strong>Climb</strong> up the face following a break tending<br />
slightly leftwards to below a small overlap. Traverse right to gain another break then continue up to the<br />
top of the crag.<br />
Note: Pitch 2 is exquisite climbing, a real must do.<br />
FA: G. Frost, I. Kotze 2004/11/27<br />
43
MNR MOTHER NATURE’S RECIPES 18 <br />
APPROACH<br />
On the right hand side of the Jungle Book crag a large pinnacle with a grey face to the left can be seen.<br />
There is an obvious rightward tending crag, heading <strong>for</strong> some trees on the right hand arête, which makes a<br />
<strong>for</strong>k in the middle of the face. The bottom section of the crack, be<strong>for</strong>e the <strong>for</strong>k, is climbed in TBN. This route<br />
starts further to the right just to the left of a ramp where a leftward tending diagonal crack can be seen. This<br />
crack is not obvious when looking from the left of the grey face.<br />
1. 20m (16)<br />
<strong>Climb</strong> the face just to the left of the ramp to a short, shallow corner. Continue up to the leftward tending<br />
diagonal crack which is climbed to a block. <strong>Climb</strong> up the block, using the crack on the left, to a stance<br />
on top (shared with TBN).<br />
2. 30m (18)<br />
<strong>Climb</strong> the rightward tending diagonal crack to a small ledge below the large trees. Traverse right on the<br />
ledges to a blocky recess then up to a stance on the blocks.<br />
3. 30m (scramble)<br />
Scramble up following the blocky recess to the top of the crag.<br />
FA: I. Kotze, G. Frost 2004/11/28<br />
MNR MOTHER NATURE’S NECESSITIES 19 <br />
APPROACH<br />
This a combination of The Bear Necessities and Mother Nature’s Recipes.<br />
Start as <strong>for</strong> Mother Nature’s Recipes.<br />
1. 20m (16)<br />
<strong>Climb</strong> the face just to the left of the ramp to a short, shallow corner. Continue up to the leftward tending<br />
diagonal crack which is climbed to a block. <strong>Climb</strong> up the block, using the crack on the left, to a stance<br />
on top.<br />
2. 28m (19)<br />
<strong>Climb</strong> just above the block then traverse left with the rail <strong>for</strong> feet to below an open book with a jam<br />
crack, to the right of a large detached pillar. <strong>Climb</strong> the open book to a ledge on the right below a small<br />
overhang.<br />
3. 22m (16)<br />
<strong>Climb</strong> up below the overhang then move left onto the arête. <strong>Climb</strong> up the face following a break tending<br />
slightly leftwards to below a small overlap. Traverse right to gain another break then continue up to the<br />
top of the crag.<br />
Note: Pitch 2 is exquisite climbing, a real must do.<br />
FA: I. Kotze, G. Frost 2004/11/28<br />
44
SK SHER KAHN-AGE 18 <br />
APPROACH<br />
This climb starts on the extreme right hand side of the Jungle Book directly behind a large pinnacle. The<br />
climb ascends the crack line marking the abseil route. Start in the right-hand crack line above a ledge and<br />
tree at the base of the abseil route.<br />
1. 35m (18)<br />
<strong>Climb</strong> the right-hand crack to a ledge. Follow the break up to a tree. Move right onto the face and left<br />
again into the small chimney. Follow the easiest line to the top and belay at the large tree.<br />
2. 10m (18)<br />
(One can avoid this pitch by scrambling up the gulley to the right.)<br />
Move up and left across an exposed face to the base of a short corner. Move up the corner to easier<br />
ground. Continue up to top of crag.<br />
FA: M. Sporen, D. Margetts 2007/09/22<br />
45
STAR WARS WALL<br />
TO GET THERE<br />
From the main resort road, drive up to the “Academy” complex following the sign posts to the stables and<br />
airfield. Follow the track up the hill, passing the airfield on the left and the rubbish tip on the right to the<br />
dormitory complex and then park up at the top gate. Pass through the gate (which is sometimes locked)<br />
then turn immediately left through a small gate and follow a vague path to reach the head of a large gully.<br />
Descend this gully to access the routes on the right hand wall.<br />
APPROACH TIME: 20-30 minutes<br />
OR<br />
From the top gate at the “Academy” complex (which is sometimes locked), follow the track up to the pony<br />
kraal. From the gate of the pony kraal, heading in the direction of the Swadini Wall in the distance, walk<br />
towards the NE arête of the buttress. Scramble down to a tree where an abseil reaches the base of the<br />
crag. Star Wars Wall is around the arête to the north.<br />
APPROACH TIME: 25-30 minutes<br />
DESCENT ROUTE<br />
From the top of the routes walk up to the pony kraal on the summit and follow the track down to the gate at<br />
the top of the “Academy”.<br />
JMT JEDI MIND TRICKS 17 <br />
APPROACH<br />
About 100m right of the pinnacle on the north-eastern arête an impressive red open book half way up the<br />
wall with a grey open book below can be seen. Start on the ledge 3m above the ground below the open<br />
books.<br />
1. 30m (17)<br />
<strong>Climb</strong> up the broken face on the right of the ledge, moving left higher up to gain a large ledge. <strong>Climb</strong><br />
the grey open book on the left of the ledge up to where a rail going left to a ledge is reached. Rail left<br />
and belay on the ledge.<br />
2. 20m (15)<br />
<strong>Climb</strong> the face above the ledge up to a gnarly slab. Continue directly up, just to the right of a vague<br />
crack, to a ledge.<br />
3. 30m (16)<br />
<strong>Climb</strong> the corner on the left of the ledge to where a step rightwards can be made to gain some blocks.<br />
<strong>Climb</strong> up tending leftwards below some overhangs to the top of the crag.<br />
FA: G. Frost, N. Hemphill 2004/01/25<br />
46
SB SPACE BALLZ 24 <br />
APPROACH<br />
About 100m right of the pinnacle on the north-eastern arête an impressive red open book half way up the<br />
wall. This route ascends this open book. Start on the ledge 3m above the ground below the open books.<br />
1. 30m (17)<br />
<strong>Climb</strong> up the broken face on the right of the ledge, moving left higher up to gain a large ledge. <strong>Climb</strong> up<br />
the corner on the left hand side of the ledge to where a traverse can be made on a narrow ledge to gain<br />
an easy face on the right. <strong>Climb</strong> up to a large tree and belay.<br />
2. 35m (24)<br />
<strong>Climb</strong> the short ramp leftwards to the open book corner crack system. <strong>Climb</strong> the open book crack<br />
through a few bulges and continue up the crack till one gets to a white bird guano ledge on the left.<br />
Belay from ledge.<br />
3. 15m (17)<br />
Traverse back into the open book crack system and continue up past the bird nest. Pull through a small<br />
roof and move out left to the top.<br />
FA: K. Thrash, I. McMaster 2005/02/19<br />
CT CHEWBACCA’S TRAVERSE 16 <br />
APPROACH<br />
Same as JMT but climbs the face with the large flake to the left of the prominent open book.<br />
1. 25m (13)<br />
<strong>Climb</strong> up the broken face on the right of the ledge. Continue up on broken, vegetated blocks to the right<br />
of the slabs. <strong>Climb</strong> up to a ledge and large tree belay.<br />
2. 25m (16)<br />
From the ledge, move right around the arête to gain a crack behind a large flake. Follow the crack up to<br />
the top of the flake then traverse right to a short chimney. Continue up to a small ledge below a<br />
recessed off-width.<br />
3. 25m (13)<br />
Continue up the recess passing an overhang on the left into an open book. <strong>Climb</strong> up the open book<br />
moving left onto the blocky face above. Continue up on blocky ground to the top of the crag.<br />
FA: G. Frost, D. Margetts 2004/10/16<br />
47
CM CHEWBACCA’S MUSTACHE 19 <br />
APPROACH<br />
Start in the large corner around the buttress to the right of the start of CT. This route aims to climb the crack<br />
line immediately to the right of the flake climbed in CT.<br />
1. 40m (19)<br />
<strong>Climb</strong> up from the base of the corner passing a vegetated ledge to a crack on the right of the corner.<br />
<strong>Climb</strong> the crack moving leftwards higher up, avoiding a steep section, to a ledge below a steep recess.<br />
<strong>Climb</strong> the recess, moving rightwards past a small overhang, to gain a small ledge on the left. <strong>Climb</strong> the<br />
steep, narrow crack on the right hand side of the ledge, passing a small tree, to a small ledge on the<br />
left. <strong>Climb</strong> the face above the ledge diagonally leftwards to gain an off width crack above a tree. <strong>Climb</strong><br />
the off width to a ledge and belay, shared with CT.<br />
2. 25m (13)<br />
Continue up the recess passing an overhang on the left into an open book. <strong>Climb</strong> up the open book<br />
moving left onto the blocky face above. Continue up on blocky ground to the top of the crag.<br />
FA: G. Frost, D. Margetts, J. Viljoen 2008/03/22<br />
HG HANGING GARDENS 19 ☺<br />
APPROACH<br />
To the right of the impressive open book where JMT and CT start, a face with a series of crack systems<br />
appears on the left of a vegetated open book. This route ascends the more prominent of these crack<br />
systems.<br />
1. 18m (18)<br />
<strong>Climb</strong> the crack that ends at a boulder at the foot of a steep chimney.<br />
2. 15m (19)<br />
From the top of the boulder climb the steep chimney then traverse right to gain an obvious ledge.<br />
3. 17m (16)<br />
Traverse leftwards back into the crack. <strong>Climb</strong> the off-width up to a large ledge.<br />
4. 25m (12)<br />
Traverse left <strong>for</strong> about 4m then scramble to the top of the crag.<br />
FA: I. Kotze, D. Ferreira 2004/10/16<br />
48
PM THE PHANTOM MENACE 20 A1 ☺<br />
APPROACH<br />
Continue down from JMT passing under the prominent prow above on the next arete. To the right of the<br />
prow a large, a vegetated gully can be seen extending the height of the crag. Just to the left of the gully a<br />
rightward facing corner with a good crack can be seen going up to a ledge on the left and chimney above.<br />
Start on the blocky ledge below the corner a few meters above the ground (short scramble).<br />
1. 25m (17)<br />
<strong>Climb</strong> up the corner, moving rightwards to bypass an obstacle near the bottom, following the crack to<br />
the overhang which caps the corner. Move leftwards to gain the ledge then continue up and leftwards to<br />
the ledge on the right of the off-width chimney.<br />
2. 22m (20 A1)<br />
<strong>Climb</strong> up the overhanging section at the base of the off-width chimney. Continue up the off-width<br />
chimney to an overhang above. Pull through the break on the right to gain a crack which is followed to a<br />
narrow ledge on the right. <strong>Climb</strong> onto the ledge then ascend the corner above to gain a good ledge on<br />
the left.<br />
3. 50m (14)<br />
Continue up the crack in the face above<br />
the ledge, moving leftwards onto the<br />
gnarly face. Tending leftwards towards the<br />
arête, continue up the face and<br />
subsequent slab to a large boulder above<br />
on the right of a gully. <strong>Climb</strong> up the<br />
boulder to gain the blocky face<br />
above and continue up to the top of the<br />
crag.<br />
FA: G. Frost, M. Sporen 2006/09/09<br />
DS DARK SPADER 18 <br />
49<br />
Gareth and Mike on the summit of “The Phantom Menace“<br />
APPROACH<br />
Continue down from JMT passing under the prominent prow above and then around the next corner to<br />
where a very large tree is growing up against the cliff. Start in the corner about 3m left of the tree.<br />
1. 30m (17)<br />
<strong>Climb</strong> up on broken rock <strong>for</strong> about 5m. Traverse right <strong>for</strong> about 2m to get into a crack system. <strong>Climb</strong> the<br />
crack through the roof and continue up to a ledge.<br />
2. 25m (18)<br />
Continue up the crack behind the ledge avoiding the small roof on the left. Continue up to the large<br />
“wobbly” block and belay.<br />
3. 30m (18)<br />
Continue up the crack avoiding some loose blocks. Traverse about 2m right to gain the right-hand<br />
tending crack system. Follow this to the tree and top of the crag.<br />
FA: I. McMaster, K. Thrash 2004/10/16
RS REVENGE OF THE SMURF 19 <br />
APPROACH<br />
Continue down from JMT passing under the prominent prow above and then around the next corner to<br />
where a very large tree is growing up against the cliff. Start at the tree. The route climbs an obvious<br />
rightward facing open book and subsequent recess higher up and to the right of the start of the route.<br />
1. 25m (17)<br />
<strong>Climb</strong> the face directly up from the tree tending slightly rightwards to below the rightward facing open<br />
book with a vine above. <strong>Climb</strong> the crack up to the open book then move rightwards passing a small<br />
overhang and continue up passed the vine to where the open book steepens. Traverse rightwards then<br />
climb up to a good ledge with a tree and belay.<br />
2. 15m (18)<br />
<strong>Climb</strong> the chimney at the back of the ledge <strong>for</strong> a short distance until a traverse ledge leading leftwards<br />
can be taken around the arête and into the open book with a good hand crack. <strong>Climb</strong> the corner up to a<br />
large ledge below a steep corner and belay.<br />
3. 45m (19)<br />
From the right most extremity of the ledge, climb up the steep face on the arête then tend leftwards<br />
back into the corner bypassing its steepest section. Continue up the corner to a narrow blocky ledge on<br />
the right. <strong>Climb</strong> up into an easy recess. Follow the recess then move leftwards under an overhanging<br />
section to another easy recess on the left which is followed to the top of the crag.<br />
FA: G. Frost, D. Margetts 2006/11/04<br />
SW STAR WHORES 21 <br />
APPROACH<br />
To the right of the very large tree at the start of DS, a large boulder is situated at the base of the cliff. The<br />
route starts on a small ledge just to the right of the boulder below a recess.<br />
1. 25m (14)<br />
<strong>Climb</strong> up the recess, moving leftwards onto a short face which leads to a large ledge system higher up.<br />
Belay on the second tier of the ledge on the left hand side.<br />
2. 45m (21)<br />
Move left from the stance into a niche below a wide crack in an open book corner. <strong>Climb</strong> up the corner<br />
to a sloping ledge where a prominent crack is seen in the right hand face of the open book. <strong>Climb</strong> the<br />
crack to where it widens below a small overhang. Pass the overhang to the right and onto a flake then<br />
climb up onto the top of the flake. Traverse leftwards back to the open book. Follow the crack up to a<br />
niche and belay ledge.<br />
3. 25m (16)<br />
<strong>Climb</strong> up above the stance to the small overhang. <strong>Climb</strong> rightwards passing the overhang then tend<br />
leftwards and up to a small ledge on the left of the big roof. <strong>Climb</strong> up the recess a short way until a foot<br />
ledge on the right hand side can be traversed rightwards to a break in the face. <strong>Climb</strong> the break,<br />
tending slightly rightwards, to the top of the crag.<br />
FA: G. Frost, G. Lowther 2005/04/16<br />
50
DSF THE DAFT SIDE OF THE FARCE 19 <br />
APPROACH<br />
About 30m to the right of SW, a prominent blocky face leading up into a recess with a tree at its base can<br />
be seen. Higher up a distinct open book can be seen. Start below the block face.<br />
1. 35m (17)<br />
<strong>Climb</strong> up the blocky face to a tree then move rightwards onto a short face. <strong>Climb</strong> up then move<br />
leftwards to below the recess/chimney. <strong>Climb</strong> up then step leftwards to climb up a bulgy face to below a<br />
ledge at the base of a corner on the left.<br />
2. 45m (19)<br />
<strong>Climb</strong> the corner up to the next blocky ledge. <strong>Climb</strong> the open book on the right of the ledge moving<br />
leftwards in a crack higher up to another smaller ledge. Move leftwards into the main corner then climb<br />
up to the overhang. Exit through the left break of the overhang into a short corner. <strong>Climb</strong> the corner<br />
exiting rightwards to a good ledge.<br />
3. 30m (16)<br />
<strong>Climb</strong> the bulgy face on the right hand side of the ledge to another ledge below an overhang. Traverse<br />
rightwards below the overhang around the arête to a wide crack system. <strong>Climb</strong> up the crack to a ledge<br />
then continue up passing a series of ledges and bulges to the top.<br />
FA: G. Frost, D. Margetts, M. Sporen 2005/12/16<br />
YRH YOUR ROYAL HARNESS 18 ☺<br />
APPROACH<br />
The right hand central portion of the crag is dominated by large overhangs and to the left of this a section<br />
the lower layers start being composed of brown, polished rock and the lines look less impending. To the left<br />
of the arête climbed in BF, an obvious leftward tending series of steps can be seen in the face. Start below<br />
these steps.<br />
1. 25m (17)<br />
<strong>Climb</strong> the stepped ledges, tending leftward, then pull through the recess up to a ledge. Scramble<br />
leftwards and climb the open book <strong>for</strong> 2m then traverse leftwards on the face to the other side of the<br />
arête where a good stance is found.<br />
2. 40m (18)<br />
<strong>Climb</strong> the easy off-width to a ledge then climb up tending leftwards following the easier line to gain a<br />
ledge with a crack on the right and an arête on the left. <strong>Climb</strong> the arête to a large ledge.<br />
3. 30m (17)<br />
<strong>Climb</strong> the corner crack system <strong>for</strong> 20m and then 10m of dirty slab until a com<strong>for</strong>table belay stance.<br />
4. Scramble<br />
Ascend rightwards up a gully to the top of the crag.<br />
FA: H. Tillwick, G. Lowther 2005/06/17<br />
51
BF BANTHA FODDER 17 <br />
APPROACH<br />
Start as <strong>for</strong> MCY but the route will traverse leftwards above the overhangs from the open book towards the<br />
arête.<br />
1. 25m (17)<br />
<strong>Climb</strong> up the ledges that lead to the start of the open book. <strong>Climb</strong> the open book until the rock in the<br />
corner deteriorates and an obvious traverse can be made to the left onto a ledge above the first<br />
overhang. <strong>Climb</strong> up the short face moving leftwards to exit onto a good ledge.<br />
2. 35m (17)<br />
<strong>Climb</strong> the face on the right of the ledge to a block ledge. Move rightwards to the arête then climb up the<br />
face close to the arête continuing up to a ledge higher up on the left. Traverse leftwards on a small<br />
ledge to the main recess then climb up to a ledge on the right (shared with 2 nd stance of MCY).<br />
3. 50m (16)<br />
Same as <strong>for</strong> pitch 3 of MCY.<br />
<strong>Climb</strong> the face, starting directly behind the tree, tending slightly rightwards away from the large<br />
vegetated corner. Continue upwards to an obvious, short open book on the left of the arête. <strong>Climb</strong> the<br />
open book, exiting leftwards then ascend the short gully to the top of the crag.<br />
FA: G. Frost, D. Margetts, N. Hemphill, M. Sporen 2005/12/17<br />
MCY MAY THE CHEESE BE WITH YOU 16 ☺<br />
APPROACH<br />
The right hand central section of crag is dominated by large red overhangs. Just to the left of where the<br />
overhangs end and shortly be<strong>for</strong>e rounding an arête, an obvious break can be seen going up a dominant<br />
recessed corner. There are a series of overhangs to the left of the base of the corner. Start below this break<br />
on the ledges immediately below the start of the open book.<br />
1. 40m (15)<br />
<strong>Climb</strong> up the ledges that lead to the start of the open book. <strong>Climb</strong> the open book until the rock in the<br />
corner deteriorates and an obvious traverse can be made to the right. <strong>Climb</strong> the next recess, to the<br />
right of the corner, up to a large ledge and tree belay.<br />
2. 15m (16)<br />
Move left from the stance into the chimney. <strong>Climb</strong> the chimney and exit left then climb up onto a ledge.<br />
<strong>Climb</strong> the break on the left of the ledge, taking care on the loose ground, then up to another ledge and<br />
tree belay.<br />
3. 50m (16)<br />
<strong>Climb</strong> the face, starting directly behind the tree, tending slightly rightwards away from the large<br />
vegetated corner. Continue upwards to an obvious, short open book on the left of the arête. <strong>Climb</strong> the<br />
open book, exiting leftwards then ascend the short gully to the top of the crag.<br />
FA: G. Frost, K. Schmidt, N. Hemphill 2005/06/17<br />
52
LM LEIA’S MANTLE 19 <br />
APPROACH<br />
Scramble down the gully on the southern side of Star Wars Wall. The first large feature is a right leaning<br />
chimney that reaches <strong>for</strong> the length of the crag. Next is a large gully like feature with a lot of vegetation.<br />
Just to the left of the gully is a grey buttress that is slightly impending. On the left hand edge of this is a<br />
sandy shelf with a tree that is convenient to belay off. Just left of the ledge is a very clean open book.<br />
1. 30m (16)<br />
About 7 meters up is a small wide roof. Start below this roof and head diagonally up left towards the<br />
arête. Pass the overhang on the left. Head up a further leftwards until a com<strong>for</strong>table position is reached<br />
on the arête. Follow the arête upwards towards a large com<strong>for</strong>table ledge with a large block below an<br />
open book. Take a stance.<br />
2. 30m (19)<br />
Traverse 2 meters left of the ledge to a crack. <strong>Climb</strong> the crack until it ends. Then climb straight up to a<br />
ledge and belay.<br />
3. 30m (16)<br />
<strong>Climb</strong> up on the left hand edge of the ledge. <strong>Climb</strong> a short open book, then step slightly right and follow<br />
the gully to another ledge where a big flake leans against the face. <strong>Climb</strong> up behind the flake. Then go<br />
<strong>for</strong> the top minding some of the lose rock.<br />
FA: I. Kotze, G. Terrell, R. van der Wiel 2004/11/20<br />
PAJ PARTY AT JUBBAH’S 18 <br />
APPROACH<br />
Scramble down the gully on the southern side of Star Wars Wall. Follow a vague path on the right of the<br />
gully. After a steep section the path meets the cliff face. Here a large tree up on the cliff with roots and<br />
stems growing against the rock face can be seen. To the left of the tree the rock face opens up to reveal a<br />
grey face with ledges and a grassy crack above the uppermost ledge where the face begins to steepen.<br />
Above the crack a series of recessed open books can be seen with overhangs on the left. Start below the<br />
grey face.<br />
1. 35m (18)<br />
<strong>Climb</strong> the grey face, past a small grassy ledge just off the ground, to a ledge with a tree on the left<br />
below the grassy crack. <strong>Climb</strong> the crack to a good ledge and belay below an open book.<br />
2. 28m (17)<br />
<strong>Climb</strong> the open book to a small ledge on the right with a tree. Traverse leftwards around the arête to<br />
below another corner. <strong>Climb</strong> up the corner then move left up a crack to another corner. <strong>Climb</strong> the<br />
corner exiting rightwards to a big ledge and tree belay.<br />
3. 23m (17)<br />
<strong>Climb</strong> the obvious open book going up from the left of the ledge. At the top of the open book climb the<br />
juggy face on the left up to a blocky ledge and belay.<br />
4. 10m (Scramble)<br />
From the ledge scramble to the top of the crag.<br />
Note: Pitch 1 is sparsely protected <strong>for</strong> the first 10m to the ledge with the tree below the grassy crack. Pitch<br />
2 and 3 produces some excellent climbing on good rock.<br />
FA: M. Sporen, G. Frost 2004/12/18<br />
53
THE LIBRARY<br />
TO GET THERE<br />
Park at the upper lookout point then walk back along the road to the dirt track that breaks off to the right.<br />
Follow this up the hill, past the dormitory complex on the right, to the fence. Go through the gate and<br />
immediately turn left to walk through the bush past a small cemetery on the right. Continue up the short hill<br />
heading slightly rightwards to a big fence. Follow the fence rightwards to where it ends then cross over to<br />
the other side and walk along the top of the cliff band following it to its furthest point.<br />
Walk down the hill to the right of the summit, avoiding the bushes and head directly down the ridge <strong>for</strong> the<br />
furthest point of the plateau on the next tier down. The descent ramp is located to the right of this.<br />
APPROACH TIME: 45 minutes<br />
DESCENT ROUTE<br />
Descend the bushy ramp following the cliff band rightwards around the arête.<br />
From the top of the climbs, take the same route back to the car park as was used in the approach.<br />
PR PAPERBACK ROMANCE 18 <br />
APPROACH<br />
From the bottom of the descent ramp, just around the first arête, an obvious, curved chimney higher up the<br />
crag can be seen on the right hand facing wall. To the right of this feature is a steep, vegetated open<br />
book/gully. To the right of the gully is a face with a flake on it about half way the wall. Start below the<br />
broken face slightly to the right of the flake above.<br />
1. 45m (18)<br />
<strong>Climb</strong> up the broken face tending slightly rightwards to break through the first rock band then climb<br />
diagonally leftwards to the right hand edge of the flake. Pull through the small overhang to gain the<br />
crack which is followed to a sloping ledge below a shallow recessed corner. Continue up to a ledge with<br />
a tree.<br />
2. 25m (18)<br />
<strong>Climb</strong> the open book, with a jam crack, above the stance to the top of the crag.<br />
FA: G. Frost, D. Margetts 2005/02/19<br />
54
RONDAWEL VIEW<br />
TO GET THERE<br />
Rondawel Lookout Complex are the crags below the Three Rondawels lookout point. Drive south out of the<br />
resort towards Graskop, turn left after a little way to the lookout point. Park at the cul-de-sac where the<br />
tourists go (toilets and water available here).<br />
Three sections are found here and all are gained from the same gully. Walk in a north-westerly direction<br />
towards the resort following some beacons that lead to the edge of the cliff band. Here a descent is found<br />
through a hole under a boulder at the cliff edge.<br />
From the decent gully turn right and head out along the cliff band to the far arête and turn the corner.<br />
APPROACH TIME: 35-45 minutes<br />
DESCENT ROUTE<br />
These routes finish at the top of the crag at the tourist view spots.<br />
Local climber at the RONDAWEL VIEW crag<br />
55
AA ASHEN AWARENESS 18 ☺<br />
APPROACH<br />
To the left of GOT a large dark red corner capped by roofs can be seen. The roof directly above the corner,<br />
at the top of the crag, is a large projecting spike with a break to its left and vague break to its right. This<br />
route climbs the corner and takes the right break past the roof.<br />
1. 55m (18)<br />
<strong>Climb</strong> the corner <strong>for</strong> a few meters until able to move left to a crack in the left face of the corner. <strong>Climb</strong><br />
the crack and left arête to where the crack dies then step back right in to the corner. <strong>Climb</strong> the corner<br />
until about 10m below a ledge. A foot ledge runs off to the right, traverse right and climb the face using<br />
the right arête to a chossy ledge. <strong>Climb</strong> the corner to a small stance at the base of a large pillar.<br />
2. 40m (18)<br />
<strong>Climb</strong> the crack on the right side of the pillar. Traverse left across loose blocks on top of the pillar and<br />
climb the left hand break above, through the first small overhang. Traverse right to the obvious escape<br />
ramp and climb the easy face, tending rightwards to a small plat<strong>for</strong>m. Continue rightwards to a good<br />
ledge. <strong>Climb</strong> the corner above the ledge until able to step left around the arête on good holds. Continue<br />
up to a large ledge.<br />
3. 20m (13)<br />
<strong>Climb</strong> the easy break to the top of the cliff.<br />
FA: H. Pringle, A. Kock 2002/12/06<br />
GOT GET ON TOP 18 <br />
APPROACH<br />
Descend gully to the right and walk along the base around the corner to the complex of crags facing the<br />
Three Rondawels to the east. Continue along the base of this crag around another buttress corner further<br />
along. Continue past a grassy grey south facing slab. To the left of this slab the start of some dark<br />
overhanging rock can be seen. Just to the right of these a break is seen starting just left of an overhanging<br />
bulge at the base of the cliff. Start in the recess left of the bulge.<br />
1. 15m (12)<br />
<strong>Climb</strong> up the grassy recess moving right higher past blocky ledges to a good ledge higher below an<br />
open book.<br />
2. 25m (16)<br />
<strong>Climb</strong> the crack in the short face on the right of the ledge then move left into the open book. <strong>Climb</strong> the<br />
open book exiting left higher onto the arête. Continue up a short way then move back right across the<br />
corner. Pass blocky ledges to a good ledge higher below a short corner.<br />
3. 48m (18)<br />
<strong>Climb</strong> the short corner moving left under the overhang to the arête. Continue up the juggy face tending<br />
leftwards to the recess. <strong>Climb</strong> the recess passing steeper ground to a grassy ledge.<br />
4. 20m (12)<br />
Move right on the ledge then climb the grassy break to the top.<br />
FA: H. Pringle, G. Frost, A. Grant 2001/09/01<br />
56
DB DOWNWARD BOUND 19 <br />
APPROACH<br />
This route <strong>for</strong>ms a variation to GOT <strong>for</strong> the first pitch and a half. It also shares a start with NFH.<br />
Descend gully to the right and walk along the base around the corner to the complex of crags facing the<br />
Three Rondawels to the east. Continue along the base of this crag around another buttress corner further<br />
along. Continue past a grassy grey south facing slab. About 50m to the left of this slab a large pillar is seen<br />
<strong>for</strong>ming a chimney with the wall. The pillar chimney overhangs on the right. Start to the left of the large pillar<br />
at the base of a large recess.. A large off-width crack can be seen on the left hand wall of the corner <strong>for</strong>med<br />
by the pillar and the main wall.<br />
1. 40m (19)<br />
<strong>Climb</strong> the recess to the base of the large off-width on the left. Traverse left to the arête on good foot<br />
grips. <strong>Climb</strong> the arête and step right onto the face. Continue up the face just left of a grassy crack to a<br />
good ledge (shared with 2 nd pitch of GOT).<br />
2. 50m (17)<br />
<strong>Climb</strong> the break from the right edge of the ledge on steep rock. Step left at 20m on good holds and<br />
continue traversing diagonally leftwards to the corner. Continue up the corner (shared with 3 rd pitch of<br />
GOT) to a stance on the large grassy ledge.<br />
3. 20m (12)<br />
Move right on the ledge then climb the grassy break to the top (shared with 4 th pitch of GOT).<br />
FA: H. Pringle, J. Pierce 2002/03/31<br />
NFH NO FAIRIES HERE 19 <br />
APPROACH<br />
Descend gully to the right and walk along the base around the corner to the complex of crags facing the<br />
Three Rondawels to the east. Continue along the base of this crag around another buttress corner further<br />
along. Continue past a grassy grey south facing slab. About 50m to the left of this slab a large pillar is seen<br />
<strong>for</strong>ming a chimney with the wall. The pillar chimney overhangs on the right. Start to the left of the large pillar<br />
at the base of a large recess. A large off-width crack can be seen on the left hand wall of the corner <strong>for</strong>med<br />
by the pillar and the main wall.<br />
1. 25m (17)<br />
<strong>Climb</strong> the corner <strong>for</strong>med by the pillar and the main wall. Pass a tree and continue up rightwards to<br />
belay at the base of a big chimney.<br />
2. 35m (19)<br />
Chimney up keeping close to the arête. <strong>Climb</strong> the face above the chimney moving left to stay on the<br />
juggy rock. Where the wall steepens move right to a small corner with a short off-width above. <strong>Climb</strong><br />
the off-width to a small ledge.<br />
3. 30m (18)<br />
<strong>Climb</strong> the crack at the left edge of the ledge. Move right beneath a large flake (may be loose) and<br />
continue up a vague corner to a small triangular roof. Step left around the roof and continue up tending<br />
rightwards to a large ledge.<br />
4. 20m (12)<br />
<strong>Climb</strong> a recess to summit (same as <strong>for</strong> CTD)<br />
FA: H. Pringle, D. Cullinan, D. Wright 2001/12/04<br />
57
CTD CRACK TEST DUMMIES 21 <br />
APPROACH<br />
Descend gully to the right and walk along the base around the corner to the complex of crags facing the<br />
Three Rondawels to the east. Continue along the base of this crag around another buttress corner further<br />
along. Continue past a grassy grey south facing slab. About 50m to the left of this slab a large pillar is seen<br />
<strong>for</strong>ming a chimney with the wall. The pillar chimney overhangs on the right. Start in the recess below the<br />
overhanging chimney.<br />
1. 15m (17)<br />
<strong>Climb</strong> the corner on the right of the recess moving left onto the face then up to a large ledge and tree.<br />
2. 40m (18)<br />
<strong>Climb</strong> the wide corner on the left of the ledge. Stem up the chimney until it widens then move onto the<br />
crack system in the face. <strong>Climb</strong> up then traverse right on a good rail to another crack. Continue up the<br />
cracks to the start of the bottomless chimney. Chimney up heading rightwards to exit through a hole<br />
onto a good ledge on top of the pillar.<br />
3. 35m (21)<br />
<strong>Climb</strong> the slab above the mid point of the ledge to a rail. <strong>Climb</strong> up then traverse right using the rail <strong>for</strong><br />
feet around the arête to gain a corner. <strong>Climb</strong> the corner to a small ledge and tree. Continue up the jam<br />
crack in the corner behind the tree to a blocky pillar. Move left around the arête then climb the juggy<br />
face to a grassy ledge.<br />
4. 20m (15)<br />
<strong>Climb</strong> the break above the ledge moving left on a ledge. Continue up the blocks then pull the small<br />
overhang to the top.<br />
FA: G. Frost, H. Pringle, A. Grant 2001/09/01<br />
58
BB BURNING BRIDGES 21 A0 ☺<br />
APPROACH<br />
This routes starts in the same place as CTD.<br />
Descend gully to the right and walk along the base around the corner to the complex of crags facing the<br />
Three Rondawels to the east. Continue along the base of this crag around another buttress corner further<br />
along. Continue past a grassy grey south facing slab. About 50m to the left of this slab a large pillar is seen<br />
<strong>for</strong>ming a chimney with the wall. The pillar chimney overhangs on the right. Start in the recess below the<br />
overhanging chimney.<br />
1. 10m (15)<br />
<strong>Climb</strong> the wide recess with chock-stones in it on the left below the chimney above. <strong>Climb</strong> passed the<br />
vegetation to a tree at the back of the ledge.<br />
2. 45m (21)<br />
<strong>Climb</strong> the corner on the right of the ledge up to an overhanging bulge. Traverse right with difficultly to a<br />
large, acute open book. Continue up this open book passing a series of three overhangs to a small<br />
ledge with a tree.<br />
3. 7m (18)<br />
Continue up the corner at the back of the ledge to a better ledge with a tree.<br />
4. 20m (20 A0)<br />
<strong>Climb</strong> up the left corner at the back of the ledge (the right corner is off-width) <strong>for</strong> a few meters until the<br />
crack peters out. Tension-traverse right to the off-width. Continue up this corner to below an overhang.<br />
Exit the overhang to the right then climb up passed grassy ledges to a large ledge.<br />
5. 20m (18)<br />
<strong>Climb</strong> up the obvious jam-crack on the right of the ledge. Tend rightwards to easier blocks then climb<br />
the break to the top.<br />
FA: G. Frost, A. Grant 2002/03/31<br />
STPP SQUATTING TIGER PANTING PENGUIN 22 A1 ☺<br />
APPROACH<br />
Descend gully to the right. Walk along the base past the corner to the Rondawel View complex. Continue<br />
along the base passing the “flat rock” around an arête until a large grey slab pillar is seen. Start on the left<br />
of this pillar blow a very direct crack line in the wall.<br />
1. 15m (17)<br />
<strong>Climb</strong> the slab face to a tree in the corner below a chimney with a crack in the wall on the left.<br />
2. 27m (18 A1)<br />
<strong>Climb</strong> the crack with stemming moves on the chimney arête to a small ledge on the arête. Gain the thin<br />
crack in the wall and using aid and some free climbing higher continue up to a niche belay below an offwidth.<br />
3. 27m (22 A0)<br />
Continue directly up from the stance climbing the off-width to a sloping ramp. Continue up the ramp the<br />
base of an overhanging off-width chimney. Stem up placing gear in a crack on the left inside the offwidth.<br />
Exit left and continue past a niche to a good ledge above.<br />
4. 45m (17)<br />
<strong>Climb</strong> through the overhang break on the left of the stance. Continue up to just below the next<br />
overhang then step left to gain the arête. <strong>Climb</strong> a short face then move left around the arête continuing<br />
up on easier ground to the top of the crag.<br />
FA: H. Pringle, G. Frost, A. Grant 2001/06/30<br />
59
BWB BUGGERED WITHOUT THE BUSH 22 ☺<br />
APPROACH<br />
Descend gully to the right and walk around to the Rondawel View complex. Walk past the “flat rock” and<br />
around the next arête. The route starts at the base of three cracks splitting the face on the right of a<br />
prominent corner. Begin just to the left of a tree growing out of the rock a few meters up.<br />
1. 25m (20)<br />
<strong>Climb</strong> broken cracks moving slightly right above the tree, climb the middle crack using the others where<br />
necessary. Move right higher up to a small ledge.<br />
2. 20m (22)<br />
<strong>Climb</strong> the crack directly above the stance. Continue up on harder ground to gain a cubbyhole. Break<br />
through the overhang to the left above the cubbyhole then traverse diagonally left and up across a short<br />
face to gain a small niche and crack on the left. Continue up the crack to a sloping stance below a<br />
steep off-width.<br />
3. 20m (16)<br />
Stem up the off-width keeping left. Avoiding loose rock climb a short corner to a good stance on the<br />
right.<br />
4. 30m (14)<br />
<strong>Climb</strong> up to the overhang above the right of the ledge. Move around this to the left. Continue up broken<br />
ground to the top.<br />
FA: H. Pringle, N. McKenzie 2001/06/23<br />
MR MOJO RISING 18 <br />
APPROACH<br />
Descend gully to the right and walk around to the Rondawel View complex. Walk past the “flat rock” to the<br />
next corner. Start in the corner below a large tree higher up.<br />
1. 10m (15)<br />
<strong>Climb</strong> the recess in the corner passing the tree on the right to a ledge.<br />
2. 35m (16)<br />
Continue up the corner above the ledge and when able to, traverse left across the face to gain a groove<br />
above the tree. <strong>Climb</strong> the groove to a ledge and tree. Continue up the face past a series of small ledges<br />
to the top of the buttress.<br />
3. 35m (18)<br />
<strong>Climb</strong> up using a flake to a corner on the left higher up. Move slightly right onto the face and up to an<br />
overhang. Pull the overhang then continue up a recessed corner to a ledge system. <strong>Climb</strong> up to below<br />
an overhang on the left arête, step left onto the face and continue up to a large ledge.<br />
4. Scramble up to the top and belay at the view point fence.<br />
FA: G. Frost, D. Margetts 2001/06/23<br />
60
VP VAGABOND PRINCES 18 ☺<br />
APPROACH<br />
Descend gully to the right and walk around to the Rondawel View complex. Walk to the “flat rock” at the<br />
base of the wall on the left of a steep gully. Start below the start of a left leaning ramp higher up on the left<br />
of the “flat rock”.<br />
1. Scramble up the grassy face to a ledge at the start of the ramp.<br />
2. 30m (15)<br />
<strong>Climb</strong> up a grassy start to the ramp on the left. <strong>Climb</strong> up the ramp to the start of a crack system in the<br />
main face. <strong>Climb</strong> the cracks to a belay on the left above a tree.<br />
3. 36m (17)<br />
<strong>Climb</strong> the face on the right of the steep corner above the stance. <strong>Climb</strong> up to the vegetated recessed<br />
corner and continue up, moving right higher to avoid a bush, to a tree belay below a chimney.<br />
4. 30m (18)<br />
Chimney up above the tree to a small ledge below an off-width. Stem up to gain the jam crack at the<br />
top of the off-width. <strong>Climb</strong> up to a small ledge system below some overhangs. <strong>Climb</strong> directly up to<br />
below the break in the overhang with a tree above. Pull through the break passing the tree on the left<br />
and up to a small ledge. <strong>Climb</strong> the face to a grassy ledge.<br />
5. 25m (14)<br />
<strong>Climb</strong> a small break and blocky cracks to where a short traverse left can be made to avoid the<br />
overhang. Scramble up to a belay on the top of the crag.<br />
FA: G. Frost, N. McKenzie 2001/05/31<br />
TGR THE GARDEN ROUTE 17 ☺<br />
APPROACH<br />
Descend gully to the right and walk around to the Rondawel View complex. Be<strong>for</strong>e the start of VP at the<br />
“flat rock” a large crack can be seen about 10m up from the ground in the face. This leads up to a broken<br />
crack system below a large overhang. On the right is a vegetated recess that can be seen going to the top.<br />
This route ascends that recess.<br />
1. 50m (15)<br />
Start up the face just to the right and below the large crack. <strong>Climb</strong> up tending left to the start of a left<br />
facing corner with grey lichen on it. <strong>Climb</strong> up this corner passing the large crack which is to the left. At a<br />
small ledge follow a leftward leaning ramp corner and at the top of this step right onto a small ledge and<br />
belay.<br />
2. 45m (17)<br />
From the stance traverse right to the gully recess. <strong>Climb</strong> up passing a short layback crack to a recess.<br />
Follow this recess passed trees to the base of a large chimney. <strong>Climb</strong> this exiting right onto a large<br />
ledge and belay.<br />
3. 20m (10)<br />
<strong>Climb</strong> up some blocks at the stance then scramble to some trees on the right at the top.<br />
FA: G. Frost, B. Nicholson 2003/02/15<br />
61
LAKE VIEW RIGHT<br />
TO GET THERE<br />
Rondawel Lookout Complex are the crags below the Three Rondawels lookout point. Drive south out of the<br />
resort towards Graskop, turn left after a little way to the lookout point. Park at the cul-de-sac where the<br />
tourists go (toilets and water available here).<br />
Three sections are found here and all are gained from the same gully. Walk in a north-westerly direction<br />
towards the resort following some beacons that lead to the edge of the cliff band. Here a descent is found<br />
through a hole under a boulder at the cliff edge.<br />
Turn right at the bottom of the gully.<br />
APPROACH TIME: 10-15 minutes<br />
DESCENT ROUTE<br />
Most of these routes finish on top of semidetached buttresses with bushy gullies separating them from the<br />
main crag. Scramble across the gullies back up to the main crag then traverse back rightwards towards the<br />
descent gully.<br />
BM BLUE MERCURY 20 <br />
APPROACH<br />
Descend the gully, turn right and walk along the base of Lake View Crag until the last buttress be<strong>for</strong>e the<br />
corner turns right to Rondawel View Crag. This buttress is characterized by a large triangular overhang<br />
<strong>for</strong>ming a flake above midway up on the left. There is a grotty gully-crack at the base of the buttress.<br />
1. 25m (14)<br />
<strong>Climb</strong> the crack just to the left of the gully-crack. Move around onto the small arête where the rock<br />
steepens and continue up the face to a belay at a tree just right of the flake overhang.<br />
2. 26m (20)<br />
Step left from the stance to underneath the flake overhang. A dassie traverse left will gain the left edge<br />
of the flake. Follow the flake up and right to the base of a short corner below a second triangular<br />
overhang. Move up the corner then pull the overhang to gain a rightward tending crack. Continue up<br />
the crack to a stance on top of a boulder below some overhangs.<br />
Decent: climb right and down to an abseil off a tree on a ledge below the stance.<br />
Note: the opening party did not top out on this route.<br />
FA: G. Frost, A. Grant, H. Pringle 2001/07/01<br />
SE SUNDAY EXPRESS 18 <br />
APPROACH<br />
Shares the same start as BM.<br />
1. 25m (14)<br />
Shares the same 1 st pitch of BM but belay below the corner on the right of the overhang flake.<br />
2. 23m (18)<br />
Ascend the corner above the belay and exit right to below an overhang. Pull the overhang and continue<br />
up the crack to a stance on a ledge behind a tree.<br />
Note: The opening party did not top out on this route but abseiled off the tree on the top of pitch 2.<br />
FA: G. Frost, A. Grant, H. Pringle 2001/07/01<br />
62
W WASSANME 18 <br />
APPROACH<br />
Shares the same start as BM.<br />
1. 40m (12)<br />
<strong>Climb</strong> the face above the block-ledge to the gully-crack. Continue up the gully-crack to easier ground<br />
on a gnarly face. Pass a vegetated ledge and climb up another gnarly face to a higher ledge below an<br />
open book.<br />
2. 20m (18)<br />
<strong>Climb</strong> the open book exiting right at the top. <strong>Climb</strong> up to a ledge then traverse left to a belay in a corner<br />
behind a tree.<br />
3. 20m (10)<br />
Continue up the corner on easy ground passing a crack and blocks to the top.<br />
FA: D. Margetts, G. Devine, G. Frost 2002/03/03<br />
SR SEPARATE REALITY 17 <br />
APPROACH<br />
Start on the ledge to the right of the block ledge used in W, BM and SE.<br />
1. 45m (16)<br />
<strong>Climb</strong> up a block to the base of a pillar on the right of a steep crack in the face. <strong>Climb</strong> to the top of the<br />
pillar then mantle left to a small ledge. <strong>Climb</strong> up the face on the right to a short corner. Traverse right to<br />
better holds then up to a vegetated ledge. Continue up a gnarly face to a ledge higher up.<br />
2. 30m (17)<br />
<strong>Climb</strong> directly above the ledge on a face to a foot ledge. Traverse right on the ledge to a hand crack.<br />
<strong>Climb</strong> the crack to below an overlap. Move right under the overlap then pull up onto the face. <strong>Climb</strong> the<br />
gnarly face with cracks to a belay on some blocks at the top.<br />
FA: G. Frost, D. Margetts, G. Devine 2002/03/03<br />
AIMC I TJEKED AN ALIEN IN MY COFFIN 17 ☺<br />
APPROACH<br />
Descend gully, turn right and walk along the base until passing below a large boulder. Walk back up to the<br />
crag to where a large pillar half the high of the crag sit up against the wall. An obvious groove leads up from<br />
the pillar. A steep gully is right of the pillar and face.<br />
1. 45m (17)<br />
Start on the right of the pillar base. <strong>Climb</strong> the recessed corner and exit left below an overhang. <strong>Climb</strong><br />
up following a series of ledges and faces past a vegetated ledge to a higher ledge and belay.<br />
OR<br />
1. 45m (17)<br />
Start a few meters left of the pillar base’ arête below a crack that goes up to a roof. <strong>Climb</strong> the crack and<br />
move left under the roof then up to a ledge. <strong>Climb</strong> up tending leftwards to ascend a corner and then a<br />
break in the steeper part just right of the arête. Continue up a face past a vegetated ledge to a higher<br />
ledge and belay.<br />
2. 30m (16)<br />
<strong>Climb</strong> up to the groove on the left of the ledge with a wide crack on the right higher up. <strong>Climb</strong> the<br />
recess to below the wide crack then move right onto the a gnarly face and continue up to the top.<br />
FA: D. Margetts, G. Frost 2001/06/23<br />
63
HSG HORROR SHOW GROODIES 20 ☺<br />
APPROACH – AUSSIE PINNACLE<br />
Descend gully to the right. Walk along the base until a prominent pinnacle is seen on the left of a steep<br />
gully. This pinnacle is characterized by a large crack in the middle of the face on the right of an open book<br />
and has a thinner crack just to its right. This route climbs the open book.<br />
1. 30m (20)<br />
<strong>Climb</strong> up stacked blocks to a crack. Continue up the crack to a ledge below the corner. <strong>Climb</strong> the<br />
corner to a sloping ledge.<br />
2. 15m (20)<br />
Continue up the corner stepping left onto large wedged blocks. Continue up the blocks to the top taking<br />
care on the loose stuff.<br />
FA: H. Pringle, D. Glass, G. Saintz 2001/06/23<br />
MSC MY SORRY CARCASS 20 <br />
This route could possibly be a re-opening of The Fat Lady Sings (S. Newman).<br />
APPROACH – AUSSIE PINNACLE<br />
Descend gully to the right. Walk along the base until a prominent pinnacle is seen on the left of a steep<br />
gully. This pinnacle is characterized by a large crack in the middle of the face on the right of an open book<br />
and has a thinner crack just to its right.<br />
1. 45m (20)<br />
Start a few meters left of the large crack that begins above some shattered blocks. <strong>Climb</strong> the up the<br />
blocks tending right to a ledge. Traverse right along this ledge to a tree. <strong>Climb</strong> passed the tree, up the<br />
off-width to a small ledge. Continue up the corner on the right of the ledge. Move left to gain twin cracks<br />
splitting an overhang. <strong>Climb</strong> up to a narrow chimney and follow this to the top of the pinnacle.<br />
Descent: At the back of the pinnacle a chimney can be used to get off the top and into the gully. Scramble<br />
down behind the pinnacle to where a single tree-abseil will bring you to the base of the steep gully<br />
described in the approach.<br />
FA: N. McKenzie, H. Pringle 2001/06/23<br />
64
CE CALLING ELVIS 20 A1 <br />
This route could possibly be a re-opening of The Thin Men Were Screaming (K. Thrash).<br />
APPROACH - AUSSIE PINNACLE<br />
<strong>Climb</strong>s the same buttress described in MSC but starts directly below the thin crack higher and at a loose<br />
block at the base of an overhanging corner.<br />
1. 10m (19 A1)<br />
Using the block and a tree in the crack climb up to an overhang on the left of a smooth face. Using aid<br />
ascend the corner on the left of the overhang up to a small ledge on the left. Step right below an<br />
overhang to a square groove and climb this to a ledge on top of a block higher up.<br />
2. 20m (20)<br />
<strong>Climb</strong> the thin crack in the face, moving right to the arête to avoid a blank section then back left to belay<br />
on a small ledge.<br />
3. 20m (19)<br />
Traverse left up a ramp and a ledge to twin cracks splitting an overhang. <strong>Climb</strong> up to a narrow chimney<br />
and follow this to the top of the pinnacle.<br />
Descent: At the back of the pinnacle a chimney can be used to get off the top and into the gully. Scramble<br />
down behind the pinnacle to where a single tree-abseil will bring you to the base of the steep gully<br />
described in the approach.<br />
FA: H. Pringle, G. Frost, D. Margetts 2001/08/04<br />
FL FUDGE LAKE 17 ☺<br />
APPROACH<br />
Descend gully to the right. Walk along the base until a buttress is seen with steep gully on the left. The<br />
buttress is characterized by a large open book, about half way up the wall, near the left arête. At the base<br />
of the open book is a recess with a small pillar against the wall below. Start on top of this pillar and tree.<br />
1. 30m (15)<br />
<strong>Climb</strong> up the recess moving right higher to a ledge below and right of the open book.<br />
2. 30m (16)<br />
<strong>Climb</strong> up and then right around the arête to a ledge on the face. Continue up the arête face to the top of<br />
the crag.<br />
FA: N. McKenzie, G. Frost, D. Margetts 2000/04<br />
65
DRH DAS ROLLENDE HOTEL 17 ☺<br />
APPROACH<br />
This route <strong>for</strong>ms a variation to the second pitch of FL.<br />
Descend gully to the right. Walk along the base until a buttress is seen with steep gully on the left. The<br />
buttress is characterized by an open book in the middle and about half way up the wall. Right is a steep<br />
face with a large crack in it above a ledge. At the base of the open book is a recess with a small pillar<br />
against the wall below. Start on top of this pillar and tree.<br />
1. 30m (15)<br />
<strong>Climb</strong> up the recess moving right higher to a ledge below and right of the open book.<br />
2. 30m (16)<br />
Traverse right and slightly downwards across the blocky face until able to move up near the right arête<br />
of the face. <strong>Climb</strong> the face tending slightly rightwards continuing up broken ledges and blocks above to<br />
the top.<br />
FA: H. Pringle, D. Wright 2001/12/05<br />
MMM MUCH MORE MUNTER 20 <br />
APPROACH<br />
Descend the gully and turn right. Just around the corner past the bulge a large groove-gully is found and to<br />
left of this an overhanging open book with a wide crack and a steep face on the left. To the left of this steep<br />
face a dual crack system of two shallow corners can be seen starting behind a tree. The left corner goes up<br />
to a flake pillar-stack. Higher there is an open book recess.<br />
1. 30m (20)<br />
<strong>Climb</strong> the right hand corner crack <strong>for</strong> about 6m then traverse left, around the arête, on small hand holds<br />
to the left corner (flake pillar-stack). Continue up passing a strenuous layback corner to a belay on a<br />
blocky ledge.<br />
2. 35m (16)<br />
<strong>Climb</strong> the recess corner on the left of the ledge. Exit left around the arête when reaching a small roof at<br />
the top of the corner. Continue up on blocks to the top.<br />
FA: G. Frost, A. Lloyd 2003/12/13<br />
L LASERATION – PROJECT ? ?<br />
APPROACH<br />
Descend the gully and turn right. Just around the corner past the bulge a large groove-gully is found and to<br />
the left of this an overhanging open book with a wide crack. This routes attempts this open book.<br />
PROJECT: H. Pringle, G. Frost 2003/02/16<br />
66
SWW SLIPPERY WHEN WET 14 ☺<br />
APPROACH<br />
Descend the gully and turn right. Just around the corner past the bulge a large groove-gully is found with a<br />
large tree on the right crack. Start below the tree.<br />
1. 40m (14)<br />
<strong>Climb</strong> the stepped face above the tree. Continue up the groove-gully passing vegetation. Move right<br />
higher to belay on top.<br />
Descent: Traverse on top to the left corner of the pinnacle, using the tree climb down to the descent gully.<br />
FA: G. Devine, S. Devine, D. Chesney, T. Wilmot, D. Margetts 2000/04<br />
ILD I LIKE DIRT 15 ☺<br />
APPROACH<br />
Descend the gully and turn right. Just around the corner past the bulge a large groove is found with a large<br />
tree on the right crack. Start below the tree.<br />
1. 40m (15)<br />
<strong>Climb</strong> the stepped face tending right to the crack above the tree. At the top of the crack step right onto<br />
ledges. Traverse right to a crack. <strong>Climb</strong> up the face moving right to easier ground just below the top.<br />
Belay on top.<br />
Descent: Traverse on top to the left corner of the pinnacle, using the tree climb down to the descent gully.<br />
FA: H. Pringle, D. Margetts, G. Frost 2001/10/13<br />
67
LAKE VIEW LEFT<br />
TO GET THERE<br />
Rondawel Lookout Complex are the crags below the Three Rondawels lookout point. Drive south out of the<br />
resort towards Graskop, turn left after a little way to the lookout point. Park at the cul-de-sac where the<br />
tourists go (toilets and water available here).<br />
Three sections are found here and all are gained from the same gully. Walk in a north-westerly direction<br />
towards the resort following some beacons that lead to the edge of the cliff band. Here a descent is found<br />
through a hole under a boulder at the cliff edge.<br />
The crags are found to the left at the bottom of the gully.<br />
APPROACH TIME: 10-15 minutes<br />
DESCENT ROUTE<br />
Most of these routes finish on top of semidetached buttresses with bushy gullies separating them from the<br />
main crag. Scramble across the gullies back up to the main crag then traverse back leftwards towards the<br />
descent gully.<br />
SR THE SILVER RIBBON 18 <br />
APPROACH<br />
Descend gully to the left. Just as the gully ends some impressive cracks can be seen on the left wall. This<br />
route ascends the first of these cracks.<br />
1. 50m (18)<br />
<strong>Climb</strong> the crack in the steep face to a ledge below an overhang. <strong>Climb</strong> the off-width crack on the left of<br />
the ledge up to a stance near the top of the crag.<br />
FA: G. Frost, T. Wilmot, D. Chesney, D. Margetts 2000/04<br />
CD CACTUS DYKES 20 <br />
APPROACH<br />
Descend gully to the left. Just as the gully ends some impressive<br />
cracks can be seen on the left wall. This route ascends the second of<br />
these cracks.<br />
1. 45m (20)<br />
<strong>Climb</strong> the jam-crack past a small roof and up to a small ledge<br />
above the jam-crack. Traverse diagonally leftwards to a sloping<br />
ledge (shared with SR). <strong>Climb</strong> up right past an overhang to the<br />
top.<br />
FA: I. McMaster, K. Thrash 2000/04<br />
Note: A direct finish is possible up the face (grade 21) after the small<br />
ledge above the jam-crack (G. Frost, A. Grant 2002/3/29).<br />
68<br />
Ian McMaster on “Cactus Dykes”
MB MYTHICAL BEAST 22 A1 <br />
APPROACH<br />
Descend gully to the left. Just as the gully ends some impressive cracks can be seen on the left wall. This<br />
route ascends the third crack through the roof.<br />
1. 50m (22 A1)<br />
<strong>Climb</strong> the crack to the jam crack below the roof. Using aid gain the face above. Continue up to a<br />
slanting right rail. Move right then up and left to gain a crack through the head wall. <strong>Climb</strong> the crack and<br />
bulge and continue to the top.<br />
Project: H. Pringle, J. Pierce 2002/03/29<br />
FA: H. Pringle, A. Kock (up to slanting rail) 2002/12/05<br />
FA: H. Pringle, G. Saintz, D. Glass 2003/02/15<br />
DYFL DO YA FEEL LUCKY 23 <br />
APPROACH<br />
Descend gully to the left. This climb ascends the fourth crack on the wall after the gully ends.<br />
1. 45m (23)<br />
<strong>Climb</strong> the crack to below the roof. Pull through the roof on good holds. Continue up the face following<br />
the crack to a ledge. Follow the rightward tending jam crack to below a narrow chimney. Traverse left to<br />
the corner with a large crack. <strong>Climb</strong>/layback up to the top of the crack. Continue up to a belay on the<br />
top.<br />
Note: Good sustained climbing but a clean ascent was not made by the opening party because a wasps’<br />
nest had to be removed from under the roof.<br />
FA: G. Frost, D. Margetts, H. Pringle 2001/10/12<br />
LSS THE LONG SHADOW SHIMMY 15 <br />
APPROACH<br />
Descend gully to the left. Walk along the base passed the first wall and a steep gully until the second wall is<br />
reached. On the left arête of this wall a grey slab and ramp is seen leading up to a corner just inside of the<br />
arête. Start in the trees at the base of this ramp.<br />
1. 45m (16)<br />
<strong>Climb</strong> the short face below the ramp then continue up the ramp to the base of the corner. <strong>Climb</strong> the<br />
corner to the top of a pillar. <strong>Climb</strong> the juggy face tending right to the start of a blocky recess near the<br />
top. <strong>Climb</strong> up the recess to a stance on top.<br />
FA: G. Frost, A. Grant, H. Pringle 2001/09/01<br />
69
TIC THE IRON CURTAIN 24 <br />
APPROACH<br />
Descend gully to the left. Walk along the base passed the first wall and a steep gully until the second wall is<br />
reached. This climb ascends a series of two steep corners leading up to an overlap roof near the left arête<br />
of the face. Start on a ledge, about 5m above the ground, below the first of the corners.<br />
1. 28m (23)<br />
<strong>Climb</strong> up to the first stepped corner then move right and up to the overlap. Continue moving rightwards<br />
to the next corner then again climb up to the overlap. Pull through the overlap onto the steep face and<br />
follow a thin crack line up to a ledge higher up on the right.<br />
2. 15m (24)<br />
From the left edge of the ledge climb up to a short open book. Continue up following a thin crack in the<br />
steep face to the top of the crag.<br />
Note: Excellent climbing with a bold lead on the thin cracks of the first and second pitches.<br />
Project: G. Frost, A. Grant 2002/03/29<br />
FA: K. Thrash, G. Frost 2004/12/17<br />
TGC THE GAY CACTUS 19 <br />
APPROACH<br />
Descend gully to the left. Walk along the base passed the first wall and a steep gully until the second wall is<br />
reached. <strong>Climb</strong> ascends a steep sickle shaped crack in the middle of the wall (45m).<br />
1. 50m (19)<br />
<strong>Climb</strong> up to below the sickle shaped crack. Continue up following the crack to a small ledge on the right<br />
of an open book and tree. Pull up the corner to a ledge. Move to the left of the ledge and climb a crack<br />
to a small ledge. Bypass an awkward move up to a grassy ledge by moving right along the ledge and<br />
climbing up on easier ground to the top.<br />
FA: K. Thrash, I. McMaster 2000/04<br />
EHA ELEVEN AND A HALF ARMADILLOS 16 <br />
APPROACH<br />
Descend gully to the left. Walk along the base passed the first wall and a steep gully until the second wall is<br />
reached. This route is located on the right of the steep wall nearer the gully on the right. Start below an upturned<br />
sickle shaped crack in the wall higher up.<br />
1. 45m (16)<br />
<strong>Climb</strong> up a short face to a rail. Continue up tending left on a juggy face to a tree below a corner. <strong>Climb</strong><br />
past the tree, up the corner to below a large flake jutting out the face. Move slightly left and up then<br />
back right onto the top of the flake. Continue up the juggy face to a ledge and tree. <strong>Climb</strong> the corner<br />
behind the tree up to the top.<br />
FA: G. Frost, D. Margetts, H. Pringle 2001/08/04<br />
70
NTSF NOT TOO SHABBY HEY FOREST 15 ☺<br />
APPROACH<br />
Descend gully to the left. Walk along the base passed the first wall and a steep gully until the second wall is<br />
reached. This route is located on the right of the steep wall nearer the gully on the right. Start below a small<br />
triangular overhang higher up.<br />
1. 45m (15)<br />
<strong>Climb</strong> the face up the corner below the triangular overhang. Pull through the overhang on the left then<br />
move up and right into a recessed corner. Continue up to a ledge below an overhang. Move right under<br />
the roof to a break and climb to the top.<br />
FA: G. Frost, D. Margetts, D. Chesney, T. Wilmot 2000/04<br />
71
SPRING PINNACLE<br />
TO GET THERE<br />
Use the same approach route that accesses the Rondawel View and Lake View crags.<br />
Descend the gully then walk in a westerly direction along the base of the crags, passing the Lake View Left<br />
crag. Spring Pinnacle is the obvious pinnacle just to the right of the big gully to the right of the route “Not<br />
Too Shabby Hey Forest”.<br />
APPROACH TIME: 15-20 minutes<br />
DESCENT ROUTE<br />
<strong>Climb</strong> down from the summit using the face closest to the main crag.<br />
RMC ROOF MEAN CUBED 21 <br />
APPROACH<br />
Descend gully to the left. Head towards the obvious pinnacle on the left of the gully. On the east side of the<br />
pinnacle a series of open books and a chimney can be seen above a ledge higher up. This route ascends<br />
the chimney and the roof on the right. Start on the left of the pinnacle below an open book a little way up<br />
the gully.<br />
1. 20m (18)<br />
<strong>Climb</strong> the corner to the large ledge. Traverse across on blocks to below the chimney.<br />
2. 25m (21)<br />
Chimney up to the tree. Using the tree and a rail on the right arête traverse right to gain an open book<br />
and hand crack. <strong>Climb</strong> up to below the triangular roof. Using a chock in the crack pull through the roof<br />
and continue up the jam crack to easier ground. <strong>Climb</strong> up to the blocky ledge.<br />
Descent: scramble to the top using a corner behind the tree to the summit then descend the back of the<br />
pinnacle into the gully below.<br />
FA: H. Pringle, G. Frost 2001/10/14<br />
SITT A SPRING IN THE TAIL 22 <br />
APPROACH<br />
Descend gully to the left. Head towards the obvious pinnacle on the left of the gully. On the east side of the<br />
pinnacle a series of open books and a chimney can be seen above a ledge higher up. This route ascends<br />
the right most corner below an overhang. Start on the grey face below the chimney.<br />
1. 25m (20)<br />
<strong>Climb</strong> a short face tending right into a short corner. <strong>Climb</strong> the corner then move right to a mantle that<br />
gains a small ledge. Move up then left across the face to gain a grassy crack. <strong>Climb</strong> to the ledge and<br />
then traverse right to the first open book.<br />
2. Walk 5m right to the next steep open book below an overhang.<br />
3. 30m (22)<br />
<strong>Climb</strong> the strenuous corner exiting right higher under the roof. <strong>Climb</strong> the crack in the steep face to a<br />
ledge and tree just below the summit.<br />
Descent: scramble to the top using a corner behind the tree to the summit then descend the back of the<br />
pinnacle into the gully below.<br />
FA: H. Pringle, G. Frost, A. Grant 2001/09/01<br />
72
MUTINY CRAG<br />
TO GET THERE<br />
Use the same approach route that accesses the Rondawel View and Lake View crags.<br />
Descend the gully then walk in a westerly direction along the base of the crags, passing the Lake View Left<br />
and Spring Pinnacle crags. After some distance a small crag is found be<strong>for</strong>e the steep ramp that goes<br />
down to The Bounty Crag is reached. There is a very large boulder to the right of the crag.<br />
APPROACH TIME: 25-30 minutes<br />
ST SLAVE TRADER 20 ☺<br />
APPROACH<br />
There are two obvious lines at Mutiny: A crack up a smooth wall on the left, and a left-facing corner on the<br />
right. This route goes up the corner.<br />
1. 50m (20)<br />
<strong>Climb</strong> the chimney and corner above to a blocky ledge. Step right and climb blocks to the top.<br />
FA: H. Pringle, I. Kotze 2008/12/20<br />
73
THE BOUNTY<br />
TO GET THERE<br />
Use the same approach route that accesses the Rondawel View and Lake View crags.<br />
Descend the gully then walk in a westerly direction along the base of the crags, passing the Lake View Left<br />
and Spring Pinnacle crags. After some distance a steep ramp is reached on the right of some larger cliffs<br />
with steep red walls and a distinctive triangular roof on the right higher up. Descend the ramp to the base of<br />
the cliff.<br />
APPROACH TIME: 30-40 minutes<br />
OR<br />
Approach from the top of Treasure Island crag. Walk up the descent gully turning left at the top to walk<br />
along the top of the crag towards the arête. When The Bounty crag comes into view, start walking up the<br />
ridge to where the rocky band starts. Traverse across leftwards to reach the base of the crag. Avoid the<br />
steep gully by traversing across at a higher level then descending slightly to reach the cliff.<br />
APPROACH TIME: 45 minutes<br />
DESCENT ROUTE<br />
An abseil descent from this tier can be found from a tree at the top of the route “The Crows Nest” or walk<br />
back along the top to a descent gully on the right hand side of the crag.<br />
TCN THE CROWS NEST 21 <br />
APPROACH<br />
Start on the next obvious line to the left of POE.<br />
1. 30m (17)<br />
<strong>Climb</strong> the crack through the pod shaped gully. Continue to the roof and traverse right then up and right<br />
again to the large ledge belay.<br />
2. 20m (21)<br />
<strong>Climb</strong> directly above the belay following the obvious weakness through cracks and roofs tending<br />
rightwards, then up a short chimney to a large ledge and tree belay (abseil tree).<br />
FA: S. Newman, C. Ziranek 2000/?<br />
POE PIECES OF EIGHT 19 <br />
APPROACH<br />
Start to the right of the obvious open book which dominates the left of the crag.<br />
1. 20m (14)<br />
<strong>Climb</strong> easy ledges to a short chimney. <strong>Climb</strong> up then step left at the top onto a large vegetated ledge<br />
belay at the bottom of the corner.<br />
2. 40m (18)<br />
<strong>Climb</strong> cracks to the overhang barrier. Layback through and continue up the corner to a good stance on<br />
the right.<br />
3. 35m (19)<br />
Continue up the corner until an overhang barrier is reached. Move left to gain the arête. <strong>Climb</strong> the arête<br />
to good ledges.<br />
FA: S. Newman, C. Ziranek 2000/?<br />
74
SV STORM VOYAGE 22 <br />
APPROACH<br />
Start at the first clean crack to the right of the huge detached block.<br />
1. 25m (18)<br />
<strong>Climb</strong> the crack to the large ledge and belay by the large block.<br />
2. 15m (18)<br />
<strong>Climb</strong> up over the block then move left and climb the short corner. Continue diagonally leftwards to a<br />
block belay.<br />
3. 25m (22)<br />
<strong>Climb</strong> straight up then left using thin flakes. <strong>Climb</strong> the arête on the right until a sling flake is reached.<br />
Step across left to easier ground and on to a good belay ledge below a corner.<br />
4. 15m (18)<br />
<strong>Climb</strong> the corner, beware of a loose block on the left, then traverse left around the arête past a small<br />
tree and on to a good ledge.<br />
5. 20m (15)<br />
<strong>Climb</strong> the crack at the right hand end of the ledge until <strong>for</strong>ced back over the arête and to easier ground<br />
to the top.<br />
FA: S. Newman, C. Ziranek 2000/?<br />
DJL DAVEY JONES’ LOCKER 21 <br />
APPROACH<br />
Start directly below the large triangular roof.<br />
1. 44m (18)<br />
Scramble up to the large ledge. <strong>Climb</strong> the short open book moving left out the top. <strong>Climb</strong> diagonally left<br />
<strong>for</strong> 5m then climb the flake crack and move back right to the bottom of the main crack. <strong>Climb</strong> the crack<br />
to a small stance on the left.<br />
2. 35m (21)<br />
<strong>Climb</strong>/layback the main crack to the large roof. Traverse left under the roof to a small stance at the far<br />
end.<br />
3. 38m (15)<br />
<strong>Climb</strong> chimney/cracks to easier ground. Move left and climb the short buttress on the left. Belay on<br />
good blocks.<br />
FA: S. Newman, C. Ziranek 2000/?<br />
75
BBT BLACKBEARD’S TREASURE 22 ☺<br />
APPROACH<br />
This climb starts to the left and around the corner from HBM. Approach as <strong>for</strong> HBM but continue past the<br />
large corner to the wall on the left. Scramble up to a higher ledge with a small boulder. Start at the open<br />
book between the main face and the boulder.<br />
1. 30m (22)<br />
<strong>Climb</strong> the open book to a roof. Pull through the roof on the left. Continue up the crack to a bulge where<br />
a leftwards traverse is made to another break. Continue up the steepening break to a belay and tree.<br />
2. 30m (17)<br />
<strong>Climb</strong> on the right hand side of the break on a slab up to a ledge. Walk rightwards to a chimney and<br />
follow this to the top of the crag.<br />
FA: K. Thrash, D. Margetts 2008/12/15<br />
HBM HERE BE MONSTERS 17 ☺<br />
APPROACH<br />
On the right hand side of The Bounty crag, a broken section of face with shorter lines can be seen to the<br />
left of the descent gully. On the left of the middle of this face an easy looking break with a large tree at the<br />
bottom can be seen to the left of DMC. Start on the vegetated ledge to the right and below the tree.<br />
Darryl traversing on “Here Be Monsters” pitch 1.<br />
1. 48m (17)<br />
From the ledge climb up onto a free standing block below the<br />
recess with a tree. <strong>Climb</strong> through the tree to a corner which gains<br />
another tree and a ledge on the left. <strong>Climb</strong> up, tending slightly<br />
leftwards, to below an open book with a small overhang higher up.<br />
<strong>Climb</strong> the corner passing the small overhang then continue<br />
upwards to below a larger overhang with off width cracks above.<br />
Traverse leftwards out of the corner passing a small tree with a<br />
rail behind it to gain a good ledge on the arête.<br />
2. 30m (17)<br />
At the back of the ledge, climb the corner to reach a vegetated<br />
ledge with an open book above. <strong>Climb</strong> the crack in the right hand<br />
face, to avoid the vines at the base of the corner, then move back<br />
leftwards into the corner. When the corner starts becoming broken<br />
and grassy, move rightwards onto the face to climb a nice crack<br />
up to the blocks at the top of the crag.<br />
FA: G. Frost, D. Margetts 2007/03/24<br />
76
DMC DEAD MAN’S CHEST 17 ☺<br />
APPROACH<br />
On the right hand side of The Bounty crag, a broken section of face<br />
with shorter lines can be seen to the left of the descent gully. On the<br />
left of the middle of this face a feature rich rib can be seen dividing<br />
two obvious chimneys, one higher up on the left and one lower down<br />
on the right. Start on the vegetated ledge below the easy recess to<br />
the left of the steep red corners.<br />
1. 30m (17)<br />
From the ledge climb up into the blocky recess to the base of a<br />
right facing open book with a good crack. <strong>Climb</strong> the open book<br />
with a tricky section higher up to gain a ledge on the left. <strong>Climb</strong><br />
up the cracks on the left of the ledge then move rightwards under<br />
an overhang to gain a ledge. Continue up tending rightwards to<br />
below a gnarly face which is climbed to gain a large blocky ledge<br />
below a steep chimney.<br />
77<br />
Darryl and Ron below “Dead Man’s Chest”<br />
2. 30m (15)<br />
<strong>Climb</strong> up the wide crack on the right hand side of the ledge to below a narrow pillar. <strong>Climb</strong> around to<br />
the right hand side of the pillar then up to the top to stand below an overhang. Bypass the overhang on<br />
the left and climb up into a blocky recess which is ascended to the top of the crag.<br />
FA: G. Frost, R. Nathan, D. Margetts 2006/12/28<br />
BB BLISTERING BARNACLES 17 <br />
APPROACH<br />
On the right hand side of The Bounty crag, a broken section of face with shorter lines can be seen to the<br />
left of the descent gully. About half way up the gully a grey, slabby looking buttress with a steeper face<br />
above can be seen. Start below the obvious crack to the right of the buttress arête.<br />
1. 48m (17)<br />
<strong>Climb</strong> the crack, moving rightwards higher up onto the face to avoid some grass tufts then back<br />
leftwards to gain a small ledge with a flake on the right. <strong>Climb</strong> the flake to gain an easy slab on the left<br />
which leads up to two obvious cracks in the steep face above. <strong>Climb</strong> the left hand crack to a sloping<br />
ledge then continue up to the blocks at the top of the crag.<br />
FA: G. Frost, D. Margetts 2007/03/24
PROSPECTOR CRAG<br />
TO GET THERE<br />
Park at the guard hut at the entrance to the Rondawel View Lookout point. Cross the road and head down<br />
to the large gully on the eastern side of the road. Descend the gully using a vague path that leads to the<br />
base of the south facing wall.<br />
APPROACH TIME: 25-30 minutes<br />
YCD CLIMB ON YOU CRAZY DIAMOND 20 A1 ☺<br />
APPROACH<br />
Most of the crag in the beginning section of the gully is non-descript grey rock with few distinct features.<br />
This climb takes the first obvious line, on the true left, characterized by a chimney and subsequent<br />
vegetated recess leading up to a ledge with a large tree. Below the chimney is a steep recess with a series<br />
of small overhangs on the left. Start on the slab below a short open book that leads to the recess.<br />
1. 45m (20 A1)<br />
<strong>Climb</strong> the slab into the base of the corner and continue up to the recess which leads into the chimney.<br />
<strong>Climb</strong> to the roof at the top of the chimney then using aid, ascend the crack until it ends. An awkward<br />
move leftwards gains a vegetated recess which is climbed far a few meters until it is possible to climb<br />
the pleasant face on the right. Continue up the face passing a small ledge, up to a large ledge below an<br />
open book with a wide crack.<br />
2. 15m (18)<br />
<strong>Climb</strong> the open book above the ledge then traverse leftwards to a steep corner. <strong>Climb</strong> the corner up to<br />
a very large ledge system.<br />
3. Scramble up to the top of the crag using the easiest route up from the ledge.<br />
FA: G. Frost, M. Sporen, D. Margetts 2005/10/08<br />
78
GOLF CLUB TERRACE<br />
TO GET THERE<br />
Park at the guard hut at the entrance to the Rondawel View Lookout point. Cross the road and head down<br />
to the large gully on the eastern side of the road. The best approach is not to descend the gully but to follow<br />
the edge of the cliff face on true right of the gully <strong>for</strong> a few hundred meters until a rocky scramble descent<br />
can be found going down a grassy ramp. The Golf Club Terrace crag can be found to the left (looking up) of<br />
the descent scramble where the broken section of crag ends and the more impressive routes start to<br />
appear.<br />
APPROACH TIME: 40-45 minutes<br />
FTH FAIRWAY TO HEAVEN 18 <br />
APPROACH<br />
To the left (looking up) of the major corner system that dominates Golf Club Terrace, two obvious pillars<br />
can be seen propped up against the face. The routes starts on the ledge below the chimney on the right<br />
hand side of the leftmost pillar.<br />
Mike on “Fairway to Heaven”, pitch 1.<br />
1. 25m (17)<br />
<strong>Climb</strong> the chimney up to where a cave leading leftwards can<br />
be found. Traverse leftwards thought the cave, to the other<br />
side of the pillar, to a ledge below an overhang. <strong>Climb</strong> up to<br />
above the overhang then move diagonally rightwards, on the<br />
outside of the pillar, to a good ledge on the arête.<br />
2. 20m (18)<br />
Traverse rightwards off the ledge onto the main face and to<br />
below an open book break. <strong>Climb</strong> up the open book to a<br />
belay on a ledge on the right.<br />
3. 30m (16)<br />
Continue up the break on the left hand edge of the stance.<br />
Move rightwards higher up onto the face to avoid the<br />
vegetated recess. <strong>Climb</strong> the face passing a ledge and up to<br />
another larger ledge near the top of the crag.<br />
4. Scramble up the short gully to the top of the crag.<br />
FA: G. Frost, M. Sporen 2005/10/09<br />
79
TAXI CRAG<br />
TO GET THERE<br />
Continue along the R532 towards Graskop, past the entrance to the Rondawel Lookout, to the next lookout<br />
point <strong>for</strong> the <strong>Blyde</strong> <strong>Canyon</strong>. Park at the lookout point then walk back towards the Rondawel View lookout.<br />
Pass around the first gully on the right then walk outwards on the peninsular, above the crags that face<br />
Swadini. Find the massive Taxi Gully.<br />
Choose an abseil point depending on where you’re going to climb. A 90m fixed rope is required, or pick a<br />
spot with a tree halfway down. It is possible to walk all the way along the bottom of the crag, but crossing<br />
the Taxi Gully is difficult.<br />
APPROACH TIME: 35-40 minutes<br />
EV ESCAPE VELOCITY 21 ☺<br />
APPROACH<br />
Left of Taxi Gully (looking up).<br />
About 50m left of the gully is a terrifying guillotine flake sticking straight out of the cliff. This climb starts<br />
about 10m left of this, below a left-facing hand crack corner in grey rock.<br />
1. 40m (21)<br />
<strong>Climb</strong> the corner to a ledge. Step right and climb the gully until able to traverse back left on top of some<br />
blocks. <strong>Climb</strong> the big flake to a ledge. Rejoin the gully to get to a spectacular pinnacle below a steep<br />
broken crack in yellow rock. <strong>Climb</strong> the crack to a semi-hanging stance, just below a massive square-cut<br />
block.<br />
2. 30m (19)<br />
Surmount the block, then the chimney above it, then up the crack above to a ledge on the right. Step<br />
right and climb grotty blocks and recess to a massive grassy ledge.<br />
3. Scramble through a small rock band to the top.<br />
Note: #4 and #5 cams are useful.<br />
FA: H. Pringle, I. Kotze 2008/12/19<br />
UTI UNDER THE INFLUENCE 22 ☺<br />
APPROACH<br />
Right of Taxi Gully (looking up). Note that this route does not top out.<br />
<strong>Climb</strong>s the first face left of the massive boulder-fall (about 30m left of the boulder-fall). Ascends a slightly<br />
overhanging red face, then a stunning crack up a yellow face to a ridge.<br />
1. 30m (22)<br />
<strong>Climb</strong> the crack up the red wall, pull through the bulge into the stunning cracks on the yellow wall.<br />
<strong>Climb</strong> to wedged flakes, step right to the arête then up to belay on sloping blocks.<br />
2. 15m (19)<br />
Start from the lowest point of the sloping ledge (i.e. on the right). Traverse right, using a cammed block<br />
to the arête. Keep going right until able to step down to a bushy tree in the corner.<br />
3. Scramble down the sloping ledge, then up to the massive tree. Abseil off, back to the ground.<br />
Note: Opened with one rest on pitch 1. We thought about trying to top out but everything above looked<br />
either loose.<br />
FA: H. Pringle, I. Kotze 2008/12/19<br />
80
EDEN CRAG<br />
TO GET THERE<br />
The Eden Crags are a rather seclude section of crags situated on the R532 road between the <strong>Blyde</strong><br />
<strong>Canyon</strong> Forever Resort and the “T” junction with the R36. When driving back towards Ohrigstad from the<br />
resort, the road winds down past a subsidiary canyon seen to the right (north) of the road. After about<br />
10Km from the resort and where the road is lined with a stone wall and is going through some sharp Scurves,<br />
a large kloof can be seen on the right-hand side of the road.<br />
Find the nearest lay-by and park, or better still, get dropped off. It might not be safe to leave cars parked<br />
here.<br />
Only leave the road at the point when you can see into the kloof (GPS Coordinates S 24°32’58.8” / E<br />
30°43’46.7”). Bundu bash to get to the edge of the upper wall (north facing, true right) of the kloof. All the<br />
routes to date are on this wall, although there is plenty of scope <strong>for</strong> routes on the other (south-facing, true<br />
left) wall. It will, however, be a bit of a mission to get to the true left wall.<br />
From the road to the edge of the true right cliffs is around 500m.<br />
The true right cliffs are bounded on their downstream (east) end by a gulley from a (usually) dry riverbed. It<br />
is possible, although much further, to walk out along this riverbed, which eventually comes very close to the<br />
road.<br />
APPROACH TIME: 10-15 minutes<br />
DESCENT ROUTE<br />
The true right cliff has many large paper-bark trees along its rim. These provide easy, 50m abseil points to<br />
get down to the climbs. It is a good idea to use a tree as close as possible to the intended route, because<br />
walking along the base of the cliff is a bit of a bundu bash.<br />
TOB A THING OF BEAUTY 18 <br />
APPROACH<br />
When standing on top of the cliff find the big gulley at the extreme right (looking out). Find the first big<br />
paper-bark to the left of this, looking out. Abseil off the tree. The route follows the abseil route. Start off<br />
blocks at the base.<br />
1. 50m (18)<br />
<strong>Climb</strong> a short corner on the right. Traverse left to the main break. <strong>Climb</strong> the crack until it peters out.<br />
Step left, then up the arête and blocks above to the tree.<br />
Note: A harder, direct start is possible.<br />
FA: H. Pringle, I. Kotze 2008/12/17<br />
81
LB LABOR PAINS 20 A0 ☺<br />
APPROACH<br />
When standing on top of the cliff find the big gulley at the extreme right (looking out). Find the first big<br />
paper-bark to the left of this, looking out. Abseil off the tree. From the base of the abseil, walk about 20m<br />
upstream (rightwards) until an obvious, acute open book is found that ends at a ledge a little further up.<br />
Start at the base of the open book.<br />
1. 15m (20)<br />
<strong>Climb</strong> the open book to the ledge with a deep recess and tree at the back.<br />
2. 30m (19 A0)<br />
From the outside edge of the ledge, climb rightwards up the ramp to the top of the pillar below the steep<br />
face. <strong>Climb</strong> the steep face to a niche below an overhang. Pull through the overhang then tend<br />
rightwards following the corner and ramp up to a large ledge and belay.<br />
3. 25m (15)<br />
<strong>Climb</strong> up the block at the back of the ledge towards an open book on the right. <strong>Climb</strong> the open book<br />
onto a mantle ledge then continue up following a break and wide crack to a ledge on the right and the<br />
top of the route.<br />
Note: It is estimated that the steep face on pitch 2 will climb free at about grade 22.<br />
FA: G. Frost, D. Margetts, J. Viljoen, B. Gardner 2009/06/14<br />
SP SPLENDOR 17 <br />
APPROACH<br />
When standing on top of TOB looking outwards, one can see an obvious chickenhead face at the top of the<br />
crag about 150m to the left (looking out). Abseil off the paper-bark tree just right (looking out) of the<br />
chickenheads, to a large ledge. Do not abseil all the way to the ground as the bottom 10m of the cliff looks<br />
grotty here.<br />
1. 40m (17)<br />
<strong>Climb</strong> rightward diagonal recess above the right hand side of the ledge to under a roof. Crank through<br />
and climb the immaculate jam crack to the chickenhead face above. Jug haul to the top.<br />
FA: H. Pringle, I. Kotze 2008/12/17<br />
82
CONTOUR MAP OF BLYDEPOORT<br />
This map shows where the various crags and parking areas are situated within the <strong>Blyde</strong>poort<br />
climbing area.<br />
83
PHOTOS FOR BLYDEPOORT CRAGS<br />
The following photos show sections of the crags with labels indicating the basic line or starting point of the routes.<br />
84
TOPO SKETCHES FOR BLYDEPOORT<br />
KEY TO TOPO SKETCHES<br />
CORNER/OPEN<br />
BOOK<br />
WIDE<br />
CRACK/CHIMNEY<br />
OVERHANG/ROOF<br />
NICHE<br />
PILLAR<br />
TREE/BUSH<br />
FACE CLIMB<br />
CRACK<br />
LEDGE<br />
ARÊTE<br />
BLOCKS<br />
OVERHANGING<br />
WALL<br />
GULLY<br />
VEGETATION/GRASS<br />
96
TREASURE ISLAND<br />
97
LAKE VIEW RIGHT<br />
LAKE VIEW LEFT<br />
98
SPRING PINNACLE<br />
THE BOUNTY<br />
99
NOTES<br />
100
NOTES<br />
101