I III - I LARGECAPACITYTHINTWIN" AUTOMATICWASHERDRYER ...
I III - I LARGECAPACITYTHINTWIN" AUTOMATICWASHERDRYER ...
I III - I LARGECAPACITYTHINTWIN" AUTOMATICWASHERDRYER ...

You also want an ePaper? Increase the reach of your titles
YUMPU automatically turns print PDFs into web optimized ePapers that Google loves.
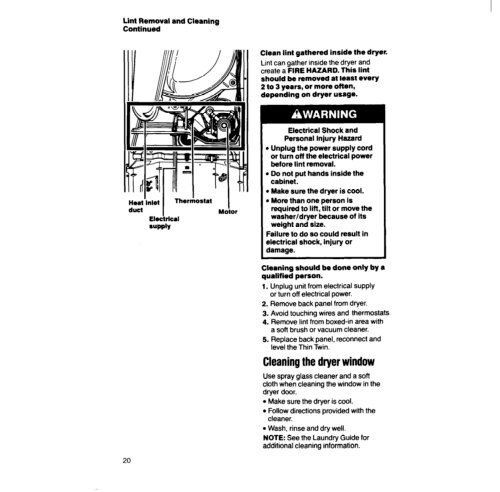
Lint Removal and Cleaning<br />
Continued<br />
20<br />
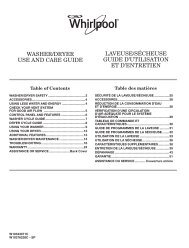
I<br />
Heat Inlet Thern!ostat<br />
duct<br />
I<br />
ElectrIcal<br />
SUPPlY<br />
Motor<br />
Clean lint gathered inside the dryer.<br />
Lint can gather inside the dryer and<br />
create a FIRE HAZARD. This lint<br />
should be removed at least every<br />
2 to 3 years, or more often,<br />
depending on dryer usage.<br />
Electrical Shock and<br />
Personal Injury Hazard<br />
l Unplug the power supply cord<br />
or turn off the electrical power<br />
before lint removal.<br />
l Do not put hands inside the<br />
cabinet.<br />
l Make sure the dryer is cool.<br />
l More than one person is<br />
required to lift, tilt or move the<br />
washer/dryer because of its<br />
weight and size.<br />
Failure to do so could result in<br />
electrical shock, injury or<br />
damage.<br />
Cleaning should be done only by a<br />
qualified person.<br />
1. Unplug unit from electrical supply<br />
or turn off electrical power.<br />
2. Remove back panel from dryer.<br />
3. Avoid touching wires and thermostats.<br />
4. Remove lint from boxed-in area with<br />
a soft brush or vacuum cleaner.<br />
5. Replace back panel, reconnect and<br />
level the Thin Twin.<br />
Cleaning the dryer window<br />
Use spray glass cleaner and a soft<br />
cloth when cleaning the window in the<br />
dryer door.<br />
l Make sure the dryer is cool.<br />
l Follow directions provided with the<br />
cleaner.<br />
l Wash, rinse and dry well.<br />
NOTE: See the Laundry Guide for<br />
additional cleaning information.