IlillHjajajllHIBJWIJBIJIIIIMIBII ij;l:aiiiiiiiiiMiiMFtfMpiJaiiJwH/iH^
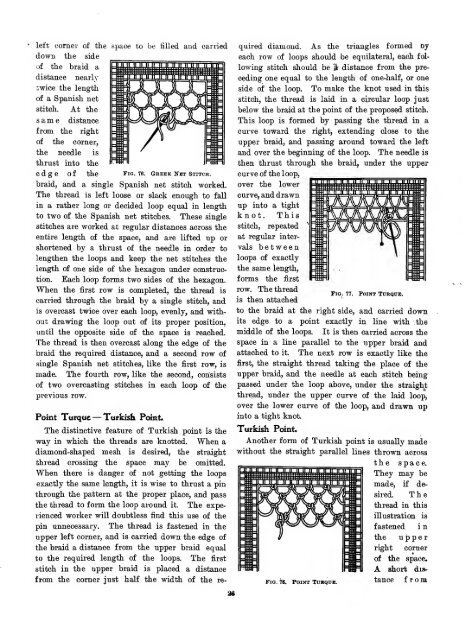
the corner a plain buttonhole stitch is worked in the upper braid. Close to this a Turkish <strong>point</strong> stitch is worked. At the required distance from this pair <strong>of</strong> stitches a second pair is p<strong>lace</strong>d, with the loop between the two pairs long or slack. This is re- peated to the end <strong>of</strong> the row. <strong>The</strong> thread is then carried down the side <strong>of</strong> the space, <strong>and</strong> the second row begun. This is like the first except that, being begun at the left side, the plain buttonhole stitch is each time at the left <strong>of</strong> the Turkish <strong>point</strong> stitch. This is continued until the second <strong>and</strong> each suc- ceeding row is completed. Point dc Filet. Net Groundwork Stitch. Point de Filet is an easy, speedy, <strong>and</strong>, at the same time, very beautiful stitch used for background or groundwork, instead <strong>of</strong> Brussels net. It is really an imitation <strong>of</strong> netting. It is worked diagonally across the space to be filled. <strong>The</strong> thread is fastened af the upper left corner <strong>of</strong> the space, <strong>and</strong> brought down the edge <strong>of</strong> the braid a distance equal to one §ide <strong>of</strong> the desired squares <strong>of</strong> the network. It is then carried across the left / corner <strong>of</strong> the space, <strong>and</strong> fastened t o the upper braid at a <strong>point</strong> equally distant from the corner. <strong>The</strong> loop must be just twice the length <strong>of</strong> the Fig. 79. Point de Filet. p- r O p O S e d square, s o that when held in p<strong>lace</strong> by the knots <strong>of</strong> the next row it will form two sides <strong>of</strong> the corner square. <strong>The</strong> thread is then carried along the edge <strong>of</strong> the upper braid the same distance as before, <strong>and</strong> is fasteped into the corner loop by means <strong>of</strong> a Turk- ish net stitch. <strong>The</strong> thread is then attached to the braid at the left the same distance as before from the adjoining fastening. <strong>The</strong>se rows <strong>of</strong> diagonal loops, secured by knots <strong>of</strong> Turkish net stitch, are continued until the space is filled. <strong>The</strong> beauty <strong>of</strong> this stitch lies in its perfect- accuracy. <strong>The</strong> verti- cal lines must be parallel <strong>and</strong> the horizontal lines must be parallel. This necessitates the making <strong>of</strong> all the loops <strong>of</strong> exactly the same length. To facil- . 29 itate this, pins may be stuck into the pattern *t the right p<strong>lace</strong>s, <strong>and</strong> the thread passed under them when the loops are being made. <strong>The</strong> work may be made still easier, if, before the stitch is begun, the space to be filled is checked <strong>of</strong>f on the pattern with pen or pencil. Upon the finished network the various stitches used in netting, <strong>and</strong> many beautiful <strong>lace</strong> stitches, may be worked. Point de Filet. This stitch shows another method <strong>of</strong> tying the knot in <strong>point</strong> de filet. <strong>The</strong> thread is secured to the loops above it by a single Brussels net or Fig. 80. Point de Filet. buttonhole stitch. <strong>The</strong> needle is then passed under this buttonhole stitch or knot, over the fork- ing thread, under it, <strong>and</strong> drawn up tightly. This method very closely simulates netting <strong>and</strong> makes a good background for Other stitches. Bruges Stitch. <strong>The</strong> Bruges <strong>lace</strong> stitch is well adapted for the filling <strong>of</strong> large spaces^ <strong>and</strong> may be used with or without the rosettes that give it its elaborate appearance. Fasten the thread at the front left corner <strong>of</strong> the space, <strong>and</strong> overcast it along the edge <strong>of</strong> the nearer braid for the distance <strong>of</strong> one-fourth <strong>of</strong> an inch. Carry the thread across the space to the back or farther braid, <strong>and</strong> fasten it with a buttonhole stitch Fig. 81. Bruges Stitch. just one-fourth <strong>of</strong> an inch from the back left corner. Overcast the thread along the edge <strong>of</strong> the braid for" a distance <strong>of</strong> one - sixteenth <strong>of</strong> an inch. ^About three-sixteenths <strong>of</strong> an inch from the back braid work a single button- hole stitch over the long thread thrown across the space. Over the length <strong>of</strong> this buttonhole stitch p<strong>lace</strong> two other buttonhole stitches close together <strong>and</strong> extending toward the front end <strong>of</strong> the space