Nailing Basics - Fine Homebuilding
Nailing Basics - Fine Homebuilding
Nailing Basics - Fine Homebuilding

You also want an ePaper? Increase the reach of your titles
YUMPU automatically turns print PDFs into web optimized ePapers that Google loves.
When I was a small boy growing up on the<br />
Nebraska high prairies during the Depression,<br />
my first hammer was a 16-oz., wood-handle<br />
model with one of its curved claws missing. It<br />
wasn't much good for pulling nails, but at the<br />
time it was all we could afford.<br />
Our nails were gleaned from the site where an<br />
old barn had burned to the ground. I'd find<br />
round nails as well as the cut, square type and<br />
used to straighten bunches of them getting<br />
ready for childhood building projects. We'd<br />
bang together forts and playhouses made of<br />
wooden orange crates and stray boards. They<br />
were fun to build, but they didn't stand up very<br />
well to the strong, gusty winds that blew down<br />
from Wyoming.<br />
In 1948 I had my first job as a paid carpenter.<br />
For a dollar a day, I helped an old craftsman put<br />
together a precut house. The house was shipped<br />
by rail and hauled to the site on a horse-drawn<br />
wagon. Over the next year or so, we put it together<br />
piece by piece. I was still using a curvedclaw<br />
hammer, but this one had all its parts.<br />
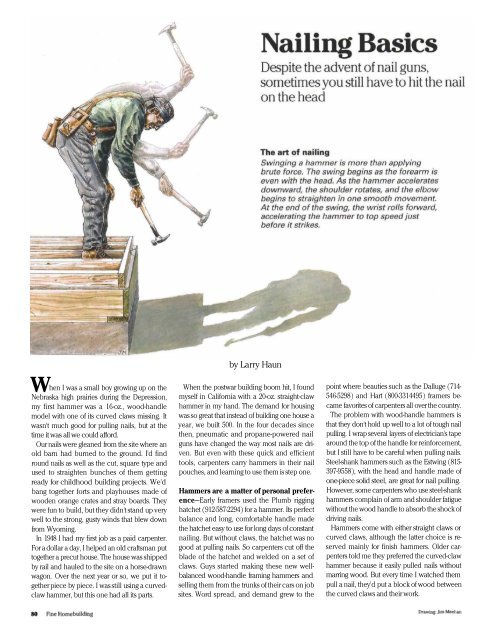
<strong>Nailing</strong> <strong>Basics</strong><br />
Despite the advent of nail guns,<br />
sometimes you still have to hit the nail<br />
on the head<br />
The art of nailing<br />
Swinging a hammer is more than applying<br />
brute force. The swing begins as the forearm is<br />
even with the head. As the hammer accelerates<br />
downward, the shoulder rotates, and the elbow<br />
begins to straighten in one smooth movement,<br />
At the end of the swing, the wrist rolls forward,<br />
accelerating the hammer to top speed just<br />
before it strikes.<br />
by Larry Haun<br />
When the postwar building boom hit, I found<br />
myself in California with a 20-oz. straight-claw<br />
hammer in my hand. The demand for housing<br />
was so great that instead of building one house a<br />
year, we built 500. In the four decades since<br />
then, pneumatic and propane-powered nail<br />
guns have changed the way most nails are driven.<br />
But even with these quick and efficient<br />
tools, carpenters carry hammers in their nail<br />
pouches, and learning to use them is step one.<br />
Hammers are a matter of personal preference—Early<br />
framers used the Plumb rigging<br />
hatchet (912-587-2294) for a hammer. Its perfect<br />
balance and long, comfortable handle made<br />
the hatchet easy to use for long days of constant<br />
nailing. But without claws, the hatchet was no<br />
good at pulling nails. So carpenters cut off the<br />
blade of the hatchet and welded on a set of<br />
claws. Guys started making these new wellbalanced<br />
wood-handle framing hammers and<br />
selling them from the trunks of their cars on job<br />
sites. Word spread, and demand grew to the<br />
point where beauties such as the Dalluge (714-<br />
546-5298) and Hart (800-3314495) framers became<br />
favorites of carpenters all over the country.<br />
The problem with wood-handle hammers is<br />
that they don't hold up well to a lot of tough nail<br />
pulling. I wrap several layers of electrician's tape<br />
around the top of the handle for reinforcement,<br />
but I still have to be careful when pulling nails.<br />
Steel-shank hammers such as the Estwing (815-<br />
397-9558), with the head and handle made of<br />
one-piece solid steel, are great for nail pulling.<br />
However, some carpenters who use steel-shank<br />
hammers complain of arm and shoulder fatigue<br />
without the wood handle to absorb the shock of<br />
driving nails.<br />
Hammers come with either straight claws or<br />
curved claws, although the latter choice is reserved<br />
mainly for finish hammers. Older carpenters<br />
told me they preferred the curved-claw<br />
hammer because it easily pulled nails without<br />
marring wood. But every time I watched them<br />
pull a nail, they'd put a block of wood between<br />
the curved claws and their work.
The many faces of hammers. The hammer<br />
on the left has a standard smooth face for driving<br />
finish nails. The middle hammer has a<br />
face with a sandpaper texture that helps to<br />
keep the hammer on the nail, while the milled<br />
face on the right hammer grips the nail aggressively<br />
for framing.<br />
Besides handle and shape of claws, the biggest<br />
difference between hammers is face treatment<br />
(photo above). I was thrilled when I got my first<br />
hammer with a milled face—until I missed and<br />
hit my finger. (There is a big difference between<br />
a mashed finger and a shredded finger.)<br />
Milled-face hammers (also called serrated or<br />
waffle-face hammers) come with checkerboard<br />
grooves cut into the face. These grooves help to<br />
grab the head of a nail even when your aim<br />
might be off a little. When it's driving galvanized<br />
nails, the milled face doesn't become slick from<br />
the galvanized coating and slip off the nail like a<br />
standard smooth-face hammer. But be careful<br />
with your milled-face hammers around finish<br />
lumber: They can leave nasty hammer tracks.<br />
Before milled-face hammers were available,<br />
we used to rub the smooth faces of our hammers<br />
on concrete to give them a slightly rough<br />
texture, which made them better at gripping<br />
nails. Dalluge now makes a finish hammer with<br />
a face that has been textured slightly to the consistency<br />
of 180-grit sandpaper. I am amazed by<br />
how much easier it is to drive a finish nail with<br />
this hammer rather than a smooth-face one.<br />
For framing my choice is a 22-oz. straight-claw<br />
hammer with a serrated face and an 18-in. wood<br />
handle. I like the balance and shape of this hammer,<br />
and I use the claws to pick up anything on<br />
a job site from a 2x4 to a heavy beam. I've also<br />
stuck those straight claws into roof sheathing to<br />
save me from sliding off an icy roof.<br />
For a finish hammer I've always used a 16-oz.<br />
to 20-oz. head, straight-claw hammer with a<br />
Continuous nailing. Fast<br />
and efficient nailing calls<br />
for nailing with one hand<br />
while feeding nails with<br />
the other (photo below).<br />
First, get all the nails going<br />
in the same direction by<br />
pulling out upside-down<br />
nails and flipping them<br />
over (photo right).<br />
smooth face and wood handle, although the<br />
slightly heavier Dalluge with the textured face is<br />
really appealing. The straight claws are easy to<br />
slip between a trimmer and a king stud when<br />
setting a door frame, and they even come in<br />
handy for tightening a wing nut.<br />
For nail aprons, simpler is usually better—<br />
White bib overalls were a carpenter's trademark<br />
in the 1950s, and I miss them, with their pockets<br />
that held different nails, the pencil slot in the<br />
front and that funky side pocket for my folding<br />
rule. There was even a loop for my hammer. But<br />
best of all, the overalls kept us warm in winter.<br />
The rhythm of nailing<br />
Cloth aprons came next, but they didn't hold<br />
enough nails. Webbed belts with leather nail<br />
bags sewn in front replaced the apron, but carpenters<br />
had trouble getting their hands into the<br />
nail bags while working bent over. Finally, someone<br />
came up with a wide leather belt holding removable<br />
bags, arguably the most popular nailapron<br />
design today.<br />
Carpenters like this style because they can position<br />
the bags wherever they like, and the wide<br />
belt helps to distribute the weight. I usually wear<br />
two bags, one for 8d nails and one for 16d nails,<br />
with smaller pouches sewn in for hanger nails, a<br />
measuring tape and a small square. The latest
design is the Cordura nylon nail bag that is lightweight<br />
and hard to tear. The padded nylon belt<br />
is comfortable, but most of the nylon bags have<br />
more pockets than the average carpenter needs.<br />
The first time I attached a pair of suspenders to<br />
my nail belt, my lower back breathed a huge<br />
sigh of relief. A loaded nail belt can weigh over<br />
12 lb., and suspenders transfer most of that nailbelt<br />
weight to the shoulders.<br />
Pick the right nail for the job—In an effort to<br />
drive more nails faster, carpenters in the 50s<br />
came up with the "gas-wax" method of coating<br />
Roofing nails are held between fingers.<br />
Because of their Short shanks and large heads,<br />
roofing nails can be set more easily by holding<br />
them between your first two fingers.<br />
nails. First, they'd let a block of paraffin dissolve<br />
in about 4 gal. of gasoline in a bucket sitting in<br />
the sun. Then they'd splash a cup or so of the<br />
mixture into a 50-lb. box of nails. They'd shake<br />
the box to get all the nails wet. Then as the gasoline<br />
evaporated, the nails were left with a wax<br />
coat that made them a lot easier to drive. Looking<br />
back, I'm amazed that more job sites didn't<br />
go up in flames, to say nothing of gas-waxing as<br />
an environmentally unsound practice.<br />
Thankfully, coated nails called sinkers made<br />
gas wax obsolete years ago, Sinkers have thinner<br />
shanks, and their coating makes them easier to<br />
drive than common nails. However, carpenters<br />
in other parts of the country use common nails<br />
exclusively. Using sinkers instead of common<br />
nails is a matter of preference, but building<br />
codes specify how many nails and what size<br />
must be used.<br />
Codes vary depending on locale, so consult<br />
your building official. Codes require a given<br />
number of nails to hold framing members together<br />
at, for instance, stud-to-plate connections<br />
or floor-joist-to-rim-joist connections.<br />
Many years ago, I was nailing door jambs in<br />
place with 8d finish nails that extended beyond<br />
the second piece of wood. An old craftsman on<br />
the job told me that if I used 6d nails instead,<br />
I'd save a mile of nails every year. A nail needs<br />
only to be long enough to grip the second piece<br />
of wood without going all the way through. No<br />
need to use a 16d nail to attach two 1xs.<br />
Hardened nails are also available for attaching<br />
wood to masonry. It's best to drive these<br />
nails before concrete has fully cured. But if I<br />
have to drive a nail into fully cured concrete, I<br />
drill a small starter hole with a hammer drill.<br />
Without a starter hole, the nail may bend or may<br />
chip out a hole in the concrete. Masonry nails<br />
should never be driven with a regular hardenedsteel<br />
hammer, which can cause chips of steel<br />
to break off and fly through the air. Instead, I<br />
use a softer-headed hammer when I'm driving<br />
hardened nails.<br />
Getting a grip—Almost every carpenter has<br />
heard tales of flying steel and flying nails. Unfortunately,<br />
these stories are not just fairy tales<br />
with happy endings. Always wear approved eye<br />
protection. Never strike the hard steel of a hammer<br />
face against another hammer face. Small<br />
A vehicle for nailing floors. When a lot of<br />
subfloor needs to be nailed off, a nailing buggy,<br />
a scrap of plywood on wheels, can save<br />
your knees. The carpenter sits on it, pushing<br />
backward and nailing as he goes.<br />
pieces of steel can break off and become dangerous<br />
projectiles. Flying nails can be just as<br />
dangerous. In the early 50s, I hit a nail that flew<br />
and punctured my eyeball (FHB #91, p. 84). Several<br />
stitches and several months later, I was back<br />
to work, wiser to say the least. It is not hard to<br />
see the moral of these stories. Eye protection<br />
isn't optional when driving nails.<br />
Driving nails has more to do with rhythm, coordination<br />
and timing rather than power and<br />
force. Your shoulder, elbow, forearm and wrist<br />
should all work in a single fluid motion when<br />
driving large nails (drawing p. 80). Smaller nails<br />
such as finish nails are driven mainly with the<br />
wrist and forearm.<br />
Don't grab the handle with a tiring, whiteknuckle<br />
grip. Instead, hold the handle near the<br />
end easily but firmly. Your thumb should wrap<br />
around the handle rather than resting on top,<br />
pointing toward the head. If the handle is slippery<br />
and difficult to hold, try roughing it up with<br />
a rasp or heavy-grit sandpaper. You can also<br />
smear a bit of wood pitch onto the handle to<br />
improve your grip. But go easy on the pitch, or<br />
you may end up sleeping with your hammer.<br />
Place the nail on the wood, start it with a tap,<br />
and begin driving. A smooth, practiced swing<br />
will let you apply the maximum force with the<br />
least effort to drive the nail into the wood.<br />
<strong>Nailing</strong> in a bent-over position, such as when<br />
assembling walls on a deck, is pretty easy if your<br />
aim is true. The weight of the hammer coming<br />
down reduces the amount of physical force you<br />
have to exert. The same holds true when nailing<br />
plywood decking to floor joists.<br />
Holding a framing hammer near the end of<br />
the handle when you're driving large nails into<br />
2x stock maximizes the force you are applying<br />
to the nail. But less force is needed to sink smaller<br />
nails, so I choke up on the handle when driving<br />
6d or 8d nails. It hardly takes a tap to drive<br />
an 8d into a green 2x4, and with less swing,<br />
choking up on the handle keeps the hammer<br />
head on target.<br />
Grabbing the hammer handle more toward<br />
the middle also gives you greater control, so I<br />
also choke up on the hammer when driving finish<br />
nails. For most finish nails, I strike the nail<br />
using mostly wrist action to reduce the chances<br />
of missing the nail and marring the wood.<br />
Framing with your feet. Placing the ball of<br />
your foot on the plate and your heel on the<br />
stud will keep the stud on the layout and keep<br />
it from bouncing off the plate during nailing.
A cat's-paw digs out buried nails. If a nail<br />
that's been punched home needs to come out,<br />
drive the claws of a cat's-paw under the head<br />
of the nail to pry it out of the hole.<br />
Prying out a nail sideways. To reduce<br />
stress on your hammer, grab the nail in the<br />
claws and push the handle to the side.<br />
Don't take nails from your pouch one at a<br />
time—Back before the days of collated coils<br />
and sticks of nails for pneumatic guns, carpenters<br />
would spend evenings bundling small<br />
bunches of nails with rubber bands to prepare<br />
for the next day's work. But then as now, I just<br />
pick up a handful of nails straight out of the box<br />
and hold them in a bundle with all the shafts<br />
parallel. Next I grab all the heads that are facing<br />
toward me with the fingertips of my other<br />
hand, pull them out of the bundle and turn them<br />
so that all heads are facing away from me (photo<br />
top right, p. 81). Then I feed the nails out one<br />
at a time with my thumb and forefinger. As I<br />
drive one nail with my right hand, my left hand<br />
feeds out the next (photo bottom right, p. 81).<br />
Pulling nails<br />
A block adds leverage. Slipping a block of wood between your hammer and the wood<br />
decreases the amount of force that it takes to pull a nail. The block also protects the wood<br />
from damage from the hammer.<br />
Eventually, a rhythm develops, and you'll be<br />
able to feed out nails as fast as you drive them.<br />
Short nails, such as those used for roofing and<br />
drywall or for attaching framing anchors, are<br />
easiest to start by holding the nails between your<br />
first two fingers (photo left, facing page). I grab a<br />
handful of these nails and feed them out one at<br />
a time, but I don't worry about getting them all<br />
going the same way. With my thumb I flip each<br />
into position between my first and second fingers<br />
with my fingernails facing down. A good<br />
roofer nailing by hand this way can almost keep<br />
up with an air gun.<br />
When I first started working in the large housing<br />
tracts, there were acres of subfloor to be<br />
nailed. Without a good nailing rhythm, we'd still<br />
be there nailing floor. Some carpenters who<br />
didn't like nailing off flooring on their knees<br />
made themselves a nail buggy, which is a piece<br />
of plywood with wheels screwed to the bottom<br />
(photo center, facing page). A tray nailed onto<br />
one side held the nails, and the carpenters<br />
would sit on the buggy and push themselves<br />
backward, nailing the subfloor to joists as they<br />
went. If you try a nail buggy, make sure you<br />
don't roll off the side of the building.<br />
Hands and arms aren't the only body parts carpenters<br />
use when nailing a house together. Legs<br />
and feet also play an important part. When I'm<br />
building a wall flat on the deck, I often use my<br />
feet to manipulate the stud into place (photo<br />
right, facing page). Once the stud is on its layout,
I place the ball of my foot on the plate and my<br />
heel on the stud to hold the framing members<br />
upright and to keep them from bouncing apart<br />
during the banging. A stud lying flat can be<br />
flipped on edge with your foot, and I occasionally<br />
put my feet on both sides of a stud and lift it<br />
with both heels to bring it up flush with the plate.<br />
Bending nails: to pull or not to pull—Part of<br />
getting into the swing of nailing is making sure<br />
the face of the hammer strikes the nail squarely.<br />
If the hammer is tipped to one side, the force<br />
delivered to the nail isn't centered on the nail,<br />
and the nail will bend. I have worked with<br />
framers who bent nails and never bothered to<br />
Toenailing a cripple. Planting a foot behind<br />
the cripple keeps it from moving while toenails<br />
are driven in at an angle to secure the cripple<br />
to the header.<br />
pull them, reasoning that they would be hidden<br />
with sheathing or drywall. But I think bent nails<br />
leave a frame looking shoddy.<br />
Every carpenter bends nails. However, most<br />
practiced carpenters know that when a nail<br />
does bend, they can usually tip the hammer in<br />
the opposite direction and hit the nail again to<br />
make it straighten back up. Bending nails is often<br />
the result of nailing in an awkward position<br />
or in a tight spot. So if you find yourself in such a<br />
position, use shorter, more direct strokes, and<br />
you'll bend fewer nails.<br />
Sometimes, a nail will bend when it hits a knot<br />
or tough piece of wood. Generally, the harder<br />
the wood is, the harder it is to drive a nail without<br />
bending it. So when nailing into a hardwood,<br />
I hit the nail with softer, direct blows. Occasionally,<br />
I have sunk a nail through a knot by<br />
driving it through the center core, which is usually<br />
softer than the surrounding area.<br />
If a nail bends too much to be straightened<br />
out by changing the angle of your hammer, it<br />
often can be straightened with the hammer<br />
claws and then driven home with softer blows.<br />
A toenail aligns crowned boards. To line<br />
up two boards that have to be nailed together<br />
but aren't parallel, first nail the ends, then sink<br />
a toenail through the highest part of the crown<br />
to bring the two boards into alignment.<br />
When a nail bends and you can't redrive it, pull<br />
it and try driving another nail in the same hole.<br />
As I mentioned earlier, pulling nails can push a<br />
wood-handle hammer to its limit. I either slip a<br />
block of wood under the head to increase leverage<br />
(photo right, p. 83), or I slip the shank of the<br />
nail between the claws of my wood-handle hammer<br />
and push the hammer over to one side<br />
(photo bottom left, p. 83). So I release the hammer,<br />
hook the nail again and push the hammer<br />
to the opposite side. I repeat the process until<br />
the nail is loose. Pulling nails in this fashion is effective<br />
but usually dents the wood pretty severely,<br />
so I don't try it with finish lumber.<br />
If you are pulling a nail from an expensive<br />
piece of trim, put something softer than a block<br />
of wood between the hammer and the trim. A<br />
piece of heavy leather or rubber or folded-up<br />
cardboard works well.<br />
There are times when a nail that has been driven<br />
home has to be pulled—maybe the head is<br />
in the way of a sawcut that you need to make. If<br />
I'm looking at a framing nail driven into 2x<br />
stock, I usually reach for my cat's-paw (photo<br />
top left, p. 83), which has short, hammerlike<br />
claws that come to a sharp point. I drive points<br />
A blunted nail won't split the wood. Flattening<br />
the point of a nail lets it break the fibers<br />
in a piece of wood as it's driven through instead<br />
of wedging the fibers apart and causing<br />
the wood to split.<br />
of the cat's-paw into the wood just upgrain from<br />
the nail head. As the points dig into the wood, I<br />
angle the cat's-paw toward the nail and drive<br />
the claws under the head. The nail can then be<br />
pried out enough to be pulled by a hammer.<br />
When I need to remove a piece of trim while<br />
minimizing the damage, I use a fine nail set and<br />
drive the nails through the trim. Most nail sets<br />
will enlarge the hole slightly, but that is better<br />
than prying the trim off with a flat bar, a sure<br />
way to ruin a piece of trim. If I need to pull nails<br />
from a piece of trim that I've removed and want<br />
to save, I pull the finish nails from the backside<br />
of the piece using a pair of carpenter's nippers.<br />
Miss the nail, and you'll have to cover<br />
your tracks—No discussion of nailing goofs<br />
would be complete without mention of what<br />
old-time carpenters called "Charlie Olsens."<br />
When you miss a nail and the hammer hits the<br />
wood, a telltale dent is always left. If the hammer<br />
is tipped a bit, the dent will look like the letter<br />
"C," and if the miss is full on, the dent will be<br />
Charlie's other initial, "O."<br />
Like bent nails, Charlie Olsens are more likely<br />
to happen when nailing in an awkward position,<br />
and practice is the best way to keep Charlie<br />
away from the job. However, if you do happen<br />
to leave a dent in trim or baseboard where it<br />
will be seen, you'll have to do some fixing.<br />
If the wood is to be painted, the holes can be<br />
filled with putty and sanded. Dents in stain-grade<br />
wood take a bit more work. A moist, cotton<br />
cloth placed on the dent and heated with a flatiron<br />
is often enough to expand and raise the
dented wood. Once the wood has dried completely,<br />
give it a gentle sanding to blend the repair<br />
in with the surrounding wood.<br />
Toenails work best at the proper angle—<br />
Nails driven straight into end grain, like those<br />
through a wall plate and into a stud, have shear<br />
strength but little withdrawal resistance. On the<br />
other hand, toenails driven in at an angle will<br />
hold two pieces of wood together much more<br />
securely, especially when the nails in the same<br />
piece of wood are driven in at opposite angles.<br />
If a toenail is started at the right spot and driven<br />
at the correct angle (about 60°), half the<br />
length of the nail will be in each piece of wood.<br />
Most nails have a sharp point that lets you start<br />
them at the proper angle. But if you have trouble<br />
starting a toenail this way, you can tap the nail<br />
more or less straight into the wood and then pull<br />
it up to the correct angle before driving it home.<br />
One place where I use toenails is for attaching<br />
cripples to load-bearing headers (photo left,<br />
facing page). First, I start the nail in the cripple<br />
and then place it on the header about in. off<br />
the layout line. I back up the cripple with my<br />
foot and steady it with my hand while sinking<br />
the nails. The final hammer blow moves the<br />
cripple onto the layout line and draws it down<br />
tight to the header. Another toenail driven from<br />
the opposite side ties the cripple to the header.<br />
When driving the second toenail, try not to hit<br />
the cripple, which could loosen the cripple,<br />
knock it off its layout and raise it off the header.<br />
With practice, you'll be able to toenail framing<br />
members together just by holding them tightly in<br />
position with hand pressure. The key is making<br />
sure the angle of the nail is right. In these situations<br />
or when toenailing a stud to a sill plate,<br />
our code requires three 16d or four 8d nails. I<br />
use box nails because their thinner shank is not<br />
as likely to split the end of the 2x.<br />
When toenailing cripples or driving nails near<br />
the end of a board, you'll sometimes need<br />
to avoid splitting wood with the nail. In these<br />
cases, I try dulling the point (photo right, facing<br />
page). Place the nail with the point upright and<br />
with the head on a hard surface. Tap the point<br />
several times with your hammer. The blunt point<br />
breaks the wood grain as the nail penetrates instead<br />
of spreading and splitting it.<br />
I also drive toenails to straighten bowed framing<br />
members that have to be nailed together,<br />
such as two 2xs forming a header or a comer<br />
stud (photo center, facing page). This is one<br />
place where pneumatics will never replace the<br />
good old hammer. If one board is crowned so<br />
that it stands higher than the second board, I<br />
nail both ends together and then drive a toenail<br />
into the highest part of the crown, banging the<br />
nail down until the crowned board is flush with<br />
its partner. A couple of 16ds are then driven<br />
Starting a nail one-handed.<br />
When you need to drive a nail<br />
that's beyond the reach of two<br />
hands, wrap one hand around the<br />
head of the hammer and hold the<br />
head of the nail against the hammer<br />
head with your thumb and<br />
forefinger.<br />
Remote control. With the nail<br />
held as shown above, you can<br />
stretch up to that out-of-reach<br />
spot and start the nail by swinging<br />
your fist toward the wood.<br />
Once the nail is started, regrip<br />
the handle and drive the nail.<br />
through the face of the header to keep the two<br />
boards aligned permanently.<br />
Change your swing for nailing in tight<br />
places—One way of nailing in tight places such<br />
as under a roof overhang or toenailing joists to<br />
plates is with short strokes: tap, tap, tap. But in<br />
most cases, I take a modified full swing, moving<br />
the hammer not only in an arc, but also up<br />
as it clears the overhang (or down as the hammer<br />
clears the joist) and approaches the nail.<br />
These tight spots are prime candidates for bent<br />
nails and Charlie Olsens, and one way to help<br />
prevent those mistakes is by angling the nail toward<br />
you slightly before trying to drive it home.<br />
Also, if you're nailing in that last piece of gable<br />
siding over your head, get the nails started before<br />
climbing up the ladder.<br />
Stretching to start a nail<br />
There are also times when you'll need to drive<br />
a nail that's a full arm's length away, such as way<br />
over your head (bottom photo). Starting the nail<br />
is the trick in these situations. Today, you can<br />
buy a hammer with a magnetic slot in the head<br />
(Ted Hammer; 800-645-2434) where you can insert<br />
a nail and start it with your first swing. Another<br />
option I use is grabbing the head of my<br />
framing hammer in the palm of my hand. I hold<br />
a nail with my thumb and forefinger, placing the<br />
head of the nail against the side of the hammer<br />
head (top photo). Then, with a quick punching<br />
action, I can start the nail with one hand.<br />
Larry Haun, the author of The Very Efficient Carpenter,<br />
a book and video series published by The<br />
Taunton Press, is a carpenter who lives in Coos<br />
Bay, Oregon. Photos by Roe A. Osborn.