(WC) Wall Cantilever Jib Cranes - Spanco
(WC) Wall Cantilever Jib Cranes - Spanco
(WC) Wall Cantilever Jib Cranes - Spanco

Create successful ePaper yourself
Turn your PDF publications into a flip-book with our unique Google optimized e-Paper software.
INSTALLATION (Continued)<br />
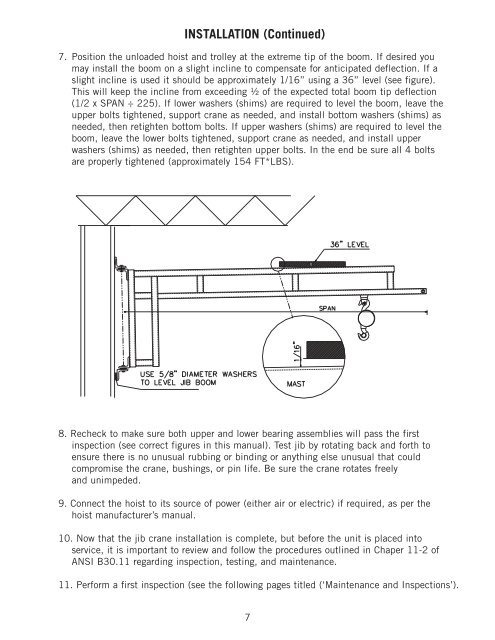
7. Position the unloaded hoist and trolley at the extreme tip of the boom. If desired you<br />
may install the boom on a slight incline to compensate for anticipated deflection. If a<br />
slight incline is used it should be approximately 1/16” using a 36” level (see figure).<br />
This will keep the incline from exceeding ½ of the expected total boom tip deflection<br />
(1/2 x SPAN ÷ 225). If lower washers (shims) are required to level the boom, leave the<br />
upper bolts tightened, support crane as needed, and install bottom washers (shims) as<br />
needed, then retighten bottom bolts. If upper washers (shims) are required to level the<br />
boom, leave the lower bolts tightened, support crane as needed, and install upper<br />
washers (shims) as needed, then retighten upper bolts. In the end be sure all 4 bolts<br />
are properly tightened (approximately 154 FT*LBS).<br />
8. Recheck to make sure both upper and lower bearing assemblies will pass the first<br />
inspection (see correct figures in this manual). Test jib by rotating back and forth to<br />
ensure there is no unusual rubbing or binding or anything else unusual that could<br />
compromise the crane, bushings, or pin life. Be sure the crane rotates freely<br />
and unimpeded.<br />
9. Connect the hoist to its source of power (either air or electric) if required, as per the<br />
hoist manufacturer’s manual.<br />
10. Now that the jib crane installation is complete, but before the unit is placed into<br />
service, it is important to review and follow the procedures outlined in Chaper 11-2 of<br />
ANSI B30.11 regarding inspection, testing, and maintenance.<br />
11. Perform a first inspection (see the following pages titled (‘Maintenance and Inspections’).<br />
7