Service Manual - Fontaine International
Service Manual - Fontaine International
Service Manual - Fontaine International

You also want an ePaper? Increase the reach of your titles
YUMPU automatically turns print PDFs into web optimized ePapers that Google loves.
Preventive maintenance<br />
Remember to exercise extreme caution, follow all stated<br />
& customary safety procedures, and be sure to wear<br />
safety glasses.<br />
Step 1. Visual inspection<br />
Using a suitable solvent, degrease the fifth wheel and<br />
mounting brackets every 90 days or 30,000 miles and<br />
inspect for:<br />
1. Cracks in the fifth wheel assembly, mounting brackets,<br />
and mounting parts.<br />
2. Wear and/or damage to moving parts.<br />
3. Correct operation of the secondary lock.<br />
4. Loose nuts and bolts in the fifth wheel and in the<br />
mounting hardware.<br />
5. Securely fastened and properly working springs.<br />
6. Check to see if both bracket pins are in place and<br />
secured by retainer pins and cotter pins.<br />
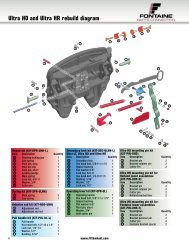
7. Check the locking jaw. If dimension “X” is less than 0.8"<br />
(20.25 mm) replacement of the jaw and lockbar (wedge)<br />
is required. See Figure A.<br />
Figure A<br />
Dimension “X”<br />
Check the fifth wheel operation and adjustment. Using a<br />
test kingpin or 2" (50.88 mm) diameter pipe, follow the<br />
instructions provided in the pre-service procedure on<br />
pages 6-8.<br />
Step 2. Function Inspection<br />
FONTAINE<br />
FIFTH WHEEL ®<br />
Begin with the fifth wheel in the unlocked position. Pull<br />
handle to unlock fifth wheel if it is not open.<br />
Insert a test kingpin, such as <strong>Fontaine</strong> Kingpin Tool<br />
KIT-ULTRA-KP, to close the lock.<br />
Make sure the jaw and wedge are engaged behind the<br />
kingpin and the pull handle is fully retracted.<br />
Open and close the wheel again.<br />
If the action is slow or sluggish, it may be due to a build up<br />
of old grease or a bent part causing binding (see trouble<br />
shooting section).<br />
Lightly lubricate the pivot points on the mechanism with a<br />
spray lubricant.<br />
Step 3. Adjustment<br />
1. With the wheel in the closed position, loosen the<br />
adjuster lock nut and turn the adjuster stud counter<br />
clockwise (outward) until it is free from touching the end<br />
of the lockbar (wedge).<br />
2. Insert a test kingpin or 2" (50.8 mm) diameter shaft to<br />
ensure the locking mechanism is completely closed.<br />
3. Turn the adjuster stud clockwise (inward) until it<br />
contacts the end of the lockbar (wedge). Now turn the<br />
adjuster stud clockwise (inward) an additional 2-1/2<br />
revolutions. This will give the recommended .02"<br />
(0.525 mm) running clearance.<br />
4. Tighten the adjuster lock nut.<br />
Improper adjustment can cause the mechanism to bind<br />
and/or wear prematurely.<br />
800-874-9780 • www.fifthwheel.com 9