DIGITAL TTL POWER ZOOM FLASH for Four Thirds ... - Nissin Japan
DIGITAL TTL POWER ZOOM FLASH for Four Thirds ... - Nissin Japan
DIGITAL TTL POWER ZOOM FLASH for Four Thirds ... - Nissin Japan

Create successful ePaper yourself
Turn your PDF publications into a flip-book with our unique Google optimized e-Paper software.
<strong>for</strong> <strong>Four</strong> <strong>Thirds</strong>/Micro <strong>Four</strong> <strong>Thirds</strong><br />
INSTRUCTION MANUAL<br />
<strong>DIGITAL</strong> <strong>TTL</strong> <strong>POWER</strong> <strong>ZOOM</strong> <strong>FLASH</strong><br />
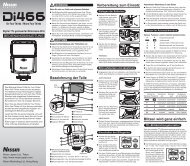
<strong>Nissin</strong> Di466 <strong>Four</strong> <strong>Thirds</strong> / Micro <strong>Four</strong> <strong>Thirds</strong> version has been<br />
developed <strong>for</strong> digital SLR and (Micro) <strong>Four</strong> <strong>Thirds</strong> system cameras<br />
with hotshoe and the latest <strong>TTL</strong> flash control technolgy.<br />
Note: No film camera can be used with Di466 <strong>Four</strong> <strong>Thirds</strong>.<br />
Attach Di466 <strong>Four</strong> <strong>Thirds</strong> to your camera, and then almost all jobs<br />
are controlled by the camera <strong>for</strong> the most proper exposure.<br />
Read this instruction manual and refer your camera owner’s<br />
manual to enjoy flash photography.<br />
Read this instruction manual and refer your canera owner’s manual<br />
to enjoy flash photography.<br />
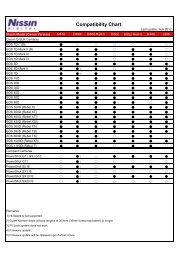
The compatibility list of Di622 Mark II, please check at our official<br />
website: www.nissindigital.com<br />
<strong>Nissin</strong> <strong>Japan</strong> Ltd., Tokyo<br />
http://www.nissin-japan.com<br />
<strong>Nissin</strong> Marketing Ltd., Hong Kong<br />
http://www.nissindigital.com<br />
Design and Specifications are subject to change without prior notice. 466FT.Rev0310.1.2<br />
WARNING<br />
This sign refers the danger or serious damage.<br />
The flash unit contains high voltage electric parts. Do not try<br />
to open or repair the flash unit. Return it back to the repair<br />
service station or the store you bought it.<br />
Do not touch the inside parts from the opening when the unit<br />
was dropped and broken.<br />
Do not fire the flash direct to the eye at short distance. It may<br />
damage the eye. When taking flash picture especially<br />
toward a baby, it is recommended to keep the flash unit at<br />
least 1 meter (3.3feet) away from the subject.<br />
Or use diffuser or bounce the light to the ceiling or to the wall<br />
to soften its intensity.<br />
Do not use the flash unit in the flammable gas, chemicals or<br />
such liquids. It may cause fire or electric shock.<br />
CAUTIONS<br />
This sign refers the damage or defect.<br />
Do not leave or store the flash unit in the temperature over<br />
40°C, such like in the automobile.<br />
The flash unit is not water resistant. Keep the unit away from<br />
rain, snow and humidity.<br />
Do not use benzene, thinner or other alcoholic agents to<br />
clean the unit.<br />
Do not use this flash with the cameras which is not listed in<br />
the compatibility list at our official website, otherwise it may<br />
damage the camera’s circuitry.<br />
Remove the batteries when not in use <strong>for</strong> a longer period of<br />
time.
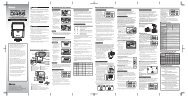
Nomenclature<br />
Filter<br />
guide<br />
Fill-in reflector<br />
Light diffusing panel<br />
Wireless flash sensor<br />
Flash head<br />
AF-assist light<br />
Pilot lamp (Test flash button)<br />
On / Off switch (Press button)<br />
Mode select button / indicator<br />
(<strong>TTL</strong>→Manual→Slave 1→Slave 2)<br />
Flash power level indication lamps (6 LEDs)<br />
Flash power level select button<br />
Accessories: Flash stand, Pouch<br />
Lock ring<br />
Mounting foot<br />
Hotshoe contacts<br />
Battery magazine<br />
Mounting Di466 <strong>Four</strong> <strong>Thirds</strong> on the Camera<br />
Turn the lock ring to loosen it as shown in<br />
the picture.<br />
Slide the mounting foot of Di466 <strong>Four</strong><br />
<strong>Thirds</strong> into the hotshoe of camera.<br />
Turn the lock ring to opposite direction<br />
and tighten it.<br />
Lock pin comes out to hook the foot at<br />
the hotshoe <strong>for</strong> sure contact.<br />
Removing Di466 <strong>Four</strong> <strong>Thirds</strong> from the Camera<br />
12-53<br />
For 4/3 Digital Cameras<br />
Flash stand<br />
Loosen the lock ring and slide the mounting foot of Di466 <strong>Four</strong> <strong>Thirds</strong> off<br />
the hotshoe of the camera. Make sure to turn the lock ring all the way to<br />
completely clear the lock pin off the hooking slot on the hotshoe.<br />
NOTE<br />
Be<strong>for</strong>e mounting or removing Di466 <strong>Four</strong> <strong>Thirds</strong> into or from the<br />
camera, it is recommended to turn off the power switch of both Di466<br />
<strong>Four</strong> <strong>Thirds</strong> and the camera.<br />
Basic Operation<br />
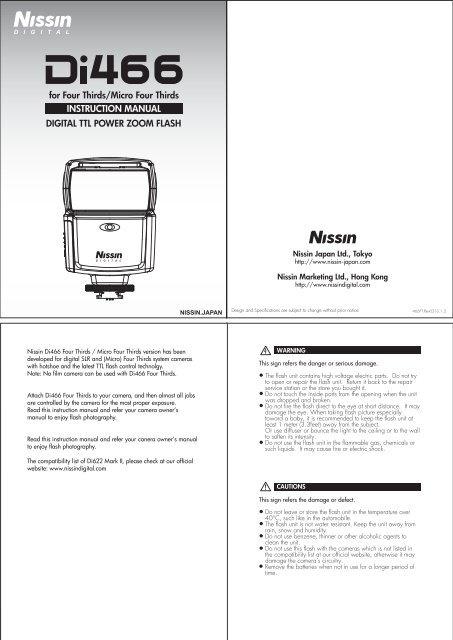
Inserting batteries<br />
Remove the battery magazine and<br />
insert 4 x size AA batteries as shown<br />
in the picture.<br />
The battery compartment is designed<br />
so that each cell is placed in same<br />
direction to avoid the confusion in<br />
poor light situation.<br />
+ / - symbol is clearly marked at the<br />
battery compartment.<br />
Place the battery magazine back<br />
into the body.<br />
NOTE<br />
It is recommended to use all 4 batteries in same brand and type, and<br />
replace them all at the same time. Wrong insertion of each cell does<br />
not make electric contact.<br />
Turn on the flash unit<br />
Press the On / Off switch and Pilot lamp<br />
turns red showing the unit is turned on.<br />
In a few seconds, the Pilot lamp turns<br />
green. Di466 <strong>Four</strong> <strong>Thirds</strong> is ready to shoot.<br />
For a test flash, press the Pilot lamp. When using the test flash as an<br />
open flash, please note that the reference guide number in this case is<br />
G.No.10 (ISO 100).<br />
To turn off the flash unit manually, press the On / Off switch <strong>for</strong> 2<br />
seconds.<br />
Di466 <strong>Four</strong> <strong>Thirds</strong> has energy saving double power off function.<br />
To save battery energy, the power is automatically turned off (to<br />
stand-by mode), both in <strong>TTL</strong> mode & Manual Power mode, in about 2<br />
minutes of idle use.<br />
While Di466 <strong>Four</strong> <strong>Thirds</strong> is in the stand-by mode a Pilot lamp blinks<br />
every 2 seconds showing the flash unit is in stand-by mode.<br />
To turn on Di466 <strong>Four</strong> <strong>Thirds</strong> again, press the camera’s shutter button<br />
halfway or press any button of the flash unit.<br />
In case Di466 <strong>Four</strong> <strong>Thirds</strong> is not in use over 30 minutes, the unit is<br />
completely turned off and shut out the current leakage from the<br />
batteries.<br />
To turn on Di466 <strong>Four</strong> <strong>Thirds</strong> again, take the first step of turning the<br />
flash unit on.<br />
In case of using Di466 <strong>Four</strong> <strong>Thirds</strong> as a slave flash (at slave mode*5),<br />
Di466 <strong>Four</strong> <strong>Thirds</strong> will not go into the stand-by mode. It will however<br />
automatically turn off when not used over 60 minutes.<br />
*5: Slave mode : Refer instruction below.<br />
x4
Bounce Lighting<br />
When taking a picture of a baby or small children,<br />
do not shoot the flash straight on to them. Bounce<br />
the light off the ceiling or wall so that it won’t scare<br />
them. The lighting on a subject in front of the wall,<br />
creates an unnecessary sharp shadow on the wall<br />
resulting the picture disappointed. Bounce the light<br />
off the ceiling or wall to soften the light on the<br />
subject, and the shadow fade out.<br />
Turn the flash head upwards. It turns upward<br />
to 45 > 60 > 75 > 90 degrees.<br />
When the flash head stays at turning or tilting<br />
position, the zoom setting position of Di466 is<br />
automatically set at the position <strong>for</strong> 25<br />
mm(50mm / film camera standard) focal<br />
The wall or ceiling in this case should be flat<br />
surface and white color is preferable. Colored<br />
ceiling or wall may reflect its color on the<br />
subject.<br />
AF assist light emitter<br />
Under the low light condition, in the dark place, AF assist light will automatically<br />
emit the beam and illuminate the subject, so that the camera can easily<br />
focus the subject in darkness. The beam is however not shown in the picture.<br />
*Remark: Some camera models are originally programmed to disable the AF assist<br />
light function.<br />
For Panasonic only<br />
Following functions are available on Panasonic cameras. Refer to camera<br />
owner's manual <strong>for</strong> details.<br />
Slow synchronization<br />
When taking pictures against a dark background<br />
landscape, this feature will slow the shutter speed when<br />
the flash is activated. Dark background landscape will<br />
appear brighter.<br />
Slow synchronization (2nd curtain)<br />
2nd curtain flash fires just be<strong>for</strong>e the shutter closes.<br />
Changing the flash timing can create interesting effects<br />
in your picture. The slower the shutter speed, the better<br />
the effects turn out.<br />
Manual Exposure Flash<br />
In some occasion, or <strong>for</strong> special expression, you may need your own<br />
flash exposure instead of automatic controlled exposure. You can set<br />
Di466 <strong>Four</strong> <strong>Thirds</strong> <strong>for</strong> non-automatic flash mode, and select the desired<br />
flash power from 6 different levels.<br />
When the flash unit is turned on, it is automatically set <strong>for</strong> <strong>TTL</strong> automatic<br />
flash mode. In this mode, the mode select indicator does not light.<br />
Press the mode select button.<br />
The color of mode select indicator turns<br />
to Red as shown in the picture.<br />
You can select the power, from the left to<br />
right,<br />
Select your desired F-stop and /or shutter speed. Point the subject and<br />
press the shutter.<br />
Red<br />
Set the camera shooting mode to either [ A ] or [ M ].<br />
Flash mode setting<br />
Setting Di466 <strong>Four</strong> <strong>Thirds</strong> as the external flash.<br />
The camera sets the flash mode according to various factors such as firing<br />
pattern and flash timing. Available flash mode depend on the exposure mode.<br />
For Olmypus only<br />
Following functions are available on Olmypus cameras. Refer to camera<br />
owner's manual <strong>for</strong> details.<br />
Slow synchronization<br />
The flash is controlled at a slow shutter speed to the correct<br />
exposure <strong>for</strong> both the main subject and back ground in low<br />
light conditions or at night.<br />
Red-eye reduction flash<br />
In the red-eye reduction flash mode, a series of pre-flashes<br />
are emitted just be<strong>for</strong>e the regular flash fires. This helps<br />
accustom the subject’s eyes to the bright light and minizes<br />
the red-eye phenomenon.<br />
Slow synchronization (2nd curtain)<br />
2nd curtain flash fires just be<strong>for</strong>e the shutter closes.<br />
Changing the flash timing can create interesting effects in<br />
your picture. The slower the shutter speed, the better the<br />
effects turn out.<br />
**<br />
<strong>for</strong> M and S mode ONLY<br />
Slow synchronization / Red-eye reduction<br />
While using slow synchronization with flash shooting, you<br />
can also use this funtion to achieve red-eye reduction.<br />
When shooting a subject against a night scene, this<br />
function allows you to reduce the red-eye phenomenon. As<br />
the time from emitting pre-flashes to shooting is long in<br />
2nd curtain synchronization, it is difficult to achieve red-eye<br />
reduction. Hence, only 1st curtain synchronization setting<br />
is available.<br />
Wireless Remote Flash<br />
Di466 <strong>Four</strong> <strong>Thirds</strong> has a wireless remote flash system as a slave unit.<br />
You can enjoy creative flash photography with multiple lightings from the<br />
various directions. 2 slave modes are provided, Slave 1 (S1: color green)<br />
<strong>for</strong> digital pre-flash system and Slave 2 (S2: color blue) <strong>for</strong> analog flash<br />
system.<br />
Slave 1: In this mode, Di466 <strong>Four</strong> <strong>Thirds</strong> synchronize to the pre-flash<br />
system. The master flash is to be set at <strong>TTL</strong> mode.<br />
Slave 2: In this mode, Di466 <strong>Four</strong> <strong>Thirds</strong> synchronize to the traditional<br />
single flash system. The master flash is to be set at manual mode. Studio<br />
lighting system synchronizes to this mode. This mode is also available <strong>for</strong>
Warranty<br />
In case of the following reason of the defect, it may void the warranty.<br />
Please refer the respective warranty condition <strong>for</strong> details which depend<br />
on the country by country.<br />
1. The product is not used in accordance with the instruction of the<br />
owner’s manual.<br />
2. The product is repaired or modified by the one who is not an<br />
authorized repair service.<br />
3. When the product is used with the cameras not applicable, lens,<br />
adaptors or such accessories produced by the third party.<br />
4. Fault or defect cased by fire, earthquake, flood, public pollution<br />
and such natural accident.<br />
5. In case that the product is stored in dust, moisture, extremely high<br />
temperature or such poor condition.<br />
6. Scratch, blemish, crush or worn out by a violently use or treatment.<br />
7. Guarantee card without name of place purchased or date of<br />
purchase stamped, or no guarantee card.