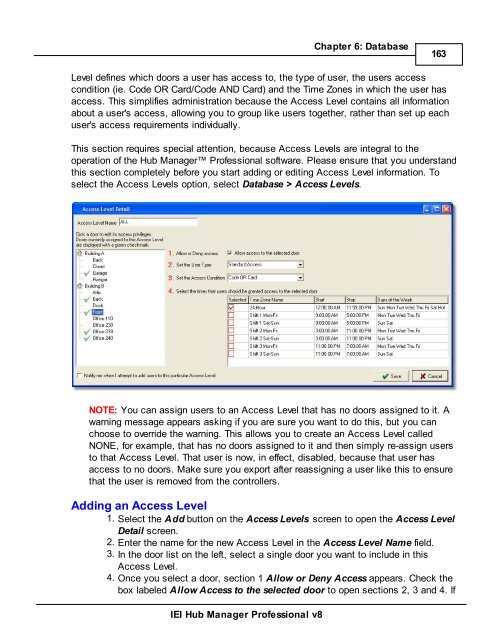
- Page 1 and 2:
International Electronics, Inc. Hub
- Page 3 and 4:
Contents 5 Time Zones .............
- Page 5 and 6:
Chapter 1: Using Online Help 1.1 Us
- Page 7 and 8:
Database This section describes the
- Page 9 and 10:
IEI Hub Manager Professional v8 Cha
- Page 11 and 12:
IEI Hub Manager Professional v8 Cha
- Page 13 and 14:
IEI Hub Manager Professional v8 Cha
- Page 15 and 16:
IEI Hub Manager Professional v8 Cha
- Page 17 and 18:
Using the DTD Printer Utility IEI H
- Page 19 and 20:
Chapter 4: Overview 4.1 General Ove
- Page 21 and 22:
IEI Hub Manager Professional v8 Cha
- Page 23 and 24:
IEI Hub Manager Professional v8 Cha
- Page 25 and 26:
IEI Hub Manager Professional v8 Cha
- Page 27 and 28:
4.2 Initial Set Up IEI Hub Manager
- Page 29 and 30:
IEI Hub Manager Professional v8 Cha
- Page 31 and 32:
IEI Hub Manager Professional v8 Cha
- Page 33 and 34:
Audit Archive Viewer Generate Data
- Page 35 and 36:
IEI Hub Manager Professional v8 Cha
- Page 37 and 38:
IEI Hub Manager Professional v8 Cha
- Page 39 and 40:
4.6 PDA Software IEI Hub Manager Pr
- Page 41 and 42:
IEI Hub Manager Professional v8 Cha
- Page 43 and 44:
IEI Hub Manager Professional v8 Cha
- Page 45 and 46:
IEI Hub Manager Professional v8 Cha
- Page 47 and 48:
IEI Hub Manager Professional v8 Cha
- Page 49 and 50:
IEI Hub Manager Professional v8 Cha
- Page 51 and 52:
4.7 Uninstall IEI Hub Manager Profe
- Page 53 and 54:
Uninstalling the DTD Printer Utilit
- Page 55 and 56:
IEI Hub Manager Professional v8 Cha
- Page 57 and 58:
IEI Hub Manager Professional v8 Cha
- Page 59 and 60:
IEI Hub Manager Professional v8 Cha
- Page 61 and 62:
IEI Hub Manager Professional v8 Cha
- Page 63 and 64:
IEI Hub Manager Professional v8 Cha
- Page 65 and 66:
IEI Hub Manager Professional v8 Cha
- Page 67 and 68:
IEI Hub Manager Professional v8 Cha
- Page 69 and 70:
Advanced Options IEI Hub Manager Pr
- Page 71 and 72:
Delete Selected System IEI Hub Mana
- Page 73 and 74:
IEI Hub Manager Professional v8 Cha
- Page 75 and 76:
5.4 Logout IEI Hub Manager Professi
- Page 77 and 78:
Chapter 6: Database 6.1 Database Me
- Page 79 and 80:
Field/Button Description Name Speci
- Page 81 and 82:
6.4 Sites IEI Hub Manager Professio
- Page 83 and 84:
IEI Hub Manager Professional v8 Cha
- Page 85 and 86:
IEI Hub Manager Professional v8 Cha
- Page 87 and 88:
6.4.2 Serial Connection IEI Hub Man
- Page 89 and 90:
6.4.4 Data Transfer Device (DTD) Co
- Page 91 and 92:
IEI Hub Manager Professional v8 Cha
- Page 93 and 94:
IEI Hub Manager Professional v8 Cha
- Page 95 and 96:
Field/Button Description IEI Hub Ma
- Page 97 and 98:
IEI Hub Manager Professional v8 Cha
- Page 99 and 100:
Aiming the DTD The following diagra
- Page 101 and 102:
Exporting using the AUTO SEARCH Men
- Page 103 and 104:
Exporting using the MANUAL SEARCH M
- Page 105 and 106:
UTILITIES Menu IEI Hub Manager Prof
- Page 107 and 108:
OPTIONS IEI Hub Manager Professiona
- Page 109 and 110:
SET MODE IEI Hub Manager Profession
- Page 111 and 112:
Setup Method Definitions IEI Hub Ma
- Page 113 and 114:
Generate Random Security Key IEI Hu
- Page 115 and 116: IEI Hub Manager Professional v8 Cha
- Page 117 and 118: Above Security Key into the SEG opt
- Page 119 and 120: IEI Hub Manager Professional v8 Cha
- Page 121 and 122: IEI Hub Manager Professional v8 Cha
- Page 123 and 124: IEI Hub Manager Professional v8 Cha
- Page 125 and 126: IEI Hub Manager Professional v8 Cha
- Page 127 and 128: IEI Hub Manager Professional v8 Cha
- Page 129 and 130: IEI Hub Manager Professional v8 Cha
- Page 131 and 132: option will NOT change the IP addre
- Page 133 and 134: 6.4.7 Managing Stand-Alone Controll
- Page 135 and 136: 6.5 Time Zones Time Zones are used
- Page 137 and 138: IEI Hub Manager Professional v8 Cha
- Page 139 and 140: Adding a Door IEI Hub Manager Profe
- Page 141 and 142: IEI Hub Manager Professional v8 Cha
- Page 143 and 144: IEI Hub Manager Professional v8 Cha
- Page 145 and 146: Common Door Settings Field/Button D
- Page 147 and 148: Feature Daylight Savings Time Auto
- Page 149 and 150: IEI Hub Manager Professional v8 Cha
- Page 151 and 152: IEI Hub Manager Professional v8 Cha
- Page 153 and 154: IEI Hub Manager Professional v8 Cha
- Page 155 and 156: IEI Hub Manager Professional v8 Cha
- Page 157 and 158: Max 3 v2 Features IEI Hub Manager P
- Page 159 and 160: IEI Hub Manager Professional v8 Cha
- Page 161 and 162: First-In Auto-Unlock User Selection
- Page 163 and 164: Temporary\Expiring Users IEI Hub Ma
- Page 165: IEI Hub Manager Professional v8 Cha
- Page 169 and 170: IEI Hub Manager Professional v8 Cha
- Page 171 and 172: IEI Hub Manager Professional v8 Cha
- Page 173 and 174: IEI Hub Manager Professional v8 Cha
- Page 175 and 176: IEI Hub Manager Professional v8 Cha
- Page 177 and 178: IEI Hub Manager Professional v8 Cha
- Page 179 and 180: IEI Hub Manager Professional v8 Cha
- Page 181 and 182: IEI Hub Manager Professional v8 Cha
- Page 183 and 184: Adding a User IEI Hub Manager Profe
- Page 185 and 186: IEI Hub Manager Professional v8 Cha
- Page 187 and 188: IEI Hub Manager Professional v8 Cha
- Page 189 and 190: IEI Hub Manager Professional v8 Cha
- Page 191 and 192: IEI Hub Manager Professional v8 Cha
- Page 193 and 194: IEI Hub Manager Professional v8 Cha
- Page 195 and 196: IEI Hub Manager Professional v8 Cha
- Page 197 and 198: IEI Hub Manager Professional v8 Cha
- Page 199 and 200: 6.9.1 User Import Wizard IEI Hub Ma
- Page 201 and 202: IEI Hub Manager Professional v8 Cha
- Page 203 and 204: Field/Button Description Number of
- Page 205 and 206: IEI Hub Manager Professional v8 Cha
- Page 207 and 208: IEI Hub Manager Professional v8 Cha
- Page 209 and 210: IEI Hub Manager Professional v8 Cha
- Page 211 and 212: Select All Click this to select all
- Page 213 and 214: 7.5 Network Query IEI Hub Manager P
- Page 215 and 216: IEI Hub Manager Professional v8 Cha
- Page 217 and 218:
automatically start updating data a
- Page 219 and 220:
IEI Hub Manager Professional v8 Cha
- Page 221 and 222:
IEI Hub Manager Professional v8 Cha
- Page 223 and 224:
IEI Hub Manager Professional v8 Cha
- Page 225 and 226:
IEI Hub Manager Professional v8 Cha
- Page 227 and 228:
8.6 Run COM Port Test IEI Hub Manag
- Page 229 and 230:
IEI Hub Manager Professional v8 Cha
- Page 231 and 232:
IEI Hub Manager Professional v8 Cha
- Page 233 and 234:
IEI Hub Manager Professional v8 Cha
- Page 235 and 236:
IEI Hub Manager Professional v8 Cha
- Page 237 and 238:
IEI Hub Manager Professional v8 Cha
- Page 239 and 240:
Chapter 9: Reports 9.1 Reports Menu
- Page 241 and 242:
IEI Hub Manager Professional v8 Cha
- Page 243 and 244:
IEI Hub Manager Professional v8 Cha
- Page 245 and 246:
IEI Hub Manager Professional v8 Cha
- Page 247 and 248:
IEI Hub Manager Professional v8 Cha
- Page 249 and 250:
9.6 Assignment Reports IEI Hub Mana
- Page 251 and 252:
Door Selection Select the doors tha
- Page 253 and 254:
Print Report to Monitor IEI Hub Man
- Page 255 and 256:
IEI Hub Manager Professional v8 Cha
- Page 257 and 258:
IEI Hub Manager Professional v8 Cha
- Page 259 and 260:
IEI Hub Manager Professional v8 Cha
- Page 261 and 262:
Chapter 10: Help 10.1 Help IEI Hub
- Page 263 and 264:
IEI Hub Manager Professional v8 Cha
- Page 265 and 266:
10.6 About IEI Hub Manager Professi
- Page 267 and 268:
10.7 Glossary IEI Hub Manager Profe
- Page 269 and 270:
Chapter 11: Obtaining Technical Sup
- Page 271 and 272:
Index - 2 - 24 Hours 131 - A - Abou
- Page 273 and 274:
- H - HC500 149 Help 1 About 261 Ch
- Page 275 and 276:
Serial 83 Serial Converter 83 Setti


