P2G - Creating New Items and Categories - AssistiveWare
P2G - Creating New Items and Categories - AssistiveWare
P2G - Creating New Items and Categories - AssistiveWare

You also want an ePaper? Increase the reach of your titles
YUMPU automatically turns print PDFs into web optimized ePapers that Google loves.
<strong>Creating</strong> <strong>New</strong> <strong>Items</strong> <strong>and</strong> <strong>Categories</strong><br />
Proloquo2Go (iPad, iPhone <strong>and</strong> iPod touch). In this tutorial you will learn how to create new items <strong>and</strong><br />
categories in different ways.<br />
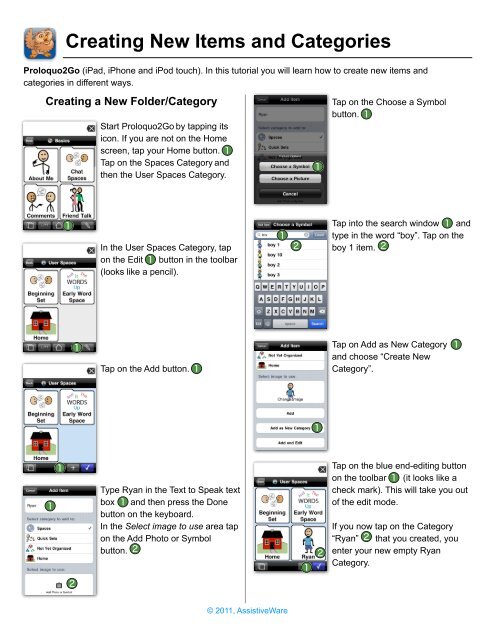
<strong>Creating</strong> a <strong>New</strong> Folder/Category<br />
Start Proloquo2Go by tapping its<br />
icon. If you are not on the Home<br />
screen, tap your Home button.<br />
Tap on the Spaces Category <strong>and</strong><br />
then the User Spaces Category.<br />
In the User Spaces Category, tap<br />
on the Edit button in the toolbar<br />
(looks like a pencil).<br />
Tap on the Add button.<br />
Type Ryan in the Text to Speak text<br />
box <strong>and</strong> then press the Done<br />
button on the keyboard.<br />
In the Select image to use area tap<br />
on the Add Photo or Symbol<br />
button.<br />
© 2011, <strong>AssistiveWare</strong><br />
Tap on the Choose a Symbol<br />
button.<br />
Tap into the search window <strong>and</strong><br />
type in the word “boy”. Tap on the<br />
boy 1 item.<br />
Tap on Add as <strong>New</strong> Category<br />
<strong>and</strong> choose “Create <strong>New</strong><br />
Category”.<br />
Tap on the blue end-editing button<br />
on the toolbar (it looks like a<br />
check mark). This will take you out<br />
of the edit mode.<br />
If you now tap on the Category<br />
“Ryan” that you created, you<br />
enter your new empty Ryan<br />
Category.
<strong>Creating</strong> <strong>New</strong> <strong>Items</strong> <strong>and</strong> <strong>Categories</strong> page 2/3<br />
<strong>Creating</strong> a <strong>New</strong> Item<br />
Tap on the Edit button in the<br />
toolbar. Tap on the add item button<br />
<strong>and</strong> type Hamburger in the Text to<br />
Speak text box.<br />
In the Select image to use area on<br />
the Add Photo or Symbol button.<br />
Then tap on the Choose a Symbol<br />
button <strong>and</strong> type “hamburger”<br />
into the search window.<br />
Tap on the hamburger 1 item, tap<br />
on the Add button <strong>and</strong> then tap<br />
on the blue end-editing button to<br />
go out of editing mode.<br />
Editing an Item<br />
Tap on the edit button in the<br />
toolbar (the pencil). Now tap on the<br />
Hambuger item you just created<br />
<strong>and</strong> then tap on the Edit button.<br />
© 2011, <strong>AssistiveWare</strong><br />
Tap into the Hamburger text area.<br />
Type “I want a hambuger.” into the<br />
text field. Click on the Done button<br />
on the keyboard <strong>and</strong> then on<br />
the Done button at the top of the<br />
screen of the Item Editor. Tap<br />
on the blue end-editing button.<br />
Tap on the Hambuger item to<br />
see the message you just created<br />
in the Message Window. Tap<br />
the Delete button to clear the<br />
message window.<br />
Adding an item using Typing view<br />
Tap on the Views button (the two<br />
overlapping squares) on the<br />
toolbar <strong>and</strong> then on the Typing<br />
button.<br />
Type “I want a salad” into the text<br />
area <strong>and</strong> tap on the Insert button.<br />
Press the Cancel button in the<br />
toolbar below the Message<br />
Window to hide the keyboard.
<strong>Creating</strong> <strong>New</strong> <strong>Items</strong> <strong>and</strong> <strong>Categories</strong> page 3/3<br />
Tap on the Views button <strong>and</strong><br />
then on the Grid button .<br />
Tap on the Add item (the +) in the<br />
bar below the Message Window<br />
<strong>and</strong> tap on the Add <strong>and</strong> Edit<br />
button.<br />
Tap in the Label text area <strong>and</strong><br />
type the word Salad. Tap on the<br />
Done button on the keyboard<br />
<strong>and</strong> then on the Done button at the<br />
top of the Item Editor screen.<br />
Using Copy to Easily Add Multiple <strong>Items</strong><br />
Tap on the Home button on the<br />
toolbar <strong>and</strong> tap on the <strong>Categories</strong><br />
item on the Home screen. Tap on<br />
the Food <strong>and</strong> Drinks category. Tap<br />
on the Lunch category <strong>and</strong> tap on<br />
the Edit button on the toolbar.<br />
Tap on the caesar salad item <strong>and</strong><br />
tap on the Copy button.<br />
Tap on the chicken nuggets item<br />
<strong>and</strong> tap on the Copy button.<br />
Tap on the french fries item <strong>and</strong><br />
tap on the Copy button.<br />
Note how each time you copy an<br />
item it appears slightly dimmed in<br />
the message window.<br />
© 2011, <strong>AssistiveWare</strong><br />
Be careful! Cutting an item<br />
removes it from the category!<br />
Tap on the end-editing button on<br />
the toolbar (it looks like a check<br />
mark) <strong>and</strong> then on the back button<br />
in the bar below the Message<br />
Window. Tap on the Drinks<br />
category <strong>and</strong> tap on the Edit button<br />
on the toolbar. Copy a few items by<br />
using the before mentioned<br />
strategy.<br />
Tap on the end-editing button on<br />
the toolbar. Tap on the Home<br />
button, tap on the Spaces<br />
category, tap on the User Spaces<br />
category, tap on the Ryan category<br />
<strong>and</strong> tap on the Paste button.<br />
You have now copied several<br />
items from the Lunch category <strong>and</strong><br />
the Drinks category to Ryan’s<br />
category.