Assembly And Maintenance Instructions â WABCO
Assembly And Maintenance Instructions â WABCO
Assembly And Maintenance Instructions â WABCO

You also want an ePaper? Increase the reach of your titles
YUMPU automatically turns print PDFs into web optimized ePapers that Google loves.
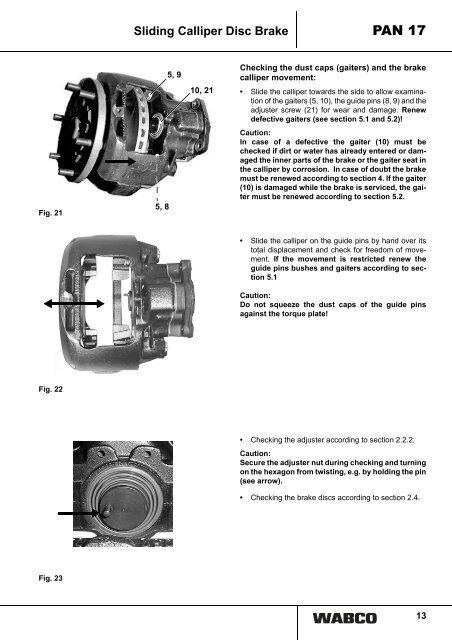
Fig. 21<br />
Fig. 22<br />
Fig. 23<br />
Sliding Calliper Disc Brake PAN 17<br />
5, 8<br />
5, 9<br />
10, 21<br />
Checking the dust caps (gaiters) and the brake<br />
calliper movement:<br />
• Slide the calliper towards the side to allow examination<br />
of the gaiters (5, 10), the guide pins (8, 9) and the<br />
adjuster screw (21) for wear and damage. Renew<br />
defective gaiters (see section 5.1 and 5.2)!<br />
Caution:<br />
In case of a defective the gaiter (10) must be<br />
checked if dirt or water has already entered or damaged<br />
the inner parts of the brake or the gaiter seat in<br />
the calliper by corrosion. In case of doubt the brake<br />
must be renewed according to section 4. If the gaiter<br />
(10) is damaged while the brake is serviced, the gaiter<br />
must be renewed according to section 5.2.<br />
• Slide the calliper on the guide pins by hand over its<br />
total displacement and check for freedom of movement.<br />
If the movement is restricted renew the<br />
guide pins bushes and gaiters according to section<br />
5.1<br />
Caution:<br />
Do not squeeze the dust caps of the guide pins<br />
against the torque plate!<br />
• Checking the adjuster according to section 2.2.2.<br />
Caution:<br />
Secure the adjuster nut during checking and turning<br />
on the hexagon from twisting, e.g. by holding the pin<br />
(see arrow).<br />
• Checking the brake discs according to section 2.4.<br />
13