Assembly And Maintenance Instructions â WABCO
Assembly And Maintenance Instructions â WABCO
Assembly And Maintenance Instructions â WABCO

Create successful ePaper yourself
Turn your PDF publications into a flip-book with our unique Google optimized e-Paper software.
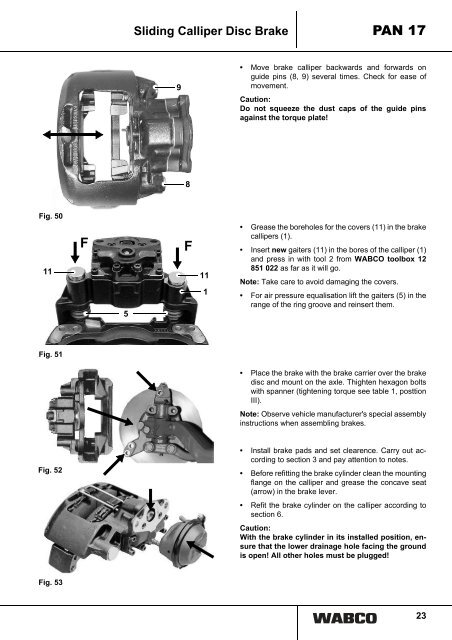
Fig. 50<br />
11<br />
Fig. 51<br />
Fig. 52<br />
Fig. 53<br />
Sliding Calliper Disc Brake PAN 17<br />
F F<br />
5<br />
9<br />
8<br />
11<br />
1<br />
• Move brake calliper backwards and forwards on<br />
guide pins (8, 9) several times. Check for ease of<br />
movement.<br />
Caution:<br />
Do not squeeze the dust caps of the guide pins<br />
against the torque plate!<br />
• Grease the boreholes for the covers (11) in the brake<br />
callipers (1).<br />
• Insert new gaiters (11) in the bores of the calliper (1)<br />
and press in with tool 2 from <strong>WABCO</strong> toolbox 12<br />
851 022 as far as it will go.<br />
Note: Take care to avoid damaging the covers.<br />
• For air pressure equalisation lift the gaiters (5) in the<br />
range of the ring groove and reinsert them.<br />
• Place the brake with the brake carrier over the brake<br />
disc and mount on the axle. Thighten hexagon bolts<br />
with spanner (tightening torque see table 1, posttion<br />
III).<br />
Note: Observe vehicle manufacturer's special assembly<br />
instructions when assembling brakes.<br />
• Install brake pads and set clearence. Carry out according<br />
to section 3 and pay attention to notes.<br />
• Before refitting the brake cylinder clean the mounting<br />
flange on the calliper and grease the concave seat<br />
(arrow) in the brake lever.<br />
• Refit the brake cylinder on the calliper according to<br />
section 6.<br />
Caution:<br />
With the brake cylinder in its installed position, ensure<br />
that the lower drainage hole facing the ground<br />
is open! All other holes must be plugged!<br />
23