Assembly And Maintenance Instructions â WABCO
Assembly And Maintenance Instructions â WABCO
Assembly And Maintenance Instructions â WABCO

You also want an ePaper? Increase the reach of your titles
YUMPU automatically turns print PDFs into web optimized ePapers that Google loves.
Fig. 37<br />
Fig. 38<br />
2<br />
Fig. 39<br />
6<br />
11<br />
F<br />
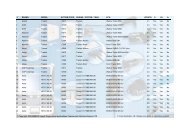
Sliding Calliper Disc Brake PAN 17<br />
1<br />
2<br />
8, 9<br />
7<br />
1<br />
5.1 Renewing guide pin gaiters and<br />
bushes<br />
Important:<br />
The position of the guide pins in the brake may vary depending<br />
on the case of operation. An example of installation<br />
with a long guide pin (8) (plug gauge) driving forward<br />
on the brake disc leading side is shown here. The<br />
renewal can also be carried out with a shorter guide pin<br />
(9) (clearance fit) on the brake disc trailing side.<br />
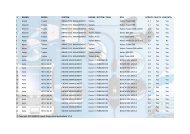
Working sequences for removal:<br />
• Remove brake pads according to section 3.<br />
• Remove brake cylinder from brake calliper according<br />
to section 6.<br />
• Dismantle the calliper with the carrier from the axle<br />
according to section 4.<br />
• Dismantle brake calliper (1) from brake carrier (2) by<br />
removing sealing caps (11) of the guide pins (8, 9)<br />
from the calliper (1) with a suitable tool, e.g. chisel.<br />
Caution:<br />
Take care not to damage cover bores in calliper.<br />
Position the proper tool on the cover.<br />
• Release the screws (6, 7) with a spanner (table 1, position<br />
IV) and separate the calliper (1) from the carrier<br />
(2).<br />
Important:<br />
Moving brake calliper: danger of bodily injury!<br />
• Clean the mating surfaces (collars) of the carrier (2).<br />
19