Operating instructions - Graupner
Operating instructions - Graupner
Operating instructions - Graupner

You also want an ePaper? Increase the reach of your titles
YUMPU automatically turns print PDFs into web optimized ePapers that Google loves.
PIEZO NT-312 G gyro system<br />
Order No. 5951<br />
disabled (switched off) permanently.<br />
5. Be sure to disable the mixer which suppresses the effect of the gyro system in response to<br />
a tail rotor control command (“gyro control”, “gyro suppression”).<br />
6. Switch on the transmitter first, then the receiving system. The LED starts flashing to indicate<br />
that the gyro system is carrying out its self-calibration procedure. Don’t disturb the model<br />
until the LED is glowing constantly.<br />
7. Operate the tail rotor stick on the transmitter and check that the tail rotor responds in the<br />
correct direction.<br />
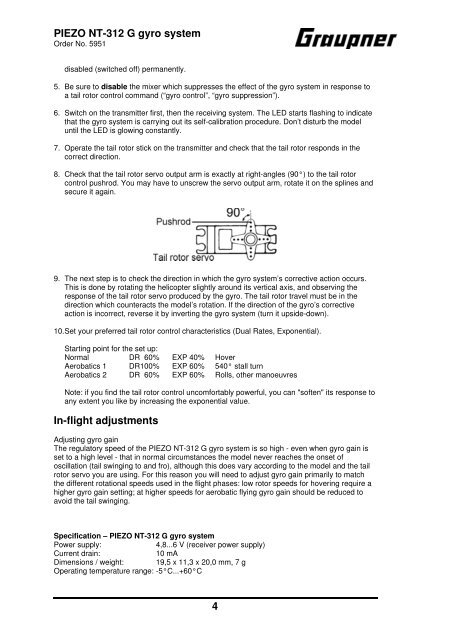
8. Check that the tail rotor servo output arm is exactly at right-angles (90°) to the tail rotor<br />
control pushrod. You may have to unscrew the servo output arm, rotate it on the splines and<br />
secure it again.<br />
9. The next step is to check the direction in which the gyro system’s corrective action occurs.<br />
This is done by rotating the helicopter slightly around its vertical axis, and observing the<br />
response of the tail rotor servo produced by the gyro. The tail rotor travel must be in the<br />
direction which counteracts the model’s rotation. If the direction of the gyro’s corrective<br />
action is incorrect, reverse it by inverting the gyro system (turn it upside-down).<br />
10. Set your preferred tail rotor control characteristics (Dual Rates, Exponential).<br />
Starting point for the set up:<br />
Normal DR 60% EXP 40% Hover<br />
Aerobatics 1 DR100% EXP 60% 540° stall turn<br />
Aerobatics 2 DR 60% EXP 60% Rolls, other manoeuvres<br />
Note: if you find the tail rotor control uncomfortably powerful, you can "soften" its response to<br />
any extent you like by increasing the exponential value.<br />
In-flight adjustments<br />
Adjusting gyro gain<br />
The regulatory speed of the PIEZO NT-312 G gyro system is so high - even when gyro gain is<br />
set to a high level - that in normal circumstances the model never reaches the onset of<br />
oscillation (tail swinging to and fro), although this does vary according to the model and the tail<br />
rotor servo you are using. For this reason you will need to adjust gyro gain primarily to match<br />
the different rotational speeds used in the flight phases: low rotor speeds for hovering require a<br />
higher gyro gain setting; at higher speeds for aerobatic flying gyro gain should be reduced to<br />
avoid the tail swinging.<br />
Specification – PIEZO NT-312 G gyro system<br />
Power supply: 4,8...6 V (receiver power supply)<br />
Current drain: 10 mA<br />
Dimensions / weight: 19,5 x 11,3 x 20,0 mm, 7 g<br />
<strong>Operating</strong> temperature range: -5°C...+60°C<br />
4