Network connection Scanmax - Dimension
Network connection Scanmax - Dimension
Network connection Scanmax - Dimension
Create successful ePaper yourself
Turn your PDF publications into a flip-book with our unique Google optimized e-Paper software.
Setting up a network <strong>connection</strong> between <strong>Scanmax</strong> and DIMENSION<br />
<strong>Network</strong> <strong>connection</strong> <strong>Scanmax</strong> - <strong>Dimension</strong><br />
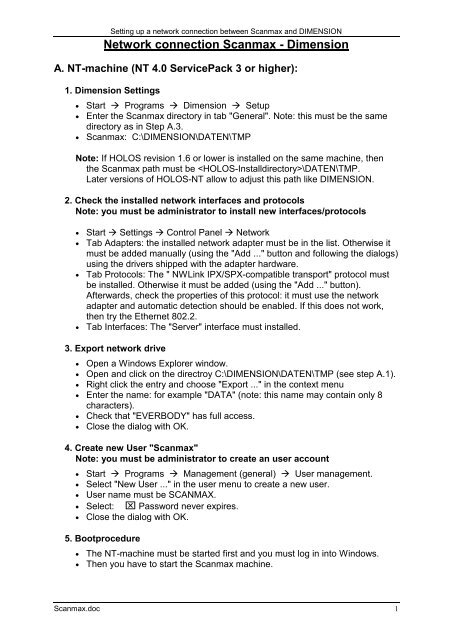
A. NT-machine (NT 4.0 ServicePack 3 or higher):<br />
1. <strong>Dimension</strong> Settings<br />
• Start Programs <strong>Dimension</strong> Setup<br />
• Enter the <strong>Scanmax</strong> directory in tab "General". Note: this must be the same<br />
directory as in Step A.3.<br />
• <strong>Scanmax</strong>: C:\DIMENSION\DATEN\TMP<br />
Note: If HOLOS revision 1.6 or lower is installed on the same machine, then<br />
the <strong>Scanmax</strong> path must be \DATEN\TMP.<br />
Later versions of HOLOS-NT allow to adjust this path like DIMENSION.<br />
2. Check the installed network interfaces and protocols<br />
Note: you must be administrator to install new interfaces/protocols<br />
• Start Settings Control Panel <strong>Network</strong><br />
• Tab Adapters: the installed network adapter must be in the list. Otherwise it<br />
must be added manually (using the "Add ..." button and following the dialogs)<br />
using the drivers shipped with the adapter hardware.<br />
• Tab Protocols: The " NWLink IPX/SPX-compatible transport" protocol must<br />
be installed. Otherwise it must be added (using the "Add ..." button).<br />
Afterwards, check the properties of this protocol: it must use the network<br />
adapter and automatic detection should be enabled. If this does not work,<br />
then try the Ethernet 802.2.<br />
• Tab Interfaces: The "Server" interface must installed.<br />
3. Export network drive<br />
• Open a Windows Explorer window.<br />
• Open and click on the directroy C:\DIMENSION\DATEN\TMP (see step A.1).<br />
• Right click the entry and choose "Export ..." in the context menu<br />
• Enter the name: for example "DATA" (note: this name may contain only 8<br />
characters).<br />
• Check that "EVERBODY" has full access.<br />
• Close the dialog with OK.<br />
4. Create new User "<strong>Scanmax</strong>"<br />
Note: you must be administrator to create an user account<br />
• Start Programs Management (general) User management.<br />
• Select "New User ..." in the user menu to create a new user.<br />
• User name must be SCANMAX.<br />
• Select: Password never expires.<br />
• Close the dialog with OK.<br />
5. Bootprocedure<br />
• The NT-machine must be started first and you must log in into Windows.<br />
• Then you have to start the <strong>Scanmax</strong> machine.<br />
<strong>Scanmax</strong>.doc 1
Setting up a network <strong>connection</strong> between <strong>Scanmax</strong> and DIMENSION<br />
B. <strong>Scanmax</strong> (ScanWare Version 1.30 or higher):<br />
1. BNC Connectors:<br />
<strong>Scanmax</strong>: Replace the terminator with a coax cable with BNC connector.<br />
NT-machine: Connect the other cable's end T-connector to the NT-machine and<br />
don't forget reinstall the terminator on that end.<br />
2. Changes in Scanware.bat in C:\Scanware<br />
Edit SCANWARE.BAT (Caution: blanks are important!); MS-DOS commands:<br />
• CD C:\SCANWARE<br />
• EDIT SCANWARE.BAT<br />
Search for " SCANWARE ". The file must look like this:<br />
:SCANWARE (same setting at section SERVICE, if desired)<br />
GOSUB GEMEINSAM<br />
GOSUB MSCLIENT REM must be removed<br />
REM GOSUP PCTCP<br />
REM GOSUB SCAN_NETZ<br />
C:<br />
CD C:\SCANWARE<br />
SCANWARE.EXE<br />
GOTO ENDE<br />
3. Changes in CAD_LINK.0xx in C:\Scanware\Module<br />
Edit CAD_LINK.0xx (Caution: blanks are important!); MS-DOS commands:<br />
• CD C:\SCANWARE\MODULE<br />
• EDIT CAD_LINK.0xx<br />
Where "0xx" is the country code of the installation. E.g. 049 for Germany. The<br />
following entries must be changed:<br />
ZIELNAME = E:\ (Drive letter „E:\“ for example)<br />
NT = YES<br />
HOLOS = YES<br />
HOLOS_PFAD_NAME = dmis.dmi<br />
4. Create a network <strong>connection</strong><br />
a) Write down the name of the NT-machine<br />
Start Settings Control Panel <strong>Network</strong><br />
In Tab Identifikation you find the computer name.<br />
b) Start <strong>Scanmax</strong> in DOS mode (eventually you have to switch the <strong>Scanmax</strong><br />
computer off and wait 10 seconds before switching it on again; switch off any<br />
connected printer).<br />
c) Start bootnet with these MS-DOS commands<br />
• CD \LOGIN<br />
• Startnet<br />
d) Edit MSCLIENT.BAT (Caution: blanks are important!); MS-DOS commands:<br />
<strong>Scanmax</strong>.doc 2
Setting up a network <strong>connection</strong> between <strong>Scanmax</strong> and DIMENSION<br />
• CD MSCLIENT (Install floppy disk with MSCLIENT, if it is missing)<br />
• EDIT MSCLIENT.BAT<br />
• The file must look like this (computer and drive names are examples; an<br />
explanation of their meaning is given below):<br />
CD \MSCLIENT<br />
NET USE E: \\ZO01Q55P\DATA /YES<br />
NET USE F: \\ZO01Q55P\Q-STAT /YES<br />
NET USE LPT1: \\ZO01Q55P\HP870 /YES<br />
NET USE<br />
e) After saving and leaving the editor the batchfile must be executed with this<br />
command: MSCLIENT.BAT. The batchfile connects the <strong>Scanmax</strong><br />
computer with the NT-machine and shows the connected drives.<br />
Explanation:<br />
ZO01Q55P: Name of the NT-machine (Step B.4.a)<br />
DATA: Exported directory (Step A.3)<br />
E: Drive letter where the data will be written to<br />
Attention: this drive letter must be the same than the<br />
target name (ZIELNAME) CAD_LINK.0xx See Step B.3.<br />
F: More drive letters (e.g. for Q-STAT)<br />
LPT1: You can rederict the printer output to a printer connected<br />
to the NT-machine. The printer must be exported in<br />
Windows NT.<br />
NET USE This command shows all connected drives and printers.<br />
5. Test the network <strong>connection</strong><br />
For final testing, exit from HOLOS and DIMENSION if they are running on<br />
the NT-machine. Reboot the <strong>Scanmax</strong>-machine normally. If the network<br />
<strong>connection</strong> is established, send a data file from Scanware to the NT-machine<br />
using CADLINK.<br />
This will create two files in the exported drive (defined in step A.3:<br />
C:\DIMENSION\DATEN\TMP) on the NT-machine: DMIS.DMI and<br />
READY.xxx.<br />
If this is the case, then the network <strong>connection</strong> between the <strong>Scanmax</strong>- and<br />
the NT-machine is working. Otherwise you may check the error list below for<br />
possible reasons. Eventually you have to recheck all previous steps to make<br />
sure that everything was done correctly.<br />
<strong>Scanmax</strong>.doc 3
Setting up a network <strong>connection</strong> between <strong>Scanmax</strong> and DIMENSION<br />
Fehlermeldungen<br />
Error message Possible reasons To resolve the error<br />
<strong>Dimension</strong> error:<br />
CADLINK error No.:14<br />
<strong>Scanmax</strong> error:<br />
Failed to open home file<br />
<strong>Scanmax</strong> error:<br />
Failed to open home file<br />
<strong>Scanmax</strong> error:<br />
Failed to open home file<br />
Holos error:<br />
Failed to open<br />
datafile!<br />
When booting the <strong>Scanmax</strong>machine<br />
the network <strong>connection</strong> to<br />
the NT-machine is not established<br />
properly<br />
When booting the <strong>Scanmax</strong>machine<br />
the network <strong>connection</strong> to<br />
the NT-machine is not established<br />
properly<br />
When booting the <strong>Scanmax</strong>machine<br />
the network <strong>connection</strong> to<br />
the NT-machine is not established<br />
properly<br />
When starting <strong>Scanmax</strong>, an internal<br />
network <strong>connection</strong> is not<br />
established and Scanware counts<br />
from 300 to 0<br />
CAD_LINK.0xx is not configured<br />
correctly<br />
ZIELNAME in CAD_LINK.0xx does<br />
not coincidence with the drive letter<br />
specified in MSCLIENT.BAT<br />
Target directory was not exported<br />
on the NT-machine<br />
The name of the NT-machine was<br />
entered incorrectly in<br />
MSCLIENT.BAT<br />
CAD_LINK.0xx is not configured<br />
correctly<br />
<strong>Network</strong> interfaces and protocols<br />
not correctly installed or user<br />
<strong>Scanmax</strong> was not<br />
Check the settings in<br />
CAD_LINK.0xx<br />
Assign the drive letter used in<br />
MSCLIENT.BAT to the ZILENAME<br />
in CAD_LINK.0xx<br />
Export the target directory on the<br />
NT-machine<br />
Check the NT-machine name and<br />
correct it in MSCLIENT.BAT<br />
Check the Settings in<br />
CAD_LINK.0xx:<br />
HOLOS_PFAD_NAME=dmis.dmi<br />
Check/install network<br />
interfaces/protocolls and check the<br />
user <strong>Scanmax</strong><br />
Power on order was not correct Turn on the NT-machine first and<br />
wait until Windows NT has started,<br />
then boot the <strong>Scanmax</strong>-machine<br />
Hardware <strong>connection</strong> with failures.<br />
Check that you have used a 50Ω<br />
cable and the t-<strong>connection</strong> sits<br />
properly on the network adapter.<br />
<strong>Scanmax</strong> was switched off and on<br />
too quickly or printer wasn't<br />
switched off<br />
Check that you have used a 50Ω<br />
cable and the t-<strong>connection</strong> sits<br />
properly on the network adapter.<br />
Switch off <strong>Scanmax</strong> and printer and<br />
wait 10 seconds before switching it<br />
on again<br />
Please note:<br />
These represent the most common errors. If an error occurs that is not listed here you have to recheck all<br />
settings described in section A and B.<br />
This includes a thorough check of the network settings on the NT-machine. If you get any error messages<br />
concerning the network when booting windows N, you have to correct these before you can continue the<br />
<strong>Scanmax</strong> network <strong>connection</strong> setup.<br />
Eventually the complete network must be reinstalled on the NT-machine. Please consult your NT Administrator<br />
for help on this issue.<br />
<strong>Scanmax</strong>.doc 4


