Followspot HMI 1200 - Lite-Factory OHG
Followspot HMI 1200 - Lite-Factory OHG
Followspot HMI 1200 - Lite-Factory OHG

Create successful ePaper yourself
Turn your PDF publications into a flip-book with our unique Google optimized e-Paper software.
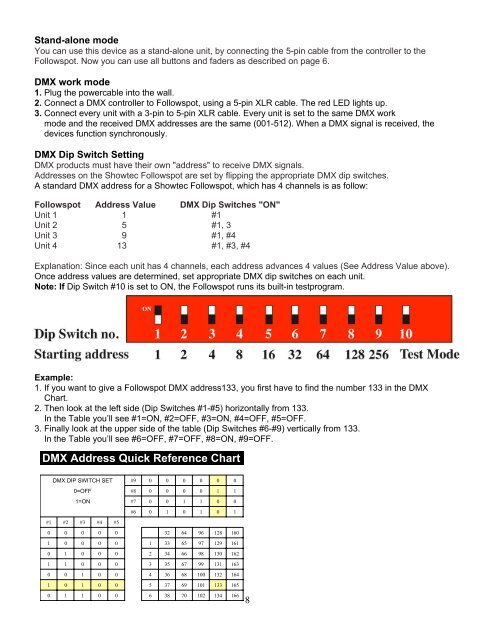
Stand-alone mode<br />
You can use this device as a stand-alone unit, by connecting the 5-pin cable from the controller to the<br />
<strong>Followspot</strong>. Now you can use all buttons and faders as described on page 6.<br />
DMX work mode<br />
1. Plug the powercable into the wall.<br />
2. Connect a DMX controller to <strong>Followspot</strong>, using a 5-pin XLR cable. The red LED lights up.<br />
3. Connect every unit with a 3-pin to 5-pin XLR cable. Every unit is set to the same DMX work<br />
mode and the received DMX addresses are the same (001-512). When a DMX signal is received, the<br />
devices function synchronously.<br />
DMX Dip Switch Setting<br />
DMX products must have their own "address" to receive DMX signals.<br />
Addresses on the Showtec <strong>Followspot</strong> are set by flipping the appropriate DMX dip switches.<br />
A standard DMX address for a Showtec <strong>Followspot</strong>, which has 4 channels is as follow:<br />
<strong>Followspot</strong> Address Value DMX Dip Switches "ON"<br />
Unit 1 1 #1<br />
Unit 2 5 #1, 3<br />
Unit 3 9 #1, #4<br />
Unit 4 13 #1, #3, #4<br />
Explanation: Since each unit has 4 channels, each address advances 4 values (See Address Value above).<br />
Once address values are determined, set appropriate DMX dip switches on each unit.<br />
Note: If Dip Switch #10 is set to ON, the <strong>Followspot</strong> runs its built-in testprogram.<br />
Example:<br />
1. If you want to give a <strong>Followspot</strong> DMX address133, you first have to find the number 133 in the DMX<br />
Chart.<br />
2. Then look at the left side (Dip Switches #1-#5) horizontally from 133.<br />
In the Table you’ll see #1=ON, #2=OFF, #3=ON, #4=OFF, #5=OFF.<br />
3. Finally look at the upper side of the table (Dip Switches #6-#9) vertically from 133.<br />
In the Table you’ll see #6=OFF, #7=OFF, #8=ON, #9=OFF.<br />
DMX Address Quick Reference Chart<br />
DMX DIP SWITCH SET #9 0 0 0 0 0 0<br />
0=OFF<br />
#8 0 0 0 0 1 1<br />
1=ON<br />
#7 0 0 1 1 0 0<br />
#6 0 1 0 1 0 1<br />
#1 #2 #3 #4 #5<br />
0 0 0 0 0 32 64 96 128 160<br />
1 0 0 0 0 1 33 65 97 129 161<br />
0 1 0 0 0 2 34 66 98 130 162<br />
1 1 0 0 0 3 35 67 99 131 163<br />
0 0 1 0 0 4 36 68 100 132 164<br />
1 0 1 0 0 5 37 69 101 133 165<br />
0 1 1 0 0 6 38 70 102 134 166<br />
8