

Download our induction pack here - Atlantic Whale Foundation
Download our induction pack here - Atlantic Whale Foundation
Download our induction pack here - Atlantic Whale Foundation

Create successful ePaper yourself
Turn your PDF publications into a flip-book with our unique Google optimized e-Paper software.
The Data Explained<br />
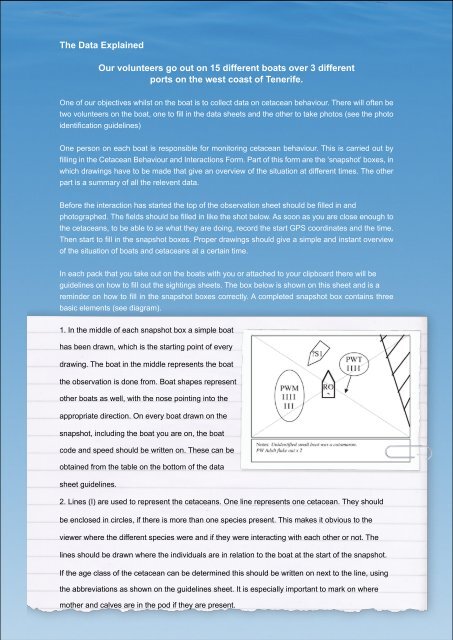
1. In the middle of each snapshot box a simple boat<br />
has been drawn, which is the starting point of every<br />
drawing. The boat in the middle represents the boat<br />
the observation is done from. Boat shapes represent<br />
other boats as well, with the nose pointing into the<br />
appropriate direction. On every boat drawn on the<br />
snapshot, including the boat you are on, the boat<br />
code and speed should be written on. These can be<br />
obtained from the table on the bottom of the data<br />
sheet guidelines.<br />
Our volunteers go out on 15 different boats over 3 different<br />
ports on the west coast of Tenerife.<br />
One of <strong>our</strong> objectives whilst on the boat is to collect data on cetacean behavi<strong>our</strong>. T<strong>here</strong> will often be<br />
two volunteers on the boat, one to fill in the data sheets and the other to take photos (see the photo<br />
identification guidelines)<br />
One person on each boat is responsible for monitoring cetacean behavi<strong>our</strong>. This is carried out by<br />
filling in the Cetacean Behavi<strong>our</strong> and Interactions Form. Part of this form are the ‘snapshot’ boxes, in<br />
which drawings have to be made that give an overview of the situation at different times. The other<br />
part is a summary of all the relevent data.<br />
Before the interaction has started the top of the observation sheet should be filled in and<br />
photographed. The fields should be filled in like the shot below. As soon as you are close enough to<br />
the cetaceans, to be able to se what they are doing, record the start GPS coordinates and the time.<br />
Then start to fill in the snapshot boxes. Proper drawings should give a simple and instant overview<br />
of the situation of boats and cetaceans at a certain time.<br />
In each <strong>pack</strong> that you take out on the boats with you or attached to y<strong>our</strong> clipboard t<strong>here</strong> will be<br />
guidelines on how to fill out the sightings sheets. The box below is shown on this sheet and is a<br />
reminder on how to fill in the snapshot boxes correctly. A completed snapshot box contains three<br />
basic elements (see diagram).<br />
2. Lines (I) are used to represent the cetaceans. One line represents one cetacean. They should<br />
be enclosed in circles, if t<strong>here</strong> is more than one species present. This makes it obvious to the<br />
viewer w<strong>here</strong> the different species were and if they were interacting with each other or not. The<br />
lines should be drawn w<strong>here</strong> the individuals are in relation to the boat at the start of the snapshot.<br />
If the age class of the cetacean can be determined this should be written on next to the line, using<br />
the abbreviations as shown on the guidelines sheet. It is especially important to mark on w<strong>here</strong><br />
mother and calves are in the pod if they are present.