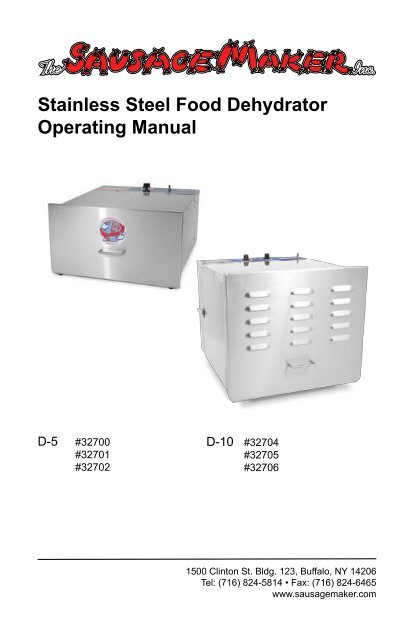
Stainless Steel Food Dehydrator Operating Manual - Everything ...
Stainless Steel Food Dehydrator Operating Manual - Everything ...
Stainless Steel Food Dehydrator Operating Manual - Everything ...

You also want an ePaper? Increase the reach of your titles
YUMPU automatically turns print PDFs into web optimized ePapers that Google loves.
<strong>Stainless</strong> <strong>Steel</strong> <strong>Food</strong> <strong>Dehydrator</strong><br />
<strong>Operating</strong> <strong>Manual</strong><br />
D-5 #32700<br />
#32701<br />
#32702<br />
D-10 #32704<br />
#32705<br />
#32706<br />
1500 Clinton St. Bldg. 123, Buffalo, NY 14206<br />
Tel: (716) 824-5814 • Fax: (716) 824-6465<br />
www.sausagemaker.com<br />
R
D-5 and D-10 <strong>Dehydrator</strong> <strong>Operating</strong> <strong>Manual</strong><br />
Table of Contents Page<br />
Introduction 1<br />
Dehydration 2<br />
Important Safeguards 2<br />
Preparation of <strong>Food</strong> (Pre-Treatment) 2<br />
<strong>Operating</strong> Instructions 3<br />
<strong>Food</strong> Drying Guides 4<br />
<strong>Food</strong> Storage 7<br />
Reconstitution 7<br />
Cleaning 7<br />
Reviewing the Dehydrating Process 8<br />
Warranty 8<br />
D-5 Parts List 9<br />
D-10 Parts List 10<br />
Introduction<br />
Drying food for presearvation dates back to the ancient Egyptians. The<br />
Spaniards were the first explorers known to use dehydration to prepare food for their expeditions.<br />
The method was used extensively in the days of the Lewis and Clark expedition<br />
as they charted the expanse of the Louisiana Land Purchase. Buffalo, elk and deer were<br />
plentiful, but their success relied heavily upon the proper use of this preserving method.<br />
The D-5 and D-10 <strong>Dehydrator</strong>s were designed and constructed to help you get the best<br />
results possible. The shell is made of durable stainless steel so it can be easily cleaned and<br />
maintained. When used properly, it will not rust or crack. All electrical components used are<br />
UL listed for safety and reliability. The information in this manual is intended to help you get<br />
the best results from this equipment. Please read this booklet carefully and call the manufacturer<br />
if you have any questions.<br />
1
Dehydration<br />
There are no exact rules that apply to food dehydration because your results can be af-<br />
fected by room temperature, relative humidity and moisture levels in the food that you are<br />
drying. To become proficient, it will be necessary to experiment with your drying techniques.<br />
If you use too much heat, food may harden on the outside while still being moist inside.<br />
However, with too little heat, your drying times will be very long. With a little practice you will<br />
be creating tasty, ready to eat snacks in no time.<br />
Important Safeguards<br />
1. Read ALL of these instructions thoroughly before using your dehydrator.<br />
2. Save these instructions for future reference.<br />
3. Never leave your dehydrator unattended.<br />
4. Close supervision is required if the unit will be used around children.<br />
5. Only for use indoors in a clean, dry location, free of flammable objects.<br />
6. This unit gets hot. Do not touch surfaces while operating.<br />
7. Continuous operation above 155° F is not recommended as surfaces will<br />
become very hot.<br />
8. This unit may scratch household surfaces.<br />
9. Do not use if the cord or controls have been damaged in any way. Contact<br />
the manufacturer before attempting to make any repairs.<br />
10. Do not use sharp utensils inside the unit.<br />
11. Turn off unit before plugging into or unplugging from an electrical outlet.<br />
12. Unplug the unit when not in use.<br />
13. Allow unit to cool before cleaning.<br />
14. Clean with a damp cloth and mild detergent.<br />
15. Never immerse unit or cord in water or other liquids.<br />
16. Never plug unit into a damaged electrical outlet.<br />
17. Do not allow the cord to contact the edge of a counter, table or hot surface.<br />
18. The use of attachments or accessories is not recommended by the<br />
manufacturer and will void the warranty.<br />
19. Do not attempt to move this unit while it is operating.<br />
Preparation of <strong>Food</strong>s (Pre-Treatment)<br />
For best results, select the freshest foods available to dehydrate. Note that<br />
immature fruits and vegetables do not have as much color and flavor as do those that are<br />
fully matured. <strong>Food</strong>s should be dehydrated as soon after purchase as possible. <strong>Food</strong>s high<br />
in sugar such as apples, pears, peaches and bananas are prone to darkening as a result of<br />
oxidation of the sugars. Below are some<br />
pre-treatments that will help reduce this effect.<br />
Lemon and pineapple juice are natural antioxidants. Place the sliced produce in the juice<br />
for a few minutes. Remove, drain and place on the dehydrator shelf. For extra flavor, try<br />
sprinkling on cinnamon, Jello powders or other sweeteners.<br />
2
Preparation of <strong>Food</strong>s (Pre-Treatment), cont’d<br />
Ascorbic acid mix, a form of vitamin C which is available at most health food stores,<br />
comes in either tablet or powder form. Use about 2-3 tablespoons of powder or ground<br />
tablets per quart of water. Stir to completely dissolve powder. Place fruit into the solution for<br />
2-3 minutes. Remove, drain and place on the dehydrator shelf.<br />
Sodium Bisulfite can be purchased at your local pharmacy. If you or anyone who will be<br />
eating the food has any known chemical allergies, you should check with your<br />
physician before using this chemical. Be certain to ask for food grade (safe) product only.<br />
Mix 1 teaspoon of sodium bisulfite in 1 quart of water. Dip the sliced fruit in the solution for<br />
a few minutes. Remove, drain and place on the dehydrator shelf.<br />
Blanching is used primarily to prepare fruits and vegetables for dehydrating that have<br />
skins that will toughen during drying. This process helps lock in the color and flavor as well<br />
as soften the skin of grapes, cherries, prunes and plums. There are two blanching methods:<br />
water and steam.<br />
Water blanching - Fill a large pan about half full of water. Bring water to a boil.<br />
Use tongs to place food directly into the water, cover the pan and blanch for<br />
about 3 minutes. Remove, drain and place on the dehydrator shelf.<br />
Steam blanching - Using a steamer pot such as one used in Chinese cooking,<br />
put 2-3 inches of water in the pan and bring to a boil. Place food into the steamer<br />
basket, place in pan and cover. Steam food for about 5 minutes. Remove and<br />
place on the dehydrator shelf.<br />
<strong>Operating</strong> Instructions<br />
For the safest results, read all of the instructions first.<br />
1. Examine the carton and the unit for any damage that may have occurred during<br />
shipping. Contact the manufacturer and the carrier to report any damage.<br />
2. Fill out and return the product warranty card. The card must be on file for your<br />
warranty to take effect.<br />
3. Make sure the power switch is turned off. Place the unit on a clean, dry surface away<br />
from children and pets. Plug into an undamaged electrical outlet. Warning: Do not use<br />
an extension cord with your dehydrator.<br />
4. Turn on the unit. The unit will begin to heat up. You may hear the heating element<br />
cycle on and off depending on the temperature you have selected.<br />
5. Lift the door up 2-3” and heat the unit at 90° F for 45 minutes to remove any moisture.<br />
6. If the unit stops for any reason, turn off, unplug and then repeat Steps 3 and 4. If the<br />
unit does not operate normally, turn off, unplug and call the manufacturer.<br />
7. Follow your recipe to prepare the food that you wish to dehydrate. Place the prepared<br />
food evenly on the shelves provided. We recommend using cooking spray on the<br />
shelves to prevent sticking. Do not overlap the food.<br />
8. Using oven mitts, remove the front panel by sliding it straight up. Set it aside on a heat<br />
resistant surface.<br />
3
<strong>Operating</strong> Instructions, cont’d<br />
9. Carefully place shelves onto the rails inside the unit and slowly slide them in. Forcing<br />
the shelves in may damage the heating assembly.<br />
10. Slide the cover into place.<br />
11. To monitor the internal temperature of the unit, slide the optional thermometer into the<br />
hole on the front panel. THIS THERMOMETER MUST BE REMOVED BEFORE<br />
YOU CAN OPEN THE FRONT PANEL. FAILURE TO REMOVE IT WILL DAMAGE<br />
THE SHELVES AND THE THERMOMETER.<br />
12. Set the temperature by turning the knob on top of the unit. Monitor the internal<br />
temperature and adjust as needed.<br />
13. Monitor the unit to ensure that the proper temperature is maintained. If the internal<br />
temperature exceeds 155° F, it may damage the unit. If the temperature of the unit<br />
reaches 155° F, turn off and allow it to cool.<br />
14. If drying is uneven, use oven mitts to rotate the shelves 180°.<br />
15. For very moist foods, such as tomatoes, it may be necessary to prop open the front<br />
cover 1 1 /2 to 2” with a small block of wood for the first 2 hours of operation. This will<br />
increase the air flow and help drive excess moisture out of the unit.<br />
16. Note: Moisture may collect on the bottom of the unit during operation and can be<br />
wiped out with a paper towel. Avoid touching the walls and shelves with your bare<br />
hands as a burn may result.<br />
<strong>Food</strong> Drying Guides<br />
The following charts are guidelines for the preparation of various fruits, vegetables and<br />
meats. Drying times will vary depending on the room temperature, relative humidity and<br />
moisture levels in the food that you are drying. If the moisture level is low, the drying time<br />
will be on the low end of the range. However, if the moisture level is high, the drying time<br />
will be on the high end of the range.<br />
Keep in mind that drying times are also affected by the amount of food placed on the<br />
shelves. Over loading the shelves will slow the drying time and may produce poorer results.<br />
When dehydrating foods, it is important to check on the dryness of the product. If the product<br />
is not thoroughly dried, mold may form during storage (see <strong>Food</strong> Storage). To test for<br />
dryness, remove a piece of food from the dehydrator and allow to cool to room temperature.<br />
Bend and tear the piece to check for internal moisture.<br />
4
Vegetables at 125° F<br />
<strong>Food</strong> Preparation Test Time<br />
Asparagus Wash and cut into 1” pieces Crunchy 4-6 hours<br />
Beans, Green or<br />
Waxed<br />
Wash, remove ends and cut into<br />
1” pieces or French style<br />
Beets Remove 1 /2” of the top, scrub<br />
thoroughly, steam blanch until<br />
tender. Peel and cut into 1 /4” thick<br />
slices.<br />
Broccoli Wash and trim. Cut stems into 1 /4”<br />
pieces. Dry florets whole.<br />
Crunchy 9-12 hours<br />
Pliable 9-12 hours<br />
Crunchy 10-14 hours<br />
Cabbage Wash and trim. Cut into 1 /8” strips. Crunchy 8-11 hours<br />
Carrots Wash and trim tops. Peel or<br />
scrape if desired. Cut into 1 /8”<br />
thick slices.<br />
Celery Wash, separate leaves and stalks.<br />
Cut stalks into 1 /4” strips.<br />
Corn Shuck corn and trim silk. Steam<br />
until milk is set. Cut kernels from<br />
cob and spread on plastic screen.<br />
Stir several times during drying.<br />
Pliable 7-11 hours<br />
Crunchy 3-10 hours<br />
Crunchy 7-10 hours<br />
Cucumber Wash and trim. Cut into 1 /8” slices. Pliable 4-8 hours<br />
Eggplant Wash and peel. Cut into 1 /4”<br />
slices.<br />
Pliable 4-8 hours<br />
Mushroom Wash and cut into 3 /8” slices. Pliable 4-7 hours<br />
Parsnips Scrub thoroughly, steam blanch<br />
until tender. Peel if desired and<br />
cut into 3 /8” thick slices.<br />
Peppers Wash and remove stems, seeds<br />
and white section. Pat dry. Cut<br />
into 1 /4” thick strips or rings.<br />
Potatoes Use new potatoes. Wash, peel if<br />
desired. Steam blanch 4-6<br />
minutes. Cut french style, 1 /4”<br />
slices, 1 /8” thick circles or grate.<br />
Summer Squash Wash and peel. Cut into 1 /4”<br />
slices.<br />
Tomatoes Wash and remove stems. Slice<br />
into 1 /4” circles. For cherry<br />
tomatoes, slice in half, dry skin<br />
side down.<br />
Zucchini Wash, peel if desired. Cut into 1 /4”<br />
slices or chips.<br />
5<br />
Pliable/<br />
Tough<br />
7-11 hours<br />
Pliable 4-8 hours<br />
Crunchy/<br />
Pliable<br />
7-13 hours<br />
Pliable 10-14 hours<br />
Pliable 5-9 hours<br />
Crunchy 7-11 hours
Fruits at 135° F<br />
<strong>Food</strong> Preparation Test Time<br />
Apples Wash, core and peel if desired.<br />
Cut into 1 /4” slices. Dust with<br />
cinnamon if desired.<br />
Apricots Wash, halve and remove pit. Slice<br />
if desired and dry skin side down.<br />
Bananas Wash, peel and slice into 1 /8”<br />
slices.<br />
Figs Wash, cut out blemishes, quarter.<br />
Dry skin side down.<br />
Pliable 7-15 hours<br />
Pliable 21-29 hours<br />
Pliable 7-10 hours<br />
Pliable 22-30 hours<br />
Kiwi Wash, peel and slice in 1 /4” slices. Crisp 8-15 hours<br />
Nectarines Wash, halve and remove pit. Slice<br />
if desired and dry skin side down.<br />
Peaches Wash, halve and remove pit. Slice<br />
if desired and dry skin side down.<br />
Pears Wash, core and peel if desired.<br />
Cut into 1 /4” slices or quarter.<br />
Pineapple Peel, remove fibrous eyes,<br />
remove core. Cut into 1 /4” slices or<br />
wedges.<br />
Pliable 8-17 hours<br />
Pliable 8-16 hours<br />
Pliable 8-16 hours<br />
Pliable 11-18 hours<br />
Rhubarb Wash, cut into 1” lengths. Pliable 6-10 hours<br />
Strawberries Wash, cut out caps, slice 1 /4” thick. Crisp 7-15 hours<br />
Watermelon Cut off rind, cut into wedges and<br />
remove seeds.<br />
Jerky at 145-150° F<br />
Pliable and<br />
Sticky<br />
8-10 hours<br />
<strong>Food</strong> Preparation Test Time<br />
Jerky Use lean meat and remove as<br />
much fat as possible. Fat turns<br />
rancid with time. Cut uniform 1 /4”<br />
thick or less slices. Do not overlap<br />
slices on the shelves.<br />
6<br />
Pliable 3-4 hours<br />
Meat<br />
temperature<br />
should reach<br />
145-150° F
<strong>Food</strong> Storage<br />
Dried foods should be allowed to condition before being placed into a storage container.<br />
Generally, let stand about 1 week in a dry, well ventilated and protected area. The<br />
conditioning time allows for further drying and removes most of the remaining moisture in<br />
the food. Dried foods can be placed into clean, dry, insect resistant containers, preferably<br />
glass jars. Heavy gauge plastic freezer bags can also be used. Eliminate as much air as<br />
possible before sealing the bag.<br />
When properly used, vacuum sealers provide ideal storage. The less air present, the less<br />
potential for the formation of molds. Stored foods should be checked monthly for insects<br />
and mold. If mold is present, you can scrape it off, place the food on a cookie sheet and<br />
heat in the oven at 175° for 15 - 25 minutes. Re-pack into a clean, air tight container.<br />
Reconstitution<br />
Dried foods do not need to be reconstituted for consumption. Many people prefer to eat<br />
them in their dried state. If you want to reconstitute your food, here are some basic<br />
guidelines. Soak food in unsalted water for 3 - 7 minutes and then prepare as usual. If you<br />
are boiling them, use the same water they soaked in to preserve nutrients.<br />
If you plan to soak foods for more than 1 hour, they should be placed in the refrigerator to<br />
prevent bacterial growth. One cup of dried vegetables will reconstitute to about 2 cups. One<br />
cup of dried fruit will reconstitute to about 1 1 /2 cups. Reconstitution times will vary<br />
depending on the thickness of the food and the water temperature used. Warm water will<br />
speed reconstitution but may result in some flavor loss.<br />
Cleaning<br />
To clean the unit, remove the shelves and wash separately. Wipe off both the exterior and<br />
interior surfaces of the unit with a damp cloth and mild detergent. Do not use scouring pads<br />
or abrasive cleaners as this may mar the finish.<br />
NEVER IMMERSE THE UNIT OR POWER CORD IN WATER OR OTHER LIQUIDS<br />
7
Reviewing the Dehydrating Process<br />
To obtain the best results:<br />
1. Use high quality food: the better the food the better the results<br />
2. Wash food, use clean utensils and keep work area clean.<br />
3. Pre-treat foods to prevent discoloration.<br />
4. Do not overlap food on shelves.<br />
5. Drying times will vary depending on food thickness, moisture in the food, relative<br />
humidity and temperature of the room.<br />
6. Cool food before testing for dryness.<br />
7. Rotate trays 180° if you notice uneven drying.<br />
8. Let food condition in a clean, dry, ventilated area for a week before placing them in air<br />
tight containers.<br />
9. Reconstitute as needed.<br />
10. And last but not least, ENJOY!<br />
Warranty Information<br />
The Sausage Maker, Inc., through its Distributors, warrants each new product sold by it to<br />
the initial user to be free of defects in material and workmanship for a period of one year<br />
from the date of sale of the equipment. With respect to the sale of parts, such warranty<br />
period shall be three (3) months from the date of sale.<br />
The Sausage Maker, Inc. will provide a new part or repaired part, at its election, in place of<br />
any part which is found upon inspection to be defective in material and workmanship during<br />
the period described above. Purchaser must present proof of purchase and purchase date<br />
at the time of exercising this warranty.<br />
This warranty does not apply to failures occurring as a result of abuse, misuse, negligent<br />
repairs, corrosion, erosion and normal wear and tear, alterations or modifications made to<br />
the product without express written consent of The Sausage Maker, Inc. or failure to follow<br />
the recommended operating practices and maintenance procedures as provided in the<br />
products operating and maintenance publications. The warranty provided herein does not<br />
apply to equipment sold hereunder but manufactured by others as they are warranted by<br />
their respective manufacturers directly to the user.<br />
This warranty is in lieu of all other warranties (except of title) expressed or implied and<br />
there are no warranties of merchantability or of fitness for a particular purpose<br />
8
D-5 Parts List<br />
Part Name Part #<br />
Box P32700-01<br />
Heater Box P32700-02<br />
Door P32700-03<br />
Thermostat/Knob P32700-04<br />
Rubber Feet P32700-05<br />
Toggle Switch P32700-06<br />
Heating Element P32700-07<br />
Thermal Fuse (Thermodisc) P32700-08<br />
Motor P32700-09<br />
Fan Blade P32700-10<br />
Power Cord P32700-11<br />
Screen Guard P32700-12<br />
Bottom Bracket P32700-13<br />
Top Bracket P32700-14<br />
Door Handle with Screw P32700-15<br />
Male/Female Insulator P32700-16<br />
Grooved Insulator P32700-17<br />
Complete Back Panel Assembly - D5 32500-BPA<br />
Shelving:<br />
Chrome Shelf (3/4” holes) 32731<br />
<strong>Stainless</strong> <strong>Steel</strong> Shelf (3/8” holes) 32733<br />
Non-Stick Shelf (3/8” holes) 32732<br />
Plastic Drying Screen (1/4” holes) 32737<br />
Non Stick Drying Sheets 32735<br />
9
D-10 Parts List<br />
Part Name Part #<br />
Box P32704-01<br />
Heating Panel P32704-02<br />
Door P32704-03<br />
Shelving Unit P32704-04<br />
Latch P32704-05<br />
Timer P32704-06<br />
Terminal Block P32704-07<br />
Thermostat P32704-08<br />
Pilot Light P32704-09<br />
Toggle Switch P32704-10<br />
Thermal Fuse (Thermodisc) P32704-11<br />
Power Cord P32704-12<br />
Heating Element P32704-13<br />
Motor P32704-14<br />
Fan Blade P32704-15<br />
Screen Guard P32704-16<br />
Legs P32704-17<br />
Door Handle with Screw P32704-18<br />
Male/Female Insulator P32704-19<br />
Grooved Insulator P32704-20<br />
Complete Back Panel Assembly 32213<br />
Shelving:<br />
Chrome Shelf (3/4” holes) 32731<br />
<strong>Stainless</strong> <strong>Steel</strong> Shelf (3/8” holes) 32733<br />
Non-Stick Shelves (3/8” holes) 32732<br />
Plastic Drying Screen (1/4” holes) 32734<br />
Non Stick Drying Sheets 32735<br />
10
The Sausage Maker, Inc.<br />
1500 Clinton St. Bldg. 123, Buffalo, NY 14206<br />
Tel: (716) 824-5814 • Fax: (716) 824-6465<br />
www.sausagemaker.com