Create successful ePaper yourself
Turn your PDF publications into a flip-book with our unique Google optimized e-Paper software.
<strong>Creating</strong> a<br />
<strong>CourSe</strong> <strong>with</strong> <strong>olat</strong><br />
You can create an course and activate it for course<br />
participants in just a few minutes.<br />
this is a good place to start if you want to learn some of the<br />
basic features of the course editor. By the end of this<br />
document, you will have created a course comparable to one<br />
created <strong>with</strong> the course wizard. unlike the situation <strong>with</strong> the<br />
course wizard, here you will become familiarized <strong>with</strong> the<br />
fundamental features of the course editor and will then have<br />
the skills to subsequently create more advanced courses and<br />
to edit your courses.<br />
2 Create a welCome page<br />
right in the toolbox insert<br />
course eLements, select<br />
singLe page. then insert the<br />
page into the desired position<br />
in the course.<br />
in the tab titLe and<br />
description enter a brief<br />
title for this course element<br />
and click save.<br />
in the tab page content,<br />
click on seLect or create<br />
page.<br />
in the text field enter filename of<br />
the html page that you wish to<br />
create (for example, „welcome“).<br />
then click on create.<br />
Compose a welcome message in<br />
the html editor.<br />
Click on save and cLose.<br />
1 Starting the <strong>CourSe</strong> editor<br />
activate the tab<br />
Learning resources<br />
in the main navigation.<br />
right in the toolbox create,<br />
select course.<br />
enter the title and description<br />
of the course and click save.<br />
Click on next.<br />
Start the course editor.
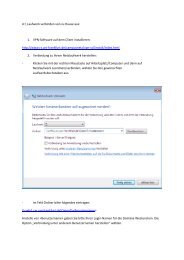
3 inSert a folder for <strong>CourSe</strong> doCumentS and<br />
upload doCumentS from your Computer 4 inSert a diSCuSSion forum<br />
right in the toolbox<br />
insert course eLements,<br />
select FoLder. then insert the<br />
course element into the desired<br />
position (as in Step 2 Create<br />
a welCome page).<br />
in the tab titLe and<br />
description, enter a brief title<br />
for this folder and click save.<br />
in the tab<br />
FoLder conFiguration,<br />
click on open FoLder.<br />
Click on the link upLoad FiLe.<br />
Search for a document on your<br />
own computer and then click<br />
on upLoad.<br />
5 publiSh your <strong>CourSe</strong> and make it available to uSerS<br />
right in the toolbox editor<br />
tooLs, select puBLish.<br />
Choose the course elements<br />
that you wish to publish.<br />
Click on next.<br />
in the combobox under<br />
modiFication oF course<br />
access, select<br />
aLL registered oLat users.<br />
Click on Finish.<br />
right in the toolbox editor<br />
tooLs, select cLose editor.<br />
your <strong>CourSe</strong> iS now viSible<br />
for <strong>olat</strong> uSerS and Can be viSited.<br />
right in the toolbox<br />
insert course eLements,<br />
select Forum. then insert the<br />
course element into the desired<br />
position.<br />
in the tab titLe and<br />
description, enter a brief<br />
title for this forum and click<br />
on save.<br />
HRZ