Test-A-Pack Systems
Test-A-Pack Systems
Test-A-Pack Systems
Create successful ePaper yourself
Turn your PDF publications into a flip-book with our unique Google optimized e-Paper software.
<strong>Test</strong>-A-<strong>Pack</strong> <strong>Systems</strong><br />
Carleton Technologies Inc. doing business as Cobham Life Support<br />
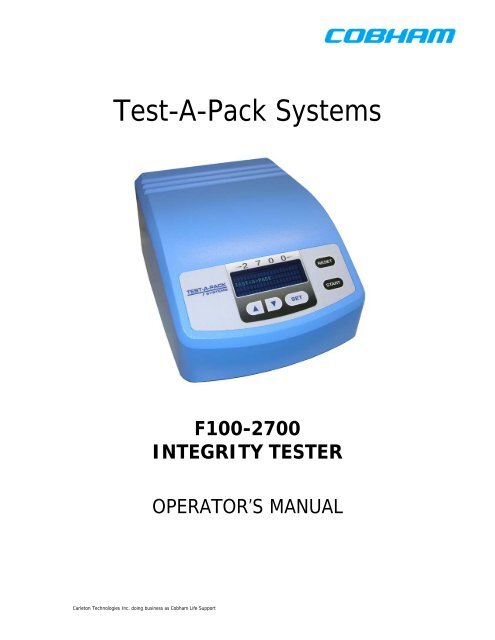
F100-2700<br />
INTEGRITY TESTER<br />
OPERATOR’S MANUAL
THIS PAGE INTENTIALLY LEFT BLANK
Table of Contents<br />
SYSTEM AND TESTING INTRODUCTION .................................................................. 1<br />
2700 INTEGRITY TESTER........................................................................................... 1<br />
SYSTEMS COMPONENTS .......................................................................................... 1<br />
UNITS AND VALUES .................................................................................................. 1<br />
ABSOLUTE PRESSURE ........................................................................................... 2<br />
GAUGE PRESSURE .................................................................................................. 2<br />
ALTITUDE ................................................................................................................. 2<br />
TESTER SET UP/ POWER UP ......................................................................................... 4<br />
CAUTIONS AND NOTICES ......................................................................................... 4<br />
BASIC OPERATIONS/FEATURES.................................................................................. 5<br />
FRONT PANEL: ............................................................................................................ 5<br />
REAR PANEL: ............................................................................................................... 6<br />
SETTING THE TIME AND DATE ............................................................................... 7<br />
SECURITY CODE ......................................................................................................... 8<br />
SETTING A SECURITY CODE.................................................................................... 8<br />
TESTER VACUUM SENSITIVITY .............................................................................. 9<br />
CHANGING THE VACUUM SENSITIVITY .............................................................. 9<br />
TEST-A-PACK PRINTER ............................................................................................. 9<br />
PARALLEL PRINTER PORT ....................................................................................... 9<br />
SCREEN SAVER FEATURE ...................................................................................... 10<br />
MAINTENANCE AND SERVICE .................................................................................. 11<br />
CLEANING .................................................................................................................. 11<br />
SERVICE ...................................................................................................................... 11<br />
CALIBRATION ........................................................................................................... 11<br />
TESTING NON-POROUS PACKAGES ......................................................................... 12<br />
SUBMERSION TEST .................................................................................................. 12<br />
DRY TEST.................................................................................................................... 13<br />
APPENDIX A. ..................................................................................................................... I<br />
QUESTIONS & ANSWERS ........................................................................................... I<br />
APPENDIX B ..................................................................................................................... II<br />
CE CERTIFICATION: ................................................................................................... II<br />
APPENDIX C ................................................................................................................... III<br />
SPECIFICATIONS ....................................................................................................... III<br />
APPENDIX D ................................................................................................................... IV<br />
OPTIONAL ACCESSORIES ....................................................................................... IV<br />
CONTACT INFORMATION ....................................................................................... IV<br />
INDEX ............................................................................................................................... V<br />
Carleton Technologies Inc. doing business as Cobham Life Support i
THIS PAGE INTENTIALLY LEFT BLANK<br />
Carleton Technologies Inc. doing business as Cobham Life Support ii
SYSTEM AND TESTING INTRODUCTION<br />
2700 INTEGRITY TESTER<br />
The 2700 Integrity <strong>Test</strong>er is used to test for leaks in the seal or package material<br />
of non-porous flexible packages. The Control console regulates the flow of<br />
vacuum to the test chamber. This causes a positive differential pressure across<br />
the package boundary and enables the user to visually detect leakage. The tests<br />
may be performed wet or dry. Employing state of the art technology, the tester<br />
offers levels of accuracy and repeatability not available with other equipment.<br />
The tester provides readings in MmHg (gauge and absolute), InHg (gauge and<br />
absolute), and altitude (feet). The alphanumeric display shows these values<br />
during the test and then allows the user to “pass” or “fail” the package.<br />
Alternatively, the test settings and results can be output to the optional <strong>Test</strong>-A-<br />
<strong>Pack</strong> printer.<br />
IMPORTANT: Operation of the 2700 Integrity <strong>Test</strong>er is relatively self explanatory<br />
and easy, however, it is critical that you go through this manual in order to fully<br />
understand the tester and its functions. We recommend stepping through the<br />
operation of the machine with the manual for a thorough understanding of its<br />
operation and features.<br />
SYSTEMS COMPONENTS<br />
Included with the 2700 system:<br />
• The F100-2700-1 control console<br />
• One cylindrical glass water trap<br />
• One power cord<br />
• One 3/8 inch vacuum line<br />
As optional equipment, the following can also be purchased:<br />
• Oil-less, dual diaphragm vacuum pump<br />
• Optional printer accessory kit<br />
• Additional vacuum test chambers<br />
UNITS AND VALUES<br />
The 2700 Integrity <strong>Test</strong>or can provide readings in three different units of<br />
measure: absolute pressure, gauge pressure, and feet of altitude. In order to<br />
properly interpret the test results, it is important that you understand these terms<br />
Carleton Technologies Inc. doing business as Cobham Life Support 1
and how they are related. It is also important to know the atmospheric pressure<br />
(barometric) in your area.<br />
ABSOLUTE PRESSURE<br />
Refers to the actual pressure at a specific point without regard to atmospheric<br />
(barometric) pressure. The reference point is zero pressure (total vacuum).<br />
Barometric pressure is an absolute pressure measurement; therefore, if the<br />
barometric pressure in your area is 28.95 InHg today, that is the absolute<br />
pressure.<br />
2700 EXAMPLE: If you set the value on your 2700 to 20 InHg absolute, the<br />
Control Console will allow the vacuum source to “pull” as much vacuum as<br />
necessary to reduce the absolute pressure inside the chamber down to 20 InHg.<br />
GAUGE PRESSURE<br />
Is the difference between absolute pressure and atmospheric (barometric)<br />
pressure. The reference point is the current atmospheric pressure at the testing<br />
site. Gauge pressure is stated as either above or below atmospheric. A<br />
pressure gauge that reads pressures below atmospheric is ordinarily called a<br />
vacuum gauge. The gauge values on the 2700 are vacuum gauge readings.<br />
2700 EXAMPLE: If the barometric pressure is 29.15 InHg in Buffalo, NY and<br />
you set the value on your 2700 to 20 InHg Gauge, the Control Console will allow<br />
the vacuum source to reduce the chamber pressure by 20 InHg, therefore, the<br />
absolute (actual) pressure inside the chamber would be 9.15 InHg.<br />
ALTITUDE<br />
Is a measure of height above sea level (not ground level). A change in altitude<br />
has a corresponding effect on atmospheric (absolute) pressure. The purpose of<br />
the altitude test on the 2700 is to stimulate the effect that air travel will have on<br />
your packages. The altitude function computes altitude from absolute pressure<br />
measurements in accordance with the ARDC model atmosphere, 1959.<br />
2700 Example: If you set the value on your 2700 to 35,000 feet, the<br />
atmospheric pressure inside the chamber will drop to the corresponding absolute<br />
pressure value.<br />
IMPORTANT: As ground level altitude increases above sea level, atmospheric<br />
(absolute) pressure decreases. For example, the barometric pressure in Denver,<br />
Colorado (which is approximately 5,200 ft above sea level), is lower than the<br />
Carleton Technologies Inc. doing business as Cobham Life Support 2
arometric pressure in Buffalo, New York, (which is approximately 700 ft above<br />
sea level).<br />
Example: Using the gauge example above, if you set your 2700 to 20 InHg in<br />
Denver (where the barometric pressure is typically 24.90); the actual (absolute)<br />
pressure in the chamber would be 4.90 InHg.<br />
NOTE: The 2700 can not pull negative vacuum pressures. Thus, if at Denver<br />
the 2700 is set to 26 InHg, the actual chamber pressure would be approximately<br />
zero, not negative 1.1 InHg.<br />
Carleton Technologies Inc. doing business as Cobham Life Support 3
TESTER SET UP/ POWER UP<br />
CAUTIONS AND NOTICES<br />
The following warnings are presented throughout this manual, where appropriate, to<br />
ensure safe, efficient operation of the 2700 System:<br />
WARNINGS<br />
This symbol indicates that failure to follow the warning could<br />
result in severe bodily injury.<br />
Eye and ear protection required for all tests.<br />
To protect personnel from electric shock hazards;<br />
always connect the control unit to an adequately<br />
grounded 2-pole 3-wire electrical supply receptacle.<br />
The following cautions are presented throughout this manual, where appropriate, to<br />
ensure safe, efficient operation of the 2700 System:<br />
NOTICES<br />
! This symbol indicates that failure to follow the notice could result<br />
in damage to the test equipment that will void the warranty.<br />
!<br />
Avoid overfilling the test chamber. Introduction of<br />
liquids into the 2700 will damage the tester and void<br />
any warranty.<br />
!<br />
Use water only inside the vacuum chamber for submersion<br />
testing. Other liquids may have an adverse effect on the<br />
chamber potentially compromising structural integrity when<br />
subjected to vacuum.<br />
Carleton Technologies Inc. doing business as Cobham Life Support 4
BASIC OPERATIONS/FEATURES<br />
FRONT PANEL:<br />
The controls on the membrane keypad have the following functions (Figure 1):<br />
UP ARROW- Moves the cursor up and increments selected characters.<br />
DOWN ARROW- Moves the cursor down and moves the cursor to the next<br />
character on a selected line.<br />
SET- Selects a choice from a menu.<br />
START- Confirms settings and starts the test.<br />
RESET- Aborts a test, cancels a choice or takes the user back to the previous<br />
screen.<br />
Figure 1.<br />
Carleton Technologies Inc. doing business as Cobham Life Support 5
REAR PANEL:<br />
To assemble the 2700 testing system, please refer to Figure 2:<br />
1. Connect your vacuum source to PORT 1 (vacuum source port) on the rear<br />
of the machine with user supplied tubing and connectors.<br />
2. Locate the glass water trap supplied with the unit and attach it to PORT 2<br />
(test chamber port). The arrow on the top of the water trap should point<br />
towards the rear of the 2700.<br />
3. Locate the test chamber vacuum line and insert one end into the quick<br />
disconnect port on the back of the water trap. Connect the other end of<br />
the line to the quick disconnect fitting on the vacuum test chamber.<br />
4. Insert the female end of the power cord into the power module on the rear<br />
panel of the control console and plug the male end into a grounded AC<br />
power outlet.<br />
5. If you have purchased the optional printer, you can connect the printer<br />
cable to the DB-25 connector on the rear panel of the control console.<br />
The printer manual contains full operating instructions for the printer.<br />
Figure 2<br />
Carleton Technologies Inc. doing business as Cobham Life Support 6
6. Turn on the AC power to the tester by pressing the rocker switch on the<br />
rear panel of the control console. The Carleton Technologies screen<br />
should appear (Figure 3).<br />
Figure 3<br />
7. Press the START key on the membrane key pad and the SELECT MODE<br />
screen will appear (Figure 4).<br />
SETTING THE TIME AND DATE<br />
Figure 4<br />
The clock operates on a 24-hour military time cycle (12:00 midnight is 00:00:00;<br />
1:00 PM is 13:00:00).<br />
1. At the select mode screen, move the cursor to CONFIGURE and press<br />
SET. The CONFIGUR MACHINE screen will appear Figure 5).<br />
Figure 5<br />
2. Move the cursor to SET TIME-DATE. Press SET.<br />
Carleton Technologies Inc. doing business as Cobham Life Support 7
3. To set the date, move the cursor to the DATE line and press SET. This<br />
will position the cursor on the first character of the date line (denoted by<br />
the flashing character). Pressing the UP ARROW will increment the<br />
flashing character. Pressing the DOWN ARROW will move the cursor to<br />
the next character.<br />
4. Using the ARROW buttons, change the characters to reflect the correct<br />
date. When you have entered the correct information, press SET.<br />
5. Follow the same instructions to set the time. When you are satisfied that<br />
the Date and Time information is correct, press the START key. This will<br />
take you back to the SELECT MODE screen.<br />
SECURITY CODE<br />
The tester is equipped with a user-definable four character password protection<br />
feature. This feature is provided to prevent unauthorized users from changing<br />
test parameters. The security code is preset at the factory to 0000. If the factory<br />
code is left unaltered, any user can access and modify all test parameters.<br />
SETTING A SECURITY CODE<br />
1. At the SELECT MODE screen, position the cursor at the CONFIGURE<br />
line. Press SET. The CONFIGURE MACHINE screen will appear.<br />
2. Move the cursor to the CHANGE PASSWORD line and press SET (Figure<br />
6).<br />
Figure 6<br />
3. Move the cursor to the NEW PASSWORD line and press SET. This will<br />
move the cursor to the first character on the NEW PASSWORD line,<br />
indicated by the flashing digit.<br />
4. Use the UP ARROW to increment the first character. When you have<br />
arrived at the desired number, press the DOWN ARROW to move to the<br />
next character. After you have chosen all four characters, press SET.<br />
5. If you are satisfied with the four characters you have entered, press<br />
START to confirm the new code.<br />
Carleton Technologies Inc. doing business as Cobham Life Support 8
6. If you decide that you do not want a security code or are unhappy with the<br />
one you have chosen, press RESET and the code will revert to the factory<br />
preset.<br />
IMPORTANT: Once you have set a security code, the 2700 will prompt you to<br />
enter it whenever you attempt to change a test parameter, and therefore, it is<br />
vital that you remember the security code.<br />
TESTER VACUUM SENSITIVITY<br />
Some vacuum sources may be subject to sudden flow variances. This may have<br />
an effect on how your 2700 operates. The tester has a vacuum sensitivity setting<br />
that enables the machine to operate properly with almost any vacuum source.<br />
There are three sensitivity settings to choose from: LOW, MEDIUM, and HIGH.<br />
The factory preset is LOW. <strong>Systems</strong> being used with high quality, extremely<br />
stable vacuum sources should be set to HIGH sensitivity. This will enable the<br />
2700 to operate faster.<br />
CHANGING THE VACUUM SENSITIVITY<br />
If you feel it is necessary to alter the vacuum sensitivity, follow these steps:<br />
1. At the SELECT MODE screen, position the cursor on the CONFIGURE<br />
line and press SET.<br />
2. Move the cursor to the VACUUM SENSITIVITY line and press SET. The<br />
factory preset value (LOW) should appear. To change this, press SET.<br />
3. Use the UP ARROW to increment the vacuum sensitivity choices. If you<br />
have been experiencing problems with the factory preset of LOW, try<br />
MEDIUM. When you arrive at your choice, press SET.<br />
4. Press START to confirm your new vacuum sensitivity.<br />
TEST-A-PACK PRINTER<br />
A compact printer is available from Carleton Technologies that is specifically<br />
configured to support the data output from the 2700 control console. Full<br />
installation and operating instructions are provided with the printer. Contact <strong>Test</strong>-<br />
A-<strong>Pack</strong> for more information.<br />
PARALLEL PRINTER PORT<br />
The DB-25 parallel printer port connector may be used with any parallel printer<br />
supporting the Simplified Centronics printer protocol.<br />
Carleton Technologies Inc. doing business as Cobham Life Support 9
SCREEN SAVER FEATURE<br />
The 2700 Control Console uses a Vacuum Fluorescent Display (VFD). In order<br />
to prevent the VFD from “burning out” due to long periods of power on, nonusage,<br />
the 2700 has a screen saver feature. After five minutes of power-on, nonuse,<br />
the screen will dim and the words TEST-A-PACK will appear on the screen.<br />
You can exit the screen saver mode by touching any button on the keypad.<br />
Carleton Technologies Inc. doing business as Cobham Life Support 10
MAINTENANCE AND SERVICE<br />
CLEANING<br />
Do not use any harsh chemicals to clean the F100-2700 or its chambers. Use a<br />
soft cloth or sponge dampened with a mild detergent and water only. Use of any<br />
other chemicals or solvents could damage the exterior of the unit.<br />
SERVICE<br />
The electrical fuses found in the power module are the only user-serviceable<br />
parts within the F100-2700 control console. In the unlikely event that the fuses<br />
blow, this indicates that the machine experienced voltage or current levels that<br />
exceeded the rated specifications. The cause of this incident should be<br />
determined and corrected before the unit is returned to service. Blown fuses<br />
should be replaced with two 5 x 20mm, 250 volt, 1 amp, time delay fuses. Due to<br />
high voltages within the unit and the danger posed by improperly installed<br />
components, all servicing, maintenance or calibration must be performed by a<br />
factory authorized service technician. Any work performed by a non-factory<br />
authorized service technician will void the warranty and certificate of calibration<br />
and potentially place the operator of the unit in physical danger.<br />
CALIBRATION<br />
The F100-2700 must be returned to the factory annually for calibration/service.<br />
Carleton Technologies Inc. doing business as Cobham Life Support 11
TESTING NON-POROUS PACKAGES<br />
SUBMERSION TEST<br />
1. Pour the appropriate amount of water into the bottom half of the test<br />
chamber. Make sure that you take the size of your package into<br />
consideration so you do not overflow the chamber when submerging the<br />
package.<br />
2. Place the lid on the vacuum chamber so that the clear retaining plate<br />
submerges your package. Depending on the size of your package, you<br />
may have to hold the lid down until the test begins.<br />
3. At the SELECT MODE screen, move the cursor to the TEST SETUP<br />
(Figure 7). Press SET.<br />
Figure 7<br />
4. At the UNITS line, press SET and use the UP ARROW to choose your unit<br />
of measure. When you arrive at your choice, press SET.<br />
5. Move the cursor to the VALUE line and press SET.<br />
6. Use the UP ARROW to increment the flashing character and the DOWN<br />
ARROW to move the cursor to the next digit. When you have chosen a<br />
value, press SET, the ranges are as follows:<br />
mmHg ABS: 1-760<br />
mmHg gauge: 1-760<br />
InHg ABS: 1-29.9<br />
InHg gauge: 1-29.9<br />
ft. Altitude: 700-50,000 (100 foot increments)<br />
Max Vacuum: Upper limit of your vacuum source<br />
7. Move the cursor to the TIME line. Press SET.<br />
8. To select the duration of your test, use the UP ARROW to increment the<br />
flashing character and the DOWN ARROW to move to the next digit. You<br />
may choose any value between 10 and 60,000 seconds. Press SET.<br />
9. Once all the test parameters are chosen, you are ready to begin. Press<br />
START to bring up the LEAK TEST screen (Figure 8).<br />
Carleton Technologies Inc. doing business as Cobham Life Support 12
Figure 8<br />
NOTE: Even though you have selected a particular unit of measure, the<br />
2700 displays the corresponding values on the other scales as well.<br />
10. To begin test #001, turn on your vacuum source and press START.<br />
The control console will regulate the supply of vacuum to the test chamber. The<br />
timer will count upward and the display will read EVACUATE while the machine<br />
drives the chamber pressure to the value you have specified. When the control<br />
console has arrived at the correct value, the display will read HOLD and the timer<br />
will begin to count down your specified test length.<br />
As the test is running, you should examine the package for leakage (denoted by<br />
a stream of bubbles coming from any pinholes or channels in the material or<br />
seal). After the test is completed, the display will read UP=PASS, DOWN=FAIL.<br />
You must use the appropriate ARROW control to enter the results of the test.<br />
If you are using the optional <strong>Test</strong>-A-<strong>Pack</strong> printer, the date, time, test number, test<br />
settings and test results will be printed out automatically.<br />
You may now continue testing using the same settings by simply reloading the<br />
test chamber with a new package and pressing START. If you need to change<br />
the test settings press RESET and go back into TEST SETUP. Any time test<br />
settings are changed, the LEAK TEST screen will revert to LEAK TEST #001.<br />
NOTE: When performing submersion testing on a regular basis, it is important to<br />
change the water in the test chamber periodically. Clean water makes it easier<br />
to detect leakage.<br />
DRY TEST<br />
Dry testing is used less frequently than submersion testing. This is simply<br />
because it is more difficult to distinguish between a bad package and a good<br />
package with this method. When performing a dry test, follow the submersion<br />
test instructions with the exception of adding water to the chamber. After the test<br />
is completed and the chamber evacuates, you should check the package for<br />
Carleton Technologies Inc. doing business as Cobham Life Support 13
shrinkage around the product. If the package material has shrunk and wrapped<br />
tightly around the product in the package, it indicates that air has leaked out of<br />
the package during the chamber evacuation and the package has failed the test.<br />
Carleton Technologies Inc. doing business as Cobham Life Support 14
APPENDIX A.<br />
QUESTIONS & ANSWERS<br />
Q: What is the highest vacuum (lowest pressure) achievable with the 2700?<br />
A: This depends on two factors: Your vacuum source and your geographical<br />
location. A 2700 with the appropriate vacuum pump, at sea level, is<br />
capable of pulling 29.92 InHg.<br />
Q: Is the 2700 System capable of testing multiple packages simultaneously?<br />
A: Yes. Contact <strong>Test</strong>-A-<strong>Pack</strong> about the availability of multiple package test<br />
chambers.<br />
Q: Can I get a larger chamber for my 2700?<br />
A: Yes. Contact <strong>Test</strong>-A-<strong>Pack</strong> about the availability of other package test<br />
chambers.<br />
Q: What does the “MAX VACUUM” setting on the 2700 do?<br />
A: The MAX VACUUM setting allows the 2700 to pull as much vacuum as<br />
your source can produce.<br />
Q: At what value should I test my packages?<br />
A: This should be determined by internal quality requirements based on a<br />
sound knowledge of the kind of stresses the package will need to endure.<br />
For example, will the packages be transported on an airplane? If so, at<br />
what altitude?<br />
Q: What criteria should my vacuum source meet?<br />
A: This depends on your testing environment and the values at which you will<br />
test. If cleanliness is important, we recommend an oil-less diaphragm<br />
pump with a dust filter (such as the <strong>Test</strong>-A-<strong>Pack</strong> model F136-1115-1).<br />
Your pump should be capable of pulling 29 InHg in order to be able to use<br />
the full scale of the 2700.<br />
Q: Where can I purchase a printer, a vacuum pump, additional vacuum<br />
chambers, or other 2700 accessories?<br />
A: All 2700 accessories can be purchased from Carleton Technologies Inc in<br />
Orchard Park, New York.<br />
I
APPENDIX B<br />
CE CERTIFICATION:<br />
II
APPENDIX C<br />
SPECIFICATIONS<br />
AC Line Power: 85 to 264 Volts<br />
47 to 63 Hz<br />
Fuses: 5 x 20mm 1 AMP SLO-BLO<br />
Operating Temperature: 60º F to 110º F<br />
15º C to 43º C<br />
Storage Temperature: 0º F to 125º F<br />
-17ºC to 51ºC<br />
Relative Humidity: 90% (max)<br />
Vacuum Range mmHg InHg Feet<br />
Absolute Pressure (max) 760 29.92 n/a<br />
Absolute Pressure (min) 1 1 n/a<br />
Gauge Pressure (max) 760 29.92 n/a<br />
Gauge Pressure (min) 1 1 n/a<br />
Altitude (max) n/a n/a 50,000 (15240 m)<br />
Altitude (min) n/a n/a 700 (213m)<br />
Timer Range: 1 to 60,000 seconds<br />
Accuracy: +/- 0.2% full scale<br />
Parallel Printer Port: Simplified Centronics Format w/DB-25 female connector<br />
Dimensions: Length: 15.0 inches (38.1 cm)<br />
Width: 11.5 inches (29.21 m)<br />
Height: 6.25 inches (15.875 cm)<br />
Weight: 12 lbs (5.44 kg)<br />
III
APPENDIX D<br />
OPTIONAL ACCESSORIES<br />
Vacuum Chambers:<br />
F100-1175-1 Small test chamber 06” H X 09” W<br />
F100-1177-2 Medium test chamber 10.5” H X 13” W<br />
F100-1177-1 Large test chamber 20” H X 13” W<br />
Vacuum Pumps:<br />
F136-1115-1 120 VAC Vacuum pump<br />
F136-1115-6 220 VAC Vacuum pump<br />
Printers:<br />
F100-2573-1 110Volt AC printer kit<br />
F100-2573-4 220Volt AC printer kit<br />
CONTACT INFORMATION<br />
For more information:<br />
<strong>Test</strong>-A-<strong>Pack</strong> <strong>Systems</strong><br />
Carleton Technologies Inc.<br />
10 Cobham Drive<br />
Orchard Park, NY 14127<br />
Phone: 1-888-TAP-PACK (1-888-827-7225)<br />
IV<br />
-OR-<br />
(716) 662-0006<br />
Fax: (716) 662-0747<br />
V2.0 Revised May 2007<br />
Printed in USA
INDEX<br />
Absolute Pressure ........................... 2<br />
actual pressure ............................... 2<br />
Altitude ............................................ 2<br />
Atmospheric Pressure ..................... 2<br />
Barometric Pressure ....................... 2<br />
Calibration ..................................... 11<br />
Cautions and Notices ...................... 4<br />
Components ................................... 1<br />
Configure ........................................ 7<br />
Controls .......................................... 5<br />
DB-25 Connector ............................ 6<br />
Down Arrow .................................... 5<br />
Dry <strong>Test</strong> ........................................ 13<br />
Front Panel ..................................... 5<br />
Gauge Pressure .............................. 2<br />
Hold .............................................. 13<br />
Max Vacuum ................................. 16<br />
Password ........................................ 8<br />
Port 1 ............................................... 6<br />
Port 2 ............................................... 6<br />
Printer .............................................. 9<br />
Printer Port .................................... 10<br />
Ranges .......................................... 12<br />
Rear Panel ...................................... 6<br />
Reset ............................................... 5<br />
Screen Saver ................................ 10<br />
Security Code .................................. 8<br />
Select Mode .................................... 7<br />
Service .......................................... 11<br />
Set ................................................... 5<br />
Set-Up ............................................. 4<br />
Start ................................................. 5<br />
Submersion <strong>Test</strong> ........................... 12<br />
Time and Date ................................. 7<br />
Up Arrow ......................................... 5<br />
Vacuum Sensitivity .......................... 9<br />
V


![NC1147 (pdf 1.47 mb) Nitrogen Concentrator [OBIGGS] - Cobham plc](https://img.yumpu.com/51124104/1/190x245/nc1147-pdf-147-mb-nitrogen-concentrator-obiggs-cobham-plc.jpg?quality=85)
