Ugra/FOGRA Media Wedge v2.2 - EFI
Ugra/FOGRA Media Wedge v2.2 - EFI
Ugra/FOGRA Media Wedge v2.2 - EFI

Create successful ePaper yourself
Turn your PDF publications into a flip-book with our unique Google optimized e-Paper software.
<strong>Ugra</strong>/<strong>FOGRA</strong> <strong>Media</strong> <strong>Wedge</strong> <strong>v2.2</strong><br />
Verifying <strong>FOGRA</strong> Validation Print Creation<br />
Professional Printing Solutions<br />
<strong>Ugra</strong> and <strong>FOGRA</strong> are organizations well known for their efforts in standardization and<br />
quality control. Together, they have developed the <strong>Ugra</strong>/<strong>FOGRA</strong> <strong>Media</strong> <strong>Wedge</strong> CMYK <strong>v2.2</strong>,<br />
a control device used worldwide to evaluate hard copy proofs. When the <strong>Ugra</strong>/<strong>FOGRA</strong><br />
<strong>Media</strong> <strong>Wedge</strong> is printed alongside a job, the user is provided a means to measure the<br />
accuracy and consistency of a printer for any printing condition, whether CMYK simulation<br />
or device CMYK color.<br />
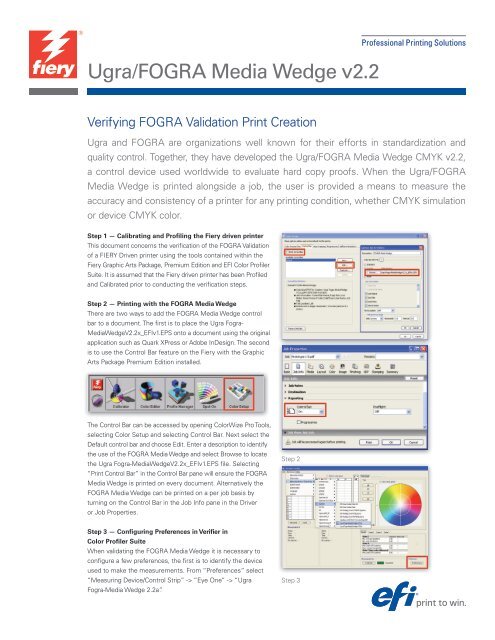
Step 1 — Calibrating and Profiling the Fiery driven printer<br />
This document concerns the verification of the <strong>FOGRA</strong> Validation<br />
of a FIERY Driven printer using the tools contained within the<br />
Fiery Graphic Arts Package, Premium Edition and <strong>EFI</strong> Color Profiler<br />
Suite. It is assumed that the Fiery driven printer has been Profiled<br />
and Calibrated prior to conducting the verification steps.<br />
Step 2 — Printing with the <strong>FOGRA</strong> <strong>Media</strong> <strong>Wedge</strong><br />
There are two ways to add the <strong>FOGRA</strong> <strong>Media</strong> <strong>Wedge</strong> control<br />
bar to a document. The first is to place the <strong>Ugra</strong> Fogra-<br />
<strong>Media</strong><strong>Wedge</strong>V2.2x_<strong>EFI</strong>v1.EPS onto a document using the original<br />
application such as Quark XPress or Adobe InDesign. The second<br />
is to use the Control Bar feature on the Fiery with the Graphic<br />
Arts Package Premium Edition installed.<br />
The Control Bar can be accessed by opening ColorWize Pro Tools,<br />
selecting Color Setup and selecting Control Bar. Next select the<br />
Default control bar and choose Edit. Enter a description to identify<br />
the use of the <strong>FOGRA</strong> <strong>Media</strong> <strong>Wedge</strong> and select Browse to locate<br />
the <strong>Ugra</strong> Fogra-<strong>Media</strong><strong>Wedge</strong>V2.2x_<strong>EFI</strong>v1.EPS file. Selecting<br />
“Print Control Bar” in the Control Bar pane will ensure the <strong>FOGRA</strong><br />
<strong>Media</strong> <strong>Wedge</strong> is printed on every document. Alternatively the<br />
<strong>FOGRA</strong> <strong>Media</strong> <strong>Wedge</strong> can be printed on a per job basis by<br />
turning on the Control Bar in the Job Info pane in the Driver<br />
or Job Properties.<br />
Step 3 — Configuring Preferences in Verifier in<br />
Color Profiler Suite<br />
When validating the <strong>FOGRA</strong> <strong>Media</strong> <strong>Wedge</strong> it is necessary to<br />
configure a few preferences, the first is to identify the device<br />
used to make the measurements. From “Preferences” select<br />
“Measuring Device/Control Strip” -> “Eye One” -> “<strong>Ugra</strong><br />
Fogra-<strong>Media</strong> <strong>Wedge</strong> 2.2a”.<br />
Step 2<br />
Step 3
<strong>EFI</strong>’s portfolio<br />
of integrated<br />
solutions increases<br />
productivity and<br />
improves your<br />
bottom line.<br />
Find out more at<br />
www.efi.com.<br />
303 Velocity Way<br />
Foster City, CA 94404<br />
650-357-3500<br />
www.efi.com<br />
<strong>Ugra</strong>/<strong>FOGRA</strong> <strong>Media</strong> <strong>Wedge</strong> <strong>v2.2</strong><br />
Step 4 — Configuring Tolerances in Verifier<br />
For verifying a contract proof using the <strong>FOGRA</strong> <strong>Media</strong> <strong>Wedge</strong><br />
it is necessary for the measurements to be within certain<br />
tolerance limits. Within Verifier these industry standard pre-sets<br />
can be select within the “Preferences” dialog box. From the<br />
“Delta E Tolerance limits” drop down menu select “ISO 12647-7<br />
Contract Proof <strong>Media</strong> <strong>Wedge</strong>”. Here you will see that the delta<br />
E, delta H (hue) and delta T (tone) tolerances are populated as<br />
specified for ISO 12647-7 (digital proofing).<br />
Step 5 — Loading the Reference Data<br />
Next step is to identify the <strong>FOGRA</strong> characterization data set to<br />
which the measurements are evaluated. For Measurement 1<br />
select “Open” and choose a data set, e.g. Fogra39.it8 (for ISO<br />
coated v2 eci) from the “IT8_CharacterizationData/Fogra_<br />
MKCheck10” folder. For other data sets reference the read me<br />
file in the IT8_CharacterizationData folder.<br />
Step 6 — Measuring the <strong>FOGRA</strong> <strong>Media</strong> <strong>Wedge</strong><br />
For a validated proof, the <strong>FOGRA</strong> <strong>Media</strong> <strong>Wedge</strong> measured must<br />
be that contained on the same printout at the proof. To get started<br />
ensure the ES-1000 is attached to the computer and wait for the<br />
“Connect” status, upon which choose to “Calibrate” the device.<br />
Next select “Measure” and follow the instructions on the screen<br />
for measuring both lines for the Fogra <strong>Media</strong> <strong>Wedge</strong>. If an error<br />
occurs during the measurement process, online instructions will<br />
indicate a re-measurement is needed. Upon completion of the<br />
measurements an evaluation of the performance can be seen<br />
in the “Results” section of Color Verifier. It will be clear whether<br />
a PASS or FAIL result has been achieved.<br />
Step 7 — Printing a Label to Show PASS Status<br />
Upon hitting the tolerances and achieving a Pass result, the final<br />
step in the verification process is to print the label and attach it<br />
to the proof. The label simply documents the proofs compliance<br />
to the ISO-12647-7 standard.<br />
Auto-Count, Bliss, Changing the Way the World Prints, ColorWise, Command WorkStation, DocBuilder, DocBuilder Pro, DocStream, EDOX, <strong>EFI</strong>, Fiery, the Fiery logo, Fiery Driven, the Fiery<br />
Driven logo, OneFlow, PrinterSite, PrintFlow, PrintMe, PrintSmith Site, Prograph, Proteus, RIP-While-Print, Setting the Standard in Digital Printing, Ultravu and VUTEk are registered trademarks<br />
of Electronics for Imaging, Inc. in the U.S. Patent and Trademark Office and/or certain other foreign jurisdictions. Bestcolor is a registered trademark of Electronics For Imaging GmbH in the U.S.<br />
Patent and Trademark Office. AutoCal, Balance, BioVu, BioWare, Build, ColorCal, Digital StoreFront, Estimate, Fiery Link, Fiery Prints, Fiery Spark, FreeForm, Hagen, Jetrion, Logic, MicroPress,<br />
PhotoXposure, Printcafe, PrintSmith, PSI, PSI Flexo, Remoteproof, RIPChips, Scan, Screenproof, SendMe, Splash, Spot-On, UltraTex, UV Series 50, VisualCal, WebTools, the <strong>EFI</strong> logo, the Fiery<br />
Prints logo and Essential to Print are trademarks of Electronics for Imaging, Inc. Best, the Best logo, Colorproof, PhotoXposure, Remoteproof, and Screenproof are trademarks of Electronics For<br />
Imaging GmbH. All other terms and product names may be trademarks or registered trademarks of their respective owners, and are hereby acknowledged.<br />
© 2009 Electronics for Imaging<br />
Step 4<br />
Step 5<br />
Step 6<br />
Step 7<br />
U126.10.09_US