Create successful ePaper yourself
Turn your PDF publications into a flip-book with our unique Google optimized e-Paper software.
<strong>RF</strong>-<strong>2.9x</strong><br />
Installation Reference Sheet<br />
Páginas de Referencia para la Instalación<br />
Schéma d’Installation<br />
Installations Beiblatt<br />
Istruzioni di Installation<br />
® ®
Dear Customer,<br />
Congratulations on your purchase of the world's finest brand of car audio electronics. At Rockford Fosgate we are<br />
fanatics about musical reproduction at its best, and we are pleased you chose our product. Through years of engineering<br />
expertise, hand craftsmanship and critical testing procedures, we have created a wide range of products that reproduce<br />
music with all the clarity and richness you deserve.<br />
For maximum performance we recommend you have your new Rockford Fosgate product installed by an Authorized<br />
Rockford Fosgate Dealer, as we provide specialized training through Rockford Technical Training Institute (RTTI).<br />
Please read your warranty and retain your receipt and original carton for possible future use.<br />
Great product and competent installations are only a piece of the puzzle when it comes to your system. Make sure that<br />
your installer is using 100% authentic installation accessories from Connecting Punch in your installation.<br />
Connecting Punch has everything from RCA cables and speaker wire to Power line and battery connectors. Insist on<br />
it! After all, your new system deserves nothing but the best.<br />
To add the finishing touch to your new fanatic image order your Rockford Fosgate wearables, which include everything<br />
from T-shirts and jackets to hats and sunglasses.<br />
To get a free brochure on Rockford Fosgate products and Rockford wearables, please call 602-967-3565 or FAX 602-<br />
967-8132. For International orders, FAX +001-1-602-967-8132 or call +001-1-602-967-3565.<br />
PRACTICE SAFE SOUND<br />
CONTINUOUS EXPOSURE TO SOUND PRESSURE LEVELS OVER 100dB MAY CAUSE PERMANENT HEARING LOSS.<br />
HIGH POWERED AUTOSOUND SYSTEMS MAY PRODUCE SOUND PRESSURE LEVELS WELL OVER 130dB. USE<br />
COMMON SENSE AND PRACTICE SAFE SOUND.<br />
If, after reading your manual, you still have questions regarding this product, we recommend that you see your Rockford Fosgate dealer. If you<br />
need further assistance, you can call us direct at 1-800-795-2385. Be sure to have your serial number, model number and date of purchase<br />
available when you call.<br />
The serial number can be found on the outside of the box. Please record it in the space provided below as your permanent record. This will<br />
serve as verification of your factory warranty and may become useful in recovering your amplifier if it is ever stolen.<br />
Serial Number: _____________________________________________<br />
Model Number: ____________________________________________
<strong>RF</strong>-<strong>2.9x</strong><br />
TECHNICAL FEATURES<br />
• Trans•ana – Sound quality topology that sends an extended bandwidth<br />
accurately to the output stages of the amplifier<br />
• TOPAZ – Eliminates troublesome group loop noise between the source<br />
and amplifier<br />
• NOMAD – Extremely fast protection system that always protects the<br />
amplifier and never degrades the sound<br />
• MOSFET Devices – Power supply and output devices that have high<br />
thermal stability, fast switching speed, low output impedance, and wide<br />
bandwidth linearity<br />
• DSM (Discrete Surface Mount) Technology – Fewer<br />
connections, improved reliability, shorter signal paths, superior signal-tonoise<br />
ratio and awesome sonic performance<br />
DESIGN FEATURES<br />
• Extruded Heatsink – Dissipates heat generated by the amplifier’s<br />
circuitry<br />
RMS Continuous Power @ 14.4V (Competition Standard)<br />
Stereo into a 4Ω load (20Hz-20kHz,
<strong>RF</strong>-<strong>2.9x</strong><br />
Extension RCA's (opt.)<br />
® ®<br />
® ® 275<br />
.9<br />
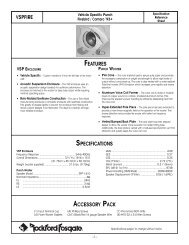
2-Channel <strong>RF</strong> Amplifier<br />
Input High Level Bass<br />
Gain L R L+ L- GND R+ R- EQ<br />
LED<br />
Connect “GND” terminal to radio<br />
chassis if noise problems arise when<br />
using High Level Inputs.<br />
Bridged/Mono 4 ohm<br />
Bridged/Mono<br />
Woofer<br />
Left (+)<br />
+<br />
Left<br />
Speaker<br />
Right<br />
Speaker<br />
Input High Level Bass<br />
Gain L R L+ L- GND R+ R- EQ<br />
LED<br />
Use passive crossovers when running amplifier in<br />
Stereo & Bridged/Mono mode simultaneously. Please<br />
contact your Authorized Rockford Fosgate Dealer for<br />
information on passive crossovers.<br />
.9<br />
Bridged/Mono<br />
Woofer<br />
+<br />
–<br />
–<br />
VOL<br />
Right (–)<br />
Left (+)<br />
Right (–)<br />
AUD CLOCK AUTO<br />
ILLUM<br />
SEL<br />
PWR<br />
+18<br />
+12<br />
+6<br />
+3<br />
0dB<br />
33Hz 45Hz 67.5Hz<br />
Stereo 2 or 4 ohm<br />
Left<br />
Speaker<br />
Right<br />
Speaker<br />
® ®<br />
+18<br />
+12<br />
+6<br />
+3<br />
0dB<br />
33Hz 45Hz 67.5Hz<br />
+<br />
–<br />
–2–<br />
+<br />
–<br />
+<br />
–<br />
+<br />
–<br />
DSPL<br />
P.SCN LOUD<br />
D.SCN SCAN RPT RDM DIM PAUSE<br />
1 2 3 4 5 6<br />
TUNE<br />
Remote Turn-On<br />
275 Watts Total Power<br />
Speaker<br />
L+ L-<br />
Speaker<br />
R+ R- B+ REM GND<br />
➝<br />
0dB<br />
–3dB<br />
30A<br />
Fuse<br />
Watts Total Power<br />
Speaker<br />
L+ L-<br />
Speaker<br />
R+ R- B+ REM GND<br />
R<br />
Battery +12V<br />
+ –<br />
Less than 18"<br />
High-Pass<br />
LP<br />
HP<br />
80Hz<br />
➝<br />
Xover Frequency<br />
➝<br />
0dB<br />
–3dB<br />
Battery<br />
Installation<br />
Reference<br />
Sheet<br />
Low-Pass Full Range<br />
HP<br />
LP<br />
➝<br />
Xover Frequency<br />
Insert XCard into Full Range only<br />
Full Range<br />
0dB<br />
–3dB<br />
FULL ↕<br />
Xover Frequency<br />
80Hz<br />
80Hz<br />
0dB<br />
–3dB<br />
FULL ↕<br />
Xover Frequency<br />
80Hz
INSTALLATION<br />
• For safety, disconnect the negative lead from the car battery prior to beginning the installation<br />
Trunk Mounting<br />
Mounting the amplifier vertically on a surface with the fin grooves running up and down will provide the best cooling for the amplifier.<br />
Passenger Compartment Mounting<br />
Mounting the amplifier in the passenger compartment will work as long as you provide a sufficient amount of air for the amplifier to cool<br />
itself. If you are going to mount the amplifier under the seat of the vehicle, you must have at least 1” (2.54cm) of air gap around the<br />
amplifier’s heatsink.<br />
B+ Terminal<br />
The B+ cable MUST be fused 18” (45cm) or less from the vehicle’s battery. Prepare the cable ends and install the fuseholder under the<br />
hood. Connections should be water tight.<br />
GND Terminal<br />
Prepare a length of cable to be used for the ground connection. Prepare the chassis ground by scraping any paint from the metal surface<br />
and thoroughly clean the area of all dirt and grease. Fasten the cable to the chassis using a screw.<br />
REM Terminal<br />
Connect the REM wire to a switched 12 volt positive source. The switched signal is usually taken from the source unit’s auto antenna or<br />
the accessory lead. If the source unit does not have these outputs available, the recommended solution is to wire a mechanical switch inline<br />
with a 12 volt source to activate the amplifier.<br />
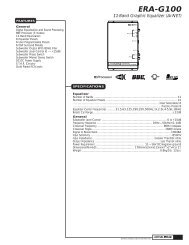
Input Connectors<br />
Follow the diagram and connect the appropriate signal cables to the input terminals of the amplifier. Be sure that the signal cables are<br />
routed close together and away from any high current wires.<br />
Speaker Output Terminals<br />
Connect the speaker system to the amplifier by inserting the wires into the corresponding output terminals and tighten the set screws.<br />
Follow the diagram for proper signal polarity. DO NOT chassis ground any of the speaker wires as unstable amplifier operation may<br />
result. CAUTION: This amplifier is not recommended for impedance loads below 2Ω stereo and/or 4Ω bridged (mono).<br />
Gain Control(s)<br />
The amplifier is factory set for optimum dynamic range with a 500mV input signal. The system levels may be adjusted by ear when using<br />
a source unit with higher or lower output levels by using the following procedure.<br />
1. Turn the gain control to minimum (counterclockwise)<br />
2. Play a music track with high dynamic content and turn up the source unit to at least 3/4 volume<br />
3. Slowly increase the gain and set it just below audible distortion or until reaching a comfortable hearing threshold (whichever occurs<br />
first)<br />
T ROUBLESHOOTING<br />
Symptom Diagnosis Remedy<br />
Amplifier does not turn on B+ or REM not between 10.5 and 15.5 volts or<br />
no voltage present<br />
Amplifier has no output<br />
Amplifier Noise<br />
(Turn-On Pop)<br />
Engine Noise<br />
Amplifier is not properly grounded<br />
XCard is missing or not inserted properly into<br />
slot<br />
Voltage spike from source unit is entering<br />
amplifier’s input<br />
Noise is radiating into signal cables<br />
–3–<br />
Check the alternator, battery, fuse, and<br />
wiring and repair as necessary<br />
Check wiring and repair as necessary<br />
Check XCard installation and repair as necessary<br />
Connect turn-on module to REM terminal if<br />
pops are eliminated with no input signal to<br />
amplifier<br />
Re-route signal cables away from sources<br />
of high current
<strong>RF</strong>-<strong>2.9x</strong><br />
Extension de RCA (opcional)<br />
® ®<br />
® ® 275<br />
.9<br />
Amplificador de <strong>RF</strong> a 2 canale – Español<br />
Input High Level Bass<br />
Gain L R L+ L- GND R+ R- EQ<br />
LED<br />
Conecte el terminal GND (Tierra) al<br />
chassis del radio en caso de que<br />
surjan problemas de ruido cuando<br />
se esten usando las entradas de alto<br />
nivel.<br />
4 Ohmios Mono/Puente<br />
Bajo<br />
Mono/Puente<br />
Izquierda (+)<br />
+<br />
Parlante<br />
Izquierdo<br />
Parlante<br />
Derecho<br />
Input High Level Bass<br />
Gain L R L+ L- GND R+ R- EQ<br />
LED<br />
Use divisores pasivos de frecuencia cuando el<br />
ampificador esté trabajando en Estéreo y Mono/Puente<br />
simultá neamente.<br />
.9<br />
Bajo<br />
Mono/Puente<br />
+<br />
–<br />
–<br />
VOL<br />
Derecha (–)<br />
Izquierda (+)<br />
Parlante<br />
Izquierdo<br />
Derecha (–)<br />
AUD CLOCK AUTO<br />
ILLUM<br />
SEL<br />
PWR<br />
+18<br />
+12<br />
+6<br />
+3<br />
0dB<br />
33Hz 45Hz 67.5Hz<br />
Estéreo 2 ó 4 Ohmios<br />
Parlante<br />
Derecho<br />
® ®<br />
+18<br />
+12<br />
+6<br />
+3<br />
0dB<br />
33Hz 45Hz 67.5Hz<br />
+<br />
–<br />
+<br />
–<br />
–4–<br />
+<br />
–<br />
+<br />
–<br />
DSPL<br />
P.SCN LOUD<br />
D.SCN SCAN RPT RDM DIM PAUSE<br />
1 2 3 4 5 6<br />
TUNE<br />
275 Watts Total Power<br />
Speaker<br />
L+ L-<br />
Speaker<br />
R+ R- B+ REM GND<br />
0dB<br />
–3dB<br />
Encendido Remoto<br />
Watts Total Power<br />
Speaker<br />
L+ L-<br />
Speaker<br />
R+ R- B+ REM GND<br />
R<br />
Batería +12V<br />
+ –<br />
Páginas de Referencia<br />
para la Instalación<br />
Fusible de<br />
30 amperios<br />
Menos de<br />
45cm<br />
Batería<br />
High-Pass Low-Pass Full Range<br />
➝<br />
LP<br />
HP<br />
80Hz<br />
➝<br />
Xover Frequency<br />
➝<br />
0dB<br />
–3dB<br />
HP<br />
LP<br />
➝<br />
Xover Frequency<br />
Insert XCard into Full Range only<br />
Full Range<br />
0dB<br />
–3dB<br />
FULL ↕<br />
Xover Frequency<br />
80Hz<br />
80Hz<br />
0dB<br />
–3dB<br />
FULL ↕<br />
Xover Frequency<br />
80Hz
INSTALACÍON<br />
• Por seguridad, desconecte el terminal negativo de la bateria antes de comenzar la instalacíon.<br />
Montaje en el Malatero del vehícule<br />
Monte el amplificador verticalmente con las líneas del radiador orientadas de arriba hacia abajo. De esta manera conseguirá la mejor<br />
ventilación.<br />
Montaje en el Compartimento de Pasajeros<br />
El montaje en el compartimento de pasajeros sera eficiente en funcion de la ventilación que tenga el amplificador. Si va a instalar el<br />
amplificador bajo un asiento deberá dejar al menos 2.5cm libres sobre la carcasa del amplificador.<br />
Terminal B+<br />
El cable B+ debe ir provisto de un fusible a una distancia no mayor de 45cm de la batería. Prepare el cable e instale el portafusibles en<br />
el compartimento del motor. Las conexiones han de ser impermeables.<br />
Terminal GND<br />
Prepare un trozo de cable para usarlo como toma de masa. Prepare un punto de masa en el chasis rascando y eliminando la pintura de<br />
la superfcicie de metal y límpielo de toda suciedad asegure el cable al chasis con un tornillo.<br />
Terminal REM (Encendido remoto)<br />
Conecte el cable REM a un punto de +12V conmutable. La señal se suele coger de la salida auto antena del radio cassette si este no<br />
tiene salida remote.<br />
Conectores de Entrada<br />
Siga el diagrama y conecte los cables adecuados para señal a los terminales de entrada del amplificador. Asegúre se que los cables de<br />
señal esten canalizados en conjunto y lo más lejo posible de cualquier cable de alto amperaje.<br />
Terminales de salida para los Parlantes<br />
Conecte el sistema de parlantes al amplificador insertando los cables correspondientes en los ternminales de salida y luego aprete los<br />
tornillos. Siga el diagrama para una adecuada polaridad de señal. NO CONECTE ninguno de los cables de los parlantes a la masa de<br />
la carcasa, ya que esto puede resultar en una operación inestable del amplificador. PRECAUCION: este amplificador no está<br />
recomendado para cargas de impedancia por abajo de 2 Ohmios en estéreo y/ó 4 Ohmios en modo puente (bridge mono).<br />
Control(es) de Ganancia<br />
El amplificador está dispuesto desde la fábrica para óptimo rango dinámico con una señal de entrada de 500mV. Los niveles del sistema<br />
pueden ser ajustado por oído cuando se utilice una unidad fuente con niveles de salidas más altos ó bajos, mediante el uso del siguiente<br />
procedimiento:<br />
1. Lleve el control de ganancia al mínimo (en contra de las agujas del reloj)<br />
2. Reproduzca una pista musical con alto contemiodo dinámico y lleve el volumen de la unidad fuente hasta unos 3/4 de máximo<br />
3. Lentamente incremente la ganancia y pare justo bajo el nivel audible de distorsion ó hasta que llegue a un umbral agradable de<br />
audición (cualquiera que ocurra primero)<br />
BÚSQUEDA DE FALLAS<br />
Síntoma Diagnóstico Remedio Reparación<br />
El Amplificador no enciende<br />
El amplificador no tiene salida<br />
Ruido de Amplificador<br />
(Popeo de encendido)<br />
Ruido de Motor<br />
B+ ó REM no están entre 10.5 y 15.5 voltios ó no hay<br />
voltaje presente.<br />
El amplificador no está aterrado apropiademente<br />
La XCard no se encuentra o no está insertada<br />
apropiadamente en la ranura<br />
Picos de voltaje de la unidad fuente están presentes en<br />
la entrada del amplificador<br />
Ruido está siendo radiado en los cables de señal<br />
–5–<br />
Chequee el alternador, batería, fusible y cableado<br />
y repare segun sea necesario<br />
Cheque el cableado y repare según sea necesario<br />
Chequee la instalación de la XCard y repare<br />
según sea necesario<br />
Conecte el módulo de encendido al terminal<br />
REM si el popeo es eliminado cuando el<br />
amplificador no tiene señal de entrada<br />
Recanlizar los cables de señal aleajado de<br />
fuentes de alto amperaje
<strong>RF</strong>-<strong>2.9x</strong><br />
Extension RCA (en option)<br />
® ®<br />
® ® 275<br />
.9<br />
Amplificateur de <strong>RF</strong> á 2-Canaux – Français<br />
Input High Level Bass<br />
Gain L R L+ L- GND R+ R- EQ<br />
LED<br />
Connectez terminal GND au châssis<br />
de la radio si des problèmes de bruit<br />
surviennent lorsque vous utilisez des<br />
entrées de niveau élevé.<br />
Biporte/Mono 4 ohm<br />
Biporte/Mono<br />
Woofer<br />
Gauche (+)<br />
+<br />
Hautparleur<br />
droit<br />
Input High Level Bass<br />
Gain L R L+ L- GND R+ R- EQ<br />
LED<br />
Utilisez des fréquences de chevauchement<br />
passives lorsque vous faîtes fonctionner<br />
l'amplificateur en mode stéréo et biport/mono<br />
simultanément.<br />
.9<br />
Bridged/Mono<br />
Woofer<br />
+<br />
–<br />
–<br />
VOL<br />
Droit (–)<br />
Left (+)<br />
Right (–)<br />
AUD CLOCK AUTO<br />
ILLUM<br />
SEL<br />
PWR<br />
+18<br />
+12<br />
+6<br />
+3<br />
0dB<br />
33Hz 45Hz 67.5Hz<br />
Stereo 2 ou 4 ohm<br />
Hautparleur<br />
gauche<br />
Left<br />
Speaker<br />
Right<br />
Speaker<br />
® ®<br />
+18<br />
+12<br />
+6<br />
+3<br />
0dB<br />
33Hz 45Hz 67.5Hz<br />
+<br />
–<br />
+<br />
–<br />
+<br />
–<br />
+<br />
–<br />
–6–<br />
DSPL<br />
P.SCN LOUD<br />
D.SCN SCAN RPT RDM DIM PAUSE<br />
1 2 3 4 5 6<br />
TUNE<br />
Allumage télécommande<br />
275 Watts Total Power<br />
Speaker<br />
L+ L-<br />
Speaker<br />
R+ R- B+ REM GND<br />
➝<br />
0dB<br />
–3dB<br />
Fusible<br />
30A<br />
Watts Total Power<br />
Speaker<br />
L+ L-<br />
Speaker<br />
R+ R- B+ REM GND<br />
R<br />
Batterie +12V<br />
+ –<br />
Moins de 45cm<br />
High-Pass<br />
LP<br />
HP<br />
80Hz<br />
➝<br />
Xover Frequency<br />
➝<br />
0dB<br />
–3dB<br />
Batterie<br />
Low-Pass Full Range<br />
HP<br />
LP<br />
80Hz<br />
➝<br />
Xover Frequency<br />
Insert XCard into Full Range only<br />
Full Range<br />
0dB<br />
–3dB<br />
FULL ↕<br />
Xover Frequency<br />
80Hz<br />
0dB<br />
–3dB<br />
Schéma<br />
d’Installation<br />
FULL ↕<br />
Xover Frequency<br />
80Hz
INSTALLATION<br />
• Pour votre sécurité, deéconnectez la borne négative de la batterie du véhicule avant de commencer l’installation.<br />
Montage dans l’habitacle<br />
Monte el amplificador verticalmente con las lineas del radiador orientadas de arriba hacia abajo. De esta manera conseguira la mejor<br />
ventilacion.<br />
Montaje en el Compartimento de Pasajeros<br />
Monter l’amplificateur dans l’habitacle ne pose aucun problème, du moment qu’il y ait assez d’air pour le refroidir. Si vous montez l’ampli en<br />
dessous du siège, prévoyez 3 cm d’air autour du radiateur.<br />
Terminal B+<br />
Il est impératif qu’il y ait un fusible sur le câble pour la connexion à la masse. Préparez le châssis en grattant la peinture de la surface métallique<br />
et nettoyez la saleté et l’huile. Attachez le câble au châssis avec une vis.<br />
Terminal GND<br />
Préparez une longueur de câble pour la connexion à la masse. Préparez le châssis en grattant la peinture de la surface métallique et nettoyez la<br />
saleté et l’huile. Attachez le câble au châssis avec une vis.<br />
Terminal REM<br />
Connectez le fil REM à une commande 12 volts positive de la source. La commande 12 volts est habuituellement prise sur la sortie antenne<br />
électrique de la source ou la commande accessoire. Si al source ne dispose pas de ces sorties, nous vous recommandons d’installer un<br />
interrupteur qui fournira un positif 12 volts au REM de l’amplificateur.<br />
Connecteurs d’entrée<br />
Suivez le diagramme et connectez les câbles de signalisation appropriés aux terminaux d’entrée de l’amplificateur. Assurez-vous que les câbles<br />
de signalisation sont bien acheminés à proximité les uns des autres et suffisamment éloignés de fils électriques à haute intensité.<br />
Terminaux de sortie du haut-parleur<br />
Connectez les haut-parleurs à l’amplificateur en introduisant les fils dans les terminaux de sortie correspondant et en serrant les vis e calage.<br />
Suivez le diagramme pour trouver la bonne polarité de signalisation NE mettez à la terre, au châssis, AUCUN des fils du haut-parleur car cela<br />
risquerait d’entraîner un fonctionnement instable de l’amplificateur.<br />
ATTENTION: cet amplificateur n’est pas recommandé pour des charges d’impédance inférieures à 2 stéréo et/ou 4 biporte (mono).<br />
Réglage(s) du gain<br />
L’ampificateur a été réglé en usine pour une gamme optimum de variations de volume avec une signalisation d’entrée de 500mV. Vous pouvez<br />
ajuster, à l’oreille, les niveaux du système, lorsque vous utilisez une unité de source dotée de niveaux de rendement de sortie inférieurs ou<br />
supérieurs par le biais de la procédure suivante.<br />
1. Réglez le gain sur le minimum (dans le sens contraire des aiguilles d’une montre)<br />
2. Choisissez un morceau de musique comprenant une gamme élevée de variations de volume et réglez le volume de l’unité de source jusqu’à<br />
trois quart, au moins, du volume possible<br />
3. Augmentez doucement le gain et réglez-le juste en-dessous d’une distorsion perceptible à l’oreille ou jusqu’à l’atteinte d’un seuil d’écoute<br />
agréable (selon ce qui est atteint en premier)<br />
TROUBLESHOOTING<br />
L’amplificateur ne<br />
s’allume pas<br />
Symptom Diagnosis Remedy<br />
L’amplificateur n’a pas<br />
de rendement de sortie<br />
Parasites amplificateur<br />
(Allumage parasite)<br />
Bruit du moteur<br />
B+ ou REM ne tombe pas entre 10.5 et 15.5 volts<br />
ou pas de voltage<br />
L’amplificateur n’est pas correctement mis à la terre.<br />
L’XCard manque ou bien n’a pas été correctement<br />
introduite dans la fente<br />
La crête de tension de voltage sortant de l’unité de<br />
source pénètre l’entrée de l’amplificateur<br />
Des parasites rayonnent dans les câbles de<br />
signalisation<br />
–7–<br />
Vérifiez l’alternateur, la batterie, les fusibles, la disposition<br />
des câbles, et effectuez des réparations si cela<br />
s’avère nécessaire<br />
Vérifiez la disposition des câbles, et effectuez des<br />
réparations si cela s’avère nécessaire<br />
Vérifiez l’installation de l’XCard, et effectuez des<br />
réparations si cela s’avère nécessaire<br />
Connectez le module d’établissement du contact au<br />
terminal REM si des parasites sont éliminés sans<br />
signalisation d’entrée à l’amplificateur<br />
Acheminez de nouveau les câbles de signalisation en<br />
les éloignant de sources de courant à haute intensité.<br />
L’amplificateur n’a pas de rendement de sortie
<strong>RF</strong>-<strong>2.9x</strong><br />
Verlängerungskabel<br />
(Optional)<br />
® ®<br />
® ® 275<br />
.9<br />
2-Kanal <strong>RF</strong> Amplifier – Deutsch<br />
Input High Level Bass<br />
Gain L R L+ L- GND R+ R- EQ<br />
LED<br />
Falls Sie Probleme mit<br />
Stoergeräuschen haben, wenn die<br />
High Level Eingänge benutzt<br />
werden, verbinden Sie den<br />
Masseanschluss mit der Masse<br />
des Radios.<br />
Gebrueckt/Mono 4 ohm<br />
Gebrueckt/<br />
Mono Woofer<br />
Links (+)<br />
+<br />
Rechter<br />
Lautsprecher<br />
Input High Level Bass<br />
Gain L R L+ L- GND R+ R- EQ<br />
LED<br />
Benutzen Sie passive Weichen, wenn Sie den<br />
Verstärker im Trimode-Betrieb nutzen. Bitte<br />
informieren Sie sich bei Ihrem autorisierten<br />
Rockford Fosgate Händler ueber passive<br />
Frequenzweichen.<br />
.9<br />
Gebrueckt/<br />
Mono<br />
Woofer<br />
+<br />
–<br />
–<br />
VOL<br />
Rechts (–)<br />
Links (+)<br />
Rechts (–)<br />
AUD CLOCK AUTO<br />
ILLUM<br />
SEL<br />
PWR<br />
+18<br />
+12<br />
+6<br />
+3<br />
0dB<br />
33Hz 45Hz 67.5Hz<br />
Linker<br />
Lautsprecher<br />
Rechter<br />
Lautsprecher<br />
® ®<br />
+18<br />
+12<br />
+6<br />
+3<br />
0dB<br />
33Hz 45Hz 67.5Hz<br />
Stereo 2 or 4 ohm<br />
Linker<br />
Lautsprecher<br />
+<br />
–<br />
+<br />
–<br />
–8–<br />
+<br />
–<br />
+<br />
–<br />
DSPL<br />
P.SCN LOUD<br />
D.SCN SCAN RPT RDM DIM PAUSE<br />
1 2 3 4 5 6<br />
TUNE<br />
Remote-Kabel<br />
275 Watts Total Power<br />
Speaker<br />
L+ L-<br />
Speaker<br />
R+ R- B+ REM GND<br />
➝<br />
0dB<br />
–3dB<br />
30A<br />
Sicherung<br />
Watts Total Power<br />
Speaker<br />
L+ L-<br />
Speaker<br />
R+ R- B+ REM GND<br />
R<br />
High-Pass<br />
LP<br />
80Hz<br />
Batterie +12V<br />
+ –<br />
Weniger als 45cm<br />
HP<br />
Abtrennung<br />
➝<br />
➝<br />
0dB<br />
–3dB<br />
HP<br />
LP<br />
Abtrennung<br />
Batterie<br />
➝<br />
80Hz<br />
XCard nur als Full Range stecken<br />
Full Range<br />
0dB<br />
–3dB<br />
FULL ↕<br />
Abtrennung<br />
80Hz<br />
Low-Pass<br />
0dB<br />
–3dB<br />
Installations<br />
Anleitung<br />
Full Range<br />
FULL ↕<br />
Abtrennung<br />
80Hz
EINBAU<br />
• Zur Sicherheit klemmen Sie den Negativ-Pol der Batterie während des gesamten Einbaues ab.<br />
Im Fahrzeugkofferraum<br />
Der vertikale Einbau der Endstufen, das bedeutet, daβ die Kühlrippen von oben nach unten verlaufen, gibt dem Verstärker die beste Kühlung.<br />
Auf der Beifahrerseite<br />
Sollte der Verstärker auf der Beifahrerseite montiert werden, so ist es sehr wichtig für eine ausreichende Kühlung zu sorgen. Sollte der Verstärker z.B. unter<br />
dem Beifahrersitz montiert werden, sollte dem Kühlkörper mindestens ein Luftspalt von 3 cm bleiben, um so für eine ausreichende Kühlung zu sorgen.<br />
B+ Anschluβ<br />
Die Plus-Leitung MUβ ca. 40 cm nach dem Plus-Pol der Batterie abgesichert sein. Preparieren Sie die Kabellängen und montieren Sie den<br />
Sicherungshalter im Motorraum. ALLE Verbindungen müssen wasserdicht sein.<br />
GND Anschluβ<br />
Preparieren Sie Ihr Kabel für die negativ Leitung (Erdung). Preparieren Sie die Anschluβstelle des Erdungskabels, indem Sie das Metall gründlich reinigen<br />
und vom Lack befreien. Befestigen Sie nun die Erdung an dieser Stelle mit einer Schraube.<br />
REM Anschluβ<br />
Verbinden Sie das Ein-und Ausschaltungskontroll-Kabel mit Ihrem Radio (12 Volt positiv). Normalerweise verwenden Sie hierfür die Ant.-Remote. Sollte<br />
Ihr Radio diesen Anschluβ nicht besitzen, so verwenden Sie eine 12 Volt Spannung, die Sie durch einen Schalter ein- und ausschalten können.<br />
Eingangs-Anschlüsse<br />
Beachten Sie den Anschlussplan und verbinden Sie die Signalkabel mit den Eingangs-Anschlüssen des Verstärkers. Seien Sie sicher, daβ die Kabel dicht<br />
zusammen und entfernt von stromführenden Kabeln liegen.<br />
Lautsprecher Ausgänge<br />
Verbinden Sie das Lautsprechersystem mit dem Verstärker, indem Sie die Kabel in die entsprechenden Anschlüsse stecken und verschrauben. Beachten<br />
Sie hierbei den Anschlussplan, um eine korrekte Polarität zu gewährleisten. Erden Sie niemals eine der Lautsprecherleitung auf die Masse des<br />
Fahrzeuges. Achtung: Die minimale Last von 2Ω Stereo und/oder 4Ω gebrückt (Mono) darf nicht unterschritten werden.<br />
Eingangsempfindlichkeit<br />
Der Verstärker ist Werksseitig auf eine Eingangsspannung von 500mV eingestellt. Die Eingangsempfindlichkeit kann nach Gehör verstellt werden, wenn<br />
die Ausgangsspannung des Steuergerätes höher oder niedriger ist. Gehen Sie wie folgt vor.<br />
1. Drehen Sie die Eingangsempfindlichkeit auf ein Minimum (gegen den Uhrzeigersinn).<br />
2. Spielen Sie einen Musiktitel mit einer sehr hohen Dynamik und drehen Sie die Lautstärkekontrolle des Steuergerätes auf 3/4 der Maximallautstärke.<br />
3. Jetzt verstellen Sie die Eingangsempfindlichkeit des Verstärkers soweit (im Uhrzeigersinn drehen), bis Sie eine Verzerrung des Signals wahrnehmen.<br />
Danach sollte die Empfindlichkeit wieder soweit zurück gedreht werden (gegen den Uhrzeigersinn), bis die Verzerrungen verschwinden.<br />
FEHLERSUCHE<br />
Syptom Diagnose Fehlerbehebung<br />
Verstärker schaltet nicht ein Die B+ oder Rem. Spannung liegt nicht zwischen<br />
10.5 und 15.5 Volt<br />
Verstärker hat keine<br />
Ausgangsleistung<br />
Verstärker Einschaltgeräusch<br />
(Turn-On Pop)<br />
Lichtmaschinen Summen<br />
Verstärker ist nicht korrekt geerdet<br />
Die XCard ist falsch oder gar nicht in den<br />
entsprechenden Sockel gesteckt.<br />
Spannungsspitze des Steuergerätes erreicht den<br />
Verstärker<br />
Störungen strahlen in die Signalkabel<br />
–9–<br />
Kontrollieren Sie die Lichtmaschine, Batterie,<br />
Sicherung und die Kabel. Reparieren Sie diese,<br />
wenn nötig<br />
Kontrollieren Sie die Kabel und reparieren Sie<br />
diese, wenn nötig<br />
Kontrollieren Sie die Installation der XCard und<br />
ändern Sie diese, wenn nötig<br />
Verbinden Sie ein Turn-on Modul mit dem Rem.<br />
Terminal, wenn die Geräusche eleminiert sind,<br />
sobald kein Signal am Verstärker anliegt.<br />
Verlegen Sie die Kabel weit entfernt von<br />
stromführenden Kabeln
<strong>RF</strong>-<strong>2.9x</strong><br />
Prolunga RCA (opzionale)<br />
® ®<br />
® ® 275<br />
.9<br />
Amplificatore di potenza a 2 canali – Italiano<br />
Input High Level Bass<br />
Gain L R L+ L- GND R+ R- EQ<br />
LED<br />
Connettere il terminale GND al telaio<br />
della sorgente in caso di problemi di<br />
rumore quando si impiega l'ingresso<br />
ad alto livello<br />
Mono a ponte 4 ohm<br />
Woofer mono<br />
a ponte<br />
sinistro (+)<br />
+<br />
Altoparlante<br />
sinistro<br />
Altoparlante<br />
destro<br />
Input High Level Bass<br />
Gain L R L+ L- GND R+ R- EQ<br />
LED<br />
Impiegando il funzionamento stereo-mono<br />
simultaneo é richiesto l'impiego di un crossover<br />
.9<br />
Woofer mono<br />
a ponte<br />
–<br />
–<br />
VOL<br />
destro (–)<br />
sinistro (+)<br />
Altoparlante<br />
+<br />
sinistro<br />
destro (–)<br />
AUD CLOCK AUTO<br />
ILLUM<br />
SEL<br />
PWR<br />
+18<br />
+12<br />
+6<br />
+3<br />
0dB<br />
33Hz 45Hz 67.5Hz<br />
Altoparlante<br />
destro<br />
® ®<br />
+18<br />
+12<br />
+6<br />
+3<br />
0dB<br />
33Hz 45Hz 67.5Hz<br />
Stereo a 2 o 4 ohm<br />
+<br />
–<br />
+<br />
–<br />
+<br />
–<br />
+<br />
–<br />
–10–<br />
DSPL<br />
P.SCN LOUD<br />
D.SCN SCAN RPT RDM DIM PAUSE<br />
1 2 3 4 5 6<br />
TUNE<br />
Accensione<br />
275 Watts Total Power<br />
Speaker<br />
L+ L-<br />
Speaker<br />
R+ R- B+ REM GND<br />
➝<br />
0dB<br />
–3dB<br />
Fusibile da<br />
30 Ampere<br />
Watts Total Power<br />
Speaker<br />
L+ L-<br />
Speaker<br />
R+ R- B+ REM GND<br />
R<br />
Batteria +12V<br />
+ –<br />
Meno di 45 centimetri<br />
High-Pass<br />
LP<br />
HP<br />
80Hz<br />
➝<br />
Xover Frequency<br />
➝<br />
0dB<br />
–3dB<br />
Batteria<br />
Low-Pass Full Range<br />
HP<br />
LP<br />
80Hz<br />
➝<br />
Xover Frequency<br />
Insert XCard into Full Range only<br />
Full Range<br />
0dB<br />
–3dB<br />
FULL ↕<br />
Xover Frequency<br />
80Hz<br />
0dB<br />
–3dB<br />
Istruzinoni di<br />
Installazione<br />
FULL ↕<br />
Xover Frequency<br />
80Hz
INSTALLAZIONE<br />
• Per sicurezza, scollegare il polo netativo della batteria dell’auto prima di iniziare l’installazione.<br />
Nel Bagagliaio<br />
Montando l’amplificatore su una superficie in verticale con le alette direzionate dall’alto verso il basso si garantirá un miglior<br />
raffreddamento dell’amplificatore.<br />
Nel’abitacolo<br />
Montare l’amplificatore nell’abitacolo si avrá un funzionamento regolare se si garantisce un flusso d’aria sufficiente. Per l’installazione<br />
sotto un sedile, é necessario avere uno spazio di almeno 3 cm attorno a tutto l’amplificatore.<br />
Terminale B+ (cavo positivo)<br />
Il cavo positivo deve essere protetto da un fusibile a non piú di 45 cam dalla batteria. Terminare il cavo e installare il fusibile nel vano<br />
motore. Tutte le connessioni devono essere a prova d’acqua.<br />
Terminal GND (cavo negativo)<br />
Decidere la lunghezza del cavo e terminarlo. Preparare la massa grattando la vernice dal telaio dell’auto ed eliminando tracce di olio o<br />
sporco. Fissare il cavo di massa al telaio con una vite.<br />
Terminal REM (Consenso di accensione)<br />
Collegare il cavo REM ad un positivo present solo ad autoradio accessa (normalmente il cavo pilota dell’antenna elettrica o il cavo<br />
accessori dell’autoradio). Se la sorgente non dovesse essere equipaggiata con queste uscite, la soluzione raccomandabile é di inserire un<br />
interruttore su un cavo positivo e connettersi all’amplificatore.<br />
Connettori di ingresso<br />
Seguendo lo schema collegate i cavi di segnale agli appropriati terminali di ingresso dell’amplificatore. Assicuratevi che i cavi di segnale<br />
siano passati vicini tra loro e lontano da cavi ad alta corrente.<br />
Connettori degli altoparlanti<br />
Collegate il sistema di altoparlanti inserendo i cavi nei terminali corrispondenti e serrate le viti. Seguite lo schema per l’ottimale colle<br />
gamento delle polaritá. Non cortocircuitate a massa nessun cavo degli altoparlanti, potrebbe verificarsi un anomalo comportamento<br />
dell’amplificatore. ATTENZIONE; questo amplificatore non é raccomandato per impedenze inferiori ai 2 ohm stereo w/o 4 ohm<br />
mono a ponte.<br />
Controlli della sensibilitá<br />
L’amplificatore é regolato dalla casa per un ottimale rendimento dinamico con segnale di ingresso di 500 mV. Il lilvello di ingresso puó<br />
essere regolato anche ad orecchio quando si impiega una sorgente con uscita superiore od inferiore. Seguite questa procedure:<br />
1. Portate il controllo della sensibilitá al minimo (senso antiorario)<br />
2. Suonate un brano musicale con elevato contenuto dinamico portando il volume della sorgente a circa 3/4<br />
3. Aumentate lentamente il livello di ingresso dell’amplificatore e posizionatelo subito prima dell’insorgere di distorsione o quando il<br />
livello generale vi appaia confortevole<br />
RISOLUZIONE DEI PROBLEMI<br />
Sintomo Diagnosi Rimendo<br />
L’ampificatore non si accende<br />
Non esce nessun suono<br />
Rumore dell’amplificatore<br />
(bump di accensione)<br />
Rumore dal motore<br />
Il B+ o il REM n on hanno una tensione<br />
compresa tra i 10,5 e 15,5 volt o nessuna<br />
tensione é presente<br />
L’amplificatore non é correttamente a massa<br />
La Xcard non é inserita correttamente o manca<br />
Picchi di tensione provenienti dalla sorgente<br />
entrano dall’ingresso dell’amplificatore<br />
Il rumore si propagna nei cavi di segnale<br />
–11–<br />
Verficate l’alternatore, la batteria, i fusibilit,<br />
il cablaggio e riparate quanto necessario<br />
Controllate il cablaggio e riparat se<br />
necessario<br />
Verificate l’installazione de la xcard e riparate<br />
se necessario<br />
Se il bump si elimina disconnettendo gli<br />
ingressi, collegate un modulo di accensione<br />
Ristendete i cavi di segnale lontano da cavi<br />
ad alta corrente
ESPAÑOL<br />
Por favor contacte al Distribuidor Autorizado Rockford<br />
Fosgate en su localidad para información sobre Políticas<br />
de Garantía Soporte Técnico.<br />
ENGLISH<br />
Please contact your local Authorized<br />
Rockford Fosgate Dealer for information<br />
on Warranty Policies and Technical Support.<br />
FRANÇAIS<br />
DEUTSCH ITALIANO<br />
Bitte Fragen Sie Ihren autorisierten Rockford Fosgate<br />
Händler über Informationen, die die Garantie oder<br />
technische Probleme betreffen.<br />
–12–<br />
Veuillez contacter votre distributeur Rockford Fosgate<br />
agréé pour toute information concernant les<br />
modalités de garantie et le support technique.<br />
Contattate il vostro rivenditore autorizzato Rockford<br />
Fosgate per informazioni sulle condizioni di garanzia<br />
e per il supporto tecnico.
LIMITED WARRANTY INFORMATION<br />
Rockford Corporation offers a limited warranty on Rockford Fosgate products on the following terms:<br />
• Length of Warranty<br />
3 years on electronics 90 days on electronic B-stock (receipt required)<br />
2 years on source units 30 days on speaker B-stock (receipt required)<br />
• What is Covered<br />
This warranty applies only to Rockford Fosgate products sold to consumers by Authorized Rockford Fosgate Dealers in the United States<br />
of America or its possessions. Product purchased by consumers from an Authorized Rockford Fosgate Dealer in another country are covered<br />
only by that country’s Distributor and not by Rockford Corporation.<br />
• Who is Covered<br />
This warranty covers only the original purchaser of Rockford product purchased from an Authorized Rockford Fosgate Dealer in the United<br />
States. In order to receive service, the purchaser must provide Rockford with a copy of the receipt stating the customer name, dealer name,<br />
product purchased and date of purchase.<br />
• Products found to be defective during the warranty period will be repaired or replaced (with a product deemed to be equivalent) at<br />
Rockford's discretion.<br />
• What is Not Covered<br />
1. Damage caused by accident, abuse, improper operations, water, theft<br />
2. Any cost or expense related to the removal or reinstallation of product<br />
3. Service performed by anyone other than Rockford or an Authorized Rockford Fosgate Service Center<br />
4. Any product which has had the serial number defaced, altered, or removed<br />
5. Subsequent damage to other components<br />
6. Any product purchased outside the U.S.<br />
7. Any product not purchased from an Authorized Rockford Fosgate Dealer<br />
• Limit on Implied Warranties<br />
Any implied warranties including warranties of fitness for use and merchantability are limited in duration to the period of the express warranty<br />
set forth above. Some states do not allow limitations on the length of an implied warranty, so this limitation may not apply. No person is<br />
authorized to assume for Rockford Fosgate any other liability in connection with the sale of the product.<br />
• How to Obtain Service<br />
Please call 1-800-669-9899 for Rockford Customer Service. You must obtain an RA# (Return Authorization number) to return any product<br />
to Rockford Fosgate. You are responsible for shipment of product to Rockford.<br />
Ship to: Electronics<br />
Rockford Corporation<br />
Warranty Repair Department<br />
2055 E. 5th Street<br />
Tempe, AZ 85281<br />
RA#:_________________<br />
–13–<br />
Ship to: Speakers<br />
Rockford Acoustic Design<br />
(Receiving-speakers)<br />
609 Myrtle N.W.<br />
Grand Rapids, MI 49504<br />
RA#:_________________
MAN-1488-A<br />
9/97<br />
MADE IN THE USA<br />
This product is designed, developed and assembled in the USA by a dedicated group of<br />
American workers. The majority of the components used in the construction of this product<br />
are produced by American companies. However, due to the global nature of their<br />
manufacturing facilities and the electronics parts industry in general, some parts may be<br />
manufactured in other countries.<br />
Rockford Fosgate<br />
Rockford Corporation<br />
546 South Rockford Drive<br />
Tempe, Arizona 85281 U.S.A.<br />
In U.S.A., (602) 967-3565<br />
In Europe, Fax (49) 850-3934-014<br />
In Japan, Fax (81) 559-79-1265