Owner's Guide Standard EasyRise™ Rectangular ... - Hunter Douglas
Owner's Guide Standard EasyRise™ Rectangular ... - Hunter Douglas
Owner's Guide Standard EasyRise™ Rectangular ... - Hunter Douglas

Create successful ePaper yourself
Turn your PDF publications into a flip-book with our unique Google optimized e-Paper software.
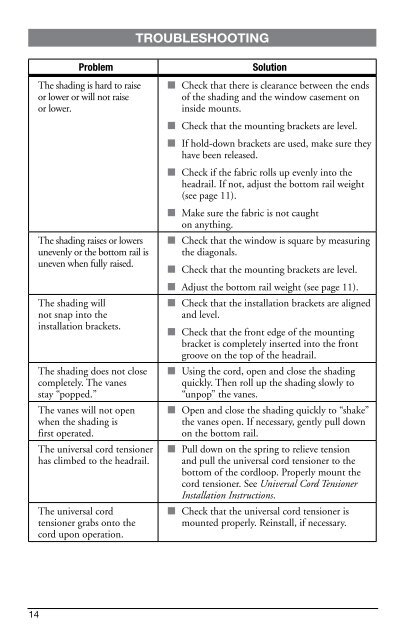
14<br />
Problem Solution<br />
The shading is hard to raise<br />
or lower or will not raise<br />
or lower.<br />
The shading raises or lowers<br />
unevenly or the bottom rail is<br />
uneven when fully raised.<br />
The shading will<br />
not snap into the<br />
installation brackets.<br />
The shading does not close<br />
completely. The vanes<br />
stay “popped.”<br />
The vanes will not open<br />
when the shading is<br />
first operated.<br />
The universal cord tensioner<br />
has climbed to the headrail.<br />
The universal cord<br />
tensioner grabs onto the<br />
cord upon operation.<br />
trouBlesHootInG<br />
■ Check that there is clearance between the ends<br />
of the shading and the window casement on<br />
inside mounts.<br />
■<br />
Check that the mounting brackets are level.<br />
■ If hold-down brackets are used, make sure they<br />
have been released.<br />
■ Check if the fabric rolls up evenly into the<br />
headrail. If not, adjust the bottom rail weight<br />
(see page 11).<br />
■ Make sure the fabric is not caught<br />
on anything.<br />
■ Check that the window is square by measuring<br />
the diagonals.<br />
■<br />
Check that the mounting brackets are level.<br />
■ Adjust the bottom rail weight (see page 11).<br />
■ Check that the installation brackets are aligned<br />
and level.<br />
■ Check that the front edge of the mounting<br />
bracket is completely inserted into the front<br />
groove on the top of the headrail.<br />
■ Using the cord, open and close the shading<br />
quickly. Then roll up the shading slowly to<br />
“unpop” the vanes.<br />
■ Open and close the shading quickly to “shake”<br />
the vanes open. If necessary, gently pull down<br />
on the bottom rail.<br />
■ Pull down on the spring to relieve tension<br />
and pull the universal cord tensioner to the<br />
bottom of the cordloop. Properly mount the<br />
cord tensioner. See Universal Cord Tensioner<br />
Installation Instructions.<br />
■ Check that the universal cord tensioner is<br />
mounted properly. Reinstall, if necessary.