Owner's Guide Standard EasyRise™ Rectangular ... - Hunter Douglas
Owner's Guide Standard EasyRise™ Rectangular ... - Hunter Douglas
Owner's Guide Standard EasyRise™ Rectangular ... - Hunter Douglas

Create successful ePaper yourself
Turn your PDF publications into a flip-book with our unique Google optimized e-Paper software.
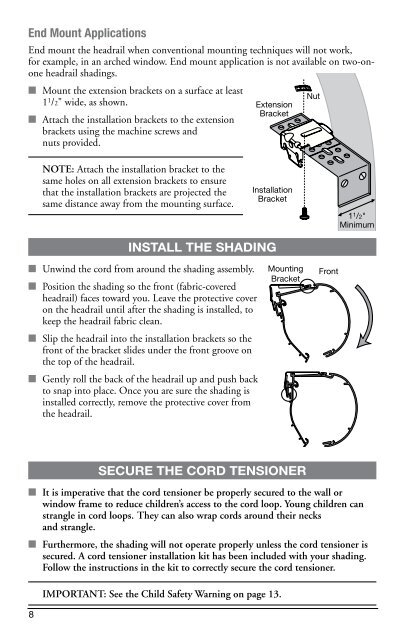
End Mount Applications<br />
End mount the headrail when conventional mounting techniques will not work,<br />
for example, in an arched window. End mount application is not available on two-onone<br />
headrail shadings.<br />
■ Mount the extension brackets on a surface at least<br />
11 /2" wide, as shown.<br />
■ Attach the installation brackets to the extension<br />
brackets using the machine screws and<br />
nuts provided.<br />
■<br />
8<br />
Note: Attach the installation bracket to the<br />
same holes on all extension brackets to ensure<br />
that the installation brackets are projected the<br />
same distance away from the mounting surface.<br />
Install tHe sHadInG<br />
Unwind the cord from around the shading assembly.<br />
■ Position the shading so the front (fabric-covered<br />
headrail) faces toward you. Leave the protective cover<br />
on the headrail until after the shading is installed, to<br />
keep the headrail fabric clean.<br />
■ Slip the headrail into the installation brackets so the<br />
front of the bracket slides under the front groove on<br />
the top of the headrail.<br />
■ Gently roll the back of the headrail up and push back<br />
to snap into place. Once you are sure the shading is<br />
installed correctly, remove the protective cover from<br />
the headrail.<br />
Extension<br />
Bracket<br />
Installation<br />
Bracket<br />
secure tHe cord tensIoner<br />
■ it is imperative that the cord tensioner be properly secured to the wall or<br />
window frame to reduce children’s access to the cord loop. Young children can<br />
strangle in cord loops. they can also wrap cords around their necks<br />
and strangle.<br />
■ Furthermore, the shading will not operate properly unless the cord tensioner is<br />
secured. a cord tensioner installation kit has been included with your shading.<br />
Follow the instructions in the kit to correctly secure the cord tensioner.<br />
iMPoRtaNt: See the Child Safety Warning on page 13.<br />
Mounting<br />
Bracket<br />
Nut<br />
Front<br />
1 1 /2"<br />
Minimum