Ditch Witch SK500 Manual
Ditch Witch SK500 Manual
Ditch Witch SK500 Manual

Create successful ePaper yourself
Turn your PDF publications into a flip-book with our unique Google optimized e-Paper software.
Operator’s<br />
<strong>Manual</strong><br />
CMW ®<br />
<strong>SK500</strong><br />
Issue 2.0<br />
054- 091
<strong>SK500</strong> Operator’s <strong>Manual</strong> Overview - 1<br />
Chapter Contents<br />
Serial Number Location . . . . . . . . . . . . . . . . . . . . . . 2<br />
Intended Use . . . . . . . . . . . . . . . . . . . . . . . . . . . . . . . 3<br />
Unit Components . . . . . . . . . . . . . . . . . . . . . . . . . . . 3<br />
Operator Orientation. . . . . . . . . . . . . . . . . . . . . . . . . 4<br />
About This <strong>Manual</strong> . . . . . . . . . . . . . . . . . . . . . . . . . . 4<br />
• Bulleted Lists. . . . . . . . . . . . . . . . . . . . . . . . . . . . . . . . . . . . . . . . . . . . . . .4<br />
• Numbered Lists . . . . . . . . . . . . . . . . . . . . . . . . . . . . . . . . . . . . . . . . . . . . .4<br />
Overview<br />
CMW
Overview - 2 <strong>SK500</strong> Operator’s <strong>Manual</strong><br />
Serial Number Location<br />
Serial Number Location<br />
Record serial numbers and date of purchase in spaces provided. Unit serial number is located as shown.<br />
CMW<br />
t05om025c.eps<br />
Item<br />
date of manufacture<br />
date of purchase<br />
unit serial number<br />
engine serial number
<strong>SK500</strong> Operator’s <strong>Manual</strong> Overview - 3<br />
Intended Use<br />
Intended Use<br />
The <strong>SK500</strong> is a walk-behind, rubber track mini skid steer unit designed for light-to medium-duty<br />
construction work. The <strong>SK500</strong> has a quick attach mount plate which makes it easy for an operator to<br />
connect different attachments. The unit is designed for operation in temperatures typically experienced in<br />
earth moving and construction work environments. Provisions may be required to operate in extreme<br />
temperatures. Contact your <strong>Ditch</strong> <strong>Witch</strong> dealer. Use in any other way is considered contrary to the<br />
intended use.<br />
The <strong>SK500</strong> should be operated, serviced, and repaired only by persons familiar with its particular<br />
characteristics and acquainted with the relevant safety procedures.<br />
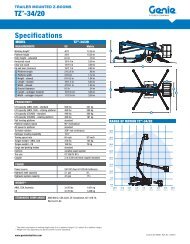
Unit Components<br />
1<br />
1. Mount plate<br />
2. Lift arms<br />
3. Engine compartment<br />
4. Tracks<br />
5. Operator station<br />
t05om001c.eps<br />
2 3 4 5<br />
CMW
Overview - 4 <strong>SK500</strong> Operator’s <strong>Manual</strong><br />
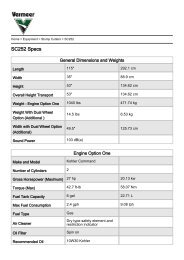
Operator Orientation<br />
Operator Orientation<br />
1. Front of unit<br />
2. Right side of unit<br />
3. Rear of unit<br />
4. Left side of unit<br />
About This <strong>Manual</strong><br />
This manual contains information for the proper use of this machine. See the beige Operation Overview<br />
pages for basic operating procedures. Cross references such as “See page 50” will direct you to detailed<br />
procedures.<br />
Bulleted Lists<br />
Bulleted lists provide helpful or important information or contain procedures that do not have to be<br />
performed in a specific order.<br />
Numbered Lists<br />
Numbered lists contain illustration callouts or list steps that must be performed in order.<br />
CMW<br />
4<br />
t05om021c.eps<br />
1<br />
3<br />
2
<strong>SK500</strong> Operator’s <strong>Manual</strong> Foreword - 5<br />
Foreword<br />
This manual is an important part of your equipment. It provides safety information and operation<br />
instructions to help you use and maintain your <strong>Ditch</strong> <strong>Witch</strong> equipment.<br />
Read this manual before using your equipment. Keep it with the equipment at all times for future reference.<br />
If you sell your equipment, be sure to give this manual to the new owner.<br />
If you need a replacement copy, contact your <strong>Ditch</strong> <strong>Witch</strong> dealer. If you need assistance in locating a<br />
dealer, visit our website at www.ditchwitch.com or write to the following address:<br />
The Charles Machine Works, Inc.<br />
Attn: Marketing Department<br />
PO Box 66<br />
Perry, OK 73077-0066<br />
USA<br />
The descriptions and specifications in this manual are subject to change without notice. The Charles<br />
Machine Works, Inc. reserves the right to improve equipment. Some product improvements may have<br />
taken place after this manual was published. For the latest information on <strong>Ditch</strong> <strong>Witch</strong> equipment, see your<br />
<strong>Ditch</strong> <strong>Witch</strong> dealer.<br />
Thank you for buying and using <strong>Ditch</strong> <strong>Witch</strong> equipment.<br />
CMW
Foreword - 6 <strong>SK500</strong> Operator’s <strong>Manual</strong><br />
CMW<br />
<strong>SK500</strong><br />
Operator’s <strong>Manual</strong><br />
Issue number 2.0/OM-1/05<br />
Part number 054-091<br />
Copyright 2003, 2004, 2005<br />
by The Charles Machine Works, Inc.<br />
, <strong>Ditch</strong> <strong>Witch</strong>, CMW, AutoCrowd, Modularmatic, Jet Trac, Roto <strong>Witch</strong>, Subsite,<br />
Fluid Miser, Perma-Soil, Power Pipe, Super <strong>Witch</strong>, Super <strong>Witch</strong> II, Pierce Airrow, The Underground, and<br />
The Underground Authority Worldwide are registered trademarks of The Charles Machine Works, Inc.
<strong>SK500</strong> Operator’s <strong>Manual</strong> Contents - 7<br />
Contents<br />
Overview<br />
machine serial number, information about the type of work this machine is designed<br />
to perform, basic machine components, and how to use this manual<br />
Foreword<br />
part number, revision level, and publication date of this manual, and factory contact<br />
information<br />
Safety<br />
machine safety alerts and emergency procedures<br />
Controls<br />
machine controls, gauges, and indicators and how to use them<br />
Prepare<br />
procedures for inspecting and classifying the jobsite, planning the installation path (if<br />
needed), preparing the jobsite for work, and connecting attachments<br />
Drive<br />
procedures for startup, cold start, driving, and shutdown<br />
Transport<br />
procedures for lifting, hauling, and towing<br />
Complete the Job<br />
procedures for restoring the jobsite and rinsing and storing equipment<br />
Service<br />
service intervals and instructions for this machine including lubrication, replacement<br />
of wear items, and basic maintenance<br />
Specifications<br />
machine specifications including weights, measurements, power ratings, and fluid<br />
capacities<br />
Support<br />
the warranty policy for this machine, and procedures for obtaining warranty<br />
consideration and training<br />
Service Record<br />
a record of major service performed on the machine<br />
1<br />
5<br />
9<br />
17<br />
21<br />
29<br />
33<br />
41<br />
43<br />
65<br />
69<br />
73<br />
CMW
Contents - 8 <strong>SK500</strong> Operator’s <strong>Manual</strong><br />
CMW
<strong>SK500</strong> Operator’s <strong>Manual</strong> Safety - 9<br />
Chapter Contents<br />
Guidelines . . . . . . . . . . . . . . . . . . . . . . . . . . . . . . . . 10<br />
Safety Alert Classifications . . . . . . . . . . . . . . . . . . 11<br />
Safety Alerts . . . . . . . . . . . . . . . . . . . . . . . . . . . . . . 12<br />
Emergency Procedures . . . . . . . . . . . . . . . . . . . . . 15<br />
• Electric Strike Description . . . . . . . . . . . . . . . . . . . . . . . . . . . . . . . . . . .15<br />
• If an Electric Line is Damaged . . . . . . . . . . . . . . . . . . . . . . . . . . . . . . . .16<br />
• If a Gas Line is Damaged . . . . . . . . . . . . . . . . . . . . . . . . . . . . . . . . . . . .16<br />
• If a Fiber Optic Cable is Damaged . . . . . . . . . . . . . . . . . . . . . . . . . . . . .16<br />
• If Machine Catches on Fire . . . . . . . . . . . . . . . . . . . . . . . . . . . . . . . . . .16<br />
Safety<br />
CMW
Safety - 10 <strong>SK500</strong> Operator’s <strong>Manual</strong><br />
Guidelines<br />
Guidelines<br />
Follow these guidelines before operating any jobsite equipment:<br />
• Complete proper training and read operator’s manual before using equipment.<br />
• Contact One-Call (888-258-0808) and any utility companies which do not subscribe to One-Call. Have<br />
all underground pipes and cables located and marked before operating equipment. If you damage a<br />
utility, contact utility company.<br />
• Classify jobsite based on its hazards and use correct tools and machinery, safety equipment, and work<br />
methods for jobsite.<br />
• Mark jobsite clearly and keep spectators away.<br />
• Wear personal protective equipment.<br />
• Review jobsite hazards, safety and emergency procedures, and individual responsibilities with all<br />
personnel before work begins. Safety videos are available from your <strong>Ditch</strong> <strong>Witch</strong> dealer.<br />
• Replace missing or damaged safety shields and safety signs.<br />
• Use equipment carefully. Stop operation and investigate anything that does not look or feel right.<br />
• Do not operate unit where flammable gas is present.<br />
• Contact your <strong>Ditch</strong> <strong>Witch</strong> dealer if you have any question about operation, maintenance, or equipment<br />
use.<br />
CMW
<strong>SK500</strong> Operator’s <strong>Manual</strong> Safety - 11<br />
Safety Alert Classifications<br />
Safety Alert Classifications<br />
These classifications and the icons defined on the following pages work together to alert you to situations<br />
which could be harmful to you, jobsite bystanders or your equipment. When you see these words and<br />
icons in the book or on the machine, carefully read and follow all instructions. YOUR SAFETY IS AT<br />
STAKE.<br />
Watch for the three safety alert levels: DANGER, WARNING and CAUTION. Learn what each level<br />
means.<br />
serious injury.<br />
serious injury.<br />
indicates an imminently hazardous situation which, if not avoided, will result in death or<br />
indicates a potentially hazardous situation which, if not avoided, could result in death or<br />
indicates a potentially hazardous situation which, if not avoided, may result in minor or<br />
moderate injury.<br />
Watch for two other words: NOTICE and IMPORTANT.<br />
NOTICE can keep you from doing something that might damage the machine or someone's property. It<br />
can also alert you against unsafe practices.<br />
IMPORTANT can help you do a better job or make your job easier in some way.<br />
CMW
Safety - 12 <strong>SK500</strong> Operator’s <strong>Manual</strong><br />
Safety Alerts<br />
Safety Alerts<br />
CMW<br />
Moving digging teeth will kill you or cut off arm or leg. Stay away.<br />
Turning shaft will kill you or crush arm or leg. Stay away.<br />
Electric shock. Contacting electric lines will cause death or serious injury.<br />
Know location of lines and stay away.<br />
Deadly gases. Lack of oxygen or presence of gas will cause sickness or<br />
death. Provide ventilation.<br />
Jobsite hazards could cause death or serious injury. Use<br />
correct equipment and work methods. Use and maintain proper safety<br />
equipment.<br />
Crushing weight could cause death or serious injury. Use<br />
proper procedures and equipment or stay away.<br />
Moving parts could cut off hand or foot. Stay away.
<strong>SK500</strong> Operator’s <strong>Manual</strong> Safety - 13<br />
Safety Alerts<br />
Explosion possible. Serious injury or equipment damage could occur.<br />
Follow directions carefully.<br />
Incorrect procedures could result in death, injury, or property damage.<br />
Learn to use equipment correctly.<br />
Improper control function could cause death or serious injury. If control does<br />
not work as described in instructions, stop machine and have it serviced.<br />
Looking into fiber optic cable could result in permanent vision damage. Do<br />
not look into ends of fiber optic or unidentified cable.<br />
Fluid or air pressure could pierce skin and cause injury or<br />
death. Stay away.<br />
Runaway possible. Machine could run over you or others. Learn how to use<br />
all controls. Start and operate only from operator’s position.<br />
Fire or explosion possible. Fumes could ignite and cause burns. No<br />
smoking, no flame, no spark.<br />
CMW
Safety - 14 <strong>SK500</strong> Operator’s <strong>Manual</strong><br />
Safety Alerts<br />
CMW<br />
Moving traffic - hazardous situation. Death or serious injury could result.<br />
Avoid moving vehicles, wear high visibility clothing, post appropriate warning signs.<br />
protection.<br />
Flying objects may cause injury. Wear hard hat and safety glasses.<br />
Hot parts may cause burns. Do not touch until cool.<br />
Exposure to high noise levels may cause hearing loss. Wear hearing<br />
Fall possible. Slips or trips may result in injury. Keep area clean.<br />
Battery acid may cause burns. Avoid contact.<br />
Improper handling or use of chemicals may result in illness, injury, or<br />
equipment damage. Follow instructions on labels and in material safety data sheets<br />
(MSDS).
<strong>SK500</strong> Operator’s <strong>Manual</strong> Safety - 15<br />
Emergency Procedures<br />
Emergency Procedures<br />
Before operating any equipment, review emergency procedures and check that all safety precautions have<br />
been taken.<br />
EMERGENCY SHUTDOWN - Turn ignition switch to STOP.<br />
Electric Strike Description<br />
When working near electric cables, remember the following:<br />
• Electricity follows all paths to ground, not just path of least resistance.<br />
• Pipes, hoses, and cables will conduct electricity back to all equipment.<br />
• Low voltage current can injure or kill. Almost one-third of work-related electrocutions result from<br />
contact with less than 440 volts.<br />
Most electric strikes are not noticeable, but indications of a strike include:<br />
• power outage<br />
• smoke<br />
• explosion<br />
• popping noises<br />
• arcing electricity<br />
If any of these occur, assume an electric strike has occurred.<br />
CMW
Safety - 16 <strong>SK500</strong> Operator’s <strong>Manual</strong><br />
Emergency Procedures<br />
If an Electric Line is Damaged<br />
If you suspect an electric line has been damaged and you are near pedestrian unit, DO NOT MOVE and<br />
do not touch unit. Take the following actions. The order and degree of action will depend upon the<br />
situation.<br />
• Warn people nearby that an electric strike has occurred. Instruct them to leave the area and contact<br />
utility.<br />
• Do not allow anyone into area until given permission by utility company.<br />
If a Gas Line is Damaged<br />
If you suspect a gas line has been damaged, take the following actions. The order and degree of action will<br />
depend on the situation.<br />
• Immediately shut off engine(s), if this can be done safely and quickly.<br />
• Remove any ignition source(s), if this can be done safely and quickly.<br />
• Warn others that a gas line has been cut and that they should leave the area.<br />
• Leave jobsite as quickly as possible.<br />
• Immediately call your local emergency phone number and utility company.<br />
• If jobsite is along street, stop traffic from driving near jobsite.<br />
• Do not return to jobsite until given permission by emergency personnel and utility company.<br />
If a Fiber Optic Cable is Damaged<br />
Do not look into cut ends of fiber optic or unidentified cable. Vision damage can occur.<br />
If Machine Catches on Fire<br />
Perform emergency shutdown procedure and then take the following actions. The order and degree of<br />
action will depend on the situation.<br />
• Immediately move battery disconnect switch (if equipped) to disconnect position.<br />
• If fire is small and fire extinguisher is available, attempt to extinguish fire.<br />
• If fire cannot be extinguished, leave area as quickly as possible and contact emergency personnel.<br />
CMW
<strong>SK500</strong> Operator’s <strong>Manual</strong> Controls - 17<br />
1. Choke<br />
2. Auxiliary power outlet<br />
3. Ignition switch<br />
4. Fuel gauge<br />
5. Hourmeter<br />
6. Engine oil pressure indicator<br />
Item Description Notes<br />
1. Choke To help start cold engine, pull<br />
knob.<br />
c00ic013c.eps<br />
t05om005c.eps<br />
1 2 3 4 5 6<br />
When engine has warmed,<br />
push in completely.<br />
2. Auxiliary power outlet To operate work lights or<br />
other 12V devices, plug into<br />
outlet.<br />
12<br />
11<br />
10<br />
Controls<br />
7. Hydraulic fluid temperature indicator<br />
8. Attachment drive control<br />
9. Lift arm control<br />
10. Throttle<br />
11. Right track drive control<br />
12. Left track drive control<br />
7<br />
8<br />
9<br />
CMW
Controls - 18 <strong>SK500</strong> Operator’s <strong>Manual</strong><br />
Item Description Notes<br />
3. Ignition switch To start engine, insert key and<br />
turn clockwise.<br />
CMW<br />
To stop engine, turn key<br />
counterclockwise.<br />
IMPORTANT: If engine does not start<br />
or stalls, turn key to STOP and then<br />
restart.<br />
4. Fuel gauge Displays fuel level in tank. Use only unleaded gasoline.<br />
5. Hourmeter Displays engine operating<br />
time.<br />
6. Engine oil pressure<br />
indicator<br />
Lights when engine oil<br />
pressure is low.<br />
Also lights briefly when<br />
engine is started.<br />
Tank holds 6 gal (23 L).<br />
Use these times to schedule service.<br />
Engine will stop.<br />
1. Check oil level.<br />
2. Check for leaks before starting<br />
engine.
<strong>SK500</strong> Operator’s <strong>Manual</strong> Controls - 19<br />
Item Description Notes<br />
7. Hydraulic fluid<br />
temperature indicator<br />
8. Attachment drive<br />
control<br />
c00ic009c.eps<br />
Lights when hydraulic fluid is<br />
overheating.<br />
To engage attachment drive<br />
in reverse, push up.<br />
To engage attachment drive<br />
in forward, pull down.<br />
9. Lift arm control To move lift arms down, push.<br />
c00ic010c.eps<br />
To float, push forward to end.<br />
To move lift arms up, pull.<br />
To curl attachment up, move<br />
to left.<br />
To curl attachment down,<br />
move to right.<br />
10. Throttle To increase engine speed,<br />
push.<br />
To decrease engine speed,<br />
pull.<br />
Check hydraulic fluid level.<br />
IMPORTANT: Do not exceed rated<br />
operating capacity when lifting loads.<br />
See page 65.<br />
Increasing engine speed also<br />
increases attachment speed.<br />
CMW
Controls - 20 <strong>SK500</strong> Operator’s <strong>Manual</strong><br />
Item Description Notes<br />
11. Right track drive<br />
control<br />
CMW<br />
To move forward, push.<br />
To move backward, pull.<br />
To go faster in either<br />
direction, move control farther<br />
from neutral.<br />
To stop, move to neutral.<br />
12. Left track drive control To move forward, push.<br />
To move backward, pull.<br />
To go faster in either<br />
direction, move control farther<br />
from neutral position.<br />
To stop, move to neutral<br />
position.<br />
To turn right, move left control forward<br />
and right control back.<br />
To turn left, move right control forward<br />
and left control back.<br />
To counter-rotate in either direction,<br />
move controls fully to ends in the<br />
directions indicated above.<br />
To turn right, move left control forward<br />
and right control back.<br />
To turn left, move right control forward<br />
and left control back.<br />
To counter-rotate in either direction,<br />
move controls fully to ends in the<br />
directions indicated above.
<strong>SK500</strong> Operator’s <strong>Manual</strong> Prepare - 21<br />
Chapter Contents<br />
Gather Information . . . . . . . . . . . . . . . . . . . . . . . . . 22<br />
• All Jobs . . . . . . . . . . . . . . . . . . . . . . . . . . . . . . . . . . . . . . . . . . . . . . . . . .22<br />
• Ground-Penetrating Jobs . . . . . . . . . . . . . . . . . . . . . . . . . . . . . . . . . . . .22<br />
• Above-Ground Jobs . . . . . . . . . . . . . . . . . . . . . . . . . . . . . . . . . . . . . . . .22<br />
Inspect Site . . . . . . . . . . . . . . . . . . . . . . . . . . . . . . . 23<br />
• Identify Hazards . . . . . . . . . . . . . . . . . . . . . . . . . . . . . . . . . . . . . . . . . . .23<br />
Classify Jobsite . . . . . . . . . . . . . . . . . . . . . . . . . . . 24<br />
• Inspect Jobsite . . . . . . . . . . . . . . . . . . . . . . . . . . . . . . . . . . . . . . . . . . . .24<br />
• Select a Classification . . . . . . . . . . . . . . . . . . . . . . . . . . . . . . . . . . . . . .24<br />
• Apply Precautions . . . . . . . . . . . . . . . . . . . . . . . . . . . . . . . . . . . . . . . . .25<br />
Check Supplies and Prepare Equipment . . . . . . . 26<br />
• Supplies . . . . . . . . . . . . . . . . . . . . . . . . . . . . . . . . . . . . . . . . . . . . . . . . .26<br />
• Fluid Levels . . . . . . . . . . . . . . . . . . . . . . . . . . . . . . . . . . . . . . . . . . . . . .26<br />
• Condition and Function . . . . . . . . . . . . . . . . . . . . . . . . . . . . . . . . . . . . .26<br />
• Accessories . . . . . . . . . . . . . . . . . . . . . . . . . . . . . . . . . . . . . . . . . . . . . .26<br />
Connect Attachment . . . . . . . . . . . . . . . . . . . . . . . 27<br />
Prepare<br />
CMW
Prepare - 22 <strong>SK500</strong> Operator’s <strong>Manual</strong><br />
Gather Information<br />
Gather Information<br />
A successful job begins before you start working. The first step in planning is reviewing information already<br />
available about the job and jobsite.<br />
All Jobs<br />
Review Job Plan<br />
Review blueprints or other plans. Check for information about existing or planned structures, elevations, or<br />
proposed work that may be taking place at the same time.<br />
Arrange for Traffic Control<br />
If working near a road or other traffic area, contact local authorities about safety procedures and<br />
regulations.<br />
Plan for Emergency Services<br />
Have the telephone numbers for local emergency and medical facilities on hand. Check that you will have<br />
access to a telephone.<br />
Ground-Penetrating Jobs<br />
Notify One-Call Services<br />
Call area One-Call or similar services and have existing lines located and marked. Call any utilities in your<br />
area that do not subscribe to One-Call.<br />
Above-Ground Jobs<br />
Locate Overhead Lines<br />
Note location and height of all overhead lines in jobsite and ensure that fully lifted attachment and/or load<br />
will not touch lines.<br />
CMW
<strong>SK500</strong> Operator’s <strong>Manual</strong> Prepare - 23<br />
Inspect Site<br />
Inspect Site<br />
Inspect jobsite before transporting equipment. Check for the following:<br />
• changes in elevation such as hills or other open trenches<br />
• obstacles such as buildings, railroad crossings, or streams<br />
• signs of utilities (See “Inspect Jobsite” on page 24.)<br />
• traffic<br />
• access<br />
• soil type and condition<br />
Identify Hazards<br />
Identify safety hazards and classify jobsite if attachment will penetrate ground. See “Classify Jobsite” on<br />
page 24.<br />
NOTICE:<br />
Jobsite hazards could cause death or serious injury. Use<br />
correct equipment and work methods. Use and maintain proper safety<br />
equipment.<br />
• Wear personal protective equipment including hard hat, safety eye wear, and hearing protection.<br />
• Do not wear jewelry or loose clothing.<br />
• Notify One-Call and companies which do not subscribe to One-Call.<br />
• Comply with all utility notification regulations before digging or drilling.<br />
• Verify location of previously marked underground hazards.<br />
• Mark jobsite clearly and keep spectators away.<br />
Remember, jobsite is classified by hazards in place -- not by line being installed.<br />
CMW
Prepare - 24 <strong>SK500</strong> Operator’s <strong>Manual</strong><br />
Classify Jobsite<br />
Classify Jobsite<br />
Inspect Jobsite<br />
• Inspect jobsite and perimeter for evidence of underground hazards, such as:<br />
– “buried utility” notices<br />
– utility facilities without overhead lines<br />
– gas or water meters<br />
– junction boxes<br />
– drop boxes<br />
– light poles<br />
– manhole covers<br />
– sunken ground<br />
• Follow U.S. Department of Labor regulations on excavating and trenching (Part 1926, Subpart P) and<br />
other similar regulations.<br />
• Contact One-Call (888-258-0808) and any utility companies which do not subscribe to One-Call.<br />
• Have an experienced locating equipment operator sweep area within 20 feet (6 m) to each side of<br />
work path. Verify previously marked line and cable locations.<br />
• Mark location of all buried utilities and obstructions.<br />
• Classify jobsite.<br />
Select a Classification<br />
Jobsites are classified according to underground hazards present.<br />
If working . . . then classify jobsite as . . .<br />
within 10 ft (3 m) of a buried electric line electric<br />
within 10 ft (3 m) of a natural gas line natural gas<br />
in sand or granite which is capable of producing crystalline silica<br />
(quartz) dust<br />
within 10 ft (3 m) of any other hazard other<br />
CMW<br />
crystalline silica (quartz) dust<br />
NOTICE: If you have any doubt about jobsite classification, or if jobsite might contain unmarked<br />
hazards, take steps outlined previously to identify hazards and classify jobsite before working.
<strong>SK500</strong> Operator’s <strong>Manual</strong> Prepare - 25<br />
Classify Jobsite<br />
Apply Precautions<br />
Once classified, precautions appropriate for jobsite must be taken.<br />
Electric Jobsite Precautions<br />
Use one or both of these methods.<br />
• Expose line by careful hand digging or soft excavation.<br />
• Have service shut down while work is in progress. Have electric company test lines before returning<br />
them to service.<br />
Natural Gas Jobsite Precautions<br />
In addition to positioning equipment upwind from gas lines, use one or both of these methods.<br />
• Expose lines by careful hand digging or soft excavation.<br />
• Have gas shut off while work is in progress. Have gas company test lines before returning them to<br />
service.<br />
Crystalline Silica (Quartz) Dust Precautions<br />
Follow OSHA or other guidelines for exposure to crystalline silica when trenching, sawing or drilling<br />
through material that might produce dust containing crystalline silica (quartz).<br />
Other Jobsite Precautions<br />
You may need to use different methods to safely avoid other underground hazards. Talk with those<br />
knowledgeable about hazards present at each site to determine which precautions should be taken or if<br />
job should be attempted.<br />
CMW
Prepare - 26 <strong>SK500</strong> Operator’s <strong>Manual</strong><br />
Check Supplies and Prepare Equipment<br />
Check Supplies and Prepare Equipment<br />
Supplies<br />
• fuel<br />
• keys<br />
• lubricants<br />
• personal protective equipment, such as hard hat and safety glasses<br />
Fluid Levels<br />
• fuel<br />
• hydraulic fluid<br />
• battery charge<br />
• engine oil<br />
Condition and Function<br />
• digging chain and teeth<br />
• filters (air, oil, hydraulic)<br />
• tracks<br />
• pumps and motors<br />
• hoses and valves<br />
• signs, guards, and shields<br />
Accessories<br />
Fire Extinguisher<br />
If required, mount a fire extinguisher near the power unit but away from possible points of ignition. The fire<br />
extinguisher should always be classified for both oil and electric fires. It should meet legal and regulatory<br />
requirements.<br />
CMW
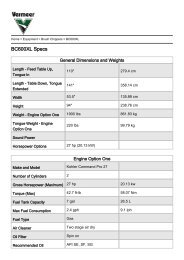
<strong>SK500</strong> Operator’s <strong>Manual</strong> Prepare - 27<br />
Connect Attachment<br />
Connect Attachment<br />
IMPORTANT: Use only <strong>Ditch</strong> <strong>Witch</strong>-approved attachments. Attachments can change the stability and<br />
operating characteristics of the unit.<br />
Attachment<br />
IMPORTANT: Before connecting attachment to unit, ensure that mount and receiver plates are free of<br />
dirt and debris.<br />
1. Position attachment on level surface with enough<br />
space behind it to accommodate unit.<br />
2. Ensure that lock pin handles (shown) on mount<br />
plate are turned away from center of attachment.<br />
3. Start engine.<br />
4. Tilt mount plate (2) forward.<br />
5. Position mount plate in the upper lip of the receiver<br />
plate (1) on attachment.<br />
6. Raise lift arms while tilting back mount plate.<br />
IMPORTANT: Attachment should be raised<br />
enough to clear the ground. Mount plate<br />
should be tilted back fully.<br />
7. Turn ignition switch off and remove key.<br />
8. Rotate lock pin handles toward center of mount<br />
plate to secure attachment to lift plate.<br />
NOTICE: To ensure proper connection, verify<br />
that bottoms of lock pins are visible under<br />
attachment receiver plate (shown).<br />
t05om022c.eps<br />
t05om026c.eps<br />
t05om027c.eps<br />
2<br />
1<br />
CMW
Prepare - 28 <strong>SK500</strong> Operator’s <strong>Manual</strong><br />
Connect Attachment<br />
Hydraulic Hoses<br />
If attachment requires hydraulic power for operation, connect hydraulic hoses.<br />
NOTICE:<br />
1. Cycle attachment drive control to relieve residual<br />
pressure at hydraulic couplers.<br />
2. Remove dirt and debris from hydraulic couplers.<br />
3. Connect male coupler on attachment to female<br />
coupler (2) on unit.<br />
4. Connect female coupler on attachment to male<br />
coupler (1) on unit.<br />
5. Ensure that connections are secure by pulling on<br />
hoses.<br />
CMW<br />
Fluid or air pressure could pierce skin and cause injury or<br />
death. Stay away.<br />
• Escaping pressurized fluid can cause injury or pierce skin and poison.<br />
• Before disconnecting a hydraulic line, turn engine off and operate all controls to relieve pressure.<br />
Lower, block, or support any raised component with a hoist. Cover connection with heavy cloth and<br />
loosen connector nut slightly to relieve residual pressure. Catch all fluid in a container.<br />
• Before using system, check that all connections are tight and all lines are undamaged.<br />
• Fluid leaks can be hard to detect. Use a piece of cardboard or wood, rather than hands, to search<br />
for leaks.<br />
• Wear protective clothing, including gloves and eye protection.<br />
• If you are injured, seek immediate medical attention from a doctor familiar with this type of injury.<br />
Hot parts may cause burns. Do not touch until cool.<br />
NOTICE: Hydraulic couplers, hoses and fluid may be hot. Wear gloves when connecting and<br />
disconnecting hydraulic hoses and wait until unit has cooled before touching hydraulic components.<br />
t05om023c.eps<br />
2<br />
1
<strong>SK500</strong> Operator’s <strong>Manual</strong> Drive - 29<br />
Chapter Contents<br />
Start Unit . . . . . . . . . . . . . . . . . . . . . . . . . . . . . . . . . 30<br />
Drive . . . . . . . . . . . . . . . . . . . . . . . . . . . . . . . . . . . . . 30<br />
Shut Down . . . . . . . . . . . . . . . . . . . . . . . . . . . . . . . . 31<br />
Drive<br />
CMW
Drive - 30 <strong>SK500</strong> Operator’s <strong>Manual</strong><br />
Start Unit<br />
Start Unit<br />
1. Ensure all controls are in neutral.<br />
2. If necessary, choke cold engine.<br />
3. Move throttle to half open.<br />
4. Turn ignition switch to start position and release when engine starts.<br />
5. Push in choke after engine is warm.<br />
Drive<br />
General Operation<br />
1. Pull lift arm control to raise mount plate (and attachment) off ground.<br />
2. Move both track drive controls to forward or reverse. See page 20.<br />
3. Adjust throttle as needed.<br />
Slope Operation Guidelines<br />
• Operate up and down slopes with heavy end of unit uphill. Weight distribution changes based on<br />
attachments and load. For example, an empty bucket makes the rear of the unit the heavy end while a<br />
full bucket makes the front of the unit the heavy end. Most <strong>Ditch</strong> <strong>Witch</strong>-approved attachments make<br />
the front of the unit the heavy end.<br />
• Avoid starting, stopping, or turning on slopes. If you must turn, keep the heavy end of the unit uphill.<br />
• Do not park unit on slope without lowering attachment to the ground and turning ignition switch to<br />
STOP.<br />
CMW<br />
EMERGENCY SHUTDOWN: Turn ignition switch to STOP.<br />
NOTICE: Keep attachment/load low when operating on a slope. Drive slowly and cautiously at all times.
<strong>SK500</strong> Operator’s <strong>Manual</strong> Drive - 31<br />
Shut Down<br />
Shut Down<br />
1. Move track drive controls to neutral position.<br />
2. Run engine at low idle for three minutes to cool.<br />
3. Turn ignition switch to STOP.<br />
4. Remove key.<br />
NOTICE:<br />
• Unit should not be parked on a slope unless chocked or blocked.<br />
• Turn ignition switch to STOP to engage parking brake.<br />
CMW
Drive - 32 <strong>SK500</strong> Operator’s <strong>Manual</strong><br />
Shut Down<br />
CMW
<strong>SK500</strong> Operator’s <strong>Manual</strong> Transport - 33<br />
Chapter Contents<br />
Lift . . . . . . . . . . . . . . . . . . . . . . . . . . . . . . . . . . . . . . 34<br />
• Points . . . . . . . . . . . . . . . . . . . . . . . . . . . . . . . . . . . . . . . . . . . . . . . . . . .34<br />
• Procedure . . . . . . . . . . . . . . . . . . . . . . . . . . . . . . . . . . . . . . . . . . . . . . . .34<br />
Haul . . . . . . . . . . . . . . . . . . . . . . . . . . . . . . . . . . . . . 35<br />
• Inspect Trailer . . . . . . . . . . . . . . . . . . . . . . . . . . . . . . . . . . . . . . . . . . . .35<br />
• Hitch Trailer . . . . . . . . . . . . . . . . . . . . . . . . . . . . . . . . . . . . . . . . . . . . . .35<br />
• Load . . . . . . . . . . . . . . . . . . . . . . . . . . . . . . . . . . . . . . . . . . . . . . . . . . . .36<br />
• Tie Down . . . . . . . . . . . . . . . . . . . . . . . . . . . . . . . . . . . . . . . . . . . . . . . .37<br />
• Unload . . . . . . . . . . . . . . . . . . . . . . . . . . . . . . . . . . . . . . . . . . . . . . . . . .38<br />
• Unhitch Trailer . . . . . . . . . . . . . . . . . . . . . . . . . . . . . . . . . . . . . . . . . . . .38<br />
Tow . . . . . . . . . . . . . . . . . . . . . . . . . . . . . . . . . . . . . 39<br />
Transport<br />
CMW
Transport - 34 <strong>SK500</strong> Operator’s <strong>Manual</strong><br />
Lift<br />
Lift<br />
Points<br />
Lifting points are identified by lifting decals. Lifting at other points is unsafe<br />
and can damage machinery.<br />
Procedure<br />
Use a hoist capable of supporting the equipment's size<br />
and weight. See page 65 or measure and weigh<br />
equipment before lifting. Use four lift points. Attach<br />
securely to cross members.<br />
CMW<br />
Crushing weight. If load falls or moves it could kill or crush you. Use<br />
proper procedures and equipment or stay away.<br />
t05om002c.eps
<strong>SK500</strong> Operator’s <strong>Manual</strong> Transport - 35<br />
Haul<br />
Haul<br />
IMPORTANT: For complete information, see the trailer manufacturer’s manual.<br />
Inspect Trailer<br />
• Check hitch for wear and cracks. Lubricate if needed.<br />
• Check battery for 12V charge, if installed.<br />
• Inspect lights for cleanliness and correct operation. Inspect reflectors and replace if needed.<br />
• Check tire pressure. Check lug nut torque with a torque wrench. Adjust if needed.<br />
• If equipped, ensure trailer brakes are adjusted to come on in synchronization with tow vehicle brakes.<br />
• Check ramps and trailer bed for cracks.<br />
Hitch Trailer<br />
1. Back tow vehicle to trailer.<br />
2. Put manual transmission into first or reverse gear or automatic transmission into park. Turn off ignition.<br />
Set parking brake.<br />
3. Connect trailer drawbar, lunette or coupler to tow vehicle hitch and lock in place with lock pin. If<br />
needed, adjust drawbar, lunette or coupler height to level load.<br />
4. Connect safety chains to tow vehicle chain keepers (cross-shaped slots on bumper of tow vehicle).<br />
Attach left chain to right side of tow vehicle and vice versa to cradle hitch.<br />
IMPORTANT: Do not connect safety chains to pintle hook or hitch ball.<br />
5. If equipped, connect breakaway switch cable to tow vehicle.<br />
IMPORTANT: Do not connect breakaway switch cable to pintle hook or hitch ball.<br />
6. If equipped, plug trailer electrical connector into tow vehicle connector.<br />
7. If equipped, use jack crank to raise jack base and stow.<br />
8. Remove wheel blocks.<br />
CMW
Transport - 36 <strong>SK500</strong> Operator’s <strong>Manual</strong><br />
Haul<br />
Load<br />
NOTICE:<br />
1. Start engine.<br />
2. Slow engine to low throttle.<br />
3. Pull lift arm control to raise mount plate (and attachment) clear of trailer, but keep it low.<br />
4. Move unit to rear of trailer and align with ramps.<br />
5. Move both track drive controls forward and slowly move unit onto trailer until tiedown position is<br />
reached.<br />
6. Push lift arm control to lower mount plate (and<br />
attachment) to trailer bed.<br />
7. Turn ignition switch off.<br />
8. Close fuel shutoff valve (shown).<br />
9. Tie down unit.<br />
CMW<br />
Crushing weight. If load falls or moves it could kill or crush you. Use<br />
proper procedures and equipment or stay away.<br />
• Load and unload trailer on level ground.<br />
• Incorrect loading can cause trailer swaying.<br />
• Attach trailer to vehicle before loading or unloading.<br />
• Ten to fifteen percent of total vehicle weight (equipment plus trailer) must be on tongue to help<br />
prevent trailer sway.<br />
NOTICE: If loading onto tilt-bed trailer, be prepared for trailer to tilt.<br />
t05om029c.eps
<strong>SK500</strong> Operator’s <strong>Manual</strong> Transport - 37<br />
Haul<br />
Tie Down<br />
Points<br />
Tiedown points are identified by tiedown decals. Securing to truck or trailer<br />
at other points is unsafe and can damage machinery.<br />
Procedure<br />
Loop tiedowns around unit at tiedown points. Make sure tiedowns are tight before transporting.<br />
t05om004c.eps<br />
CMW
Transport - 38 <strong>SK500</strong> Operator’s <strong>Manual</strong><br />
Haul<br />
Unload<br />
NOTICE:<br />
1. Lower trailer or ramps.<br />
2. Remove tiedowns.<br />
3. Open fuel shutoff valve (shown).<br />
4. Start engine.<br />
5. Pull lift arm control to raise mount plate (and<br />
attachment) off ground, but keep it low.<br />
6. Slow engine to low throttle and slowly back unit<br />
down trailer or ramps.<br />
Unhitch Trailer<br />
1. Stop tow vehicle and trailer on level ground.<br />
2. Put manual transmission into first or reverse gear or automatic transmission into park. Turn off ignition.<br />
Set parking brake.<br />
3. Block trailer wheels.<br />
4. Reverse “Hitch Trailer” steps on page 35 to unhitch trailer from tow vehicle.<br />
CMW<br />
Crushing weight. If load falls or moves it could kill or crush you. Use<br />
proper procedures and equipment or stay away.<br />
• Load and unload trailer on level ground.<br />
• Attach trailer to vehicle before loading or unloading.<br />
NOTICE: If unloading from tilt-bed trailer, be<br />
prepared for trailer to tilt.<br />
t05om029c.eps
<strong>SK500</strong> Operator’s <strong>Manual</strong> Transport - 39<br />
Tow<br />
Tow<br />
Under normal conditions, unit should not be towed. If unit breaks down and towing is necessary:<br />
t05om004c.eps<br />
• attach chains to tow points facing towing vehicle<br />
• tow for short distances at less than 1 mph (1.6 km/h)<br />
• do not tow for more than 100 ft (30 m)<br />
• use no more than 1,300 lb (5800 N) of towing force<br />
• disengage brakes and open bypass valve<br />
Prepare Unit for Towing<br />
1. Block tracks.<br />
2. Insert pry bar between end of spring (1) and frame.<br />
3. Rotate spring up and allow it to move through<br />
vertical slot.<br />
4. Drive in pin (2) in until sprocket teeth clear it.<br />
5. Unscrew bypass valve pins (shown) 3 turns.<br />
IMPORTANT: Open bypass valves in both<br />
front and rear pumps.<br />
6. Repeat process on other side.<br />
2<br />
t05om028c.eps<br />
1<br />
CMW
Transport - 40 <strong>SK500</strong> Operator’s <strong>Manual</strong><br />
Tow<br />
Return Unit to Normal Operation<br />
1. Screw in bypass valve pins and torque to 12.5 ft•lb<br />
(17 N•m).<br />
2. Remove rear access panel.<br />
3. Remove brake pin bolts (3).<br />
4. Push out pins (2) on tracks.<br />
5. Attach end of both springs (1) through hole in each side of frame.<br />
6. Stretch springs and install brake pin bolts in the same holes they were removed from.<br />
7. Install rear access panel.<br />
CMW<br />
IMPORTANT: Close bypass valve in both<br />
front and rear pumps.<br />
t05om031c.eps<br />
1<br />
3<br />
IMPORTANT: Note which holes brake pin bolts are installed in for proper reinstallation. “A”<br />
represents narrow track configuration. “B” represents wide track configuration.<br />
3<br />
2<br />
B<br />
A
<strong>SK500</strong> Operator’s <strong>Manual</strong> Complete the Job - 41<br />
Chapter Contents<br />
Rinse Equipment . . . . . . . . . . . . . . . . . . . . . . . . . . 42<br />
Disconnect Attachment . . . . . . . . . . . . . . . . . . . . . 42<br />
Stow Tools . . . . . . . . . . . . . . . . . . . . . . . . . . . . . . . 42<br />
Complete the Job<br />
CMW
Complete the Job - 42 <strong>SK500</strong> Operator’s <strong>Manual</strong><br />
Rinse Equipment<br />
Rinse Equipment<br />
1. Spray water onto equipment to remove dirt and mud.<br />
2. Open hood and remove debris from inside of unit.<br />
3. Remove mud from track sprockets.<br />
Disconnect Attachment<br />
1. Lower attachment to the ground.<br />
2. Turn off engine.<br />
3. Disengage lock pins by turning handles away from center of attachment.<br />
4. Cycle attachment drive control and disconnect hydraulic hoses, if used.<br />
5. Start engine.<br />
6. Tilt mount plate forward and back unit away from attachment.<br />
Stow Tools<br />
Make sure all tools and accessories are loaded on trailer.<br />
CMW<br />
NOTICE: Do not spray water onto operator’s console. Electrical components could be damaged.<br />
Wipe down instead.
<strong>SK500</strong> Operator’s <strong>Manual</strong> Service - 43<br />
Chapter Contents<br />
Precautions . . . . . . . . . . . . . . . . . . . . . . . . . . . . . . 44<br />
Overview . . . . . . . . . . . . . . . . . . . . . . . . . . . . . . . . . 45<br />
Recommended Lubricants/Service Key . . . . . . . . 46<br />
Oil Temperature Chart . . . . . . . . . . . . . . . . . . . . . . 46<br />
10 Hour . . . . . . . . . . . . . . . . . . . . . . . . . . . . . . . . . . 47<br />
20 Hour . . . . . . . . . . . . . . . . . . . . . . . . . . . . . . . . . . 52<br />
50 Hour . . . . . . . . . . . . . . . . . . . . . . . . . . . . . . . . . . 54<br />
100 Hour . . . . . . . . . . . . . . . . . . . . . . . . . . . . . . . . . 55<br />
200 Hour . . . . . . . . . . . . . . . . . . . . . . . . . . . . . . . . . 57<br />
250 Hour . . . . . . . . . . . . . . . . . . . . . . . . . . . . . . . . . 59<br />
300 Hour . . . . . . . . . . . . . . . . . . . . . . . . . . . . . . . . . 60<br />
500 Hour . . . . . . . . . . . . . . . . . . . . . . . . . . . . . . . . . 63<br />
Service<br />
CMW
Service - 44 <strong>SK500</strong> Operator’s <strong>Manual</strong><br />
Precautions<br />
Precautions<br />
NOTICES:<br />
Working Under Raised Lift Arms<br />
Use safety supports as indicated when working under raised lift arms.<br />
CMW<br />
Incorrect procedures could result in death, injury, or property damage.<br />
Learn to use equipment correctly.<br />
• Unless otherwise instructed, all service should be performed with engine off.<br />
• Refer to engine manufacturer’s manual for engine maintenance instructions.<br />
• Before servicing equipment, lower unstowed attachments to ground.<br />
Crushing weight could cause death or serious injury. Use<br />
proper procedures and equipment or stay away.<br />
NOTICE: Support both lift arms before working under raised lift arms.<br />
t05om020c.eps
<strong>SK500</strong> Operator’s <strong>Manual</strong> Service - 45<br />
Overview<br />
Overview<br />
t05om006c.eps<br />
500 h<br />
250 h<br />
100 h<br />
50 h<br />
20h<br />
10h<br />
CMW
Service - 46 <strong>SK500</strong> Operator’s <strong>Manual</strong><br />
Recommended Lubricants/Service Key<br />
Recommended Lubricants/Service Key<br />
Item Description<br />
Proper lubrication and maintenance protects <strong>Ditch</strong> <strong>Witch</strong> equipment from damage and failure. Service<br />
intervals listed are for minimum requirements. In extreme conditions, service machine more frequently.<br />
Use only recommended lubricants. Fill to capacities listed in “Fluid Capacities” on page 67.<br />
NOTICE:<br />
Engine Oil Temperature Chart<br />
For more information on engine lubrication and maintenance, see your engine manual.<br />
CMW<br />
GEO Gasoline engine oil meeting current API service classifications and SAE viscosity<br />
recommended by engine manufacturer (SAE 10W30)<br />
DEO IMPORTANT: DEO can be used in Honda engines to lessen foaming.<br />
Diesel engine oil meeting API service classification CF-4 or E1-96 and SAE viscosity<br />
recommended by engine manufacturer (SAE 15W40)<br />
THF Tractor hydraulic fluid, similar to Phillips 66 HG, Mobilfluid 423, Chevron Tractor<br />
Hydraulic Fluid, Texaco TDH Oil, or equivalent<br />
Check level of fluid or lubricant<br />
Check condition<br />
Filter<br />
Change, replace, adjust, service or test<br />
• Use only genuine <strong>Ditch</strong> <strong>Witch</strong> parts, filters, and approved lubricants to maintain warranty.<br />
• Use the “Service Record” on page 73 to record all required service to your machine.<br />
t05om024c.eps<br />
SAE<br />
SAE Viscosity Grades<br />
5W- 30<br />
10W- 30<br />
TEMP -20 0 20 40 60 80 100 F<br />
-30 -20 -10 0 10 20 30 40 C<br />
AMBIENT TEMPERATURE<br />
Temperature range anticipated before next oil change<br />
30
<strong>SK500</strong> Operator’s <strong>Manual</strong> Service - 47<br />
10 Hour<br />
10 Hour<br />
Location Task Notes<br />
Traction Unit Check engine oil level GEO*<br />
Traction Unit<br />
Check Engine Oil Level<br />
Honda<br />
Check hydraulic fluid level THF<br />
Check hydraulic hoses<br />
Check air filter<br />
Check track tension<br />
1<br />
2<br />
Check engine oil level at dipstick (2) every 10 hours. If low, add GEO* at fill (1). Check with unit on level<br />
surface and at least 15 minutes after stopping engine.<br />
IMPORTANT: DEO can be used in Honda engines to lessen foaming.<br />
t05om009c.eps<br />
CMW
Service - 48 <strong>SK500</strong> Operator’s <strong>Manual</strong><br />
10 Hour<br />
Kohler<br />
Check engine oil level at dipstick (1) every 10 hours. If low, add GEO at fill (2). Check with unit on level<br />
surface and at least 15 minutes after stopping engine.<br />
Check Hydraulic Fluid Level<br />
Check hydraulic fluid level every 10 hours. Maintain fluid level at halfway point on sight glass (2), when<br />
engine is off and fluid is cool. If low, add THF at fill (1).<br />
CMW<br />
2<br />
1<br />
t05om010c.eps
<strong>SK500</strong> Operator’s <strong>Manual</strong> Service - 49<br />
10 Hour<br />
Check Hydraulic Hoses<br />
Check hydraulic hoses for leaks every 10 hours.<br />
NOTICE:<br />
t05om007c.eps<br />
Fluid or air pressure could pierce skin and cause injury or<br />
death. Stay away.<br />
• Escaping pressurized fluid can cause injury or pierce skin and poison.<br />
• Before disconnecting a hydraulic line, turn engine off and operate all controls to relieve pressure.<br />
Lower, block, or support any raised component with a hoist. Cover connection with heavy cloth and<br />
loosen connector nut slightly to relieve residual pressure. Catch all fluid in a container.<br />
• Before using system, check that all connections are tight and all lines are undamaged.<br />
• Fluid leaks can be hard to detect. Use a piece of cardboard or wood, rather than hands, to search<br />
for leaks.<br />
• Wear protective clothing, including gloves and eye protection.<br />
• If you are injured, seek immediate medical attention from a doctor familiar with this type of injury.<br />
CMW
Service - 50 <strong>SK500</strong> Operator’s <strong>Manual</strong><br />
10 Hour<br />
Check Air Filter<br />
Honda<br />
Check air filter every 10 hours.<br />
1. Remove air cleaner cover (1).<br />
2. Remove and inspect foam (2) and paper (3) filter elements.<br />
3. Clean or replace elements if they are dirty or damaged. See “Clean Air Filter” on page 54.<br />
4. Wipe dirt from insides of air cleaner cover and body with a moist rag.<br />
5. Install both elements into air cleaner case.<br />
6. Install cover and latch tabs securely.<br />
CMW<br />
1<br />
3<br />
IMPORTANT: Ensure that seal lip (4) is not folded over.<br />
2<br />
4<br />
t05om011c.eps
<strong>SK500</strong> Operator’s <strong>Manual</strong> Service - 51<br />
10 Hour<br />
Kohler<br />
Check air filter every 10 hours. Replace as needed.<br />
1. Open air filter housing at latches (1).<br />
2. Remove and inspect primary (2) and secondary (3) elements.<br />
3. Wipe inside of housing and wash end cup.<br />
4. Insert primary and secondary elements.<br />
5. Close air filter case.<br />
Check Track Tension<br />
1 A<br />
Check track tension every 10 hours and adjust as needed. Turn bolt (1) clockwise to tighten and<br />
counterclockwise to loosen. Track tension is correct when dimension A is 10” (254 mm).<br />
t05om008c.eps<br />
CMW
Service - 52 <strong>SK500</strong> Operator’s <strong>Manual</strong><br />
20 Hour<br />
20 Hour<br />
Location Task Notes<br />
Traction Unit Change engine oil Initial service, GEO*<br />
Traction Unit<br />
Change Engine Oil (Initial)<br />
Honda<br />
1<br />
Change engine oil after 20 hours. Drain oil (1) and add 1.2 qt (1.1 L) of GEO* at fill (2).<br />
IMPORTANT:<br />
• Use oil specified in “Engine Oil Temperature Chart” on page 46.<br />
• DEO can be used in Honda engines to lessen foaming.<br />
CMW<br />
2<br />
t05om012c.eps<br />
t05om013c.eps
<strong>SK500</strong> Operator’s <strong>Manual</strong> Service - 53<br />
20 Hour<br />
Kohler<br />
Change engine oil after 20 hours. Drain oil (2) and add 2.1 qt (2 L) of GEO at fill (1).<br />
IMPORTANT: Use oil specified in “Engine Oil Temperature Chart” on page 46.<br />
CMW
Service - 54 <strong>SK500</strong> Operator’s <strong>Manual</strong><br />
50 Hour<br />
50 Hour<br />
Location Task Notes<br />
Traction Unit Clean air filter<br />
Traction Unit<br />
Clean Air Filter<br />
Honda only<br />
Clean air filter every 50 hours.<br />
1. Remove air filter cover (1), foam filter element (2), and paper filter element (3). See page 50.<br />
• Clean paper element by tapping several times on hard surface or blowing compressed air through<br />
element from the bottom.<br />
• Clean foam element in warm, soapy water and allow to dry thoroughly.<br />
2. Clean air cleaner cover and body and install both elements into air cleaner case. See page 50.<br />
Check Battery<br />
Check battery every 50 hours. Keep battery clean and free of corrosion.<br />
CMW<br />
Check battery<br />
1<br />
3<br />
2<br />
4<br />
t05om017c.eps<br />
t05om019c.eps
<strong>SK500</strong> Operator’s <strong>Manual</strong> Service - 55<br />
100 Hour<br />
100 Hour<br />
Location Task Notes<br />
Traction Unit Change engine oil GEO*<br />
Traction Unit<br />
Change Engine Oil<br />
Honda<br />
1<br />
Change engine oil every 100 hours. Drain oil (1) and add 1.2 qt (1.1 L) of GEO* at fill (2).<br />
IMPORTANT:<br />
2<br />
• Use oil specified in “Engine Oil Temperature Chart” on page 46.<br />
• DEO can be used in Honda engines to lessen foaming.<br />
t05om012c.eps<br />
t05om013c.eps<br />
CMW
Service - 56 <strong>SK500</strong> Operator’s <strong>Manual</strong><br />
100 Hour<br />
Kohler<br />
Change engine oil every 100 hours. Drain oil (2) and add 2.1 qt (2 L) of GEO at fill (1).<br />
IMPORTANT: Use oil specified in “Engine Oil Temperature Chart” on page 46.<br />
CMW
<strong>SK500</strong> Operator’s <strong>Manual</strong> Service - 57<br />
200 Hour<br />
200 Hour<br />
Location Task Notes<br />
Traction Unit Change engine oil filter<br />
Traction Unit<br />
Change Engine Oil Filter<br />
Honda<br />
Change engine oil filter every 200 hours. Drain oil, change filter (shown) and add 1.5 qt (1.4 L) of GEO* at<br />
fill. See page 52.<br />
IMPORTANT:<br />
• Use oil specified in “Engine Oil Temperature Chart” on page 46.<br />
• DEO can be used in Honda engines to lessen foaming.<br />
t05om014c.eps<br />
CMW
Service - 58 <strong>SK500</strong> Operator’s <strong>Manual</strong><br />
200 Hour<br />
Kohler<br />
Change engine oil filter every 200 hours. Drain oil, change filter (shown) and add 2.1 qt (2 L) of GEO at fill.<br />
See page 52.<br />
IMPORTANT: Use oil specified in “Engine Oil Temperature Chart” on page 46.<br />
CMW
<strong>SK500</strong> Operator’s <strong>Manual</strong> Service - 59<br />
250 Hour<br />
250 Hour<br />
Location Task Notes<br />
Traction Unit Change hydraulic fluid filter<br />
Traction Unit<br />
Change Hydraulic Fluid Filter<br />
Change hydraulic fluid filter every 250 hours.<br />
t05om015c.eps<br />
CMW
Service - 60 <strong>SK500</strong> Operator’s <strong>Manual</strong><br />
300 Hour<br />
300 Hour<br />
Location Task Notes<br />
Traction Unit Change fuel filter<br />
Traction Unit<br />
Change Fuel Filter<br />
Honda<br />
Change fuel filter every 300 hours. If you refuel from cans, replace filter more often. See parts manual or<br />
contact your <strong>Ditch</strong> <strong>Witch</strong> dealer for correct replacement filter.<br />
Kohler<br />
Change inline fuel filter every 300 hours. See parts manual or contact your <strong>Ditch</strong> <strong>Witch</strong> dealer for correct<br />
replacement filter.<br />
1. Remove filter.<br />
2. Install new filter.<br />
CMW<br />
Change air filter<br />
t05om016c.eps
<strong>SK500</strong> Operator’s <strong>Manual</strong> Service - 61<br />
300 Hour<br />
Change Air Filter<br />
Honda<br />
1<br />
3<br />
Change air filter every 300 hours. Change more often in dusty conditions.<br />
1. Remove air cleaner cover (1).<br />
2. Remove foam (2) and paper (3) filter elements.<br />
3. Replace both elements.<br />
4. Wipe dirt from insides of air cleaner cover and body with a moist rag.<br />
5. Install both elements into air cleaner case. Install cover and latch tabs securely.<br />
IMPORTANT: Ensure that seal lip (4) is not folded over.<br />
2<br />
4<br />
t05om017c.eps<br />
CMW
Service - 62 <strong>SK500</strong> Operator’s <strong>Manual</strong><br />
300 Hour<br />
Kohler<br />
Change air filter every 300 hours.<br />
1. Open air filter housing at latches (1).<br />
2. Remove primary (2) and secondary (3) elements.<br />
3. Wipe inside of housing and wash end cup.<br />
4. Insert new primary and secondary elements.<br />
5. Close air filter case.<br />
CMW
<strong>SK500</strong> Operator’s <strong>Manual</strong> Service - 63<br />
500 Hour<br />
500 Hour<br />
Location Task Notes<br />
Traction Unit Change hydraulic fluid THF<br />
Traction Unit<br />
Change Hydraulic Fluid<br />
1<br />
3<br />
2<br />
t05om018c.eps<br />
Change hydraulic fluid every 500 hours. Drain fluid at plug (2) and add THF at fill (1) until fluid level is at<br />
halfway point on sight glass (3).<br />
CMW
Service - 64 <strong>SK500</strong> Operator’s <strong>Manual</strong><br />
500 Hour<br />
CMW
<strong>SK500</strong> Operator’s <strong>Manual</strong> Specifications - 65<br />
Basic Unit<br />
Basic Unit<br />
H<br />
t05om003c.eps<br />
W L<br />
A2<br />
Specifications<br />
Dimensions U.S. Metric<br />
H Overall height 42.5 in 1.1 m<br />
L Overall length 72.5 in 1.8 m<br />
Weight 2270 lb 1030 kg<br />
H2 Hinge pin height, max 81.1 in 2.1 m<br />
L2 Wheelbase/track length 40 in 1 m<br />
W Track width, min 36 in 914 mm<br />
Track width, max 42 in 1.1 m<br />
Ground clearance 6.5 in 165 mm<br />
Tipping capacity 1450 lb 658 kg<br />
Rated operating capacity (@ 35% of tipping capacity) 500 lb 227 kg<br />
Capacity @ 50% of tipping capacity 725 lb 329 kg<br />
A2 Angle of departure 30° 30°<br />
Swing radius 42 in 1.1 m<br />
L2<br />
H2<br />
CMW
Specifications - 66 <strong>SK500</strong> Operator’s <strong>Manual</strong><br />
Basic Unit<br />
Performance U.S. Metric<br />
Ground drive speed, forward 3.6 mph 5.8 km/h<br />
Ground drive speed, reverse 2.3 mph 3.7 km/h<br />
Ground pressure, 7-in tracks 4.3 psi 0.3 bar<br />
Ground pressure, 9-in tracks 3.3 psi 0.2 bar<br />
Hydraulic System U.S. Metric<br />
Auxiliary: double gear pump<br />
Flow rate (pump 1) 4 gpm 15 L/min<br />
Flow rate (pump 2) 8 gpm 30 L/min<br />
Pressure 2500 psi 172 bar<br />
Ground drive: dual hydrostat<br />
Flow rate 12.5 gpm 47 L/min<br />
Pressure 2500 psi 172 bar<br />
Power - Honda Engine U.S. Metric<br />
Engine: Honda GX670, gasoline<br />
Cooling medium air<br />
Number of cylinders 2<br />
Displacement 40.9 in 3<br />
CMW<br />
670 cm 3<br />
Bore 3 in 76 mm<br />
Stroke 2.8 in 71 mm<br />
Installed net power per SAE J1349 (@ 3600 rpm) 24 hp 18 kW<br />
Maximum governed speed (no load) 3600 rpm 3600 rpm<br />
Idle speed 1700 rpm 1700 rpm
<strong>SK500</strong> Operator’s <strong>Manual</strong> Specifications - 67<br />
Basic Unit<br />
Power - Kohler Engine U.S. Metric<br />
Engine: Kohler CH740S, gasoline<br />
Cooling medium air<br />
Number of cylinders 2<br />
Displacement 44 in 3<br />
625 cm 3<br />
Bore 3.3 in 88 mm<br />
Stroke 2.6 in 67 mm<br />
Installed net power per SAE J1349 (@ 3600 rpm) 27 hp 20.1 kW<br />
Maximum governed speed (no load) 3750 rpm 3750 rpm<br />
Idle speed 1200 rpm 1200 rpm<br />
Fluid Capacities U.S. Metric<br />
Fuel tank 6 gal 23 L<br />
Engine oil, with filter<br />
Honda 1.5 qt 1.4 L<br />
Kohler 2.1 qt 2 L<br />
Hydraulic reservoir 5.5 gal 21 L<br />
CMW
Specifications - 68 <strong>SK500</strong> Operator’s <strong>Manual</strong><br />
Basic Unit<br />
Battery<br />
SAE reserve capacity 180 min, SAE cold crank @ 0°F (-18°C) 675 amp, 12V electrical system<br />
Noise Levels - Honda Engine<br />
Operator 86 dBA sound pressure per ISO 6394<br />
Exterior 101 dBA sound power per ISO 6393<br />
Noise Levels - Kohler Engine<br />
Operator 86 dBA sound pressure per ISO 6394<br />
Exterior 103 dBA sound power per ISO 6393<br />
Vibration Level<br />
Vibration at the operator’s hand during normal operation is 4.9 m/sec 2<br />
Specifications are called out according to SAE recommended practices. Specifications are general and<br />
subject to change without notice. If exact measurements are required, equipment should be weighed and<br />
measured. Due to selected options, delivered equipment may not necessarily match that shown.<br />
CMW
<strong>SK500</strong> Operator’s <strong>Manual</strong> Support - 69<br />
Procedure<br />
Procedure<br />
Notify your dealer immediately of any malfunction or failure of <strong>Ditch</strong> <strong>Witch</strong> equipment.<br />
Support<br />
Always give model, serial number, and approximate date of your equipment purchase. This information<br />
should be recorded and placed on file by the owner at the time of purchase.<br />
Return damaged parts to dealer for inspection and warranty consideration if in warranty time frame.<br />
Order genuine <strong>Ditch</strong> <strong>Witch</strong> replacement or repair parts from your authorized <strong>Ditch</strong> <strong>Witch</strong> dealer. Use of<br />
another manufacturer's parts may void warranty consideration.<br />
Resources<br />
Publications<br />
Contact your <strong>Ditch</strong> <strong>Witch</strong> dealer for publications and videos covering safety, operation, service, and repair<br />
of your equipment.<br />
<strong>Ditch</strong> <strong>Witch</strong> Training<br />
For information about on-site, individualized training, contact your <strong>Ditch</strong> <strong>Witch</strong> dealer.<br />
CMW
Warranty - 70 <strong>SK500</strong> Operator’s <strong>Manual</strong><br />
CMW<br />
<strong>Ditch</strong> <strong>Witch</strong> Equipment and Parts<br />
Limited Warranty Policy<br />
Warranty<br />
Subject to the limitations and exclusions herein, free replacement parts will be provided at any authorized <strong>Ditch</strong> <strong>Witch</strong> dealership for<br />
any <strong>Ditch</strong> <strong>Witch</strong> equipment or parts manufactured by The Charles Machine Works, Inc. (CMW) that fail due to a defect in material or<br />
workmanship within one (1) year of first commercial use (Exception: 2 years for all <strong>SK500</strong> attachments). Free labor will be provided at<br />
any authorized <strong>Ditch</strong> <strong>Witch</strong> dealership for installation of parts under this warranty during the first year following initial commercial use<br />
of the serial-numbered <strong>Ditch</strong> <strong>Witch</strong> equipment on which it is installed.<br />
Exclusions from Product Warranty<br />
• Wear-related failure of parts subject to ground contact including, but not limited to, digging teeth, digging chains, sprockets,<br />
backhoe buckets, plow blades, drill pipe, drill bits, backreamers, and swivels.<br />
• All incidental or consequential damages.<br />
• All defects, damages, or injuries caused by misuse, abuse, improper installation, alteration, neglect, or uses other than those for<br />
which products were intended.<br />
• All defects, damages, or injuries caused by improper training, operation, or servicing of products in a manner inconsistent with<br />
manufacturer’s recommendations.<br />
• All engines and engine accessories (these are covered by original manufacturer’s warranty).<br />
• Tires, belts, and other parts which may be subject to another manufacturer’s warranty (such warranty will be available to<br />
purchaser).<br />
• All implied warranties not expressly stated herein, including any warranty of fitness for a particular purpose and merchantability.<br />
IF THE PRODUCTS ARE PURCHASED FOR COMMERCIAL PURPOSES AS DEFINED BY THE UNIFORM COMMERCIAL CODE,<br />
THEN THERE ARE NO WARRANTIES WHICH EXTEND BEYOND THE FACE HEREOF AND THERE ARE NO IMPLIED<br />
WARRANTIES OF ANY KIND WHICH EXTEND TO A COMMERCIAL BUYER. ALL OTHER PROVISIONS OF THIS LIMITED<br />
WARRANTY APPLY INCLUDING THE DUTIES IMPOSED.<br />
<strong>Ditch</strong> <strong>Witch</strong> products have been tested to deliver acceptable performance in most conditions. This does not imply they will deliver<br />
acceptable performance in all conditions. Therefore, to assure suitability, products should be operated under anticipated working<br />
conditions prior to purchase.<br />
Defects will be determined by an inspection within thirty (30) days of the date of failure of the product or part by CMW or its authorized<br />
dealer. CMW will provide the location of its inspection facilities or its nearest authorized dealer upon inquiry. CMW reserves the right<br />
to supply remanufactured replacements parts under this warranty as it deems appropriate.<br />
Extended warranties are available upon request from your local <strong>Ditch</strong> <strong>Witch</strong> dealer or CMW.<br />
Some states do not allow exclusion or limitation of incidental or consequential damages, so above limitation of exclusion may not<br />
apply. Further, some states do not allow exclusion of or limitation of how long an implied warranty lasts, so the above limitation may<br />
not apply. This limited warranty gives product owner specific legal rights and the product owner may also have other rights which vary<br />
from state to state.<br />
For information regarding this limited warranty, contact CMW’s Product Support department, P.O. Box 66, Perry, OK 73077-0066, or<br />
contact your local <strong>Ditch</strong> <strong>Witch</strong> dealer.<br />
First version: 1/91; Latest version: 1/03
<strong>SK500</strong> Operator’s <strong>Manual</strong> Service Record - 73<br />
Service Record<br />
Service Performed Date Hours<br />
CMW
Service Record - 74 <strong>SK500</strong> Operator’s <strong>Manual</strong><br />
Service Performed Date Hours<br />
CMW