Procedural Skills Instruction Arterial Blood Gas (ABG) Checklist
Procedural Skills Instruction Arterial Blood Gas (ABG) Checklist
Procedural Skills Instruction Arterial Blood Gas (ABG) Checklist

Create successful ePaper yourself
Turn your PDF publications into a flip-book with our unique Google optimized e-Paper software.
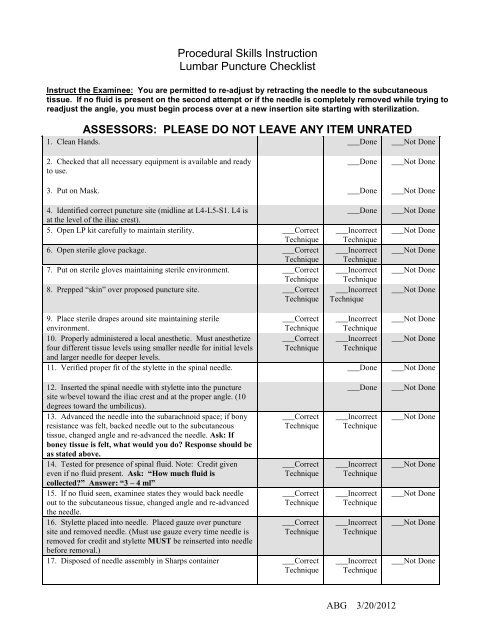
<strong>Procedural</strong> <strong>Skills</strong> <strong>Instruction</strong><br />
Lumbar Puncture <strong>Checklist</strong><br />
Instruct the Examinee: You are permitted to re-adjust by retracting the needle to the subcutaneous<br />
tissue. If no fluid is present on the second attempt or if the needle is completely removed while trying to<br />
readjust the angle, you must begin process over at a new insertion site starting with sterilization.<br />
ASSESSORS: PLEASE DO NOT LEAVE ANY ITEM UNRATED<br />
1. Clean Hands.<br />
___Done ___Not Done<br />
2. Checked that all necessary equipment is available and ready<br />
to use.<br />
3. Put on Mask. ___Done<br />
4. Identified correct puncture site (midline at L4-L5-S1. L4 is<br />
at the level of the iliac crest).<br />
5. Open LP kit carefully to maintain sterility. ___Correct<br />
Technique<br />
6. Open sterile glove package. ___Correct<br />
Technique<br />
7. Put on sterile gloves maintaining sterile environment. ___Correct<br />
Technique<br />
8. Prepped “skin” over proposed puncture site. ___Correct<br />
Technique<br />
___Done ___Not Done<br />
<strong>ABG</strong> 3/20/2012<br />
___Not Done<br />
___Done ___Not Done<br />
___Incorrect<br />
Technique<br />
___Incorrect<br />
Technique<br />
___Incorrect<br />
Technique<br />
___Incorrect<br />
Technique<br />
9. Place sterile drapes around site maintaining sterile<br />
___Correct ___Incorrect<br />
environment.<br />
Technique Technique<br />
10. Properly administered a local anesthetic. Must anesthetize ___Correct ___Incorrect<br />
four different tissue levels using smaller needle for initial levels<br />
and larger needle for deeper levels.<br />
Technique Technique<br />
11. Verified proper fit of the stylette in the spinal needle. ___Done<br />
12. Inserted the spinal needle with stylette into the puncture<br />
site w/bevel toward the iliac crest and at the proper angle. (10<br />
degrees toward the umbilicus).<br />
13. Advanced the needle into the subarachnoid space; if bony<br />
resistance was felt, backed needle out to the subcutaneous<br />
tissue, changed angle and re-advanced the needle. Ask: If<br />
boney tissue is felt, what would you do? Response should be<br />
as stated above.<br />
14. Tested for presence of spinal fluid. Note: Credit given<br />
even if no fluid present. Ask: “How much fluid is<br />
collected?” Answer: “3 – 4 ml”<br />
15. If no fluid seen, examinee states they would back needle<br />
out to the subcutaneous tissue, changed angle and re-advanced<br />
the needle.<br />
16. Stylette placed into needle. Placed gauze over puncture<br />
site and removed needle. (Must use gauze every time needle is<br />
removed for credit and stylette MUST be reinserted into needle<br />
before removal.)<br />
___Correct<br />
Technique<br />
___Correct<br />
Technique<br />
___Correct<br />
Technique<br />
___Correct<br />
Technique<br />
17. Disposed of needle assembly in Sharps container ___Correct<br />
Technique<br />
___Done<br />
___Incorrect<br />
Technique<br />
___Incorrect<br />
Technique<br />
___Incorrect<br />
Technique<br />
___Incorrect<br />
Technique<br />
___Incorrect<br />
Technique<br />
___Not Done<br />
___Not Done<br />
___Not Done<br />
___Not Done<br />
___Not Done<br />
___Not Done<br />
___Not Done<br />
___Not Done<br />
___Not Done<br />
___Not Done<br />
___Not Done<br />
___Not Done<br />
___Not Done


![CV Joan [W51] - University of Illinois College of Medicine at Chicago ...](https://img.yumpu.com/17336863/1/190x245/cv-joan-w51-university-of-illinois-college-of-medicine-at-chicago-.jpg?quality=85)