USER GUIDE & caRE InStRUctIonS - Angelzentrale Herrieden
USER GUIDE & caRE InStRUctIonS - Angelzentrale Herrieden
USER GUIDE & caRE InStRUctIonS - Angelzentrale Herrieden

You also want an ePaper? Increase the reach of your titles
YUMPU automatically turns print PDFs into web optimized ePapers that Google loves.
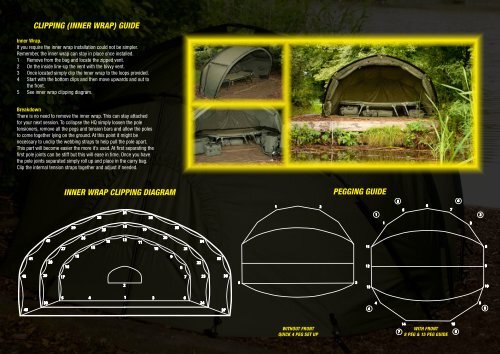
clIPPInG (InnER WRaP) <strong>GUIDE</strong><br />
Inner Wrap.<br />
If you require the inner wrap installation could not be simpler.<br />
Remember, the inner wrap can stay in place once installed.<br />
1 Remove from the bag and locate the zipped vent.<br />
2 On the inside line-up the vent with the bivvy vent.<br />
3 Once located simply clip the inner wrap to the loops provided.<br />
4 Start with the bottom clips and then move upwards and out to<br />
the front.<br />
5 See inner wrap clipping diagram.<br />
Breakdown<br />
There is no need to remove the inner wrap. This can stay attached<br />
for your next session. To collapse the HQ simply loosen the pole<br />
tensioners, remove all the pegs and tension bars and allow the poles<br />
to come together lying on the ground. At this point it might be<br />
necessary to unclip the webbing straps to help pull the pole apart.<br />
This part will become easier the more it’s used. At first separating the<br />
first pole joints can be stiff but this will ease in time. Once you have<br />
the pole joints separated simply roll up and place in the carry bag.<br />
Clip the internal tension straps together and adjust if needed.<br />
InnER WRaP clIPPInG DIaGRaM<br />
WItHoUt FRont<br />
qUIck 4 PEG SEt UP<br />
PEGGInG <strong>GUIDE</strong><br />
WItH FRont<br />
8 PEG & 15 PEG <strong>GUIDE</strong>