USER GUIDE & caRE InStRUctIonS - Angelzentrale Herrieden
USER GUIDE & caRE InStRUctIonS - Angelzentrale Herrieden
USER GUIDE & caRE InStRUctIonS - Angelzentrale Herrieden

You also want an ePaper? Increase the reach of your titles
YUMPU automatically turns print PDFs into web optimized ePapers that Google loves.
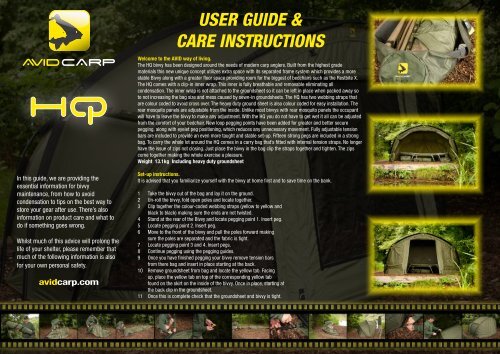
In this guide, we are providing the<br />
essential information for bivvy<br />
maintenance, from how to avoid<br />
condensation to tips on the best way to<br />
store your gear after use. There’s also<br />
information on product care and what to<br />
do if something goes wrong.<br />
Whilst much of this advice will prolong the<br />
life of your shelter, please remember that<br />
much of the following information is also<br />
for your own personal safety.<br />
avidcarp.com<br />
<strong>USER</strong> <strong>GUIDE</strong> &<br />
<strong>caRE</strong> <strong>InStRUctIonS</strong><br />
Welcome to the AVID way of living.<br />
The HQ bivvy has been designed around the needs of modern carp anglers. Built from the highest grade<br />
materials this new unique concept utilizes extra space with its separated frame system which provides a more<br />
stable Bivvy along with a greater floor space providing room for the biggest of bedchairs such as the Restbite X.<br />
The HQ comes with a clip-in inner wrap. This inner is fully breathable and removable eliminating all<br />
condensation. The inner wrap is not attached to the groundsheet so it can be left in place when packed away so<br />
to not increasing the bag size and mess caused by sewn-in groundsheets. The HQ has two webbing straps that<br />
are colour coded to avoid cross over. The heavy duty ground sheet is also colour coded for easy installation. The<br />
rear mosquito panels are adjustable from the inside. Unlike most bivvys with rear mosquito panels the occupant<br />
will have to leave the bivvy to make any adjustment. With the HQ you do not have to get wet it all can be adjusted<br />
from the comfort of your bedchair. New loop pegging points have been added for greater and better secure<br />
pegging, along with eyelet peg positioning, which reduces any unnecessary movement. Fully adjustable tension<br />
bars are included to provide an even more taught and stable set-up. Fifteen strong pegs are included in a strong<br />
bag. To carry the whole lot around the HQ comes in a carry bag that’s fitted with internal tension straps. No longer<br />
have the issue of zips not closing. Just place the bivvy in the bag clip the straps together and tighten. The zips<br />
come together making the whole exercise a pleasure.<br />
Weight 13.1kg Including heavy duty groundsheet<br />
Set-up instructions.<br />
It is advised that you familiarize yourself with the bivvy at home first and to save time on the bank.<br />
1 Take the bivvy out of the bag and lay it on the ground.<br />
2 Un-roll the bivvy, fold open poles and locate together.<br />
3 Clip together the colour-coded webbing straps (yellow to yellow and<br />
black to black) making sure the ends are not twisted.<br />
4 Stand at the rear of the Bivvy and locate pegging point 1. Insert peg.<br />
5 Locate pegging point 2. Insert peg.<br />
6 Move to the front of the bivvy and pull the poles forward making<br />
sure the poles are separated and the fabric is tight.<br />
7 Locate pegging point 3 and 4. Insert pegs.<br />
8 Continue pegging using the pegging guides.<br />
9 Once you have finished pegging your bivvy remove tension bars<br />
from there bag and insert in place starting at the back.<br />
10 Remove groundsheet from bag and locate the yellow tab. Facing<br />
up, place the yellow tab on top of the corresponding yellow tab<br />
found on the skirt on the inside of the bivvy. Once in place, starting at<br />
the back clip in the groundsheet.<br />
11 Once this is complete check that the groundsheet and bivvy is tight.
clIPPInG (InnER WRaP) <strong>GUIDE</strong><br />
Inner Wrap.<br />
If you require the inner wrap installation could not be simpler.<br />
Remember, the inner wrap can stay in place once installed.<br />
1 Remove from the bag and locate the zipped vent.<br />
2 On the inside line-up the vent with the bivvy vent.<br />
3 Once located simply clip the inner wrap to the loops provided.<br />
4 Start with the bottom clips and then move upwards and out to<br />
the front.<br />
5 See inner wrap clipping diagram.<br />
Breakdown<br />
There is no need to remove the inner wrap. This can stay attached<br />
for your next session. To collapse the HQ simply loosen the pole<br />
tensioners, remove all the pegs and tension bars and allow the poles<br />
to come together lying on the ground. At this point it might be<br />
necessary to unclip the webbing straps to help pull the pole apart.<br />
This part will become easier the more it’s used. At first separating the<br />
first pole joints can be stiff but this will ease in time. Once you have<br />
the pole joints separated simply roll up and place in the carry bag.<br />
Clip the internal tension straps together and adjust if needed.<br />
InnER WRaP clIPPInG DIaGRaM<br />
WItHoUt FRont<br />
qUIck 4 PEG SEt UP<br />
PEGGInG <strong>GUIDE</strong><br />
WItH FRont<br />
8 PEG & 15 PEG <strong>GUIDE</strong>
CO<br />
CAutIoN!<br />
Never place your stove, or other flame source in or<br />
near your bivvy or shelter. Never cook, light, or refuel<br />
a stove or any other heat source inside your tent or<br />
shelter. Death by suffocation and/or serious burns<br />
is possible.<br />
VENtILAtIoN<br />
• Keep all flame and heat sources away from the<br />
fabric of this shelter.<br />
• Never use any fuel-burning products (stoves,<br />
lanterns, heaters, etc.) inside or within<br />
proximity of this Bivvy Use of fuel-burning<br />
products inside or within proximity of this<br />
bivvy can result in the accumulation of<br />
dangerous concentrations of carbon monoxide a<br />
colourless, odourless gas. Breathing carbon<br />
monoxide will cause serious injury or death.<br />
• The fabric is not fireproof. It will burn if left in<br />
continuous contact with an open flame or other<br />
heat source.<br />
Moisture<br />
passing through<br />
living area<br />
UV<br />
Warm air and water particles rise and pass through<br />
the inner skin. condensing on the outer skin due to<br />
superior air-flow.<br />
Air-flow<br />
helps prevent<br />
condensation.<br />
GENERAL CARE<br />
StoRAGE: Avoid packing or storing your bivvy or<br />
shelter when it’s wet/damp or dirty. Though we use<br />
the best polyurethane waterproofing available,<br />
prolonged exposure to moisture causes hydrolysis;<br />
the waterproof layer breaks down, becoming soft,<br />
sticky and no longer waterproof. Storing a wet tent<br />
for as little as 24 hours in warm weather is also<br />
likely to start the process of mildew forming on<br />
the fabric. Mildew will cause your bivvy or shelter<br />
to stain, smell, and will lead to the premature<br />
breakdown of the waterproof coating. Mildew and<br />
moisture damage are not covered under the<br />
Warranty. Dry your tent thoroughly after every trip<br />
and store it outside of the supplied bag,<br />
tREAt YouR PoLES WELL DuRING SEtuP:<br />
90% of pole damage occurs during setup. Don’t<br />
allow the shock cord to pull and snap the ends<br />
together as this can damage the pole ends and<br />
result in breakage.<br />
uSE A GRouNDShEEt: Groundsheets keep your<br />
bivvy inner floor clean and dry and they minimize<br />
floor wear by protecting it from<br />
excessive abrasion.<br />
SuN & uLtRAVIoLEt RAYS: UV light is one of<br />
the most damaging elements for your shelter. When<br />
out in high temperatures, extended<br />
and prolonged exposure will cause fabric to fade,<br />
lose strength, and eventually tear. UV damage is not<br />
covered by the warranty.<br />
CLEANING: If your bivvy or shelter should require<br />
cleaning, set it up and use a sponge with warm<br />
water. If further cleaning is needed, a garden hose<br />
should be able to wash off any remaining dirt. Do<br />
not use detergent, soap, bleach, or have it dry<br />
cleaned, as these may remove the waterproofing<br />
and/or damage the fabric. Allow the tent to air-dry<br />
completely before packing or storing.<br />
ZIP CARE: When sand and grit get in the zips<br />
teeth, it can cause abrasion and damage to the<br />
metal zipper sliders. If you use your bivvy in these<br />
conditions, keep the zipper teeth clean by rinsing<br />
them out with water. The pressure from a regular<br />
garden hose will push out small sand particles from<br />
inside the zipper coil. Handling your zipper slider<br />
with care can also prolong the life of a zipper. Just<br />
like a zipper on a duffle bag or piece of luggage,<br />
make sure to align the tracks before sliding the<br />
zipper, and don’t exert excessive force. If fabric gets<br />
caught in the slider, stop and slowly reverse the<br />
slider to remove.<br />
SEAm SEALING: Superior fabrics and<br />
construction make Avid shelters extremely<br />
waterproof. They are factory seam-taped,<br />
so seam sealing is not necessary.<br />
CoNDENSAtIoN: Condensation occurs when<br />
warm moist air encounters a cooler surface and<br />
is cooled below the dew point, the temperature at<br />
which the air is saturated with moisture and dew<br />
begins to form. In a bivvy, your breath is the most<br />
common and an unavoidable source of warm moist<br />
air. A person can exhale a pint of moisture per night.<br />
Evaporation of sweat and moisture from rain-soaked<br />
clothing, frozen food and bait further humidifies the<br />
air and increases the threat of condensation.<br />
Cooking inside a bivvy adds still more water<br />
vapour to the air. All Avid bivvies sold today fight<br />
condensation with the aid of an inner skin – this<br />
double-walled design uses a breathable inner layer.<br />
Warm, moist air will rise through the first layer and<br />
condense on the overwrap outer layer (See diagram<br />
below). In temperatures above freezing, it will then<br />
roll down the inside of the overwrap and drip onto<br />
the ground instead of the occupants. In<br />
temperatures below freezing, the moisture will<br />
congeal into frost. If the wind shakes off the frost, it<br />
will land on the inner and slide harmlessly down to<br />
the ground. The theory works, in most conditions. Be<br />
sure that any bivvy and overwrap you’re considering<br />
to purchase provides a good separation between the<br />
inner and the overwrap. As good airflow is<br />
paramount. In severe cold, as well as in certain<br />
other conditions of cool temperatures and high<br />
humidity, the inner’s temperature can be below the<br />
dew point, so that moisture condenses on the inner<br />
instead of passing through to the overwrap. Leading<br />
bivvy manufacturers also try to prevent<br />
condensation by providing ventilation in various<br />
ways. The problem is providing a way to let warm<br />
air escape without permitting rain to enter. Vents<br />
that penetrate the inner but not the overwrap do<br />
little good. Opening the door can help if the<br />
overwrap extends as an awning over the door to<br />
prevent the entry of rain. Opening doors or windows<br />
on opposite sides of the bivvy (if the bivvy is so<br />
equipped) permits cross-ventilation, which works<br />
well if during the night if there is a breeze. The best<br />
venting system combines high-level and low-level<br />
vents, so that warm rising air can naturally flow out<br />
the top vent while cooler air flows in the bottom.<br />
Very few bivvies have a high/low venting system.<br />
Maintain adequate ventilation inside your tent at all<br />
times. Death by suffocation is possible.<br />
WARRANtY<br />
Avid Carp offers a limited warranty to the original<br />
owner that covers the materials and<br />
workmanship of every Avid bivvy or shelter we<br />
make. If your purchase has received proper care but<br />
fails due to a defect in manufacturing, the tent will<br />
be repaired or replaced at our discretion. Damage<br />
caused by accidents, improper care, or negligence<br />
where Avid is not at fault will not be repaired.<br />
Material breakdown due to sun degradation, mildew,<br />
and natural aging are not considered to be defects,<br />
and generally cannot be repaired.<br />
REPAIR PRoCEDuRES<br />
Contact your Avid retailer. They will contact us to<br />
sort out any problems.<br />
ImPoRtANt!<br />
• Please clean all items before handing products<br />
back over to your retailer. Dirty products may not be<br />
processed.<br />
• Clearly mark or tag the area on the product in<br />
need of repair.<br />
• Include a note regarding reason for return along<br />
with the date and place of purchase, your name and<br />
your daytime telephone number.