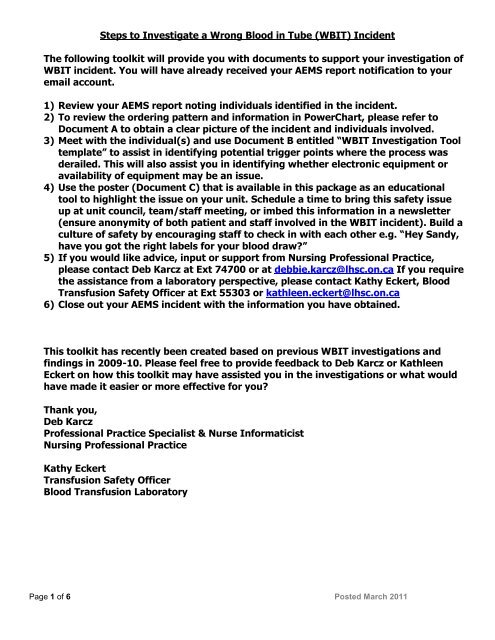
Steps to Investigate a Wrong Blood in Tube (WBIT) Incident The ...
Steps to Investigate a Wrong Blood in Tube (WBIT) Incident The ...
Steps to Investigate a Wrong Blood in Tube (WBIT) Incident The ...

Create successful ePaper yourself
Turn your PDF publications into a flip-book with our unique Google optimized e-Paper software.
<strong>Steps</strong> <strong>to</strong> <strong>Investigate</strong> a <strong>Wrong</strong> <strong>Blood</strong> <strong>in</strong> <strong>Tube</strong> (<strong>WBIT</strong>) <strong>Incident</strong><br />
<strong>The</strong> follow<strong>in</strong>g <strong>to</strong>olkit will provide you with documents <strong>to</strong> support your <strong>in</strong>vestigation of<br />
<strong>WBIT</strong> <strong>in</strong>cident. You will have already received your AEMS report notification <strong>to</strong> your<br />
email account.<br />
1) Review your AEMS report not<strong>in</strong>g <strong>in</strong>dividuals identified <strong>in</strong> the <strong>in</strong>cident.<br />
2) To review the order<strong>in</strong>g pattern and <strong>in</strong>formation <strong>in</strong> PowerChart, please refer <strong>to</strong><br />
Document A <strong>to</strong> obta<strong>in</strong> a clear picture of the <strong>in</strong>cident and <strong>in</strong>dividuals <strong>in</strong>volved.<br />
3) Meet with the <strong>in</strong>dividual(s) and use Document B entitled “<strong>WBIT</strong> Investigation Tool<br />
template” <strong>to</strong> assist <strong>in</strong> identify<strong>in</strong>g potential trigger po<strong>in</strong>ts where the process was<br />
derailed. This will also assist you <strong>in</strong> identify<strong>in</strong>g whether electronic equipment or<br />
availability of equipment may be an issue.<br />
4) Use the poster (Document C) that is available <strong>in</strong> this package as an educational<br />
<strong>to</strong>ol <strong>to</strong> highlight the issue on your unit. Schedule a time <strong>to</strong> br<strong>in</strong>g this safety issue<br />
up at unit council, team/staff meet<strong>in</strong>g, or imbed this <strong>in</strong>formation <strong>in</strong> a newsletter<br />
(ensure anonymity of both patient and staff <strong>in</strong>volved <strong>in</strong> the <strong>WBIT</strong> <strong>in</strong>cident). Build a<br />
culture of safety by encourag<strong>in</strong>g staff <strong>to</strong> check <strong>in</strong> with each other e.g. “Hey Sandy,<br />
have you got the right labels for your blood draw?”<br />
5) If you would like advice, <strong>in</strong>put or support from Nurs<strong>in</strong>g Professional Practice,<br />
please contact Deb Karcz at Ext 74700 or at debbie.karcz@lhsc.on.ca If you require<br />
the assistance from a labora<strong>to</strong>ry perspective, please contact Kathy Eckert, <strong>Blood</strong><br />
Transfusion Safety Officer at Ext 55303 or kathleen.eckert@lhsc.on.ca<br />
6) Close out your AEMS <strong>in</strong>cident with the <strong>in</strong>formation you have obta<strong>in</strong>ed.<br />
This <strong>to</strong>olkit has recently been created based on previous <strong>WBIT</strong> <strong>in</strong>vestigations and<br />
f<strong>in</strong>d<strong>in</strong>gs <strong>in</strong> 2009-10. Please feel free <strong>to</strong> provide feedback <strong>to</strong> Deb Karcz or Kathleen<br />
Eckert on how this <strong>to</strong>olkit may have assisted you <strong>in</strong> the <strong>in</strong>vestigations or what would<br />
have made it easier or more effective for you?<br />
Thank you,<br />
Deb Karcz<br />
Professional Practice Specialist & Nurse Informaticist<br />
Nurs<strong>in</strong>g Professional Practice<br />
Kathy Eckert<br />
Transfusion Safety Officer<br />
<strong>Blood</strong> Transfusion Labora<strong>to</strong>ry<br />
Page 1 of 6 Posted March 2011
Document A<br />
<strong>Steps</strong> for <strong>WBIT</strong> Occurrence Investigation <strong>in</strong> Cerner’s PowerChart<br />
1) When you are <strong>in</strong>vestigat<strong>in</strong>g a <strong>WBIT</strong> occurrence <strong>in</strong> PowerChart sign-<strong>in</strong> <strong>to</strong> PowerChart <strong>in</strong> the usual manner.<br />
2) Open the patient chart either from a current nurse unit location list OR us<strong>in</strong>g one of the search options.<br />
NOTE: If you use the patient search, ensure that you select the correct visit from the encounter pane of the<br />
search results screen.<br />
3) Once the patient chart is open, navigate <strong>to</strong> the “Orders” component on the Table of Contents.<br />
4) <strong>The</strong> default view for the Orders screen is called “Cus<strong>to</strong>m”. In this view, you only see active orders (Orders not<br />
cancelled/completed).<br />
Page 2 of 6 Posted March 2011
5) S<strong>in</strong>ce you will most likely be <strong>in</strong>vestigat<strong>in</strong>g an order/bloodwork that has been completed, you must change your<br />
view <strong>in</strong> order <strong>to</strong> display the completed order. To do this, click the drop-menu beside “Display” and select “All<br />
Orders (All Statuses). Once this view is selected, click on the ellipsis but<strong>to</strong>n <strong>to</strong> the right of the view. <strong>The</strong><br />
Advanced Filters screen will display <strong>to</strong> validate that all available criteria has been selected.<br />
NOTE: You must click <strong>in</strong> the box under Miscellaneous <strong>to</strong> “Show <strong>in</strong>dividual <strong>in</strong>stances for cont<strong>in</strong>u<strong>in</strong>g<br />
orders” <strong>in</strong> order <strong>to</strong> see each <strong>in</strong>dividual order that was placed us<strong>in</strong>g a frequency ie. Daily for 3 days.<br />
6) Click <strong>to</strong> return <strong>to</strong> the Orders screen.<br />
7) <strong>The</strong> Orders screen will display <strong>to</strong> show all orders for that patient visit. <strong>The</strong> “+” sign <strong>in</strong>dicates a frequency order.<br />
You must click the “+” sign <strong>to</strong> show each <strong>in</strong>dividual order <strong>in</strong>stance.<br />
Page 3 of 6 Posted March 2011
8) Scroll through the list of orders <strong>to</strong> f<strong>in</strong>d the order you wish <strong>to</strong> <strong>in</strong>vestigate.<br />
9) Click on the name of the test OR right-click on the order details and select “Order Info…” from the menu.<br />
10) <strong>The</strong> Order Information w<strong>in</strong>dow will appear.<br />
Page 4 of 6 Posted March 2011
11) Each tab provides different <strong>in</strong>formation about the order. <strong>The</strong> 2 tabs that provide all of the <strong>in</strong>formation you should<br />
need are the Additional Info and His<strong>to</strong>ry Tabs.<br />
Additional Info Tab<br />
Displays <strong>in</strong>formation about the order <strong>in</strong>clud<strong>in</strong>g:<br />
Ordered As - <strong>The</strong> name used <strong>to</strong> order the test<br />
Start/S<strong>to</strong>p Date/Time for the order<br />
Accession Number - Lab Track<strong>in</strong>g Number<br />
Order ID – the database track<strong>in</strong>g number<br />
Template ID – this appears if the order was<br />
placed us<strong>in</strong>g a frequency. This is the database<br />
track<strong>in</strong>g number for the frequency order.<br />
Template Order Details – these are the order<br />
details completed when the order was placed as<br />
a frequency order.<br />
Department Status – this is the current lab<br />
status for the order. time the order<strong>in</strong>g person<br />
His<strong>to</strong>ry Tab<br />
This w<strong>in</strong>dow displays <strong>in</strong>formation <strong>in</strong> reverse<br />
order, show<strong>in</strong>g the first actions for the order at<br />
the bot<strong>to</strong>m.<br />
Scroll down the w<strong>in</strong>dow <strong>to</strong> beg<strong>in</strong> view<strong>in</strong>g the<br />
details for the order.<br />
Order<br />
Shows you the name of the person who entered<br />
the order, the date/time they actually click the<br />
“Sign” but<strong>to</strong>n and the physician it was attributed<br />
<strong>to</strong>.<br />
Page 5 of 6 Posted March 2011
It shows you the status of the order for<br />
PowerChart and for the lab.<br />
It shows you all of the details that were<br />
completed when the order was signed.<br />
Status Change<br />
Each time action is taken aga<strong>in</strong>st the order, you<br />
will see a Status Change, along with the name of<br />
the staff who changed the status.<br />
In this example, the status changed from<br />
Dispatched (mean<strong>in</strong>g a label has pr<strong>in</strong>ted) <strong>to</strong><br />
“Collected” and then <strong>to</strong> “In-Lab”. This means a<br />
collected sample has arrived <strong>in</strong> the Specimen<br />
Receiv<strong>in</strong>g area and has been logged <strong>in</strong> us<strong>in</strong>g the<br />
collec<strong>to</strong>rs user name and has been routed <strong>to</strong> the<br />
appropriate lab for process<strong>in</strong>g.<br />
NOTE: You cannot see the name of the collec<strong>to</strong>r<br />
<strong>in</strong> PowerChart.<br />
Once the sample has processed, the status<br />
changes <strong>to</strong> complete for both PowerChart and<br />
the Lab.<br />
Page 6 of 6 Posted March 2011
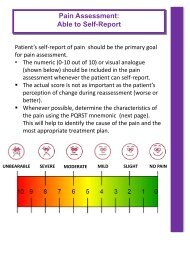
Date of Occurrence: How was occurrence discovered? Date of Interview:<br />
Location: By BTL: o By patient care area: o<br />
His<strong>to</strong>ry:<br />
Additional Info:<br />
Major <strong>Steps</strong> <strong>in</strong> the Process of Specimen<br />
Collection<br />
1. Order tests <strong>in</strong> PowerChart / pr<strong>in</strong>t labels<br />
2. Take labels <strong>to</strong> the bedside<br />
3. Compare <strong>to</strong> patient armband<br />
Investigation of <strong>WBIT</strong> Occurrences<br />
Additional <strong>in</strong>formation on each step Investigation Notes<br />
a. Who is responsible for putt<strong>in</strong>g the order <strong>in</strong> PowerChart?<br />
b. How often would someone leave their log-<strong>in</strong> active when<br />
they leave the computer? Have you used someone<br />
else's logged-<strong>in</strong> session <strong>to</strong> order tests?<br />
c. If a unit clerk <strong>in</strong>puts the order, does an RN consistently<br />
do a "Nurse Review" of the order<br />
d. Where is the computer(s) located?<br />
e Where is the label pr<strong>in</strong>ter(s) located?<br />
f In your op<strong>in</strong>ion, <strong>in</strong> what % of cases is this the 1 st step of<br />
the process.<br />
a. Who takes the labels off the label pr<strong>in</strong>ter?<br />
b. Where are they put if specimens are not drawn<br />
immediately?<br />
c. Is it consistent with the workflow <strong>to</strong> br<strong>in</strong>g labels <strong>to</strong> the<br />
bedside?<br />
d. What are the reasons why labels may not be taken <strong>to</strong><br />
the bedside?<br />
a. Are patients armbanded?<br />
b. Is it common practice <strong>to</strong> compare label <strong>to</strong> armband?<br />
c. What are the reasons why armband is not used <strong>to</strong><br />
compare <strong>to</strong> labels?<br />
Posted March 2011
4. Take specimens<br />
5. Label at bedside<br />
6. Pr<strong>in</strong>t username, date/time on label (and<br />
sign – BTL specimens only)<br />
7. Send specimen <strong>to</strong> BTL<br />
d. How frequently would you be <strong>in</strong>terrupted either when<br />
<strong>in</strong>putt<strong>in</strong>g the order or <strong>in</strong> the process of draw<strong>in</strong>g the blood<br />
and label<strong>in</strong>g it?<br />
e Do you have any recommendations as <strong>to</strong> how this could<br />
be avoided?<br />
a. Is it generally the patient’s RN who takes blood<br />
specimens?<br />
b. Where are the phlebo<strong>to</strong>my supplies located?<br />
c. Is a cart, tray or basket used that can be brought <strong>to</strong> the<br />
patient’s side?<br />
d. How do you dispose of sharps, if a sharps conta<strong>in</strong>er is<br />
not brought <strong>in</strong><strong>to</strong> the room?<br />
e Do you rout<strong>in</strong>ely take extra tubes of blood <strong>in</strong> anticipation<br />
of future orders? If yes, where do you s<strong>to</strong>re them and<br />
how are they labeled?<br />
a. What work surface is used <strong>to</strong> place tubes and labels<br />
when draw<strong>in</strong>g specimens?<br />
b. Are there any reasons why a specimen could not be<br />
labeled at the bedside?<br />
a. Can the completion of the label be done at the bedside?<br />
b. If no, why?<br />
a. Who packages up the specimens <strong>to</strong> be sent <strong>to</strong> BTL?<br />
b. Are specimens sent by pneumatic tube or by porter?<br />
Coord<strong>in</strong>a<strong>to</strong>r: Participants:<br />
Additional Notes:<br />
1.<br />
Posted March 2011
2.<br />
3.<br />
4.<br />
5.<br />
Action Items or Recommendations:<br />
1.<br />
2.<br />
3.<br />
4.<br />
Posted March 2011
Does your label match your<br />
Would you please confirm<br />
the spell<strong>in</strong>g of your last<br />
name and your date of birth?<br />
10475593 B-10-064009<br />
MOUSE, MINNIE<br />
1930/06/19 V-DSG<br />
Bld Bank P<strong>in</strong>k 6.0<br />
OD-S, RG2, BTLCR-S<br />
patient?<br />
You know your<br />
patient…<br />
Misidentified patients can result <strong>in</strong> your<br />
patient receiv<strong>in</strong>g <strong>in</strong>correct treatment<br />
BUT…<br />
Do you know<br />
your labels?<br />
Mislabeled specimens can result <strong>in</strong> another<br />
patient receiv<strong>in</strong>g <strong>in</strong>correct treatment<br />
7 <strong>Steps</strong> <strong>to</strong> Successful Specimen Label<strong>in</strong>g<br />
1. Order test <strong>in</strong> PowerChart<br />
2. Take labels <strong>to</strong> bedside<br />
3. Compare labels <strong>to</strong> patient arm (ID) band<br />
- when possible <strong>in</strong>clude patient <strong>in</strong> the identification process by ask<strong>in</strong>g<br />
them <strong>to</strong> confirm the spell<strong>in</strong>g of their last name their date of birth<br />
- avoid questions that require a Yes/No answer (ie Are you John Smith?)<br />
4. Collect specimen(s)<br />
5. Label specimen(s) at bedside<br />
6. Complete label - e.g. signature, user name, collection date<br />
7. Place specimen(s) <strong>in</strong> designated biohazard transport bag,<br />
place requisition or collection label <strong>in</strong> separate pouch and<br />
send <strong>to</strong> lab<br />
For additional <strong>in</strong>formation on specimen collection, view the on-l<strong>in</strong>e Specimen Collection Guide<br />
Prepared by: Viki Massey, Deb Karcz, Kathleen Eckert.<br />
Authorized by: <strong>WBIT</strong> committee / Glen Kearns<br />
Posted March 2011