Lab 3.5.3: Troubleshooting VLAN Configurations
Lab 3.5.3: Troubleshooting VLAN Configurations
Lab 3.5.3: Troubleshooting VLAN Configurations

You also want an ePaper? Increase the reach of your titles
YUMPU automatically turns print PDFs into web optimized ePapers that Google loves.
<strong>Lab</strong> <strong>3.5.3</strong>: <strong>Troubleshooting</strong> <strong>VLAN</strong> <strong>Configurations</strong><br />
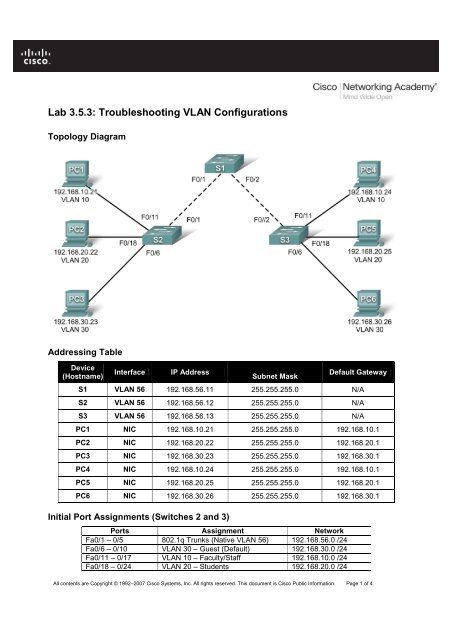
Topology Diagram<br />
Addressing Table<br />
Device<br />
(Hostname)<br />
Interface IP Address<br />
Subnet Mask<br />
Default Gateway<br />
S1 <strong>VLAN</strong> 56 192.168.56.11 255.255.255.0 N/A<br />
S2 <strong>VLAN</strong> 56 192.168.56.12 255.255.255.0 N/A<br />
S3 <strong>VLAN</strong> 56 192.168.56.13 255.255.255.0 N/A<br />
PC1 NIC 192.168.10.21 255.255.255.0 192.168.10.1<br />
PC2 NIC 192.168.20.22 255.255.255.0 192.168.20.1<br />
PC3 NIC 192.168.30.23 255.255.255.0 192.168.30.1<br />
PC4 NIC 192.168.10.24 255.255.255.0 192.168.10.1<br />
PC5 NIC 192.168.20.25 255.255.255.0 192.168.20.1<br />
PC6 NIC 192.168.30.26 255.255.255.0 192.168.30.1<br />
Initial Port Assignments (Switches 2 and 3)<br />
Ports Assignment Network<br />
Fa0/1 – 0/5 802.1q Trunks (Native <strong>VLAN</strong> 56) 192.168.56.0 /24<br />
Fa0/6 – 0/10 <strong>VLAN</strong> 30 – Guest (Default) 192.168.30.0 /24<br />
Fa0/11 – 0/17 <strong>VLAN</strong> 10 – Faculty/Staff 192.168.10.0 /24<br />
Fa0/18 – 0/24 <strong>VLAN</strong> 20 – Students 192.168.20.0 /24<br />
All contents are Copyright © 1992–2007 Cisco Systems, Inc. All rights reserved. This document is Cisco Public Information. Page 1 of 4
CCNA Exploration<br />
LAN Switching and Wireless: <strong>VLAN</strong>s <strong>Lab</strong> <strong>3.5.3</strong>: <strong>Troubleshooting</strong> <strong>VLAN</strong> Configuration<br />
Learning Objective<br />
Practice basic <strong>VLAN</strong> troubleshooting skills.<br />
Scenario<br />
In this lab, you will practice troubleshooting a misconfigured <strong>VLAN</strong> environment. Load or have your<br />
instructor load the configurations below into your lab gear. Your objective is to locate and correct any and<br />
all errors in the configurations and establish end-to-end connectivity. Your final configuration should<br />
match the topology diagram and addressing table. All passwords are set to cisco, except the enable<br />
secret password, which is set to class.<br />
Task 1: Prepare the Network<br />
Step 1: Cable a network that is similar to the one in the topology diagram.<br />
Step 2: Clear any existing configurations on the switches, and initialize all ports in the shutdown<br />
state.<br />
Step 3: Import the configurations below.<br />
Switch 1<br />
hostname S1<br />
no ip domain-lookup<br />
enable secret class<br />
!<br />
!<br />
interface range FastEthernet0/1-5<br />
switchport mode trunk<br />
!<br />
interface range FastEthernet0/6-24<br />
shutdown<br />
!<br />
interface Vlan1<br />
no ip address<br />
no ip route-cache<br />
!<br />
interface Vlan56<br />
ip address 192.168.56.11 255.255.255.0<br />
no ip route-cache<br />
!<br />
line con 0<br />
logging synchronous<br />
line vty 0 4<br />
no login<br />
line vty 5 15<br />
password cisco<br />
login<br />
!<br />
end<br />
Switch 2<br />
hostname S2<br />
no ip domain-lookup<br />
enable secret class<br />
!<br />
vlan 10,20,30,56<br />
All contents are Copyright © 1992–2007 Cisco Systems, Inc. All rights reserved. This document is Cisco Public Information. Page 2 of 4
CCNA Exploration<br />
LAN Switching and Wireless: <strong>VLAN</strong>s <strong>Lab</strong> <strong>3.5.3</strong>: <strong>Troubleshooting</strong> <strong>VLAN</strong> Configuration<br />
!<br />
interface FastEthernet0/1-5<br />
switchport trunk native vlan 56<br />
switchport mode access<br />
!<br />
interface range FastEthernet0/6-10<br />
switchport access vlan 30<br />
switchport mode access<br />
!<br />
interface range FastEthernet0/11-17<br />
switchport access vlan 10<br />
switchport mode access<br />
!<br />
interface range FastEthernet0/18-24<br />
switchport access vlan 20<br />
switchport mode access<br />
!<br />
interface GigabitEthernet0/1<br />
!<br />
interface GigabitEthernet0/2<br />
!<br />
interface Vlan1<br />
ip address 192.168.56.12 255.255.255.0<br />
no ip route-cache<br />
shutdown<br />
!<br />
line con 0<br />
password cisco<br />
login<br />
line vty 0 4<br />
password cisco<br />
login<br />
line vty 5 15<br />
password cisco<br />
login<br />
!<br />
end<br />
Switch 3<br />
hostname S3<br />
no ip domain-lookup<br />
enable secret cisco<br />
!<br />
vlan 10,20,30<br />
!<br />
interface range FastEthernet0/1-5<br />
switchport trunk native vlan 56<br />
switchport mode trunk<br />
!<br />
interface range FastEthernet0/6-10<br />
switchport mode access<br />
!<br />
interface range FastEthernet0/11-17<br />
switchport mode access<br />
!<br />
interface range FastEthernet0/18-24<br />
All contents are Copyright © 1992–2007 Cisco Systems, Inc. All rights reserved. This document is Cisco Public Information. Page 3 of 4
CCNA Exploration<br />
LAN Switching and Wireless: <strong>VLAN</strong>s <strong>Lab</strong> <strong>3.5.3</strong>: <strong>Troubleshooting</strong> <strong>VLAN</strong> Configuration<br />
switchport mode access<br />
!<br />
interface GigabitEthernet0/1<br />
!<br />
interface GigabitEthernet0/2<br />
!<br />
interface Vlan1<br />
no ip address<br />
no ip route-cache<br />
shutdown<br />
!<br />
interface Vlan56<br />
no ip route-cache<br />
!<br />
line con 0<br />
password cisco<br />
login<br />
line vty 0 4<br />
password cisco<br />
login<br />
line vty 5 15<br />
password cisco<br />
login<br />
!<br />
end<br />
Task 2: Troubleshoot and Repair the <strong>VLAN</strong> Configuration<br />
Task 3: Document the Switch <strong>Configurations</strong><br />
On each switch, capture the running configuration to a text file and save for future reference:<br />
Task 4: Clean Up<br />
Erase the configurations and reload the switches. Disconnect and store the cabling. For PC hosts that are<br />
normally connected to other networks (such as the school LAN or to the Internet), reconnect the<br />
appropriate cabling and restore the TCP/IP settings.<br />
All contents are Copyright © 1992–2007 Cisco Systems, Inc. All rights reserved. This document is Cisco Public Information. Page 4 of 4