Create successful ePaper yourself
Turn your PDF publications into a flip-book with our unique Google optimized e-Paper software.
The <strong>bbding</strong>-package ∗<br />
Karel Horak †<br />
Peter Møller Neergaard ‡<br />
turtle@diku.dk http://www.diku.dk/students/turtle<br />
Sergueï Dachian §<br />
February 18, 2010<br />
Abstract<br />
This package provides an easy-to-use interface to the <strong>bbding</strong> symbol set<br />
developed by Karel Horak. The naming conventions is made close to Zapf-<br />
Dingbat as it can be found in Wordperfect 6.0, however, sometimes shortening<br />
the names.<br />
Contents<br />
1 Usage and Symbols 1 2 How to Install <strong>bbding</strong> 4<br />
A special thought should be given to Mauro Orlandini and Max Hailperin who<br />
developed a macro for setting paragraphs in parallel. This saved me for a lot of<br />
work, when developing this manual.<br />
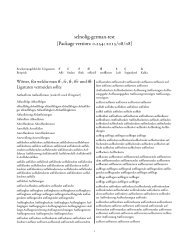
1 Usage and Symbols<br />
<strong>bbding</strong> provides an easy to use interface to the <strong>bbding</strong>-symbolfont set. It is loaded<br />
by issusing the command \usepackage{<strong>bbding</strong>} in your document preamble.<br />
You have the symbols shown in the following tables at your disposal. All the<br />
symbols are used issuing the command written to the right of the symbol.<br />
∗ This file has v1.01 and is dated 1999/04/15<br />
† Made the -source for the font.<br />
‡ Implemented the LATEX 2ε-package.<br />
§ Fixed a bug in the symbols for scissors<br />
1
´ \ScissorRight ` \ScissorRightBrokenBottom<br />
ˆ \ScissorRightBrokenTop ˚ \ScissorHollowRight<br />
¨ \ScissorLeft ˜ \ScissorLeftBrokenBottom<br />
˝ \ScissorLeftBrokenTop ˇ \ScissorHollowLeft<br />
Figure 1: Scissors<br />
” \HandRight « \HandRightUp ‚ \HandCuffRight<br />
› \HandCuffRightUp „ \HandLeft » \HandLeftUp<br />
‹ \HandCuffLeft “ \HandCuffLeftUp — \HandPencilLeft<br />
Figure 2: Hands<br />
\PencilRight ı \PencilRightUp ff \PencilRightDown<br />
‰ \PencilLeft j \PencilLeftUp fi \PencilLeftDown<br />
fl \NibRight ffl \NibSolidRight ffi \NibLeft<br />
\NibSolidLeft<br />
Figure 3: Writing tools<br />
# \XSolid $ \XSolidBold % \XSolidBrush<br />
’ \Plus & \PlusOutline ( \PlusCenterOpen<br />
) \PlusThinCenterOpen * \Cross + \CrossOpenShadow<br />
, \CrossOutline - \CrossBoldOutline 4 \CrossClowerTips<br />
. \CrossMaltese<br />
Figure 4: Crosses, plusses and the like<br />
0 \DavidStar / \DavidStarSolid 2 \JackStar<br />
3 \JackStarBold 5 \FourStar 6 \FourStarOpen<br />
8 \FiveStar 7 \FiveStarLines 9 \FiveStarOpen<br />
: \FiveStarOpenCircled ; \FiveStarCenterOpen < \FiveStarOpenDotted<br />
= \FiveStarOutline > \FiveStarOutlineHeavy ? \FiveStarConvex<br />
@ \FiveStarShadow G \SixStar H \EightStar<br />
I \EightStarBold E \EightStarTaper F \EightStarConvex<br />
J \TwelweStar K \SixteenStarLight N \Asterisk<br />
A \AsteriskBold B \AsteriskCenterOpen C \AsteriskThin<br />
D \AsteriskThinCenterOpen X \AsteriskRoundedEnds 1 \FourAsterisk<br />
Z \EightAsterisk<br />
Figure 5: All kind of stars<br />
2
R \FiveFlowerOpen P \FiveFlowerPetal<br />
M \SixFlowerOpenCenter [ \SixFlowerRemovedOpenPetal<br />
O \SixFlowerAlternate U \SixFlowerAltPetal<br />
Q \SixFlowerPetalDotted L \SixFlowerPetalRemoved<br />
Y \EightFlowerPetalRemoved S \EightFlowerPetal<br />
V \FourClowerOpen W \FourClowerSolid<br />
] \Sparkle \ \SparkleBold<br />
^ \SnowflakeChevron _ \SnowflakeChevronBold<br />
‘ \Snowflake<br />
Figure 6: Flowers, snowflakes and the like<br />
a \CircleSolid d \CircleShadow<br />
r \HalfCircleRight s \HalfCircleLeft<br />
b \Ellipse c \EllipseSolid<br />
e \EllipseShadow f \Square<br />
g \SquareSolid h \SquareShadowBottomRight<br />
i \SquareShadowTopRight j \SquareShadowTopLeft<br />
k \SquareCastShadowBottomRight l \SquareCastShadowTopRight<br />
m \SquareCastShadowTopLeft n \TriangleUp<br />
o \TriangleDown p \DiamondSolid<br />
q \OrnamentDiamondSolid t \RectangleThin<br />
u \Rectangle v \RectangleBold<br />
Figure 7: Geometrical Shapes<br />
˘ \Phone ¯ \PhoneHandset ˙ \Tape<br />
¸ \Plane ˛ \Envelope – \Peace<br />
! \Checkmark " \CheckmarkBold T \SunshineOpenCircled<br />
w \ArrowBoldRightStrobe x \ArrowBoldUpRight y \ArrowBoldDownRight<br />
z \ArrowBoldRightShort { \ArrowBoldRightCircled<br />
Figure 8: Miscellaneous<br />
3
2 How to Install <strong>bbding</strong><br />
I suppose that you have already got the file <strong>bbding</strong>10.mf containing the<br />
-source for the <strong>bbding</strong>-symbol set from your nearest CTAN-site. It<br />
should be placed in a directory, where it can be found by .<br />
Then generate the font-metrices <strong>bbding</strong>10.tfm using (ask your<br />
system administrator for details). This is done from a command line issusing, say:<br />
metafont \mode=〈localmode〉; input <strong>bbding</strong>10<br />
where 〈localmode〉 is one of the modes defined in your local setup file, local.mf,<br />
for . Move the resulting <strong>bbding</strong>10.tfm to a directory in the path,<br />
where L ATEX looks for .tfm-files. If it had also generated the bitmap-file, move it<br />
to a location, where you favourite DVI-viewer can find it.<br />
As the last thing install the package file, by running TEX with the file<br />
<strong>bbding</strong>.ins. This generates two files: <strong>bbding</strong>.sty and Uding.fd. <strong>bbding</strong>.sty<br />
is the packages file, which is loaded by L ATEX and Uding.fd contains the loading<br />
information about the font.<br />
If the manualfont manfnt.tfm—which is only used to generate the logo for<br />
—is not installed at your system, you should remove the first line of<br />
this file<br />
%\manfnttrue ^^A remove this line if. . .<br />
This file is documented using doc. This means that documentation and commented<br />
packagecode is contained in the single file <strong>bbding</strong>.dtx. If you want to see<br />
the full documentation, you should remove the second line of the file <strong>bbding</strong>.dtx<br />
%\UsersGuidetrue ^^A remove this line. . .<br />
and then run L ATEX on the changed file. After this you should generate the change<br />
history using makeindex:<br />
makeindex -s gglo.ist -o <strong>bbding</strong>.gls <strong>bbding</strong>.glo<br />
After this process the file once more.<br />
At last the borrowing formal stuff: You a encouraged to copy, use, delete etc.<br />
c○ the package (<strong>bbding</strong>.dtx, dingbat.fd and semantic.ins) as much as your<br />
heart desires as long as you pass it on in complete. You are welcome to sneak in<br />
the code and get inspiration. You should just remember: c○1993 Karel Horak for<br />
the -source and c○1995–1996 Peter Møller Neergaard for the style file<br />
4