Air-Conditioners - Mitsubishi Electric Australia
Air-Conditioners - Mitsubishi Electric Australia
Air-Conditioners - Mitsubishi Electric Australia

Create successful ePaper yourself
Turn your PDF publications into a flip-book with our unique Google optimized e-Paper software.
<strong>Air</strong>-<strong>Conditioners</strong><br />
Indoor unit<br />
PCA-RP·GA<br />
PKA-RP·FAL<br />
PKA-RP·GAL<br />
OPERATION MANUAL<br />
For safe and correct use, please read this operation manual thoroughly before operating the air-conditioner unit.<br />
BEDIENUNGSHANDBUCH<br />
Zum sicheren und einwandfreien Gebrauch der Klimaanlage dieses Bedienungshandbuch vor Inbetriebnahme<br />
gründlich durchlesen.<br />
MANUEL D’UTILISATION<br />
POUR L’UTILISATEUR<br />
Pour une utilisation correcte sans risques, veuillez lire le manuel d’utilisation en entier avant de vous servir du<br />
climatiseur.<br />
BEDIENINGSHANDLEIDING<br />
VOOR DE GEBRUIKER<br />
Voor een veilig en juist gebruik moet u deze bedieningshandleiding grondig doorlezen voordat u de<br />
airconditioner gebruikt.<br />
MANUAL DE INSTRUCCIONES<br />
PARA EL USUARIO<br />
Lea este manual de instrucciones hasta el final antes de poner en marcha la unidad de aire acondicionado<br />
para garantizar un uso seguro y correcto.<br />
ISTRUZIONI DI FUNZIONAMENTO<br />
PER L’UTENTE<br />
Leggere attentamente questi istruzioni di funzionamento prima di avviare l’unità, per un uso corretto e sicuro<br />
della stessa.<br />
E°XEIPI¢IO O¢H°IøN XPHEø<br />
°π∞ ∆√¡ Ã∏∆∏<br />
°È· ·ÛÊ¿ÏÂÈ· Î·È ÛˆÛÙ‹ ¯Ú‹ÛË, apple·Ú·Î·Ï›ÛÙ ‰È·‚¿ÛÂÙ appleÚÔÛ¯ÙÈο ·˘Ùfi ÙÔ ÂÁ¯ÂÈÚ›‰ÈÔ ¯Ú‹Ûˆ˜ appleÚÈÓ ı¤ÛÂÙ ÛÂ<br />
ÏÂÈÙÔ˘ÚÁ›· ÙË ÌÔÓ¿‰· ÎÏÈÌ·ÙÈÛÌÔ‡.<br />
MANUAL DE OPERAÇÃO<br />
PARA O UTILIZADOR<br />
Para segurança e utilização correctas, leia atentamente o manual de operação antes de pôr a funcionar a<br />
unidade de ar condicionado.<br />
DRIFTSMANUAL<br />
TIL BRUGER<br />
Læs venligst denne driftsmanual grundigt før airconditionanlægget betjenes af hensyn til sikker og korrekt brug.<br />
DRIFTSMANUAL<br />
FÖR ANVÄNDAREN<br />
Läs denna driftsmanual noga för säkert och korrekt bruk innan luftkonditioneringen används.<br />
Iflletme Elkitab›<br />
KULLANICI ‹Ç‹N<br />
Emniyetli ve do¤ru biçimde nas›l kullan›laca¤›n› ö¤renmek için lütfen klima cihaz›n› iflletmeden önce bu<br />
elkitab›n› dikkatle okuyunuz.<br />
РУКОВОДСТВО ПО ЭКСПЛУАТАЦИИ<br />
Outdoor unit<br />
PUHZ-RP·HA<br />
PU(H)-P·GAA<br />
FOR USER<br />
FÜR BENUTZER<br />
ДЛЯ ПОЛЬЗОВАТЕЛЯ<br />
Для обеспечения правильного и безопасного использования следует ознакомиться с инструкциями,<br />
указанными в данном руководстве по эксплуатации, тщательным образом до того, как приступать к<br />
использованию кондиционера.<br />
( )<br />
English<br />
∂ÏÏËÓÈο<br />
Русский
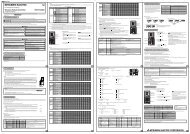
Contents<br />
1. Safety Precautions ...................................................................................................................................................................... 2<br />
2. Operation..................................................................................................................................................................................... 3<br />
3. Care and cleaning ....................................................................................................................................................................... 5<br />
4. Troubleshooting ........................................................................................................................................................................... 7<br />
5. Specifications .............................................................................................................................................................................. 8<br />
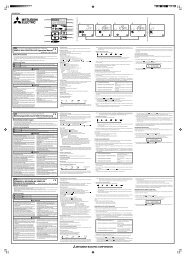
1. Safety Precautions<br />
s Before installing the unit, make sure you read all the “Safety precautions”.<br />
s The “Safety precautions” provide very important points regarding safety. Make sure you follow them.<br />
s Please report to or take consent by the supply authority before connection to the system.<br />
Symbols used in the text<br />
Warning:<br />
Describes precautions that should be observed to prevent danger of injury or death to the user.<br />
Caution:<br />
Describes precautions that should be observed to prevent damage to the unit.<br />
Symbols used in the illustrations<br />
2<br />
: Indicates an action that must be avoided.<br />
: Indicates that important instructions must be followed.<br />
: Indicates a part which must be grounded.<br />
: Indicates that caution should be taken with rotating parts.<br />
: Indicates that the main switch must be turned off before servicing.<br />
: Beware of electric shock.<br />
: Beware of hot surface.<br />
ELV : At servicing, please shut down the power supply for both of Indoor Unit and Outdoor Unit.<br />
Warning:<br />
Carefully read the labels affixed to the main unit.<br />
Warning:<br />
• The unit should not be installed by the user. Ask the dealer or an authorized company to install the unit. If the unit is installed improperly,<br />
water leakage, electric shock or fire may result.<br />
• Do not stand on, or place any items on the unit.<br />
• Do not splash water over the unit and do not touch the unit with wet hands. An electric shock may result.<br />
• Do not spray combustible gas close to the unit. Fire may result.<br />
• Do not place a gas heater or any other open-flame appliance where it will be exposed to the air discharged from the unit. Incomplete<br />
combustion may result.<br />
• Do not remove the front panel or the fan guard from the outdoor unit when it is running.<br />
• When you notice exceptionally abnormal noise or vibration, stop operation, turn off the power switch, and contact your dealer.<br />
• Never insert fingers, sticks etc. into the intakes or outlets.<br />
• If you detect odd smells, stop using the unit, turn off the power switch and consult your dealer. Otherwise, a breakdown, electric shock or<br />
fire may result.<br />
• This air conditioner is NOT intended for use by children or infirm persons without supervision.<br />
• Young children should be supervised to ensure that they do not play with the air conditioner.<br />
• If the refrigeration gas blows out or leaks, stop the operation of the air conditioner, thoroughly ventilate the room, and contact your dealer.<br />
Caution:<br />
• Do not use any sharp object to push the buttons, as this may damage the remote controller.<br />
• Never block or cover the indoor or outdoor unit’s intakes or outlets.<br />
Disposing of the unit<br />
When you need to dispose of the unit, consult your dealer.
1<br />
B<br />
1<br />
2<br />
2. Operation<br />
1<br />
MODE<br />
CHECK<br />
TEST RUN<br />
FAN<br />
VANE<br />
LOUVER<br />
3<br />
SET RESET CLOCK<br />
2<br />
AUTO STOP<br />
AUTO START<br />
h<br />
min<br />
A<br />
1<br />
B<br />
2<br />
A<br />
1<br />
5<br />
4<br />
˚C<br />
TEMP.<br />
TIMER SET<br />
˚C<br />
TEMP.<br />
TIMER SET<br />
˚C<br />
TEMP.<br />
TIMER SET<br />
6<br />
˚C<br />
ON/OFF<br />
˚C<br />
FILTER<br />
CHECK TEST<br />
ON/OFF<br />
˚C<br />
FILTER<br />
CHECK TEST<br />
ON/OFF<br />
FILTER<br />
CHECK TEST<br />
A<br />
1<br />
A<br />
1<br />
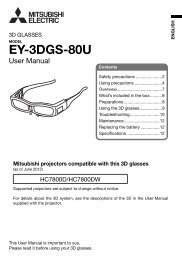
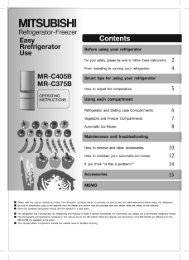
Replacing the Batteries and how to set the current time<br />
If no signal is transmitted and the indoor unit’s lamp does not light up even<br />
if the remote controller is operated, the batteries may have run out, so<br />
replace them with new ones as described below.<br />
1 Remove the front lid.<br />
2 Replace the batteries with alkali batteries (size AAA). Make sure that<br />
the batteries are installed in the correct direction. (Insert the minus<br />
pole of the batteries first.)<br />
3 Reattach the front lid.<br />
4 Press the RESET button using a thin stick.<br />
h<br />
5 Press the and min<br />
button to set the current time.<br />
6 Press the CLOCK button using a thin stick and close the front lid.<br />
If you are not going to use the unit for a long period of time, remove the<br />
batteries to prevent damage which may occur due to leakage of electrolyte.<br />
Check if your remote controller is the wired type or the wireless type before<br />
referring to the illustration and text for operation procedures.<br />
2.1. Switching the unit on/off<br />
• The power supply should not be turned off while the air conditioner is in<br />
use. This can cause the unit to break down.<br />
1 Press the ON/OFF button.<br />
AThe ON indicator should light up.<br />
• Even if you press the ON/OFF button immediately after shutting down<br />
the operation in progress, the air conditioner will not start for about three<br />
minutes. This is to prevent the internal components from being damaged.<br />
• If the operation stops due to a power failure, the unit will not automatically<br />
restart until the power has been restored. Press the ON/OFF button<br />
to restart.<br />
2.2. Mode select<br />
1 If the unit is off, press the ON/OFF button to turn it on.<br />
AThe ON indicator should light up.<br />
2 Press the operation mode ( ) button and select the operation<br />
mode.<br />
B<br />
s<br />
Cooling mode<br />
Fan mode<br />
Heating mode<br />
Drying mode<br />
Automatic (cooling/heating) mode<br />
Note:<br />
The heating display and the automatic display does not appear in models that<br />
operate exclusively as cooling only air-conditioner.<br />
2.3. Selecting a temperature TEMP.<br />
sTo decrease the room temperature:<br />
1 Press button to set the desired temperature.<br />
AThe selected temperature is displayed.<br />
• Each time you press the button, the temperature value decreases by 1<br />
°C.<br />
sTo increase the room temperature:<br />
1 Press button to set the desired temperature.<br />
AThe selected temperature is displayed.<br />
• Each time you press the button, the temperature value increases by 1<br />
°C.<br />
• Available temperature ranges are as follows:<br />
Cooling & Drying: 19 - 30 °C<br />
Heating: 17 - 28 °C<br />
Automatic: 19 - 28 °C<br />
Circulation: — (Not available)<br />
• The display flashes either 8 °C - 39 °C to inform you if the room temperature<br />
is lower or higher than the displayed temperature.<br />
3
A<br />
1<br />
1<br />
2. Operation<br />
4<br />
D<br />
1<br />
˚C<br />
TEMP.<br />
TIMER SET<br />
B A<br />
CLOCK<br />
2 1<br />
˚C<br />
TEMP.<br />
˚C<br />
TIMER SET<br />
3<br />
ON/OFF<br />
FILTER<br />
CHECK TEST<br />
A B C<br />
CLOCK<br />
ON OFF<br />
2<br />
˚C<br />
TEMP.<br />
˚C<br />
˚C<br />
TEMP.<br />
TIMER SET<br />
TIMER SET<br />
ON/OFF<br />
FILTER<br />
CHECK TEST<br />
A<br />
F<br />
1Hr.<br />
1<br />
˚C<br />
˚C<br />
ON/OFF<br />
A B C D E<br />
ON/OFF<br />
1<br />
FILTER<br />
FILTER<br />
CHECK TEST<br />
CHECK TEST<br />
ON OFF<br />
ON OFF<br />
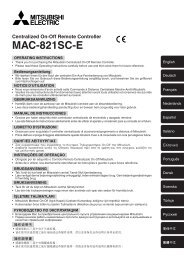
2.4. Selecting a fan speed<br />
1 Press button to select a desired fan speed.<br />
• Each time you press the button, available options change with the display<br />
A on the remote controller, as shown below.<br />
Fan speed<br />
Low<br />
Remote controller display<br />
Middle 2* Middle 1* High<br />
4-stage<br />
The display and the fan speed of the unit will differ in the following situations:<br />
• When STAND BY and DEFROST are displayed.<br />
• Just after the heating mode (while waiting to change to another mode).<br />
• When the temperature of the room is higher than the temperature setting<br />
of the unit operating in the heating mode.<br />
• In the dry operation, the indoor fan automatically turns to low-speed<br />
operation. Switching of fan speed is impossible.<br />
* Not for PKA-RP·FAL.<br />
2.5. Adjusting vertical airflow direction<br />
■ Except for PSA/PSH series<br />
The vertical air vane helps select the vertical direction of the airflow.<br />
1 Press button to select the vertical airflow direction.<br />
• Each time you press the button, the option changes are displayed on<br />
the remote controller, as shown below.<br />
A (swing) → B → C → D → E → A<br />
• If the room temperature is higher than the temperature set on the remote<br />
controller while the unit is defrosting or preparing for heating, the<br />
vertical air vane will move to the horizontal airflow position (B).<br />
• In either cooling or dry mode, if you select C, D or E when the fan<br />
speed is low, middle 2, a display reading “1 Hr” F will appear.<br />
After one hour, the air conditioner will switch automatically to horizontal<br />
air mode B and the display “1 Hr” F will disappear.<br />
• When the heating thermostat is OFF, the louver automatically turns horizontally<br />
during defrosting or preparation for heating.<br />
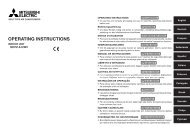
2.6. Using the timer<br />
1) Set the current time<br />
1 Press button to display the “CLOCK” B.<br />
Remote CLOCK → CLOCK<br />
controller display A ↑<br />
▼<br />
ON → CLOCK<br />
OFF → No Display<br />
2 Each time you press button, the time increases in increments of<br />
one minute. Each time you press button, the time decreases in<br />
increments of one minute.<br />
• Press and hold the button to rapidly change the time.<br />
• The time changes in increments of one minute → ten minutes → in units<br />
of hour; in this order.<br />
• Approximately ten seconds after pressing the button, the display on the<br />
remote controller will turn off.<br />
The example shows a timer set for operation start at 8:00 and end at 17:00.<br />
2) Set the mode to continuous as follows<br />
1 Press button to display D .<br />
3) Set the time to start the unit as follows<br />
2 Press button to display B ON<br />
.<br />
3 Press<br />
The start time is displayed at A.<br />
▼<br />
TIMER SET button to set the time that you want the unit to start.<br />
4) Set the time to stop the unit as follows<br />
2 Press button to display C OFF<br />
.<br />
3 Press TIMER SET button to set the time that you want the unit to stop.<br />
The stop time is displayed at A.<br />
5) Set the mode to timer as follows<br />
1 Press button to display D .<br />
▼<br />
▼
2. Operation<br />
3. Care and cleaning<br />
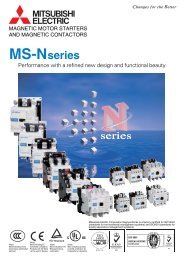
■ PKA-RP·GAL<br />
■ PKA-RP·FAL<br />
■ PCA-RP·GA<br />
C<br />
A<br />
13<br />
2<br />
B A<br />
D<br />
B<br />
A<br />
For wireless remote controller<br />
AUTO STOP<br />
1Press the or AUTO START button (TIMER SET).<br />
• Time can be set while the following symbol is blinking.<br />
OFF timer : A is blinking.<br />
ON timer : A is blinking.<br />
h<br />
2 Use the and min<br />
buttons to set the desired time.<br />
3 Canceling the timer.<br />
AUTO STOP<br />
To cancel the OFF timer, press the button.<br />
To cancel the ON timer, press the AUTO START button.<br />
• It is possible to combine both OFF and ON timers.<br />
• Pressing the ON/OFF button of the remote controller during timer<br />
mode to stop the unit will cancel the timers.<br />
• If the current time has not been set, the timer operation cannot be used.<br />
3.1. Cleaning the filters and the indoor unit<br />
Cleaning the filters<br />
• Clean the filters using a vacuum cleaner. If you do not have a vacuum<br />
cleaner, tap the filters against a solid object to knock off dirt and dust.<br />
• If the filters are especially dirty, wash them in lukewarm water. Take care<br />
to rinse off any detergent thoroughly and allow the filters to dry completely<br />
before putting them back into the unit.<br />
Caution:<br />
• Do not dry the filters in direct sunlight or by using a heat source,<br />
such as an electric heater: this may warp them.<br />
• Do not wash the filters in hot water (above 50°C), as this may warp<br />
them.<br />
• Make sure that the air filters are always installed. Operating the<br />
unit without air filters can cause malfunction.<br />
Caution:<br />
• Before you start cleaning, stop operation and turn OFF the power<br />
supply.<br />
• Indoor units are equipped with filters to remove the dust of sucked-in<br />
air. Clean the filters using the methods shown in the following sketches.<br />
Filter removal<br />
Caution:<br />
• In removing the filter, precautions must be taken to protect your<br />
eyes from dust. Also, if you have to climb up on a stool to do the<br />
job, be careful not to fall.<br />
• When the filter is removed, do not touch the metallic parts inside<br />
the indoor unit, otherwise injury may result.<br />
■ PKA-RP·GAL<br />
1 Pull both the bottom corners of the intake grille to open the grille,<br />
then lift the filter.<br />
■ PKA-RP·FAL<br />
1 Hold the filter lug (located at the bottom of the intake grille) and pull it<br />
out downward.<br />
AFilter<br />
BLug<br />
• To reinstall the filters, push the filter lug upward.<br />
■ PCA-RP·GA<br />
1 Open the intake grille.<br />
2 Hold the knob on the filter then pull the filter up in the direction of an<br />
arrow. To replace the filter after cleaning, be sure to insert the filter<br />
far enough until it fits into the stopper.<br />
AFilter BIntake Grille CKnob DStopper<br />
5
3. Care and cleaning<br />
6<br />
˚C<br />
TEMP.<br />
TIMER SET<br />
˚C<br />
A 3.2. Care and cleaning<br />
Clean the filter<br />
When the A “FILTER” indicator blinks on the remote controller to alert you<br />
to the necessity of cleaning of the filter.<br />
∗ As a guideline for typical office environment, the filter must be cleaned<br />
every 100 operating hours.<br />
FILTER<br />
ON/OFF<br />
FILTER<br />
CHECK TEST<br />
1<br />
Reset the FILTER indicator<br />
1 Press the FILTER button twice after cleaning.<br />
sWhen you press the FILTER button twice, the “FILTER” indicator A<br />
will be turned off and reset.<br />
sThe FILTER indicator provides you with a guideline for the necessity<br />
of filter cleaning based on total operating hours in typical indoor<br />
air conditions. Depending on different operating environments,<br />
more or less frequent cleaning may be necessary.
4. Troubleshooting<br />
Before you call out a repair man, check the following table to see whether there is a simple solution to your problem.<br />
[for wireless remote controller]<br />
Problem<br />
Unit does not operate at all.<br />
[for wired remote controller]<br />
Problem<br />
Unit does not cool or heat very well.<br />
The unit stops operating before arriving<br />
at the set temperature in the<br />
heating mode.<br />
The airflow direction suddenly<br />
changes.<br />
A white mist is expelled from the indoor<br />
unit.<br />
The indicators of the remote controller<br />
do not light up when operated.<br />
Solution<br />
Turn main power on. Then press the<br />
POWER ON/OFF button to turn the<br />
unit on.<br />
Wait until power is restored, then<br />
press the POWER ON/OFF button<br />
to turn the unit on.<br />
Solution<br />
Clean the filter.<br />
Frost forms when the outdoor temperature<br />
is low and humidity is high.<br />
Wait for about 10 minutes for the frost<br />
to melt.<br />
After one hour of cooling-mode operation<br />
with the airflow in a downward<br />
direction, the unit will automatically<br />
change to the “Horizontal airflow”<br />
mode.<br />
When the unit is in the heating or defrosting<br />
mode, it will automatically<br />
change to the “Horizontal airflow<br />
mode”.<br />
This may occur just after the unit is<br />
turned on when a high level of humidity<br />
is present in the room.<br />
Turn on the power switch. “ · ” will be<br />
displayed.<br />
Problem<br />
CENTRALLY CONTROLLED is displayed<br />
in the remote controller.<br />
The start and stop functions are not<br />
available just after restarting the unit.<br />
“H0” is displayed in the remote controller.<br />
An error code is displayed in the remote<br />
controller.<br />
The operating display of the wireless<br />
remote controller’s receiver is flashing.<br />
Solution<br />
The start and stop functions of the<br />
remote controller are not available<br />
when the CENTRALLY CONTROL-<br />
LED message is lit.<br />
Wait about three minutes (operation<br />
has stopped to prevent damage to<br />
the air conditioner).<br />
An automatic startup test is being<br />
performed (will last for about two minutes).<br />
A self-diagnostic function is being<br />
performed to preserve the air conditioner.<br />
*Do not attempt to make repairs<br />
yourself. Turn the main switch off<br />
and contact the dealer from whom<br />
you bought the air conditioner. Provide<br />
him or her with the name of the<br />
unit and the information displayed<br />
in the remote controller.<br />
NOTE: After a power cut, the unit will not restart automatically. You will have to restart it by pressing the POWER - ON/OFF button on the remote controller.<br />
If none of the above apply, turn the main switch off and contact the dealer from whom you bought the air-conditioner, telling him the model name and the<br />
nature of the problem. Do not try to fix the unit yourself.<br />
In any of the following cases, turn off the main power switch<br />
and contact your local dealer for service:<br />
• The operation lamp (on the main unit) flashes.<br />
• The switches do not work properly.<br />
• The circuit breaker trips frequently (or the fuse blows frequently).<br />
• Water has accidentally been splashed into the unit.<br />
• Water leaks from the unit.<br />
• Something is accidentally dropped into the air-conditioner.<br />
• An unusual noise is heard during operation.<br />
Problem<br />
Unit does not start immediately.<br />
Solution<br />
Wait until the unit restarts automatically.<br />
The compressor may hesitate<br />
resuming because a three-minute<br />
resume prevention circuit is incorporated<br />
in the outdoor unit for protection<br />
of the compressor.<br />
Operating range<br />
Indoor air intake temperature Outdoor air intake temperature<br />
Maximum<br />
Cooling<br />
Minimum<br />
35 °C DB, 22.5 °C WB<br />
19 °C DB, 15 °C WB<br />
46 °C DB<br />
–5 °C DB<br />
Maximum<br />
Heating<br />
Minimum<br />
28 °C DB<br />
17 °C DB<br />
21 °C DB, 15 °C WB<br />
–11 °C DB, –12 °C WB<br />
The following do not indicate any malfunction:<br />
Odours: smells such as tobacco or cosmetic odours may persist after they have been sucked into the unit.<br />
Sound of liquid flowing inside indoor unit: this can occur during or after operation and is simply the sound of refrigerant being circulated inside the unit.<br />
Ticking sound coming from indoor unit: this can occur when cooling or heating has just begun or has just stopped. It is caused by the indoor unit shrinking<br />
or expanding slightly due to the change in temperature.<br />
The message “CENTRALLY CONTROLLED” appearing on the LCD panel: from time to time, this message may come up on the LCD panel. This does not<br />
indicate any malfunction.<br />
Remote Controller Settings for Installing/Replacing Batteries and Restarting Operation (for wireless remote controller)<br />
• Always press the reset button after installing or replacing batteries.<br />
• The initial settings are used when installing or replacing batteries after which the settings for restarting are used.<br />
Initial Settings Restarting<br />
Operating mode Fan Previous operating mode<br />
Temperature setting — Previous temperature setting<br />
Fan speed High Previous fan speed setting<br />
Cooling - Dry Level<br />
<strong>Air</strong>flow direction Level Operating mode Heating Previous setting<br />
Fan Level<br />
NOTE: The refrigerant charged in the air conditioner is safe. Refrigerant normally does not leak, however, if refrigerant gas leaks indoors, and comes into contact<br />
with the fire of a fan heater, space heater, stove, etc., harmful substances will be generated.<br />
Be sure to ask the service representative whether there is refrigerant leakage or not when repairs are carried out.<br />
7
5. Specifications<br />
Model<br />
Capacity (Cooling/Heating) *1<br />
Total Input (Cooling/Heating) *1<br />
Power source (voltage /Frequency )<br />
Dimension (Height) <br />
Dimension (Width) <br />
Dimension (Depth) <br />
Fan <strong>Air</strong>flow rate (Low-Middle2-Middle1-High) <br />
Noise level (Low-Middle2-Middle1-High) <br />
Net weight <br />
■ PCA-RP·GA+PUHZ-RP·HA<br />
Model<br />
Capacity (Cooling/Heating) *1<br />
Total Input (Cooling/Heating) *1<br />
Power source (voltage /Frequency )<br />
Dimension (Height) <br />
Dimension (Width) <br />
Dimension (Depth) <br />
Fan <strong>Air</strong>flow rate (Low-Middle2-Middle1-High) <br />
Noise level (Low-Middle2-Middle1-High) <br />
Net weight <br />
■ PKA-RP·GAL+PUHZ-RP·HA<br />
Model<br />
Capacity (Cooling/Heating) *1<br />
Total Input (Cooling/Heating) *1<br />
Power source (voltage /Frequency )<br />
Dimension (Height) <br />
Dimension (Width) <br />
Dimension (Depth) <br />
Fan <strong>Air</strong>flow rate (Low-Middle2-Middle1-High) <br />
Noise level (Low-Middle2-Middle1-High) <br />
Net weight <br />
8<br />
RP2 RP2.5 RP3 RP4 RP5 RP6<br />
5.35/6.20 6.60/7.25 7.45/9.15 9.60/10.60 12.30/14.80 14.20/17.00<br />
2.35/2.36 2.62/2.66 3.37/3.48 3.62/3.81 4.91/5.11 5.89/6.24<br />
–<br />
210 270<br />
1000 1310 1620<br />
680<br />
10-11-12-13 14-15-16-18 20-21-23-25 27-30-32-34<br />
37-38-40-42 37-39-41-43 40-41-43-45 41-43-45-46 42-44-46-48<br />
27 34 37 43 45<br />
RP2 RP2.5 RP3 RP4 RP5 RP6<br />
4.70/5.50 6.00/7.00 7.10/8.00 10.00/11.20 12.50/14.00 14.00/16.00<br />
1.67/1.71 1.63/2.03 2.14/2.43 2.92/3.26 3.89/4.34 4.96/4.60<br />
–<br />
210 270<br />
1000 1310 1620<br />
680<br />
10-11-12-13 14-15-16-18 20-21-23-25 27-30-32-34<br />
37-38-40-42 37-39-41-43 40-41-43-45 41-43-45-46 42-44-46-48<br />
27 34 37 43 45<br />
RP1.6 RP2<br />
4.45/4.95 5.35/6.20<br />
1.70/1.79 2.33/2.34<br />
–<br />
340<br />
990<br />
235<br />
9-10-11-12<br />
36-38-41-43<br />
16<br />
RP1.6 RP2<br />
3.60/4.10 4.60/4.50<br />
1.03/1.27 1.63/1.40<br />
–<br />
340<br />
990<br />
235<br />
9-10-11-12<br />
36-38-41-43<br />
16
5. Specifications<br />
Model<br />
Capacity (Cooling/Heating) *1<br />
Total Input (Cooling/Heating) *1<br />
Power source (voltage /Frequency )<br />
Dimension (Height) <br />
Dimension (Width) <br />
Dimension (Depth) <br />
Fan <strong>Air</strong>flow rate (Low-High) <br />
Noise level (Low-High) <br />
Net weight <br />
■ PU(H)-P·GAA<br />
Model<br />
Power source (voltage /Frequency )<br />
Dimension (Height) <br />
Dimension (Width) <br />
Dimension (Depth) <br />
Fan <strong>Air</strong>flow rate <br />
Net weight <br />
■ PUHZ-RP·VHA<br />
Model<br />
Power source (voltage /Frequency )<br />
Dimension (Height) <br />
Dimension (Width) <br />
Dimension (Depth) <br />
Fan <strong>Air</strong>flow rate <br />
Net weight <br />
*1 Cooling: Indoor 27 °CDB/19 °CWB, Outdoor 35 °CDB<br />
Heating: Indoor 20 °CDB, Outdoor 7 °CDB/6 °CWB<br />
RP2.5 RP3 RP4<br />
6.45/7.35 7.85/9.40 9.40/10.80<br />
2.65/2.63 3.43/3.61 3.59/3.77<br />
–<br />
340<br />
1400 1680<br />
235<br />
15-20 22-28<br />
39-45 41-46<br />
24 28<br />
RP2.5 RP3 RP4<br />
6.00/7.00 7.10/8.00 10.00/11.20<br />
1.55/2.01 1.98/2.40 2.93/3.25<br />
–<br />
340<br />
1400 1680<br />
235<br />
15-20 22-28<br />
39-45 41-46<br />
24 28<br />
P1.6V P2V P2.5V P3V P4V<br />
P1.6Y P2Y P2.5Y P3Y P4Y<br />
V:~/N220-230-240/50, Y:3N~380-400-415/50<br />
650 855 1260<br />
900<br />
330+20<br />
45 55 50 85<br />
54 74 79 97<br />
RP1.6 RP2 RP2.5 RP3 RP4<br />
V:~/N220-230-240/50<br />
600 943 1350<br />
800 950<br />
300+15 330+30<br />
35 55 100<br />
45 75 121<br />
9
BG79U166H03<br />
This product is designed and intended for use in the residential,<br />
commercial and light-industrial environment.<br />
The product at hand is<br />
based on the following<br />
EU regulations:<br />
• Low Voltage Directive 73/23/ EEC<br />
• Electromagnetic Compatibility Directive 89/<br />
336/ EEC<br />
Please be sure to put the contact address/telephone number on<br />
this manual before handing it to the customer.<br />
HEAD OFFICE: MITSUBISHI DENKI BLDG., 2-2-3, MARUNOUCHI, CHIYODA-KU, TOKYO 100-8310, JAPAN<br />
Printed in Japan