×
Your ePaper is waiting for publication!
By publishing your document, the content will be optimally indexed by Google via AI and sorted into the right category for over 500 million ePaper readers on YUMPU.
This will ensure high visibility and many readers!
PUBLISH DOCUMENT
No, I renounce more range.
You can find your publication here:
Share your interactive ePaper on all platforms and on your website with our embed function
⬤
⬤
Network Security Platform 7.0 Manager Administration Guide - McAfee
Network Security Platform 7.0 Manager Administration Guide - McAfee
Network Security Platform 7.0 Manager Administration Guide - McAfee
SHOW MORE
SHOW LESS
You also want an ePaper? Increase the reach of your titles
YUMPU automatically turns print PDFs into web optimized ePapers that Google loves.
1<br />
熟悉 <strong>Network</strong> <strong>Security</strong> <strong>Manager</strong><br />
“Configuration(配置)”页<br />
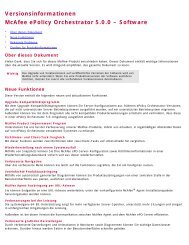
当您配置部署时,其他资源会出现在树中。大多数用户配置的资源的图标与其中一个基本节点的图标相同,只不过标有<br />
创建资源时指定的名称。例如,如果添加一个 <strong>Network</strong> <strong>Security</strong> <strong>Platform</strong> I‑1400 Sensor 并将其命名为 Sensor“I1400”,<br />
该 Sensor 便会在列表中以 Sensor_Name(Sensor 名称)图标显示,且名称为 I1400。<br />
图 1-6 显示用户配置资源的“Resource Tree(资源树)”<br />
如果右键单击任何一个节点,可以“Collapse All(全部折叠)”或“Expand All(全部展开)”,从而隐藏或显示树上的节点。<br />
您可以进行“Refresh(刷新)”,此操作将更新树,以立即显示新添加/删除的 <strong>Network</strong> <strong>Security</strong> <strong>Platform</strong> 资源。使用“Search<br />
(搜索)”选项,可以搜索树中的节点。启用“Split Tree(拆分树)”选项,可以把资源树拆分成“Domain(域)”和“Device List<br />
18 <strong>McAfee</strong> ® <strong>Network</strong> <strong>Security</strong> <strong>Platform</strong> <strong>7.0</strong> <strong>Manager</strong> 管理手册
1 熟悉 <strong>Network</strong> <strong>Security</strong> <strong>Manager</strong> “Configuration(配置)”页 当您配置部署时,其他资源会出现在树中。大多数用户配置的资源的图标与其中一个基本节点的图标相同,只不过标有 创建资源时指定的名称。例如,如果添加一个 <strong>Network</strong> <strong>Security</strong> <strong>Platform</strong> I‑1400 Sensor 并将其命名为 Sensor“I1400”, 该 Sensor 便会在列表中以 Sensor_Name(Sensor 名称)图标显示,且名称为 I1400。 图 1-6 显示用户配置资源的“Resource Tree(资源树)” 如果右键单击任何一个节点,可以“Collapse All(全部折叠)”或“Expand All(全部展开)”,从而隐藏或显示树上的节点。 您可以进行“Refresh(刷新)”,此操作将更新树,以立即显示新添加/删除的 <strong>Network</strong> <strong>Security</strong> <strong>Platform</strong> 资源。使用“Search (搜索)”选项,可以搜索树中的节点。启用“Split Tree(拆分树)”选项,可以把资源树拆分成“Domain(域)”和“Device List 18 <strong>McAfee</strong> ® <strong>Network</strong> <strong>Security</strong> <strong>Platform</strong> <strong>7.0</strong> <strong>Manager</strong> 管理手册
(设备列表)”选项卡。“Domain(域)”选项卡列出了每个域的“Root Admin Domain(根管理域)”节点、<strong>Manager</strong> 节点、子 域节点和“Policies(策略)”节点。“Device List(设备列表)”选项卡列出了在每个域中配置的 <strong>Network</strong> <strong>Security</strong> <strong>Platform</strong> 资源。 图 1-7 资源树 节点 资源树中的每一项都是一个节点,并代表一个 <strong>Network</strong> <strong>Security</strong> <strong>Platform</strong> 资源。节点可以代表逻辑实体(如管理域)、 物理实体或 Sensor。一个管理域节点可以是父节点或子节点。它既可以是下属节点的父节点,同时又是上级节点的子节 点。最多可以存在四个级别的子节点。 继承 了解父管理域节点和子管理域节点之间的关系非常重要。子管理域在创建时会接受来自父管理域的应用策略,并且用户 进入子域时会自动被授予它在父域中的角色。 子域实质上包含在父域之中。如果一个用户在父域中被授予“超级用户”角色,则这一角色也适用于父域的所有子域。 例如,在“Configuration Page(配置页)”部分显示的层次结构中,在“My Company(我的公司)”域中被授予“Operator(操 作员)”角色的用户在“Finance”域中同样具有“Operator(操作员)”角色。 可以在子级别中向用户授予其他角色,但在父级别中授予用户的角色不会被子级别中授予该用户的角色覆盖。有关角色的 详细信息,请参阅“<strong>McAfee</strong> <strong>Network</strong> <strong>Security</strong> <strong>Platform</strong> 入门手册”。 另请参阅 “Configuration(配置)”页第 14 页 配置窗格 “Configuration(配置)”窗格位于屏幕右侧,它显示了选定资源树节点的一些配置选项。这些配置选项称为操作(或操作 选项卡),分为不同的类别,由一系列“选项卡”表示。 图 1-8 所选的根管理域节点的“Configuration(配置)”窗格 熟悉 <strong>Network</strong> <strong>Security</strong> <strong>Manager</strong> “Configuration(配置)”页 1 <strong>McAfee</strong> ® <strong>Network</strong> <strong>Security</strong> <strong>Platform</strong> <strong>7.0</strong> <strong>Manager</strong> 管理手册 19
Page 1 and 2: Manager 管理手册 McAfee ® Netw Page 3 and 4: 目录 前言 7 关于本手册 . . Page 5 and 6: NSP 健康状况视图 . . . . . . Page 7 and 8: 前言 本手册将提供配置、 Page 9 and 10: 1 熟悉 Network Security Manager M Page 11 and 12: • “Reports(报告)”:链接到 Page 13 and 14: 查看工作状态 主页的“Oper Page 15 and 16: 要打开“Configuration(配置) Page 17: 3 注销 Manager 并关闭 Internet Page 21 and 22: 项目 描述 4 Sensor 名称 5 接 Page 23 and 24: 此节点是所有 NAC Sensor 的 Page 25 and 26: 子接口 如果接口连接至传 Page 27 and 28: 项目 描述 4 子管理域节点 Page 29 and 30: 项目 描述 3 IPS 设置节点 4 Page 31 and 32: 报告页 未确认的警报摘要 Page 33 and 34: 2 配置和管理管理域 2 从 Ma Page 35 and 36: 查看管理域的详细信息 对 Page 37 and 38: 4 对于 IPS 模式和 IPS 及 NAC Page 39 and 40: 删除管理域 更改根管理域 Page 41 and 42: 任务 1 选择“Admin‑Domain‑ Page 43 and 44: 任务 1 选择“Admin‑Domain‑ Page 45 and 46: 表 2-6 角色 描述 NAC Administr Page 47 and 48: 角色权限 System Administrator ( Page 49 and 50: 角色权限 Security Expert (安 Page 51 and 52: 查看和导出 Manager 活动日 Page 53 and 54: 4 选择一个或多个“Audit Cat Page 55 and 56: 查看长时间运行的进程 选 Page 57 and 58: 查看故障通知的详细信息 Page 59 and 60: 表 2-11 (续) 字段 描述 Commun Page 61 and 62: 表 2-12 (续) 字段 描述 Facili Page 63 and 64: • “Notification Scope(通知范 Page 65 and 66: 指定故障通知脚本参数 当 Page 67 and 68: 表 2-17 字段 描述 Enable Syslo Page 69 and 70: 2 键入所需的消息,然后选
Page 71 and 72: 3 Manager 服务器配置 本节介
Page 73 and 74: 下载软件更新 可以按需要
Page 75 and 76: 一旦完成重新启动过程,Sens
Page 77 and 78: 4 单击“Download(下载)”。
Page 79 and 80: 另请参阅 自动更新第 77 页
Page 81 and 82: MDR 通信 MDR 体系结构集成
Page 83 and 84: 任务 1 选择“Manager” | “M
Page 85 and 86: 适用于 MDR 配置的场景 第
Page 87 and 88: 第二种情况:使用专用 IP 地
Page 89 and 90: 3 单击“View(查看)”查看所
Page 91 and 92: 任务 1 选择“Manager” | “C
Page 93 and 94: 带着这个问题阅读以下主
Page 95 and 96: 此对话框显示以下的一项
Page 97 and 98: 执行备份时,您可以备份以
Page 99 and 100: 备份 Manager(或 Central Manager)
Page 101 and 102: • “Event Tables(事件表)”:
Page 103 and 104: 7 针对您已启用删除的那些
Page 105 and 106: 任务 1 导航到 \App\bin。 2
Page 107 and 108: 4 单击“DB Restore(数据库还
Page 109 and 110: 要还原数据,已存档的数据
Page 111 and 112: 3 选择“Maintenance(维护)”
Page 113 and 114: 3 执行“dbadmin.bat”文件。
Page 115 and 116: 3 选择“Maintenance(维护)” |
Page 117 and 118: 另请参阅 添加 RADIUS 服务
Page 119 and 120: 您可以使用 Manager 在 Manager
Page 121 and 122: 测试连接状态 任务 1 选择
Page 123 and 124: 任务 1 导航到“Manager” |
Page 125 and 126: 任务 1 选择“Manager(或 Centr
Page 127 and 128: 编辑 CIDR 网络 任务 1 选择
Page 129 and 130: 4 通过 Threat Analyzer 进行监
Page 131 and 132: 了解警报缓存和数据库 Thre
Page 133 and 134: Threat Analyzer 可以显示的警
Page 135 and 136: Threat Analyzer 主页 Threat Analy
Page 137 and 138: 了解 Central Manager 中的警报
Page 139 and 140: 查看警报信息显示板 • “
Page 141 and 142: 使用信息显示板可以执行
Page 143 and 144: 6 单击“OK(确定)”。 此时
Page 145 and 146: 编辑监视器 删除监视器 任
Page 147 and 148: 4 选择“Assign an existing monit
Page 149 and 150: 另请参阅 攻击结果状态第
Page 151 and 152: 监视器名称 深入分析监视
Page 153 and 154: 查看默认的 Sensor 性能监视
Page 155 and 156: 只有当在 Manager“Configure(
Page 157 and 158: 4 选择要在与时间的关系图
Page 159 and 160: 9 单击“Finish(完成)”查看
Page 161 and 162: 4 单击“Assign Monitor(分配监
Page 163 and 164: 9 单击“Finish(完成)”查看
Page 165 and 166: 查看工作状态 可以从“NSP
Page 167 and 168: 项目 描述 1 时间视图 2 警
Page 169 and 170: 5 右键单击柱状图可针对警
Page 171 and 172: 另请参阅 查看 IPS 警报摘
Page 173 and 174: 4 单击“Save(保存)”。 5 对
Page 175 and 176: 3 在表格部分中,将鼠标移
Page 177 and 178: 3 右键单击类别名称并单击
Page 179 and 180: 任务 1 在实时 Threat Analyzer
Page 181 and 182: 任务 1 从 Network Security Platf
Page 183 and 184: 表 4-1 NTBA 默认和深入分析
Page 185 and 186: 表 4-3 自定义监视器 ‑ 特
Page 187 and 188: 另请参阅 按属性对警报排
Page 189 and 190: 以下是此列中使用的符号:
Page 191 and 192: 图 4-59 警报视图:右键单击
Page 193 and 194: 右键单击选项 描述 TrustedSo
Page 195 and 196: • 借助 Threat Analyzer 的“Al
Page 197 and 198: 在计数视图中查看数据 可
Page 199 and 200: 任务 1 从菜单栏中单击“Al
Page 201 and 202: • “Actions(操作)”:单击右
Page 203 and 204: 单实例警报 另请参阅 查看
Page 205 and 206: URL 合并实例 URL 捕获并显
Page 207 and 208: 统计警报 “Statistical(统计)
Page 209 and 210: 当 Sensor 通过默认的启发式
Page 211 and 212: “Alerts Details(警报详细信
Page 213 and 214: 发送 TCP 重置 TCP 重置是一
Page 215 and 216: 3 右键单击警报并在 Sensor
Page 217 and 218: 任务 1 从 Manager 主页启动
Page 219 and 220: 您可以通过右键单击快捷
Page 221 and 222: 从“警报”页添加要进行 I
Page 223 and 224: 6 选择“Quarantine(隔离)”。
Page 225 and 226: 在 Threat Analyzer 的“Alerts(
Page 227 and 228: 主机可能属于以下三种类
Page 229 and 230: 详细信息显示在以主机的 I
Page 231 and 232: 任务 1 打开“Real‑time Threa
Page 233 and 234: 最近发生的 10 个防病毒事
Page 235 and 236: 删除警报 除了确认警报外,
Page 237 and 238: 5 单击“More Options(更多选
Page 239 and 240: 4 从列表中选择要添加的事
Page 241 and 242: 2 单击“Value(值)”列中的
Page 243 and 244: 2 在“Dashboard Name(信息显示
Page 245 and 246: 查看主机详细信息 当在 Sen
Page 247 and 248: • “UUID”:每个主机事件
Page 249 and 250: • “Trusted Source Information(
Page 251 and 252: 主机页中的 IPS 隔离选项 Th
Page 253 and 254: 任务 查看主机鉴证 1 打开
Page 255 and 256: 从“主机鉴证”页启动 McAf
Page 257 and 258: 从“Host Forensics(主机鉴证)
Page 259 and 260: 当选择“Scan Source IP(扫描
Page 261 and 262: 只有填写完 IP 地址后,“Sca
Page 263 and 264: 在“Vulnerability Information(漏
Page 265 and 266: Vulnerability Manager 扫描的网
Page 267 and 268: 常规面板 “General(常规)”
Page 269 and 270: 警报视图面板 “Alerts View(
Page 271 and 272: 观察列表 “Watch List(观察
Page 273 and 274: 8 选择突出显示您设置值的
Page 275 and 276: 5 监控工作状态 5 “Operation
Page 277 and 278: 工作状态界面 “Operational S
Page 279 and 280: 对于 Sensor,状态由三个通信
Page 281 and 282: 操作按钮 此处操作按钮的
Page 283 and 284: 6 生成报告 6 McAfee ® Network
Page 285 and 286: 图 6-3 报告的本地化 如果
Page 287 and 288: 当您在 Manager 主页中选择
Page 289 and 290: • Top 10 Applications by bandwidt
Page 291 and 292: 6 选择“Report Format(报告格
Page 293 and 294: 任务 1 选择“Default ‑ Syste
Page 295 and 296: 运行“默认 - 前 10 个会话
Page 297 and 298: 表 6-8 “Default ‑ Top 10 Inter
Page 299 and 300: 任务 g 选择该报告,然后单
Page 301 and 302: 传统 - 配置报告 8 要只包
Page 303 and 304: ACL 分配报告 ACL 分配报告
Page 305 and 306: • Port(端口):审核 Syslog 服
Page 307 and 308: 要生成集成摘要报告,请执
Page 309 and 310: 表 6-14 字段名 描述 Productio
Page 311 and 312: 表 6-17 字段名 描述 Syslog Fo
Page 313 and 314: 指纹 ‑ Global Threat Intelligen
Page 315 and 316: 4 根据您希望在报告中看到
Page 317 and 318: • “RADIUS Configuration(RADIUS
Page 319 and 320: 6 单击“Submit(提交)”获得
Page 321 and 322: 6 “NTBA General Settings(NTBA 常
Page 323 and 324: 2 “Threat Analyzer Presentation(T
Page 325 and 326: 4 选择“Output Format(输出格
Page 327 and 328: • Sensor:配置端口、推送配
Page 329 and 330: 您还可以计划 IPS 报告和审
Page 331 and 332: 3 填写以下字段,以缩小报
Page 333 and 334: 4 要生成报告,请选择“Run R
Page 335 and 336: • “Desired Number ('N') Of Atta
Page 337 and 338: 您可以通过指定特定的资
Page 339 and 340: • “Select Alert/Attack Type(选
Page 341 and 342: 自动生成报告 • “Maximum M
Page 343 and 344: • NTBA Configuration Summary(NTBA
Page 345 and 346: 查看计划的报告 3 在“Repor
Page 347 and 348: 3 单击“Add(添加)”。 4 键
Page 349 and 350: 索引 數字 0 117 A ACL 定义列
Page 351: 700-3575-11
×
Inappropriate
Flag as Inappropriate
Cancel
×
Inappropriate
You have already flagged this document.
×
Mail this publication
Delete template?
Are you sure you want to delete your template?
×
DOWNLOAD ePAPER
This ePaper is currently not available for download.