the Smart Oven™ - Breville
the Smart Oven™ - Breville
the Smart Oven™ - Breville
Create successful ePaper yourself
Turn your PDF publications into a flip-book with our unique Google optimized e-Paper software.
26<br />
OPERATING yOUR BREVILLE SMART OVEN - TOAST<br />
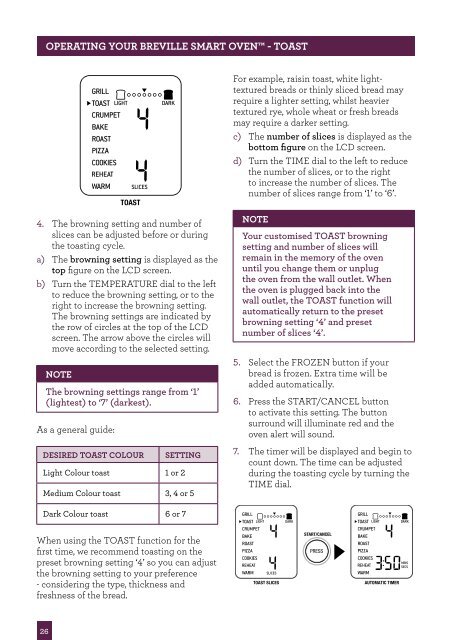
4. The browning setting and number of<br />
slices can be adjusted before or during<br />
<strong>the</strong> toasting cycle.<br />
a) The browning setting is displayed as <strong>the</strong><br />
top figure on <strong>the</strong> LCD screen.<br />
b) Turn <strong>the</strong> TEMPERATURE dial to <strong>the</strong> left<br />
to reduce <strong>the</strong> browning setting, or to <strong>the</strong><br />
right to increase <strong>the</strong> browning setting.<br />
The browning settings are indicated by<br />
<strong>the</strong> row of circles at <strong>the</strong> top of <strong>the</strong> LCD<br />
screen. The arrow above <strong>the</strong> circles will<br />
move according to <strong>the</strong> selected setting.<br />
NOTE<br />
The browning settings range from ‘1’<br />
(lightest) to ‘7’ (darkest).<br />
As a general guide:<br />
dESIREd TOAST COLOUR SETTING<br />
Light Colour toast 1 or 2<br />
Medium Colour toast 3, 4 or 5<br />
Dark Colour toast 6 or 7<br />
When using <strong>the</strong> TOAST function for <strong>the</strong><br />
first time, we recommend toasting on <strong>the</strong><br />
preset browning setting ‘4’ so you can adjust<br />
<strong>the</strong> browning setting to your preference<br />
- considering <strong>the</strong> type, thickness and<br />
freshness of <strong>the</strong> bread.<br />
For example, raisin toast, white lighttextured<br />
breads or thinly sliced bread may<br />
require a lighter setting, whilst heavier<br />
textured rye, whole wheat or fresh breads<br />
may require a darker setting.<br />
c) The number of slices is displayed as <strong>the</strong><br />
bottom figure on <strong>the</strong> LCD screen.<br />
d) Turn <strong>the</strong> TIME dial to <strong>the</strong> left to reduce<br />
<strong>the</strong> number of slices, or to <strong>the</strong> right<br />
to increase <strong>the</strong> number of slices. The<br />
number of slices range from ‘1’ to ‘6’.<br />
NOTE<br />
Your customised TOAST browning<br />
setting and number of slices will<br />
remain in <strong>the</strong> memory of <strong>the</strong> oven<br />
until you change <strong>the</strong>m or unplug<br />
<strong>the</strong> oven from <strong>the</strong> wall outlet. When<br />
<strong>the</strong> oven is plugged back into <strong>the</strong><br />
wall outlet, <strong>the</strong> TOAST function will<br />
automatically return to <strong>the</strong> preset<br />
browning setting ‘4’ and preset<br />
number of slices ‘4’.<br />
5. Select <strong>the</strong> FROZEN button if your<br />
bread is frozen. Extra time will be<br />
added automatically.<br />
6. Press <strong>the</strong> START/CANCEL button<br />
to activate this setting. The button<br />
surround will illuminate red and <strong>the</strong><br />
oven alert will sound.<br />
7. The timer will be displayed and begin to<br />
count down. The time can be adjusted<br />
during <strong>the</strong> toasting cycle by turning <strong>the</strong><br />
TIME dial.<br />
PRESS<br />
TOAST SLICES AUTOMATIC TIMER


