CG stiga 71503842/0-cop
CG stiga 71503842/0-cop
CG stiga 71503842/0-cop

You also want an ePaper? Increase the reach of your titles
YUMPU automatically turns print PDFs into web optimized ePapers that Google loves.
Model: . . . . . . . . . . . . . . . .<br />
Type: . . . . . . . . . . .<br />
(Year) . . . . . . . S/N° . . . . . . . . . . . . . . . .<br />
MOWING AHEAD<br />
www.<strong>stiga</strong>.com<br />
LWA<br />
dB<br />
Manufactured by:<br />
GGP ITALY SPA - Via del Lavoro, 6 - 31033 Castelfranco Veneto (TV) - ITALY<br />
BRUKSANVISNING<br />
KÄYTTÖOHJEET<br />
BRUGSANVISNING<br />
BRUKSANVISNING<br />
GEBRAUCHSANWEISUNG<br />
INSTRUCTIONS FOR USE<br />
MODE D’EMPLOI<br />
GEBRUIKSAANWIJZING<br />
ISTRUZIONI PER L’USO<br />
INSTRUCCIONES DE USO<br />
INSTRUÇÕES DE UTILIZAÇÃO<br />
INSTRUKCJA OBSŁUGI<br />
LIETOŠANAS PAMÅC±BA<br />
NAUDOJIMOINSTRUKCIJA<br />
àçëíêìäñàü èéãúáéÇÄíÖãü<br />
NÁVOD K POUŽITÍ<br />
NAVODILA ZA UPORABO<br />
<strong>71503842</strong>/0<br />
STIGA<br />
MULTICLIP<br />
48<br />
48 E<br />
PRO 48<br />
51 S<br />
51 SE<br />
PRO 51 S<br />
SVENSKA ............................... 1<br />
SUOMI .................................... 7<br />
DANSK ................................. 13<br />
NORSK ................................. 19<br />
DEUTSCH ............................ 25<br />
ENGLISH .............................. 31<br />
FRANÇAIS ............................ 37<br />
NEDERLANDS ...................... 43<br />
ITALIANO .............................. 49<br />
ESPAÑOL ............................. 55<br />
PORTUGUÊS ....................... 61<br />
POLSKI ................................. 67<br />
LATVISKI .............................. 73<br />
LIETUVIŠKAI ........................ 79<br />
êìëëäàâ ............................ 85<br />
ČESKY ................................. 91<br />
SLOVENSKO ........................ 97<br />
3<br />
1<br />
2<br />
4<br />
V<br />
A<br />
U
5<br />
8<br />
10<br />
S<br />
STOP<br />
H*<br />
K*<br />
G<br />
S<br />
J*<br />
6<br />
M<br />
7<br />
9<br />
11<br />
E<br />
P<br />
STOP<br />
G<br />
R<br />
D<br />
«L» «R»<br />
12<br />
15<br />
17<br />
19<br />
2<br />
1<br />
2 cm<br />
40 Nm<br />
13<br />
K<br />
L<br />
T<br />
14<br />
16<br />
18<br />
20<br />
I<br />
40 Nm<br />
S H<br />
SE<br />
ÖVRIGT<br />
NORDISK<br />
MILJÖMÄRKNING<br />
MULTICLIP PRO 48<br />
11-8396<br />
MULTICLIP PRO 51 S<br />
11-8796<br />
Denna maskin<br />
uppfyller kraven<br />
enligt Nordisk<br />
Miljömärkning<br />
av gräsklippare<br />
version 3.<br />
* Produktgrupp<br />
C1: Maskiner avsedda att<br />
användas i yrkesmässigt<br />
bruk. Slagvolym mindre<br />
än 225 cm 3 .<br />
För att undvika spill vid<br />
tankning rekommenderar<br />
vi att Stigas bensindunk<br />
används. Den finns hos<br />
auktoriserade Stiga återförsäljare<br />
och har artikelnummret<br />
9500-9934-01.<br />
När maskinen behöver<br />
bytas ut, eller inte längre<br />
behövs, rekommenderar<br />
vi att maskinen lämnas<br />
tillbaka till Er återförsäljare<br />
för återvinning.<br />
Materialdeklaration<br />
340005<br />
Följande material ingår<br />
bl.a i produkten:<br />
Material Viktprocent<br />
Stål 40%<br />
Aluminium 44%<br />
Gummi 3%<br />
ABS 2%<br />
PP < 2%<br />
POM < 2%<br />
Mässing < 2%<br />
Maskinen är lackerad<br />
med polyesterbaserad<br />
pulverlack. Motorblocket<br />
är gjutet i aluminium.<br />
FI<br />
MUUTA<br />
POHJOISMAINEN<br />
YMPÄRISTÖMERKKI<br />
MULTICLIP PRO 48<br />
11-8396<br />
MULTICLIP PRO 51 S<br />
11-8796<br />
Tämä kone täyttää<br />
Pohjoismaisen<br />
Ympäristömerkin<br />
ruohonleikkureille<br />
asetetut vaatimukset,<br />
versio 3.<br />
* Tuoteryhmä<br />
C1: Ruohonleikkurit on<br />
tarkoitettu ammattimaiseen<br />
käyttöön. Iskutilavuus<br />
alle 225 cm 3 .<br />
Polttonesteen roiskumisen<br />
välttämiseksi suositttelemme<br />
Stigan polttonestesäiliötä.<br />
Niitä on<br />
saatavana valtuutetuilta<br />
Stiga-jälleenmyyjiltä osanumerolla<br />
9500-9934-01.<br />
Kun kone on usean vuoden<br />
käytön jälkeen vaihdettava<br />
uudempaan tai<br />
sitä ei enää tarvita suosittelemme,<br />
että toimitat<br />
sen jälleenmyyjällesi kierrrätystä<br />
varten.<br />
Materiaaliselostus<br />
340005<br />
Tuotteessa on käytetty mm.<br />
seuraavia materiaaleja:<br />
Materiaali Painoprosentti<br />
Teräs 40%<br />
Alumiini 44%<br />
Kumi 3%<br />
ABS 2%<br />
PP < 2%<br />
POM < 2%<br />
Messinki < 2%<br />
Kone on maalattu polyesteripohjaisellajauhemaalilla.<br />
Moottorinrunko<br />
on valualumiinia.<br />
DA<br />
ØVRIGT<br />
NORDISK<br />
MILJØMÆRKNING<br />
MULTICLIP PRO 48<br />
11-8396<br />
MULTICLIP PRO 51 S<br />
11-8796<br />
Denne maskine<br />
overholder kravene<br />
for plæneklippere<br />
som bestemt af<br />
Nordisk Miljømærkning<br />
version 3.<br />
* Produktgruppe<br />
340005<br />
C1: Maskiner produceret<br />
til professionel brug.<br />
Slagvolumen mindre end<br />
225 cm 3 .<br />
For at undgå spild ved<br />
tankning anbefaler vi, at<br />
Stigas benzindunk anvendes.<br />
Den kan fås hos<br />
autoriserede Stiga-forhandlere<br />
og har varenummer<br />
9500-9934-01.<br />
Når maskinen skal udskiftes<br />
- eller der ikke længere<br />
er behov for den - anbefaler<br />
vi, at den leveres<br />
tilbage til forhandleren til<br />
genbrug.<br />
Materialedeklaration<br />
I produktet indgår bl.a.<br />
følgende materialer:<br />
Materiale Vægtprocent<br />
Stål 40%<br />
Aluminium 44%<br />
Gummi 3%<br />
ABS 2%<br />
PP < 2%<br />
POM < 2%<br />
Messing < 2%<br />
Maskinen er lakeret med<br />
polyesterbaseret<br />
pulverlak. Motorblokken<br />
er støbt i aluminium.<br />
ØVRIG<br />
NORDISK<br />
MILJØMERKING<br />
MULTICLIP PRO 48<br />
11-8396<br />
MULTICLIP PRO 51 S<br />
11-8796<br />
Denne maskinen<br />
oppfyller kravene<br />
iht. Nordisk<br />
Miljømerking av<br />
gressklipper versjon<br />
version 3.<br />
Multiclip Multiclip<br />
Pro 48 Pro 51 S<br />
11-8396 11-8796<br />
Ljudtrycksnivå vid Äänenpainetaso kuljetta- Lydtryksniveau ved Lydtrykksnivå ved<br />
förarens öra jan korvan korkeudella førerens øre. førerens øre. LpA=78 dB(A) LpA=78 dB(A)<br />
Produktgrupp* Tuoteryhmä* Produktgruppe* Produktgruppe* C1 C1<br />
Specifik Suhteellinen polt- Specifikt brændstof- Spesifikasjoner<br />
bränsleförbrukning tonesteen kulutus forbrug. drivstofforbruk. 354 g/kWh 354 g/kWh<br />
Relativ Suhteellinen polt- Relativt brændstof- Relativt drivstoffor- medelhög/keskikorkea medelhög/keskikorkea<br />
bränsleförbrukning tonesteen kulutus forbrug bruk middelhøj/middelshøy middelhøj/middelshøy<br />
NO<br />
* Produktgruppe:<br />
C1: Maskiner beregnet for<br />
yrkesmessig bruk.<br />
Slagvolum mindre enn<br />
225 cm 3 .<br />
For å unngå søl ved fylling<br />
av drivstoff, anbefaler<br />
vi bruk av Stigas bensinkanne.<br />
Den er å få hos<br />
autoriserte Stiga-forhandlere<br />
og har artikkelnummer<br />
9500-9934-01.<br />
Når maskinen må skiftes<br />
ut, eller ikke lenger blir<br />
brukt, anbefaler vi at<br />
maskinen returneres til<br />
forhandleren for gjenvinning.<br />
Materialdeklarasjon<br />
340005<br />
Produktene omfatter blant<br />
annet følgende materialer:<br />
Materiale Vektprosent<br />
Stål 40%<br />
Aluminium 44%<br />
Gummi 3%<br />
ABS 2%<br />
PP < 2%<br />
POM < 2%<br />
Messing < 2%<br />
Maskinen er lakkert med<br />
polyesterbasert pulverlakk.<br />
Motorblokken er<br />
støpt i aluminium.
GB ENGLISH<br />
GB<br />
SAFETY REGULATIONS<br />
A) TRAINING<br />
1) Read the instructions carefully. Get familiar<br />
with the controls and proper use of the equipment.<br />
Learn how to stop the engine quickly.<br />
2) Only use the lawnmower for the purpose for<br />
which it was designed, i.e. for cutting grass. Any<br />
other use can be hazardous, causing damage to<br />
the machine.<br />
3) Never allow children or people unfamiliar with<br />
these instructions to use the lawnmower. Local<br />
regulations may restrict the age of the operator.<br />
4) Never use the lawnmower:<br />
– When people, especially children, or pets are<br />
nearby.<br />
– If the operator has taken medicine or substances<br />
that can affect his ability to react and<br />
concentrate.<br />
5) Remember that the operator or user is<br />
responsible for accidents or hazards occurring<br />
to other people or their property.<br />
B) PREPARATION<br />
1) While mowing, always wear sturdy footwear<br />
and long trousers. Do not operate the equipment<br />
when barefoot or wearing open sandals.<br />
2) Thoroughly inspect the area where the equipment<br />
is to be used and remove all objects which<br />
may be thrown by the machine or damage the<br />
cutter assembly and the engine (stones, sticks,<br />
metal wire, bones, etc.)<br />
3) WARNING: DANGER! Engine fuel is highly<br />
flammable:<br />
– Store fuel in containers specifically designed<br />
for this purpose.<br />
– Refuel using a funnel and outdoors only. Do<br />
not smoke while refuelling or whenever handling<br />
the fuel.<br />
– Add fuel before starting the engine. Never<br />
remove the cap of the fuel tank or add fuel while<br />
the engine is running or when the engine is hot.<br />
– If fuel is spilled, do not attempt to start the<br />
engine but move the machine away from the<br />
area of spillage and avoid creating any source<br />
of ignition until the fuel has evaporated and the<br />
vapour dispersed.<br />
– Replace all fuel tanks and containers caps<br />
securely.<br />
4) Substitute faulty silencers.<br />
5) Before use, always inspect the machine,<br />
especially the condition of the blades, and<br />
check that the screws and cutting assembly are<br />
not worn or damaged. Replace worn or damaged<br />
blades and screws in sets to preserve balance.<br />
C) OPERATION<br />
1) Do not operate the engine in a confined<br />
31<br />
space where dangerous carbon monoxide<br />
fumes can collect.<br />
2) Mow only in daylight or good artificial light.<br />
3) If possible, avoid operating the equipment in<br />
wet grass.<br />
4) Always be sure of your footing on slopes.<br />
5) Walk, never run and do not allow yourself to<br />
be pulled along by the lawnmower.<br />
6) Mow across the face of slopes, never up and<br />
down.<br />
7) Exercise extreme caution when changing<br />
direction on slopes.<br />
8) Do not mow on slopes of more than 20°.<br />
9) Exercise extreme caution when pulling the<br />
lawnmower towards you.<br />
10) Stop the blade if the lawnmower has to be<br />
tilted for transportation when crossing surfaces<br />
other than grass, and when transporting the<br />
lawnmower to and from the area to be mowed.<br />
11) Never operate the lawnmower with defective<br />
guards.<br />
12) Do not change the engine governor settings<br />
or overspeed the engine.<br />
13) On power-driven models, disengage the<br />
drive clutch before starting the engine.<br />
14) Start the engine carefully, following the<br />
instructions and keeping feet well away from<br />
the blade.<br />
15) Do not tilt the lawnmower when starting the<br />
engine. Start the engine on a flat surface that is<br />
free of obstacles and tall grass.<br />
16) Do not put hands or feet near or under rotating<br />
parts.<br />
17) Never pick up or carry a lawnmower while<br />
the engine is running.<br />
18) Stop the engine and disconnect the spark<br />
plug wire:<br />
– Before carrying out any work underneath the<br />
cutting deck;<br />
– Before checking, cleaning or working on<br />
lawnmower;<br />
– After striking a foreign object. Inspect the<br />
lawnmower for damage and make repairs<br />
before restarting and operating the lawnmower;<br />
– If the lawnmower starts to vibrate abnormally<br />
(find and remove the cause of the vibration<br />
immediately).<br />
19) Stop the engine:<br />
– Whenever you leave the lawnmower unattended.<br />
Remove the key from models with electric<br />
starters.<br />
– Before refuelling.<br />
– Before adjusting the cutting heigh.<br />
20) Reduce the throttle before turning off the<br />
engine and turn the fuel off when you have finished<br />
mowing, following the instructions in the<br />
engine handbook.<br />
21) When mowing, always keep to a safe distance<br />
from the rotating blade. This distance is<br />
the length of the handle.<br />
D) MAINTENANCE AND STORAGE<br />
1) Keep all nuts, bolts and screws tight to be<br />
sure the equipment is in safe working condition.
GB ENGLISH<br />
GB<br />
Regular maintenance is essential for safety and<br />
performance.<br />
2) Never store the equipment with fuel in the<br />
tank inside a building where vapour may reach<br />
a flame or a spark or a source of extreme heat.<br />
3) Allow the engine to cool before storing in an<br />
enclosed space.<br />
4) To reduce the fire hazard, keep the engine,<br />
exhaust silencer, battery compartment and fuel<br />
storage area free of grass, leaves, or excessive<br />
grease. Do not leave containers with grass cuttings<br />
in rooms.<br />
5) If the fuel tank has to be drained, this should<br />
be done outdoors and when the engine is cool.<br />
6) Wear strong work gloves when removing and<br />
reassembling the blade.<br />
7) Check the blade’s balance after sharpening.<br />
8) For reasons of safety, do not use the equipment<br />
with worn or damaged parts. Parts are to<br />
be replaced and not repaired. Use genuine<br />
spare parts (blades should always bear the<br />
symbol ). Parts that are not of the same quality<br />
can damage the equipment and be dangerous<br />
for your safety.<br />
9) Whenever the machine is to be handled,<br />
transported or tilted you must:<br />
– wear strong working gloves;<br />
– grasp the machine at the points that offer a<br />
safe grip, taking account of the weight and its<br />
distribution.<br />
THE ENVIRONMENT<br />
In order to protect the environment, we recommend<br />
that the following points should be given<br />
special consideration:<br />
• Always use pure unleaded petrol.<br />
• Always use a funnel and/or a petrol can with a<br />
level control to avoid spillage when refilling the<br />
fuel tank.<br />
• Do not fill the fuel tank completely.<br />
• Do not overfill with engine and/or transmission<br />
oil.<br />
• When changing the oil, ensure that all the used<br />
oil is collected. Avoid spillage. Take the used oil<br />
to a recycling unit.<br />
• Do not dispose of used oil filter in a rubbish bin.<br />
Take it to a recycming unit.<br />
• Do not dispose of used lead-acid batteries in a<br />
rubbish bin. Take them to a battery collection<br />
point for recycling (applies to battery-powered<br />
machines and machines with battery start).<br />
• Replace the silencer if faulty. When carrying out<br />
repairs, always use original spare parts.<br />
• If the machines was originally equipped with a<br />
catalyser which is now faulty, a new one must<br />
be fitted when the silencer is replaced.<br />
• Always seek professional help when the carburettor<br />
requires adjustment.<br />
32<br />
• Clean the air filter according to the directions.<br />
• When, after many years of service, your<br />
machine needs to be replaced or is no longer<br />
required, we recommended that the machine is<br />
returned to your distributor for recycling.<br />
PRODUCT IDENTITY<br />
The identity of the product is determined by the<br />
article and serial numbers of the machine.<br />
These can be found on the label fixed to the chassis<br />
of the machine:<br />
ART. NR ➔<br />
SERIE NR.<br />
Use this identification whenever you contact a<br />
service workshop or buy replacement parts.<br />
As soon as possible after buying the machine,<br />
write the above numbers on the back page of this<br />
booklet.<br />
The manufacturer reserves the right to make<br />
changes to the product without prior notice.
GB ENGLISH<br />
GB<br />
IMPORTANT<br />
For the instructions relative to the engine and<br />
the battery, please read the relevant instruction<br />
handbooks.<br />
Equipment which is marked with an asterisk (*)<br />
comes as standard in certain models or countries.<br />
Certain models do not have throttle control. The<br />
engine’s speed is set for optimal function and minimal<br />
exhaust emissions.<br />
SYMBOLS<br />
The following symbols can be found on the<br />
machine to remind you of the care and attention<br />
that are required during use.<br />
The symbols mean:<br />
Important: Read the instruction handbook<br />
before using the<br />
Warning! Keep onlookers away. Beware of<br />
objects being flung out.<br />
Warning! Keep hands and feet clear of the<br />
cutting deck when the machine is running.<br />
Warning! Before starting any repair work,<br />
remove the spark plug cable from the spark<br />
plug.<br />
Warning! Always tilt the lawnmower<br />
backwards when cleaning the<br />
underside. Petrol and oil can run out<br />
if the lawnmower is tilted in the other direction.<br />
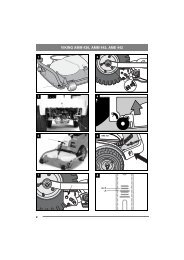
HANDLE/BUMPER (*)<br />
INSTALLATION<br />
Press in the end plugs in the openings on the handle.<br />
Place the handle on the cover so that the holes<br />
in the handle are aligned with the holes in the cover.<br />
Thread through the carriage bolts from underneath<br />
and secure with the locking nuts U. Press on the<br />
nut caps V (fig 1).<br />
33<br />
HANDLE, LOWER PART<br />
Fold back and screw tight the lower part of the<br />
handle using the screws A (fig. 2).<br />
HANDLE, UPPER PART<br />
Fit the upper part of the handlebar (fig. 3). The<br />
height of the handlebar above the ground can be<br />
adjusted within certain limits since the lower part is<br />
provided with slotted holes at the rear (fig. 4).<br />
If necessary the upper part can be turned to one<br />
side to facilitate mowing close up to walls (fig. 5).<br />
CABLE HOLDER<br />
Secure the cables in the cable holders (fig. 6):<br />
D: Start/Stop cable + Throttle cable (*)<br />
E: Clutch cable (*) + Electric cable (*)<br />
BATTERY (*)<br />
The electrolyte in the battery is toxic and<br />
corrosive. It can cause serious corrosion<br />
damage etc. Avoid all contact with skin,<br />
eyes and clothing.<br />
Before starting for the first time the battery should<br />
be charged for 24 hours, see further information<br />
under the heading MAINTENANCE, BATTERY.<br />
Insert ignition key (*) into the ignition lock.<br />
USING THE MOWER<br />
STARTING THE ENGINE<br />
1. Place the lawnmower on flat, firm ground. Do<br />
not start in long grass.<br />
2. Make sure the spark plug cable is connected to<br />
the spark plug.<br />
3. Set the clutch control M to (fig. 7).<br />
4. Press in the Start/Stop loop G towards the handle.<br />
NOTE! The Start/Stop loop G must be kept<br />
pressed in to prevent the engine stopping (fig.<br />
8).<br />
5a Manual start: Grasp the starter handle and start<br />
the engine by pulling briskly on the starter cord.<br />
5b Electric start (K*): Start the engine by turning<br />
the ignition key clockwise. Release the key as<br />
soon as the engine starts. Always make short
GB ENGLISH<br />
GB<br />
attempts at starting in order to prevent discharging<br />
the battery.<br />
6. For the best mowing results, the engine should<br />
always be driven at full throttle.<br />
STOPPING THE ENGINE<br />
Type I<br />
The engine may be very warm immediately<br />
after it is shut off. Do not touch the<br />
silencer, cylinder or cooling flanges. This<br />
can cause burn injuries.<br />
Release the Start/Stop loop G (fig. 8) to stop the<br />
engine.<br />
Type II<br />
Release the Start/Stop loop G (fig. 7) to stop the<br />
engine.<br />
Disengage the drive. Set the clutch control M to<br />
(fig. 7).<br />
If the start/stop loop ceases to work,<br />
stop the engine by removing the spark<br />
plug cable from the spark plug.<br />
Immediately take the lawn mower to an<br />
authorised workshop for repair.<br />
REAR WHEEL DRIVE (*)<br />
Type I<br />
Engage the drive by pressing the clutch loop J<br />
towards the handle. Disengage the drive by releasing<br />
the clutch loop J (fig. 8).<br />
Type II<br />
Engage the drive by moving the clutch control M to<br />
(fig. 7). Make sure the clutch control is always<br />
moved fully either to one or the other position.<br />
MOWING TIPS<br />
Before mowing the lawn, take care to remove any<br />
stones, toys and other hard objects.<br />
A machine with the MULCHING system cuts the<br />
grass, chops it finely and then blows it down into<br />
the lawn.<br />
The grass clippings need not be collected.<br />
The following rules should be observed to give the<br />
34<br />
best MULCHING effect:<br />
1. Use a high engine speed (full throttle).<br />
2. Do not mow when the grass is wet.<br />
3. Do not cut the grass too short. Not more than<br />
1/3rd of the length should be cut off.<br />
4. Ensure that the area under the mower casing is<br />
always kept clean.<br />
5. Always use a well-sharpened blade.<br />
CUTTING HEIGHT<br />
Do not set the cutting height so low that<br />
the blade(s) come into contact with<br />
uneven ground.<br />
The mower has single-lever control for adjusting<br />
the cutting height. Pull the lever out, and set the<br />
cutting height to one of the nine positions best<br />
suited to your lawn (fig. 9).<br />
MAINTENANCE<br />
IMPORTANT – Regular, careful maintenance is<br />
essential for keeping the safety level and original<br />
performance of the machine unchanged in<br />
time.<br />
Wear strong working gloves during any cleaning,<br />
maintenance or adjustment operation on the<br />
machine.<br />
Should it be necessary to access the lower part,<br />
only tilt the machine from the side shown in the<br />
engine handbook; following the relative instructions.<br />
CLEANING<br />
Carefully clean the machines with water after each<br />
cut; remove the grass debris and mud accumulated<br />
inside the chassis to avoid their drying and thus<br />
making the next start-up difficult.<br />
The paintwork on the inside of the chassis may<br />
peel off in time due to the abrasive action of the cut<br />
grass; in this case, intervene promptly by touching<br />
up the paintwork using a rustproof paint to prevent<br />
the formation of rust that would lead to corrosion of<br />
the metal.<br />
Remove the transmission casing by removing the<br />
screws S (fig. 10) and clean around the transmission<br />
(*) and drive belts (*) with a brush or compressed<br />
air once or twice a year.<br />
Once every season, the drive wheels (*) should be<br />
cleaned internally. Remove both wheels. Clean the<br />
gear wheel and the wheel gear rim of grass and dirt<br />
using a brush or compressed air (fig. 11).
GB ENGLISH<br />
GB<br />
LUBRICATING DRIVE SHAFT (*)<br />
Once per season, the wedge on the drive shaft<br />
should be greased. Remove the wheel (wheel cap,<br />
screw and washer). Then remove the circlip and<br />
washer so that the gear wheel can be removed<br />
from the shaft. Lubricate the wedge with universal<br />
grease.<br />
Reinstall the wedge (the wedge is installed differently<br />
on the right and left side, fig. 12-13). Install<br />
the gear wheel so that the «L» faces out on the left<br />
side and the «R» faces out on the right side<br />
(machine viewed from the rear).<br />
BATTERY (*)<br />
In normal use during the season, the battery is<br />
charged by the engine. If the engine cannot be<br />
started with the ignition key, it may be because the<br />
battery is 'dead'.<br />
Connect the battery charger (provided) to the battery,<br />
then connect the charger to a wall socket and<br />
charge for 24 hours (fig. 14).<br />
The battery charger may not be connected directly<br />
to the engine terminal. It is not possible to start the<br />
engine with the charger as the power source and<br />
the charger could be damaged.<br />
WINTER STORAGE<br />
Remove the battery and store it fully charged (see<br />
above) in a dry, cool place (between 0°C and<br />
+15°C). At least once during the winter storage<br />
period, the battery should be maintenancecharged.<br />
Before the start of the season, the battery should<br />
be charged once again for 24 hours.<br />
ADJUSTING CLUTCH CABLE (*)<br />
Type I<br />
If the drive does not engage when the clutch loop<br />
is pressed against the handle, or if the lawnmower<br />
feels cumbersome or slow, this may be because<br />
the clutch in the transmission is slipping. To rectify<br />
this situation, adjust the clutch cable as follows<br />
(with the engine off):<br />
1. When the clutch loop is released, it should be<br />
possible to push the mower backwards without<br />
any resistance. If this is not the case, screw in<br />
the nipple T until the mower can be pushed (fig.<br />
15).<br />
2. When the clutch loop is pressed in approx. 2 cm<br />
(position 1), there should be some resistance<br />
35<br />
when pushing the lawnmower. With the clutch<br />
loop fully pressed in (position 2) it should not be<br />
possible to push the mower. Unscrew the nipple<br />
T until this position is achieved.<br />
Type II<br />
Check the clutch function (fig. 16):<br />
1. Push the mower forwards and backwards with<br />
disengaged transmission.<br />
2. Set the clutch control to the position and<br />
push the mower until the front wheels engage.<br />
3. In this position, the spring H should be extended<br />
6 mm from it’s unloaded position to provide<br />
sufficient locking force in the transmission.<br />
4. If the spring is not extended sufficiently, adjust<br />
the wire nipple I at the handlebar.<br />
5. First loosen the locking nut S and then adjust<br />
the nipple I.<br />
6. Set the clutch control to the position and<br />
check that the transmission is disengaged by<br />
rolling the mower forwards and backwards.<br />
ADJUSTING DRIVE BELT (*)<br />
Check the belt tension regularly. The drive belt is<br />
correctly adjusted when the shoulder bolt K is centred<br />
in the front hole on the engine bracket (fig. 17).<br />
Incorrect belt tension can bring about abnormal<br />
vibrations in the handle (the belt is tensioned too<br />
tightly) or the belt can start to slide (the belt is not<br />
tensioned enough).<br />
Adjust the drive belt as follows (fig. 17):<br />
Stop the engine and remove the spark plug cable<br />
from the spark plug.<br />
Dismantle the transmission casing. Undo the screw<br />
L. Pull the transmission forwards so that the belt is<br />
tensioned and tighten the screw L.<br />
The drive belt must be adjusted so that the shoulder<br />
bolt K is centred in the front hole on the engine<br />
bracket.<br />
SHOCK-ABSORBER<br />
Fig. 18. Check the shock-absorber and the insulating<br />
sleeves twice per season. Replace in the event<br />
of damage or wear.<br />
CHANGING BLADES<br />
To replace the blade, undo the screw (fig. 19-20).<br />
Fit the new blade so that the stamped logo is<br />
turned up facing the blade holder (not facing the<br />
grass).
GB ENGLISH<br />
GB<br />
Reinstall as illustrated. Tighten the screw properly.<br />
Tightening torque 40 Nm.<br />
When replacing the blade, the blade screw should<br />
also be replaced.<br />
SHARPENING THE BLADES<br />
Sharpening of the blades must be done by wet<br />
method grinding, using a whetstone or a grindstone.<br />
For safety reasons, the blades should not be<br />
sharpened on an emery wheel. A very high temperature<br />
could cause the blades to become brittle.<br />
STORAGE<br />
The same petrol must not remain in the tank for<br />
more than one month.<br />
Thoroughly clean the mower and store it indoors in<br />
a dry place.<br />
SERVICING<br />
Genuine spare parts are supplied by service workshops<br />
and by many dealers.<br />
We recommend that you take the machine to an<br />
authorised service station for annual servicing,<br />
maintenance and inspection of safety equipment.<br />
For service and spare parts, please contact the<br />
dealer where the machine was purchased.<br />
36