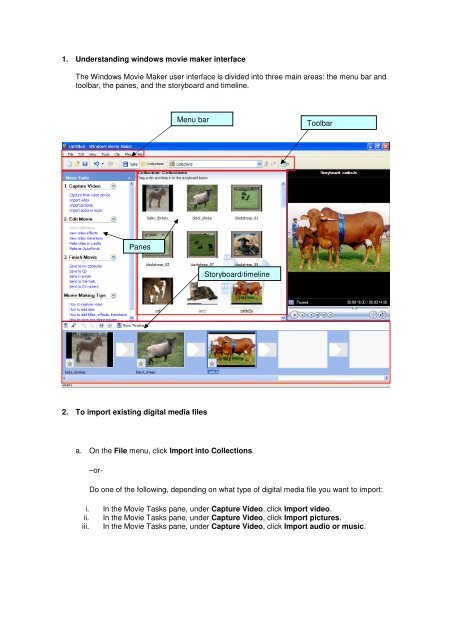
1. Understanding windows movie maker interface The Windows ...
1. Understanding windows movie maker interface The Windows ...
1. Understanding windows movie maker interface The Windows ...

You also want an ePaper? Increase the reach of your titles
YUMPU automatically turns print PDFs into web optimized ePapers that Google loves.
<strong>1.</strong> <strong>Understanding</strong> <strong>windows</strong> <strong>movie</strong> <strong>maker</strong> <strong>interface</strong><br />
<strong>The</strong> <strong>Windows</strong> Movie Maker user <strong>interface</strong> is divided into three main areas: the menu bar and<br />
toolbar, the panes, and the storyboard and timeline.<br />
2. To import existing digital media files<br />
a. On the File menu, click Import into Collections.<br />
–or-<br />
Panes<br />
Menu bar<br />
Storyboard/timeline<br />
Toolbar<br />
Do one of the following, depending on what type of digital media file you want to import:<br />
i. In the Movie Tasks pane, under Capture Video, click Import video.<br />
ii. In the Movie Tasks pane, under Capture Video, click Import pictures.<br />
iii. In the Movie Tasks pane, under Capture Video, click Import audio or music.
. In File name, enter the path and file name of the file you want to import, and then click<br />
Import.<br />
c. If you want selected video files to be separated into smaller clips, select the Create clips<br />
for video files check box.<br />
3. To import a <strong>Windows</strong> Movie Maker collections file<br />
a. On the File menu, click Import into Collections.<br />
b. In the Files of type box, select <strong>Windows</strong> Movie Maker <strong>1.</strong>x Collection Files.<br />
c. In File name, enter the path and file name of the collections file you want to import, and<br />
then click Import.<br />
<strong>The</strong> collections file is named <strong>Windows</strong> Movie Maker.col and is located on your hard<br />
disk in \Documents and Settings\UserAccountName\Application Data\Microsoft\Movie<br />
Maker. For example, if <strong>Windows</strong> is installed on drive C:, and your account name is John,<br />
your collections file would be located in C:\Documents and Settings\John\Application<br />
Data\Microsoft\Movie Maker.<br />
4. To drag pictures/audio/video to storyboard<br />
a. Drag pictures/audio/video from the collection board to the storyboard or timeline<br />
5. To Add Titles and Credits<br />
In the Movie Tasks pane, under Edit Movie, click Make titles or credits and choose different<br />
options to be creative<br />
6. To add creative transitions<br />
a. In the Movie tasks pane, under Edit Movie, click View video transitions. <strong>The</strong> Collections<br />
pane will become the Video Transitions pane.<br />
b. Drag the video transition to the video transition cell between two pictures on the<br />
storyboard.<br />
7. Adjust the time line<br />
a. Click Show Timeline above the storyboard.<br />
b. To make a picture appear on the screen longer, select the picture, and when the pointer<br />
becomes a red arrow, drag the picture's right border to the right.<br />
<strong>The</strong> individual pictures probably appear too narrow on the timeline, so click the button with a<br />
magnifying glass and a plus (+) sign a couple of times to zoom in on your pictures.<br />
8. To save a project<br />
a. On the File menu, click Save Project.<br />
b. In the File name box, type the file name, and then click Save.<br />
9. To save and send <strong>movie</strong> files<br />
a. On the File menu click Save <strong>movie</strong> files and follow the save <strong>movie</strong> wizard<br />
OR<br />
b. Select an option under Finish <strong>movie</strong> task and follow the save <strong>movie</strong> wizard