majestic convection oven - Parts Town
majestic convection oven - Parts Town
majestic convection oven - Parts Town

You also want an ePaper? Increase the reach of your titles
YUMPU automatically turns print PDFs into web optimized ePapers that Google loves.
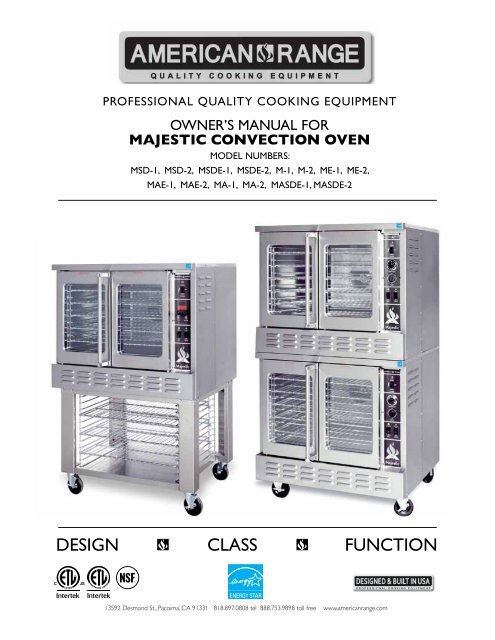
PROFESSIONAL QUALITY COOKING EQUIPMENT<br />
OWNER’S MANUAL FOR<br />
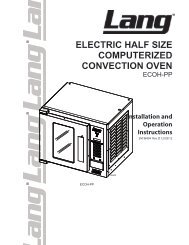
MAJESTIC CONVECTION OVEN<br />
MODEL NUMBERS:<br />
MSD-1, MSD-2, MSDE-1, MSDE-2, M-1, M-2, ME-1, ME-2,<br />
MAE-1, MAE-2, MA-1, MA-2, MASDE-1, MASDE-2<br />
DESIGN CLASS FUNCTION<br />
13592 Desmond St., Pacoima, CA 91331 818.897.0808 tel 888.753.9898 toll free www.americanrange.com
Majestic<br />
Convection Oven<br />
Owner’s Manual<br />
FOR<br />
YOUR<br />
SAFETY<br />
WARNING<br />
IMPROPER<br />
INSTALLATION<br />
Installation, Operation and<br />
Maintenance Instructions<br />
FOR YOUR SAFETY!<br />
Do not store or use gasoline or<br />
other flammable vapors or liquids<br />
in the vicinity of this or any other appliance.<br />
WARNING!<br />
Improper installation, adjustment, alteration, service<br />
or maintenance can cause property damage, injury<br />
or death. Read the installation, operating and<br />
maintenance instructions thoroughly before<br />
installing or servicing this equipment.<br />
Instruction to be followed in the event the user smells gas should be posted<br />
in a prominent location. This information should be obtained by<br />
consulting the local gas supplier.<br />
RETAIN THIS MANUAL FOR FUTURE REFERENCE.<br />
Model Number: __________________________________________<br />
Serial Number: ___________________________________________<br />
Purchase Date: ___________________________________________<br />
Installed By: _________________________ Install Date:__________<br />
Gas Type: _______________________________________________<br />
Electrical Information: ______________________________________<br />
13592 Desmond St., Pacoima, CA 91331 818.897.0808 tel 888.753.9898 toll free www.americanrange.com<br />
FOR<br />
YOUR<br />
SAFETY<br />
WARNING<br />
IMPROPER<br />
INSTALLATION
PROFESSIONAL QUALITY COOKING EQUIPMENT<br />
To Our Most Valued Customer:<br />
Congratulations on your purchase of an American Range product. We hope you will enjoy the<br />
design, manufactured quality, innovative features and cooking performance of this product – it<br />
represents our continuing dedication to satisfying the most demanding needs of customers<br />
like you.<br />
Please read this manual and become familiar with important safety information about how<br />
to install and set-up the unit, basic operating instructions, and how to maintain that just-likebrand-new<br />
appearance and performance - over years of day-to-day and special holiday use.<br />
If you should encounter any sort of problem, turn to the section of the manual entitled,<br />
“Troubleshooting” – for a quick solution or guidance regarding the next step required to get<br />
back to tip-top condition.<br />
Thank you for choosing an American Range product for your home. As you can expect, this<br />
appliance is designed for years of reliable service. If you have any questions or comments,<br />
please contact the dealer from whom you purchased the unit, or contact American Range<br />
Customer Service at www.americanrange.com or 818.897.0808.<br />
Sincerely,<br />
Shane Demirjian<br />
President, American Range Corporation<br />
13592 Desmond St., Pacoima, CA 91331 818.897.0808 tel 888.753.9898 toll free www.americanrange.com
Owner’s Manual<br />
Table of Contents<br />
Majestic Convection Oven<br />
General Information ......................................................................................................1-2<br />
Important Safety Information ........................................................................................1<br />
Shipping Damage Claim Procedure ...........................................................................1<br />
Installation-Gas Standards and Codes .....................................................................2<br />
Rating Plate ..............................................................................................................................3<br />
Clearances ...............................................................................................................................3<br />
Installation ............................................................................................................................4-8<br />
Single Oven Assembly .......................................................................................................4<br />
Double Oven Assembly ...................................................................................................5<br />
Caster Installation ................................................................................................................5<br />
Leveling ......................................................................................................................................5<br />
Air Supply and Ventilation ...............................................................................................5<br />
Electrical Connection ........................................................................................................6<br />
Gas Connection ...................................................................................................................6<br />
Manual Shut Off Valve ...................................................................................................6-7<br />
Oven with Casters ..............................................................................................................7<br />
Manual Controls ...................................................................................................................8<br />
Cook & Hold Controls.....................................................................................................9<br />
Checking for Gas Leaks ................................................................................................. 10<br />
Lighting Instructions ......................................................................................................... 10<br />
To Shut Down Oven ...................................................................................................... 10<br />
Cleaning and Preventive Maintenance............................................................10-11<br />
Operation ............................................................................................................................. 12<br />
Troubleshooting Guide .................................................................................................. 13<br />
Electrical Schematics ................................................................................................14-15<br />
Electrical Specifications .................................................................................................. 16<br />
ENERGY STAR ® Majestic Wiring Diagram ....................................................... 16<br />
Exploded View Drawings .......................................................................................17-20<br />
13592 Desmond St., Pacoima, CA 91331 818.897.0808 tel 888.753.9898 toll free www.americanrange.com
Owner’s Manual Majestic Convection Oven<br />
• Before beginning, please read all the instructions carefully.<br />
• DO NOT remove permanently affixed labels, warnings, or plates from product. This will void the warranty.<br />
• All local and national codes and ordinances must be observed; installation must conform with local codes.<br />
• The Installer must leave these instructions with the consumer who should retain for local inspector’s use and for future reference.<br />
• Installation and service must be performed by a certified / licensed installer, service agency or gas supplier.<br />
• Please ensure that the product is properly grounded.<br />
Your safety and the safety of others is very important. We have provided many important safety messages in this manual and on your<br />
appliance. Always read and obey all safety messages.<br />
!<br />
!<br />
!<br />
!<br />
IMPORTANT - PLEASE READ AND FOLLOW!<br />
This is the SAFETY ALERT SYMBOL.<br />
This symbol alerts you to hazards.<br />
DANGER<br />
WARNING<br />
CAUTION<br />
Shipping Damage Claim Procedure:<br />
Hazards or unsafe practices which may result in severe<br />
personal injury or death.<br />
Hazards or unsafe practices which may result in severe<br />
personal injury or death.<br />
Hazards or unsafe practices which may result in<br />
personal injury or property damage.<br />
The equipment is crafted and inspected carefully by skilled personnel before leaving the factory. The transportation company<br />
assumes full responsibility for the safe delivery upon acceptance of the equipment. If the shipment arrives damaged:<br />
1. Note on the freight bill or express delivery document any visible loss or damage and have the document signed by the<br />
person making the delivery.<br />
2. File claim for damages immediately regardless of the extent of damages.<br />
3. For damage noticed after unpacking (concealed loss or damage), notify the transportation company immediately and<br />
file a “Concealed Damage” claim with them. This should be done within fifteen (15) days from the date that<br />
delivery is made to you. Retain the shipping container for inspection.<br />
1<br />
13592 Desmond St., Pacoima, CA 91331 818.897.0808 tel 888.753.9898 toll free www.americanrange.com
Owner’s Manual<br />
Important - The installation of this appliance must conform to local codes or, in the absence of local codes, with the National Fuel<br />
Gas Code ANSI Z223.1 Natural Gas Installation Code, CAN/CGA-B149-1 or the Propane Installation Code, CAN/CGA-B149-2<br />
as applicable, including:<br />
1. The appliance and its individual shut off valve must be disconnected from the gas supply piping system during any<br />
pressure testing of that system at test pressure in excess of 1/2 psi (3.45 kPa).<br />
2. The appliance must be isolated from the gas supply piping system by closing the individual manual shut off<br />
valve during any pressure testing of the gas supply piping system.<br />
The appliance, when installed, must be wired and electrically grounded in accordance with local codes, or in the absence of local<br />
codes, with the National Electric Code, ANSI/NFPA 70, or the Canadian Electrical Code, CSA C22.2 as applicable.<br />
Installation, Operation and Service Personnel - Installation of the equipment should be performed by qualified, certified, licensed<br />
and/or authorized personnel who are experienced in state/local installation codes.<br />
Operation of the equipment should be performed by qualified or authorized personnel who have read and understand this manual<br />
and are familiar with the functions of the equipment.<br />
Service of the equipment should be performed by qualified and licensed service personnel who are knowledgeable with American<br />
Range products.<br />
!<br />
DANGER<br />
Installation - Gas Standards and Codes<br />
Majestic Convection Oven<br />
1. A manual gas shut off valve must be installed in the gas supply (service) line ahead of the appliance and gas pressure regulator<br />
in the gas stream for safety and ease of future maintenance/service.<br />
2. The gas pressure regulator supplied with the appliance must be installed prior to connecting the equipment to the gas supply<br />
line. Failure to install a regulator will void the equipment warranty and result in a potentially hazardous condition.<br />
3. Contact factory for installation, maintenance and repairs, American Range Customer Service at www.americanrange.com<br />
or 818.897.0808.<br />
2<br />
13592 Desmond St., Pacoima, CA 91331 818.897.0808 tel 888.753.9898 toll free www.americanrange.com
Owner’s Manual<br />
Rating Plate - The location of the rating plate is shown in Figure 2. The information on the rating<br />
plate defines the model, serial number, gas type (natural or liquid propane), operating pressures<br />
and burner BTU ratings. Keep this information for future reference. It is essential for proper<br />
identification of the unit when requesting additional information or factory support.<br />
!<br />
Appliances must be connected only to the<br />
type of gas identified on the rating plate.<br />
Clearances - The appliance must be kept free and clear of all combustible materials. This unit is designed<br />
and certified for the following installation only:<br />
CLEARANCE FROM MINIMUM COMBUSTIBLE AND NON-COMBUSTIBLE CONSTRUCTION<br />
COMBUSTIBLE NON-COMBUSTIBLE<br />
Back 6” 0”<br />
Side 6” 0”<br />
Installation - Electric Utility Connections-Standards and Codes<br />
!<br />
WARNING<br />
WARNING<br />
Majestic Convection Oven<br />
The installation instructions contained here are for the use of qualified<br />
installation and service personnel only. Installation or service by other<br />
than certified / licensed personnel will void the warranty and will result<br />
in damage to the <strong>oven</strong> and/or injury to the operator.<br />
Qualified installation personnel are individuals, a firm or a company which either in person or through a representative are engaged<br />
in and responsible for the installation of electrical wiring from the electric meter, main control box or service outlet to the electric<br />
appliance.<br />
Qualified installation personnel, licensed and bonded, must be experienced in such work, familiar with all precautions required and<br />
have complied with all requirements of state or local authorities having jurisdiction.<br />
U.S. and Canadian Installations - All <strong>oven</strong>s, when installed, must be electrically grounded in accordance with local codes, or in the<br />
absence of codes, with the National Electrical Code ANSI/NFPA 70 - Latest Edition and/or Canadian National Electrical Code C22.2<br />
as applicable.<br />
The ventilation of these <strong>oven</strong>s should be in accordance with local codes. In absence of local codes, refer to the national ventilation<br />
code titled, Standard for the Installation of Equipment for the Removal of Smoke and Grease Laden Vapors from Commercial<br />
Cooking Equipment, NFPA-96-Latest Edition.<br />
The appliance is to be installed with a check valve in accordance with applicable federal, province and local codes.<br />
General Export Installations - Installation must conform to Local and National Standards. Local installation codes and/or<br />
requirements may vary. If you have any questions regarding the proper installation or operation of your American Range<br />
Convection Oven, please contact your local distributor. If you do not have a local distributor, contact American Range<br />
Corporation at 1.888.753.9898 or visit us at www.americanrange.com<br />
3<br />
13592 Desmond St., Pacoima, CA 91331 818.897.0808 tel 888.753.9898 toll free www.americanrange.com<br />
Intertek<br />
3013256<br />
Intertek<br />
MODEL: M-2-GR<br />
SERIAL NO.<br />
GAS TYPE: NAT MAN. PRESS: 5.0 IN. W.C.<br />
ELECTRICAL RATING<br />
VOLTS 110 PHASE 1 AMPS 6.5/3/0 CYCLE 60/50<br />
INPUT-BTU/HOUR/BURNER CLEARANCES<br />
NON-COMB. COMB.<br />
CONV. OVEN 45,000 BACK<br />
SIDES<br />
0”<br />
0”<br />
FOR USE ONLY ON NONCOMBUSTIBLE FLOORS<br />
CURB MOUNT MUST HAVE 2” OVERHANG<br />
INTENDED FOR OTHER THAN HOUSEHOLD USE.<br />
ANSI Z83.11a/CSA 1.8a-2007 Food Service Equipment<br />
Rating Plate<br />
4”<br />
12”
Owner’s Manual<br />
Majestic Convection Oven<br />
Do Not Mount the <strong>oven</strong> on a curb base. Use casters. Adequate air space at the bottom and rear of the unit must be provided for<br />
the proper venting of the blower motor.<br />
Assembly - Do not use the door to lift or move the <strong>oven</strong>! The double <strong>oven</strong>s are installed on casters shipped with the unit.<br />
The standard assembly parts or casters for the single <strong>oven</strong> are shipped separately, within the crated unit.<br />
Single Oven - Assemble the leg / stand assembly as follows:<br />
1. Remove the legs from the package.<br />
2. Referring to Figure 1, secure bottom shelf to the legs, using bolts, and nuts provided. Tighten all bolts securely.<br />
3. Place <strong>oven</strong> on the top of leg / stand assembly. Match holes on the frame with <strong>oven</strong> bottom base. Fasten with bolts<br />
provided. For the bottom shelf and rack support:<br />
a. Screw the bottom shelf to the legs.<br />
b. Screw the guide support angles to the bottom shelf and top leg frame.<br />
BOTTOM SHELF QTY. (1)<br />
LEG TOTAL QTY. (4)<br />
#14 1/4 X 3/4<br />
SCREW TOTAL QTY. (12) W/LEGS<br />
SCREW TOTAL QTY. (16) W/CASTERS<br />
#20 1/4 X 3/4<br />
BOLT TOTAL QTY. (32)<br />
Figure 1<br />
4<br />
13592 Desmond St., Pacoima, CA 91331 818.897.0808 tel 888.753.9898 toll free www.americanrange.com<br />
CASTER<br />
MOUNT HOLE<br />
PATTERN<br />
LEG<br />
MOUNT HOLE<br />
PATTERN
Owner’s Manual<br />
Majestic Convection Oven<br />
Double Oven - Only 6” casters can be used with the double <strong>oven</strong>.<br />
1. Match holes on the casters with the <strong>oven</strong> bottom base and assemble with hardware provided.<br />
2. Stack top <strong>oven</strong> on top of bottom <strong>oven</strong>.<br />
3. Remove top kick plate by lifting and pulling forward. Then bolt by rear and front joiner brackets as shown in Figure 2.<br />
4. Assemble the flue extension as shown in the same figure.<br />
5. Do not use other manufacturer or aftermarket casters or legs.<br />
Majestic<br />
POWER<br />
COOK<br />
OFF<br />
COOL<br />
THERMOSTAT<br />
OFF<br />
500<br />
200<br />
450<br />
250<br />
400 300<br />
350<br />
60<br />
0<br />
TIMER<br />
LOW OFF<br />
FAN LIGHT<br />
Majestic<br />
POWER<br />
COOK<br />
OFF<br />
COOL<br />
THERMOSTAT<br />
OFF<br />
500 200<br />
450<br />
250<br />
400 300<br />
350<br />
LOW<br />
FAN<br />
60<br />
0<br />
TIMER<br />
OFF<br />
LIGHT<br />
RATING PLATE<br />
JOINER BRACKET<br />
(2 FRONT, BEHIND<br />
KICK PLATE)<br />
FRONT VIEW REAR VIEW<br />
Figure 2<br />
Caster Installation - With provided casters, match holes on the caster with holes on the <strong>oven</strong> bottom base and fasten with the<br />
hardware provided. Locking-type casters must be installed in front of the unit.<br />
Leveling - A carpenter’s spirit level should be placed on the <strong>oven</strong>’s center baking rack, and the unit leveled both front-to-back and<br />
side-to-side. If the unit is not level, cakes, casseroles and any other liquid or semi-liquid batter will not bake evenly, burner<br />
combustion may become erratic, and the unit will not function properly.<br />
If the floor is relatively smooth and level, the unit may be leveled by turning the “foot” section of the leg, since casters are not adjustable.<br />
Identify the high corner and level the unit - using metal shims if the adjustment amount required exceeds the 1-1/4” adjustment<br />
amount available. Casters must be leveled with shims. A unit will probably not return to the same position after being moved, so be<br />
sure to re-level as necessary.<br />
Air Supply and Ventilation - The area in front of, around and above the appliance must be kept clear to avoid any obstruction of<br />
the flow of combustion and ventilation air. Adequate clearance must also be maintained at all times in front and at the sides of the<br />
appliances for proper operation and servicing. Refer to the chart “Clearance from Minimum Combustible and Non-Combustible<br />
Construction” presented on page 3 of this manual.<br />
5<br />
13592 Desmond St., Pacoima, CA 91331 818.897.0808 tel 888.753.9898 toll free www.americanrange.com<br />
FLUE EXTENSION BRACKET<br />
MOTOR<br />
LIGHT<br />
FLUE EXTENSION<br />
JOINER BRACKET<br />
(2 REAR)
Owner’s Manual<br />
Means must be provided for any commercial, heavy-duty cooking appliance to exhaust combustion waste products to the outside<br />
of the building. Usual practice is to place the unit under an exhaust hood. Filters and drip troughs should be part of any industrial<br />
hood. Consult local codes before constructing and installing a hood.<br />
Air movement should be checked during installation. Strong exhaust fans in the hood or in the overall air conditioning system can<br />
produce a slight vacuum in the room and/or cause air drafts – either may interfere with the pilot or main burner performance and<br />
can also be hard to diagnose. If pilot burner or main burner outage problems persist – make up air openings or baffles may have to<br />
be provided in the room.<br />
Electrical Connection - The standard gas operated <strong>convection</strong> <strong>oven</strong>s require a 120 VAC, 60 Hz, 15 AMP electrical service for<br />
operation. The supply cord provided on the appliance is equipped with a three-prong (grounding) plug for protection against<br />
electrical shock hazard. The electrical service in the building must be equipped with a properly grounded three-prong receptacle, in<br />
accordance with local codes, or in the absence of local codes, with the National Electrical Code, ANSI/NFPA 70, or in Canada – to<br />
Canadian electrical codes, CSA C22.2. Do not cut or remove the grounding prong from this plug.<br />
!<br />
For gas fired units and any NEC compliant receptacle, properly grounded and with correct<br />
polarity is required.<br />
Electric <strong>convection</strong> <strong>oven</strong>s are configured at the factory for operation from 208 VAC, single<br />
phase, or 208 VAC, three-phase electrical service is also an available configuration. Consult<br />
wiring diagram located at the end of this manual and on the back side of the appliance.<br />
NOTE<br />
WARNING<br />
Majestic Convection Oven<br />
Electrical Grounding Instructions<br />
The appliance is equipped with a three-prong (grounding) plug for your<br />
protection against electrical shock hazard and should be plugged directly<br />
into a proper grounded three-prong receptacle.<br />
Do not cut or remove the grounding prong from the plug.<br />
No attempt should be made to operate this appliance during an electrical<br />
service failure. The appliance is not capable of operation without specified gas<br />
and electric requirements.<br />
Gas Connection - The single deck <strong>oven</strong> requires one gas connection; the double deck <strong>oven</strong> requires two gas connections. The gas<br />
inlet line size of this appliance is 3/4” NPT. For proper operation, the gas supply service line must be the same size or greater than<br />
the inlet line size of the appliance.<br />
Manual Shut Off Valve - A gas pressure regulator and a contractor-supplied shut-off valve must be plumbed in the gas service line<br />
ahead of the appliance – in a physical location where it can be reached quickly in the event of an emergency.<br />
6<br />
13592 Desmond St., Pacoima, CA 91331 818.897.0808 tel 888.753.9898 toll free www.americanrange.com<br />
CAUTION<br />
N L L N<br />
G G<br />
GOOD NO GOOD<br />
120 VAC POLARITY SPECS A39074
Owner’s Manual<br />
The gas pressure regulator must be installed in the gas line – failure to install a pressure regulator will void the equipment<br />
warranty. The regulators supplied with <strong>convection</strong> <strong>oven</strong>s have 3/4” NPT connections; the regulators adjusted at the factory for<br />
5” W.C (water column) manifold gas pressure (natural gas) or 10” W.C. manifold gas pressure for propane gas operation.<br />
Before connecting the regulator, check the incoming line pressure – as these regulators can only withstand a maximum inlet pressure<br />
of 14” W.C. (1/2 PSI); exceeding this pressure will damage them. Visually double check any installer-supplied intake pipes and/or blow<br />
them out using compressed air to clear any dirt or debris, threading chips, or other foreign matter – before installing a service line.<br />
Those particles will clog gas orifices when gas pressure is applied. Compounds used on threaded joints of this appliance piping must<br />
be resistant to the action of NP and LP gas and provide a gas tight seal to prevent leaks. If the gas supply line pressure is greater than<br />
this amount, a step-down regulator will be required. A gas flow direction arrow is cast into the body of the regulator to minimize<br />
installation error – it should point downstream to the appliance. The blue air vent cap on the top of the regulator is part of the<br />
regulator and should not be removed.<br />
Any adjustment to the regulator must be made only by qualified and licensed service personnel with the proper calibrated test<br />
equipment. Gas connections should be performed by a qualified licensed contractor.<br />
Ovens with Casters - In order to be able to service this appliance, it must be installed with the locking front casters supplied,<br />
a flexible connector complying with ANSI Z21.69.CGA6.16 and a quick disconnect device complying with ANSI Z21.41CGA 6.9.<br />
Adequate means must be provided to limit the movement of the appliance without depending on the connector and the quick<br />
disconnect device or its associated piping to limit the appliance movement.<br />
!<br />
CAUTION<br />
Majestic Convection Oven<br />
When lighting the gas <strong>oven</strong>, DO NOT stand with your face close<br />
to the combustion chamber.<br />
All American Range Corporation appliances are adjusted and tested before leaving the factory, effectively matching them to<br />
appropriate atmospheric conditions. We recommend that adjustments and calibrations are performed upon installation to assure<br />
proper operation of the unit and avoid possible problems caused by rough handling or vibration during shipment. This work must be<br />
performed only by qualified service personnel. These adjustments are the responsibility of the customer and/or dealer and are not<br />
covered by warranty.<br />
Check all gas connections for leaks with a soapy water solution before lighting the <strong>oven</strong>. DO NOT USE AN OPEN FLAME TO<br />
CHECK FOR LEAKS! Putting an open flame beside a new gas connection is extremely dangerous and may result in serious injury<br />
or death.<br />
7<br />
13592 Desmond St., Pacoima, CA 91331 818.897.0808 tel 888.753.9898 toll free www.americanrange.com
Owner’s Manual<br />
Majestic Convection Oven<br />
Reliable KXT Thermostat Manual Controls<br />
8<br />
Control Description<br />
1. Oven Indicator Light - This light indicates the heating elements are energized. When<br />
the light goes out, the <strong>oven</strong> has reached the requested operating temperature.<br />
2. Selector Switch - This switch controls power to the <strong>oven</strong>. It turns the <strong>oven</strong>, COOK, OFF<br />
or COOL if the door is open to activate the cooling fan.<br />
3. Thermostat - This allows the operator to set cooking temperatures<br />
from 200ºF to 500ºF.<br />
4. Timer - Turn knob to desired cook time. When cook period ends a buzzer sounds.<br />
5. Light switch - This momentary contact switch is used to control the light.<br />
6. Hi Speed, Lo Speed Convection Fan Switch - Use this switch to set the fan speed for<br />
best cooking results.<br />
13592 Desmond St., Pacoima, CA 91331 818.897.0808 tel 888.753.9898 toll free www.americanrange.com
Owner’s Manual<br />
TIMER TEMP.<br />
START CANCEL<br />
Majestic Convection Oven<br />
Cook and Hold Controls<br />
9<br />
Control Description<br />
1. Oven Indicator Light - This light indicates the heating elements are energized. When<br />
the light goes out, the <strong>oven</strong> has reached the requested operating temperature.<br />
2. Selector Switch - This switch controls power to the <strong>oven</strong>. It turns the <strong>oven</strong>, COOK,<br />
OFF or COOL if the door is open to activate the cooling fan.<br />
3. Thermostat - This allows the operator to set cooking temperatures<br />
from 200ºF to 500ºF.<br />
4. Timer - Turn knob to desired cook time. When cook period ends a buzzer sounds.<br />
5. Light switch - This momentary contact switch is used to control the light.<br />
6. Hi Speed, Lo Speed Convection Fan Switch - Use this switch to set the fan speed for<br />
best cooking results.<br />
13592 Desmond St., Pacoima, CA 91331 818.897.0808 tel 888.753.9898 toll free www.americanrange.com
Owner’s Manual<br />
Majestic Convection Oven<br />
To Check For Gas Leaks Using a Soapy Water Solution<br />
1. Turn ON the manual gas valve at the inlet side of the gas supply line.<br />
2. Remove the kick plate by lifting and pulling away from the unit.<br />
3. Check for gas leaks at the flexible coupling or gas connector fitting using a solution of one part soap and three parts water.<br />
4. Sparingly spray or brush the soapy solution at the gas fittings; active bubbling indicates location of gas leak.<br />
5. If a gas leak is detected turn off the manual gas valve at the inlet side of the gas line. Call your certified and licensed service<br />
technician.<br />
Lighting Instructions for Gas Fired Convection Ovens<br />
1. Before attempting to light this appliance, the cover, if so equipped should be open.<br />
2. Turn OFF the manual gas valve located at the outlet side of the gas supply line.<br />
3. Turn the manual gas supply valve to the OFF position.<br />
4. Set the thermostat to the OFF position.<br />
5. Press the power switch to the OFF position.<br />
6. Wait five minutes.<br />
7. This appliance is equipped with an automatic spark ignition device which automatically lights the pilot burner.<br />
Do not try to light the pilot burner with a match.<br />
8. Turn the manual gas supply valve to the ON position.<br />
9. Press the power switch to the ON “COOK” position.<br />
10. Set the thermostat to the desired temperature. The direct spark ignitor will light the pilot burner and the pilot<br />
burner will light the main burners. If both burners do not light, go back to steps 2 - 9 above and repeat the process. If the<br />
problem persists, call your factory personnel.<br />
11. The cover, if so equipped, should be replaced.<br />
12. If gas odor is detected turn off the gas valve and follow lighting instructions.<br />
To Shut Down the Gas Fired Convection Oven<br />
1. Set the thermostat to the OFF position.<br />
2. Press the power switch to the OFF position.<br />
3. Turn the manual gas supply valve to the OFF position.<br />
Final Preparation - On initial installation, turn the <strong>oven</strong> thermostat to 250ºF and operate the unit for about one hour, then reset the<br />
thermostat to its maximum and operate the unit for an additional hour. This will drive off any manufacturing oils remaining in the unit.<br />
Let the unit cool and thoroughly clean interior surfaces using hot soapy water.<br />
Maintenance Summary<br />
1. Never attempt to run <strong>oven</strong> with motor off.<br />
2. Cool down after cooking is finished.<br />
3. Periodically lubricate the pivot pins of the <strong>oven</strong> door hinge. Use a multi-purpose lubricating oil sparingly.<br />
4. Door chain assembly and door bushing must be inspected periodically and adjusted or replaced to ensure<br />
satisfactory operation of doors.<br />
5. Clean the burner air shutter and burner chamber. Remove any accumulation of debris by hand.<br />
6. Check blower wheel for any accumulation of debris. Remove by hand, do not use any tools.<br />
7. Replace burned out light bulbs.<br />
8. Excessive use will result in excessive wear and tear.<br />
10<br />
13592 Desmond St., Pacoima, CA 91331 818.897.0808 tel 888.753.9898 toll free www.americanrange.com
Owner’s Manual<br />
!<br />
Majestic Convection Oven<br />
Cleaning and Maintenance - Any piece of equipment operates better and lasts longer when properly maintained. Cooking equipment is<br />
no exception. Your American Range <strong>convection</strong> <strong>oven</strong> must be kept clean during the working day and thoroughly cleaned at the end of<br />
the day.<br />
To increase the lifetime of the motor, follow these instructions:<br />
a. Do not run an empty <strong>oven</strong> at higher temperatures for an extended period of time.<br />
b. After you finish cooking place the rocker switch in the COOL position and open the door. Air will be hot,<br />
use care. When the <strong>oven</strong> temperature is equal to the room temperature, turn the unit OFF.<br />
!<br />
CAUTION<br />
CAUTION<br />
Disconnect all power sources and lockout to prevent accidental start up<br />
of equipment.<br />
Never use ammonia in an <strong>oven</strong> that is warmer than room<br />
temperature and always provide direct fresh air ventilation<br />
when cleaning the unit.<br />
Daily Cleaning - Convection Ovens<br />
1. Your appliance should be checked for safe and efficient operation at least yearly by a qualified service company.<br />
2. Never spray water at or near equipment at any time as this could damage internal parts of the unit.<br />
3. Stainless Steel Care - All Stainless Steel appliance parts should be wiped regularly with hot soapy water during the day,<br />
and with a liquid cleaner designed for this material at the end of each day as well. DO NOT USE steel wool, abrasive cloths,<br />
cleaners or powders to clean Stainless Steel surfaces! If it is necessary to scrape Stainless Steel to remove encrusted<br />
materials, soak in hot water to loosen the material, then use a wooden or nylon scraper. DO NOT USE a metal knife, spatula,<br />
or any other metal tool to scrape Stainless Steel! Scratches are almost impossible to remove.<br />
4. Remove the baking racks.<br />
5. Be very careful about scratching the porcelain finish on the <strong>oven</strong> liner panels. Scrape off any food particles with a nylon<br />
griddle scraper.<br />
6. Wash all the above with hot soapy water, then reassemble.<br />
7. Baked-on spills and stubborn stains may be removed with ordinary household ammonia. Scrub with<br />
a nylon pad while <strong>oven</strong> is at room temperature only.<br />
8. Do not allow any spray-type <strong>oven</strong> cleaners to come into contact with the temperature probe in the <strong>oven</strong>.<br />
9. After cleaning the <strong>oven</strong>, rinse well with a solution of 1/4 cup of vinegar to one quart of clear water to neutralize any<br />
caustic residue remaining from the cleaning agent. Use water sparingly.<br />
Periodic Maintenance<br />
1. Check the ventilation system periodically to see that nothing has fallen down into the exhaust vents.<br />
2. Lubricate the pivot pins of the <strong>oven</strong> door hinge. Use a multi-purpose lubricating oil sparingly.<br />
Contact the factory, a factory representative or a local service company<br />
to perform maintenance and repairs.<br />
11<br />
13592 Desmond St., Pacoima, CA 91331 818.897.0808 tel 888.753.9898 toll free www.americanrange.com
Owner’s Manual<br />
General Guidelines<br />
TIPS ON USING THE CONVECTION OVEN<br />
The American Range Convection Oven is a high performance commercial cooking appliance. You may need to adjust cook time and<br />
temperature to achieve best results for your product.<br />
TEMPERATURES and COOK TIMES<br />
Preheating The Oven - Always preheat the <strong>oven</strong> before baking or roasting. to the desired temperature. When “Oven Indicator Light” is<br />
off the unit is at temperature.<br />
Cook Temperatures - Generally should be 25ºF (10ºC) lower than the deck or range <strong>oven</strong> recipes. If the edges of the product are done<br />
but the center is raw, or if there is color variation, consider reducing the thermostat setting another 15 - 25ºF (10-15ºC). Continue to<br />
reduce the cook temperature on successive loads until the desired results are achieved.<br />
NOTE: Cooking at excessive temperatures will not reduce the cook time, and more likely, will produce unsatisfactory baking and roasting results.<br />
Cook Time - Check the product in about half the time recommended for deck and range <strong>oven</strong> recipes. Record cook times and<br />
temperatures that provide the best results for future reference.<br />
NOTE: Cook time will vary with the amount of product loaded, the type of pan and the temperature.<br />
OPERATING TIPS<br />
Pans and Racks - Product or pan height determines how many racks are used. The <strong>oven</strong> holds up to ten - 18” x 26” (45.7 x 66.0 cm)<br />
pans.<br />
Load the <strong>oven</strong> from the bottom, centering the pans on the rack. Never place a pan or aluminum foil on the bottom of the <strong>oven</strong> as this<br />
will obstruct the <strong>convection</strong> air flow and result in uneven baking and roasting.<br />
Roasting - To reduce shrinkage when roasting, place meat directly on the racks. Place a sheet pan one-half full of water in the bottom<br />
rack position. The water will evaporate, increasing humidity in the <strong>oven</strong> chamber. The pan catches grease from the meat, making <strong>oven</strong><br />
cleaning easier.<br />
Baking - Weigh the product to ensure equal distribution in each pan. Varying amounts of product will cause uneven baking results.<br />
Fan - The fan must be operating for the <strong>oven</strong> to heat.<br />
Majestic Convection Oven<br />
Lights - The <strong>oven</strong> light switch is momentary contact. Press the switch to see what’s cooking – this feature will lengthen the lifetime of<br />
the bulb.<br />
12<br />
13592 Desmond St., Pacoima, CA 91331 818.897.0808 tel 888.753.9898 toll free www.americanrange.com
Owner’s Manual<br />
TROUBLESHOOTING GUIDE<br />
POSSIBLE CAUSE SUGGESTED ACTION<br />
SYMPTOM: Heating elements do not come on.<br />
Unit is not connected to gas or electrical service Visually check unit is wired to gas or electrical service<br />
Power switch is on Set the power switch to COOK<br />
Thermostat is set to very low temperature Set temperature to desired value<br />
Doors are open Close the door<br />
SYMPTOM: Oven does not reach selected temperature.<br />
May not have been on long enough Unit preheats to 350ºF in about ten minutes<br />
Thermostat may be defective Unit will require service<br />
Too little gas pressure, dirty gas line Call for authorized service<br />
SYMPTOM: Convection fan does not operate.<br />
Unit is not connected to electrical service Visually check unit is wired to electrical service<br />
Power switch is off Set the power switch to COOK<br />
Circuit breaker is tripped Reset the breaker, observe operation<br />
SYMPTOM: General baking problems.<br />
Unit set to “standard” bake temperature Set unit to <strong>convection</strong> bake temperature<br />
Thermostat out of calibration Unit will require service<br />
!<br />
WARNING<br />
Majestic Convection Oven<br />
Always disconnect the electrical power service<br />
before cleaning or servicing the <strong>oven</strong>.<br />
13<br />
13592 Desmond St., Pacoima, CA 91331 818.897.0808 tel 888.753.9898 toll free www.americanrange.com
Owner’s Manual<br />
ENERGY STAR® MAJESTIC & MSD GAS OVEN<br />
MAJESTIC & MSD SERIES PILOT IGNITION<br />
Majestic Convection Oven<br />
O<br />
N<br />
TOP<br />
C<br />
O<br />
O<br />
L<br />
14<br />
13592 Desmond St., Pacoima, CA 91331 818.897.0808 tel 888.753.9898 toll free www.americanrange.com<br />
O<br />
N<br />
TOP<br />
O<br />
F<br />
F<br />
H<br />
I<br />
TOP<br />
L<br />
O<br />
6 5 4 32 1<br />
654321
Owner’s Manual<br />
MA SERIES PILOT IGNITION<br />
Majestic Convection Oven<br />
O<br />
N<br />
TOP<br />
15<br />
13592 Desmond St., Pacoima, CA 91331 818.897.0808 tel 888.753.9898 toll free www.americanrange.com<br />
C<br />
O<br />
O<br />
L<br />
O<br />
N<br />
TOP<br />
O<br />
F<br />
F<br />
H<br />
I<br />
TOP<br />
6 5 4 3 2 1<br />
L<br />
O
Owner’s Manual<br />
ME/MSDE ELECTRIC OVEN<br />
ELECTRICAL SPECIFICATIONS<br />
KW Hz Volts Phase<br />
U.S. AND CANADIAN INSTALLATIONS<br />
16<br />
Amps Electrical Connection<br />
(minimum size)<br />
L1 L2 L3<br />
11 60 208 1 550 -- 50 6 AWG<br />
11 60 208 3 15 15 15 8 AWG<br />
11 60 220 - 240 1 550 -- 50 6 AWG<br />
11 60 220 - 240 3 15 15 15 8 AWG<br />
GENERAL EXPORT INSTALLATIONS<br />
O<br />
N<br />
Majestic Convection Oven<br />
C<br />
O<br />
O<br />
L<br />
O<br />
F<br />
F<br />
11 50 240 3 19 14 14 Size per local code<br />
11 50 240 1 42 - 42 Size per local code<br />
13592 Desmond St., Pacoima, CA 91331 818.897.0808 tel 888.753.9898 toll free www.americanrange.com<br />
O<br />
N<br />
H<br />
I<br />
L<br />
O<br />
6<br />
5<br />
4<br />
6<br />
5<br />
L3 L2 L1<br />
4<br />
L3 L2 L1<br />
3<br />
3<br />
G<br />
2<br />
2<br />
1<br />
CONTACTOR<br />
HEATING ELEMENTS<br />
1<br />
POWER CONNECTION<br />
208V, 1 PH, 50 AMPS<br />
CONTACTOR<br />
HEATING ELEMENTS<br />
POWER CONNECTION<br />
208V, 3 PH, 30 AMPS
Owner’s Manual<br />
DRAFT HOOD<br />
MAJESTIC ME-1 MSDE-1<br />
DOUBLE STACK KIT<br />
1<br />
3<br />
4<br />
11<br />
12<br />
13<br />
52<br />
33<br />
32<br />
31<br />
30<br />
29<br />
14<br />
Majestic Convection Oven<br />
47<br />
48<br />
15<br />
53<br />
46<br />
16<br />
54<br />
45<br />
17<br />
17<br />
44<br />
43<br />
36<br />
18<br />
35<br />
19<br />
42<br />
37<br />
28<br />
41<br />
38<br />
21<br />
40<br />
39<br />
22<br />
23 25<br />
24 26
Owner’s Manual<br />
ITEM<br />
NO.<br />
PART<br />
NO.<br />
1 A91014<br />
3<br />
4<br />
DESCRIPTION<br />
Motor, 1/2HP 50/60HZ 1725/1140 ME/MESD 200-230V 200V<br />
60/50HZ<br />
A91201 Blower, Motor Wheel w/Stainless Set Screws M/MSD Series<br />
A42175 Screw, Set 8mm x 16mm Socket SS M/MSD Blower Wheel<br />
A12000<br />
Element, Heating Assembly 9.9KW 3300W Per Rod 208V<br />
Incology ME<br />
A20036 Bulb, Light 40W 240V A15 ME/MESD<br />
11 A43000 Bushing, Oilite Bronze Flanged M/MSD Series<br />
12 A99341<br />
13<br />
14<br />
Bracket, Door Support Channel 1555B New Style MSD/<br />
Majestic<br />
A43108 Chain Majestic<br />
A43101 Link, Chain M1<br />
A43005 Rod, 1CV 1/4” x 3” Rt/Lt M/MSD Series<br />
A43006 Rod, 1CV 1/4” x 20” Rt/Lt ARFO/M1<br />
A43001 Turnbuckle, 1CV Alum Body M/MSD Series<br />
A99306 Chain Assembly, M/MSD Door Closing w/Cast Iron Turnbuckle<br />
A99263<br />
A99264<br />
Door, Solid Stainless Left hand Assembly w/Pullarm M/MSD<br />
Series<br />
Door, Glass Window Pack Stainless Left Side w/Pullarm M/<br />
MSD Series<br />
17 A43022 Bearing Sleeve, Bronze 1/2” ID x 3/4” OD 1/2” LG<br />
18 A53010 Tube, Handle M1/MSD .049w x 1” x 23-1/2” 180 Grit<br />
21<br />
A99265 Door, Solid Stainless Rt Side w/Switch Activator M/MSD Series<br />
A99266<br />
Door, Glass Window Pack Rt SIde w/Switch Activator M/MSD<br />
Series<br />
23 A99304 Actuator, Door Switch Collar Assembly M/MSD Series<br />
24<br />
A35018 Caster, 4” Swivel No Brake NSF 300 lb. Load AR/Medallion<br />
A35019 Caster, 4” Swivel with Brake NSF 300 lb. AR/Medallion<br />
A35107<br />
Caster, Set (4) 5” Swivel 2/w Brakes 300 lb. Load Majestic/<br />
MSD/HD<br />
25 A10003 Switch, Oven Door Plunger with Rubber Boot M/MSD only<br />
28<br />
30<br />
32<br />
33<br />
A99709 Gaskets, Oven Cell Left & Right Spring Stainless Steel M/MSD<br />
A99716<br />
Gaskets, Oven Cell Top & Bottom Spring Stainless Steel M/<br />
MSD<br />
A31000 Rack, Majestic Oven 28-1/2” x 26” Chrome Plated M/MA<br />
A31082<br />
Rack, Convection Oven MSD Chrome Plated 17.870” x<br />
28.250”<br />
A99233 Bracket, Door Hinge Left Side Heavy Duty Stainless M/MSD<br />
A99329 Hinge, Bracket Lt Louver Panel Flat Back M/MSD Series<br />
A31084 Guide, Rack 27-1/8” x 22-3/4” Chrome Plated M/MA Lt/Rt<br />
A31081 Guide, Rack 21.40” x 19.19” Chrome Plated MSD Lt/Rt<br />
35 A99330 Hinge, Bracket Rt Louver Panel Flat Black M/MSD Series<br />
36 A99234 Bracket, Door Hinge Right Side Heavy Duty Stainless M/MSD<br />
37 A20001 Bulb, Light Frosted 40W 130V M/MSD<br />
39 A20000 Socket, Light Porcelain Base 10445 M/MSD/ACB Series<br />
41 A10000 Switch, Rocker On/Off/Momentary MA<br />
42 A10001 Switch, Rocker Fan On/Off/Maintain M/MSD Series<br />
43 A32017 Knob, Black w/White Arrow ARC/M 01409<br />
44 A32005 Knob, Dial KXT Thermostat 10411 M/MSD Series, ARC<br />
45 A32023 Bezel, KXT-397-36 Thermostat 10440-C M/MSD Series, ARC<br />
Majestic Convection Oven<br />
18<br />
13592 Desmond St., Pacoima, CA 91331 818.897.0808 tel 888.753.9898 toll free www.americanrange.com<br />
ITEM<br />
NO.<br />
PART NO. DESCRIPTION<br />
46 A10009 Switch, Rocker 3 Position 10406 M/MSD Series ARC<br />
47 A10058<br />
Contactor, 3 Pole 208-240 VAC 50HZ Coil 208/220VAC ME/<br />
MSDE<br />
52 A99712 Bracket, KXT Thermostat M/MSD 1330 ARC<br />
53 A11105 Thermostat, KXT Electric M/MSD 10404 ARC<br />
54 A60001 Timer, Cooking 60 Minute 10408 M/MSD, ARC<br />
Prices subject to change without notice.
Owner’s Manual<br />
DIGITAL CONTROL<br />
MAJESTIC M-1 MSD-1<br />
DOUBLE STACK KIT<br />
86<br />
87<br />
57<br />
2<br />
3<br />
4<br />
58<br />
6<br />
89<br />
DIGITAL<br />
64<br />
66<br />
13<br />
88<br />
15<br />
51<br />
Majestic Convection Oven<br />
30<br />
16<br />
55<br />
50<br />
31<br />
73<br />
49<br />
17<br />
32<br />
33<br />
18<br />
57<br />
48<br />
47<br />
19<br />
19<br />
72<br />
58<br />
34<br />
71<br />
59<br />
36<br />
35<br />
44<br />
42<br />
20<br />
60<br />
43<br />
39<br />
37<br />
21<br />
61<br />
38<br />
62<br />
23<br />
64<br />
24<br />
66<br />
67<br />
25 27<br />
26 28<br />
DRAFT HOOD
Owner’s Manual<br />
ITEM<br />
NO.<br />
PART NO. DESCRIPTION<br />
2 A20000 Socket, Light Porcelain Base 10445 M/MSD/ACB Series<br />
3 A20001 Bulb, Light Frosted 40W 130V M/MSD<br />
4<br />
6<br />
A91000 Motor, 1/2 HP 50/60HZ 1PH M1/MSD 1725/1140 RPM 115V<br />
A91014<br />
Motor, 1/2 HP 50/60HZ 1725/1140 ME/MESD 200-230V 60/50<br />
HZ<br />
A91201 Blower, Motor Wheel w/Stainless Set Screws M/MSD Series<br />
A42175 Screw, Set 8mm x 16mm Socket SS M/MSD Blower Wheel<br />
13 A43000 Bushing, Oilite Bronze Flanged M/MSD Series<br />
15<br />
16<br />
A99306 Chain Assembly, M/MSD Door Closing w/Cast Iron Turnbuckle<br />
A43108 Chain, Door Chain Assembly M/MSD Series<br />
A43101 Link, Door Chain Assembly M/MSD Series<br />
A43005 Rod, 1CV 1/4” x 3” Rt/Lt M/MSD Series<br />
A43006 Rod, 1CV 1/4” x 20” Rt/Lt AFRO/M1<br />
A43001 Turnbuckle, 1CV Alum Body M/MSD Series<br />
A99263<br />
A99264<br />
Door, Solid Stainless Left Hand Assembly w/Pullarm M/MSD<br />
Series<br />
Door, Glass Window Pack Stainless Left Side w/Pullarm M/MSD<br />
Series<br />
17 A27005 Glass, Window Pack & J-Trim M1/MSD<br />
19 A43022 Bearing Sleeve, Bronze 1/2” ID x 3/4” OD 1/2 LG<br />
20 A53010 Tube, Handle M1/MSD .049w x 1” x 23-1/2” 180 Grit<br />
21<br />
23<br />
A42003 Bolt, Hex GR5 1/4-20 x 3/4” ZP 4000/Box<br />
A32105 Bracket, Door Handle M/MSD Polish Chrome<br />
A99265 Door, Solid Stainless Rt Side w/Switch Activator M/MSD Series<br />
A99266<br />
Door, Glass Window Pack Rt Side w/Switch Activator M/MSD<br />
Series<br />
25 A99304 Activator, Door Switch Collar Assembly M/MSD Series<br />
26<br />
A35018 Caster, 4” Swivel No Brake NSF 300 lb. Load AR/Medallion<br />
A35019 Caster, 4” Swivel with Brake NSF 300 lb. Load AR/Medallion<br />
A35107<br />
Caster, Set of (4) 5” Swivel 2/w Brakes 300 lb. Load Majestic/<br />
MSD/HD<br />
27 A10003 Switch, Oven Door Plunger with Rubber Boot M & MSD Only<br />
28<br />
30<br />
A35001 Leg 6” Cone 3” Adjustable Bullet Chrome Plated NSF<br />
A35000 Leg Bullet for 1-5/8 Tube NSF 10438<br />
A31081 Guide, Rack 21.40” x 19.19” Chrome Plated MSD Lt/Rt<br />
A31084 Guide, Rack 27-1/8” x 22-3/4” Chrome Plated M/MA Lt/Rt<br />
31 A99233 Bracket, Door Hinge Left Side Heavy Duty Stainless M/MSD<br />
32 A99329 Hinge, Bracket Lt Louver Panel Flat Black M/MSD Series<br />
33<br />
A31000 Rack, Majestic Oven 28-1/2” x 26” Chrome Plated M/MA<br />
A31082 Rack,Convection Oven MSD Chrome Plated 17.870” x 28.250”<br />
34 A24000 Elbow, Orifice Mixr 3/8C - 3/8-27 10442<br />
35 A99725 Bracket, Orifice Elbow M1<br />
Prices subject to change without notice.<br />
Majestic Convection Oven<br />
20<br />
13592 Desmond St., Pacoima, CA 91331 818.897.0808 tel 888.753.9898 toll free www.americanrange.com<br />
ITEM<br />
NO.<br />
36<br />
PART NO. DESCRIPTION<br />
37 A99716<br />
38 A99709<br />
39<br />
42<br />
A29026 Hood, Orifice #38 1/2” Brass 11038/MSD Nat Gas<br />
A29003 Hood, Orifice #53 1/2” Brass Flat Head/MSD LP Gas ARROB<br />
A29021 Hood, Orifice #35 1/2” Brass 11035M<br />
A29022 Hood, Orifice #51 1/2” Brass 11051M<br />
A11109 Orifice, Bell 0.014L VL LP Gas 11107 AF-Series<br />
A37054 Conversion Kit, M1 Nat Gas<br />
A37079 Conversion Kit, M2 LP Gas<br />
A37080 Conversion Kit, M2 Nat Gas<br />
A37144 Conversion Kit, MSD-1 LP Gas<br />
A37145 Conversion Kit, MSD-1 Nat Gas<br />
A37226 Conversion Kit, MSD-2 LP Gas<br />
A37227 Conversion Kit, MSD-2 Nat Gas<br />
Gasket, Oven Cell Top & Bottom Spring Stainless Steel M/<br />
MSD<br />
Gaskets, Oven Cell Left and Right Spring Stainless Steel M/<br />
MSD<br />
A11107 Pilot, Nat Gas .26 .110 Term Majestic 36” Long Wire<br />
A11120 Pilot, LPG Gas .16 .110 Term Majestic 36” Long Wire<br />
A14010 Burner, Convection Oven M/MA Series<br />
A14027 Burner, Convection Oven MSD Series<br />
43 A99330 Hinge, Bracket Rt Louver Panel Flat Black M/MSD Series<br />
44 A99234 Bracket, Door Hinge Right Side Heavy Duty Stainless M/MSD<br />
47 A80101<br />
48<br />
Solenoid, Valve Safety Gas 115V 10415/73462 HD Series/<br />
AR6C/M1<br />
A13019 Harness, M/MSD Majestic Wiring with Pin Connector<br />
A13021 Harness, MSD/M1 Wiring with Pin Connector “Energy Star”<br />
49 A20006 Box, Electric 4-1/2” OCT, w/Back 10459<br />
50 A13100<br />
Cord, Power NEMA 5-15P SJT 16/3 6’ Black ROJ 5-1/2”<br />
Grn#10 Term<br />
51 A10062 Control, Gas Pilot Ignition Direct Spark 120V MSD/Majestic<br />
55<br />
57 A10011<br />
A80110 Valve, Pressure Regulator 3/4 10480 Nat Gas Set 5<br />
A80011 Valve, Pressure Regulator 3/4 10481 LP Gas Set 10.0<br />
Light, Indicator 120V Red 12.7 10407 w/Wire Lead and Male<br />
Term<br />
58 A10009 Switch, Rocker 3 Position 10406 M/MSD Series, ARC<br />
59 A32023 Bezel, KXT-397-36 Thermostat 10440-C M/MSD Series, ARC<br />
60 A32005 Knob, Dial KXT Thermostat 10411 M/MSD Series, ARC<br />
61 A28002 Connector, Male 3/8cc x 1/8 MPT 10014 Compression Fitting<br />
62 A32017 Knob, Timer M/MSD Series 104099<br />
64 A10001 Switch, Rocker Fan On/Off Maintain, M/MSD only<br />
66 A10000 Switch, Rocker On/Off/Momentary, MA<br />
67 A39001 Label, Majestic Oven New Style American Range Logo<br />
71 A60001 Timer, Cooking 60 Minute 10408 M/MSD, ARC<br />
72 A11105 Thermostat, KXT Electric M/MSD 10404 ARC<br />
73 A99712 Bracket, KXT Thermostat M/MSD 1330 ARC<br />
86 A60000 Control, Digital Timer Temperature 100-500 F MA Series<br />
87 A55000 Probe, Sensor Convection Oven 1000 OHMS MA Series<br />
88 A39000 Label, Control Majestic Oven w/Red Transparent Window MA<br />
89 A32000 Knob, Digital Control Timer Black Cap MA Series
A70701 121311<br />
WARRANTY REQUIREMENT<br />
For reliable operation and for your own safety, this professional cooking equipment must<br />
be installed by a certified/licensed contractor.<br />
Failure to comply will void any written or implied warranty.<br />
Should the equipment require service during the standard warranty period, the receipt<br />
proving certified installation must be made available to American Range for verification.<br />
If installation was not performed by a certified/licensed contractor be prepared to submit<br />
a major credit card for payment for proper installation prior to service.<br />
13592 Desmond Street, Pacoima, CA 91331<br />
818.897.0808 888.753.9898 tel<br />
818.897.1670 fax<br />
www.americanrange.com