Contactless EMG sensors embroidered onto textile - Geert's pages
Contactless EMG sensors embroidered onto textile - Geert's pages
Contactless EMG sensors embroidered onto textile - Geert's pages

You also want an ePaper? Increase the reach of your titles
YUMPU automatically turns print PDFs into web optimized ePapers that Google loves.
electronics to protect them form RF noise. All the areas that<br />
were not used have been covered with the ground plane to<br />
make this shielding most effective.<br />
Unfortunately the whole package is rather thick as some<br />
of the components were not available in smaller size. The<br />
largest part is the amplifier with a thickness of 1.7mm.<br />
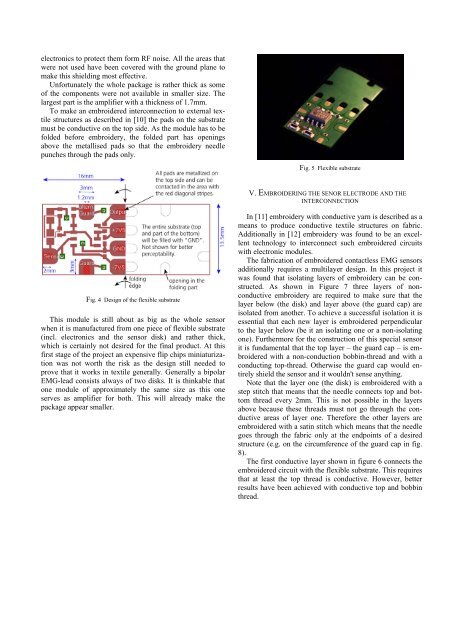
To make an <strong>embroidered</strong> interconnection to external <strong>textile</strong><br />
structures as described in [10] the pads on the substrate<br />
must be conductive on the top side. As the module has to be<br />
folded before embroidery, the folded part has openings<br />
above the metallised pads so that the embroidery needle<br />
punches through the pads only.<br />
Fig. 4 Design of the flexible substrate<br />
This module is still about as big as the whole sensor<br />
when it is manufactured from one piece of flexible substrate<br />
(incl. electronics and the sensor disk) and rather thick,<br />
which is certainly not desired for the final product. At this<br />
first stage of the project an expensive flip chips miniaturization<br />
was not worth the risk as the design still needed to<br />
prove that it works in <strong>textile</strong> generally. Generally a bipolar<br />
<strong>EMG</strong>-lead consists always of two disks. It is thinkable that<br />
one module of approximately the same size as this one<br />
serves as amplifier for both. This will already make the<br />
package appear smaller.<br />
Fig. 5 Flexible substrate<br />
V. EMBROIDERING THE SENOR ELECTRODE AND THE<br />
INTERCONNECTION<br />
In [11] embroidery with conductive yarn is described as a<br />
means to produce conductive <strong>textile</strong> structures on fabric.<br />
Additionally in [12] embroidery was found to be an excellent<br />
technology to interconnect such <strong>embroidered</strong> circuits<br />
with electronic modules.<br />
The fabrication of <strong>embroidered</strong> contactless <strong>EMG</strong> <strong>sensors</strong><br />
additionally requires a multilayer design. In this project it<br />
was found that isolating layers of embroidery can be constructed.<br />
As shown in Figure 7 three layers of nonconductive<br />
embroidery are required to make sure that the<br />
layer below (the disk) and layer above (the guard cap) are<br />
isolated from another. To achieve a successful isolation it is<br />
essential that each new layer is <strong>embroidered</strong> perpendicular<br />
to the layer below (be it an isolating one or a non-isolating<br />
one). Furthermore for the construction of this special sensor<br />
it is fundamental that the top layer – the guard cap – is <strong>embroidered</strong><br />
with a non-conduction bobbin-thread and with a<br />
conducting top-thread. Otherwise the guard cap would entirely<br />
shield the sensor and it wouldn't sense anything.<br />
Note that the layer one (the disk) is <strong>embroidered</strong> with a<br />
step stitch that means that the needle connects top and bottom<br />
thread every 2mm. This is not possible in the layers<br />
above because these threads must not go through the conductive<br />
areas of layer one. Therefore the other layers are<br />
<strong>embroidered</strong> with a satin stitch which means that the needle<br />
goes through the fabric only at the endpoints of a desired<br />
structure (e.g. on the circumference of the guard cap in fig.<br />
8).<br />
The first conductive layer shown in figure 6 connects the<br />
<strong>embroidered</strong> circuit with the flexible substrate. This requires<br />
that at least the top thread is conductive. However, better<br />
results have been achieved with conductive top and bobbin<br />
thread.