INSTRUCTIONS ON THE ANNOTATION OF PDF FILES
INSTRUCTIONS ON THE ANNOTATION OF PDF FILES
INSTRUCTIONS ON THE ANNOTATION OF PDF FILES

Create successful ePaper yourself
Turn your PDF publications into a flip-book with our unique Google optimized e-Paper software.
<strong>INSTRUCTI<strong>ON</strong>S</strong> <strong>ON</strong> <strong>THE</strong> ANNOTATI<strong>ON</strong> <strong>OF</strong> <strong>PDF</strong> <strong>FILES</strong><br />
P-annotate<strong>PDF</strong>-v2<br />
<strong>PDF</strong> files are self-contained documents for viewing on screen and for printing. They contain all appropriate<br />
formatting and all fonts, so that the correct result will be shown on screen and on the printout from your local<br />
printer.<br />
To view, print and annotate your article you will need Adobe Reader version 7. This program is freely available<br />
and can be downloaded from: http://www.adobe.com/products/acrobat/readstep2.html.<br />
Please note that this reader is available for a whole series of platforms that include PC, Mac, and UNIX.<br />
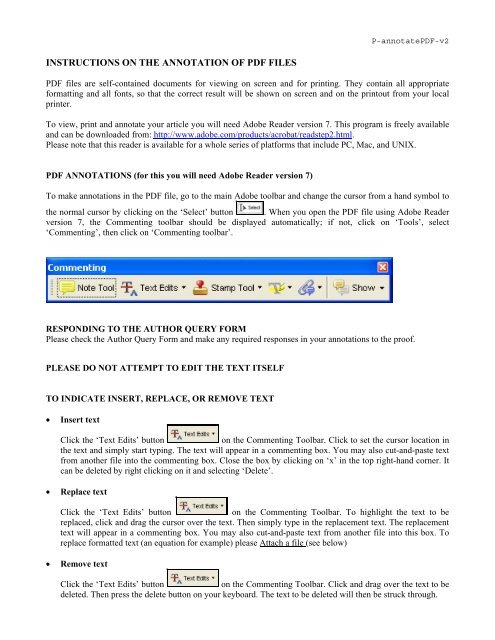
<strong>PDF</strong> ANNOTATI<strong>ON</strong>S (for this you will need Adobe Reader version 7)<br />
To make annotations in the <strong>PDF</strong> file, go to the main Adobe toolbar and change the cursor from a hand symbol to<br />
the normal cursor by clicking on the ‘Select’ button . When you open the <strong>PDF</strong> file using Adobe Reader<br />
version 7, the Commenting toolbar should be displayed automatically; if not, click on ‘Tools’, select<br />
‘Commenting’, then click on ‘Commenting toolbar’.<br />
RESP<strong>ON</strong>DING TO <strong>THE</strong> AUTHOR QUERY FORM<br />
Please check the Author Query Form and make any required responses in your annotations to the proof.<br />
PLEASE DO NOT ATTEMPT TO EDIT <strong>THE</strong> TEXT ITSELF<br />
TO INDICATE INSERT, REPLACE, OR REMOVE TEXT<br />
• Insert text<br />
Click the ‘Text Edits’ button on the Commenting Toolbar. Click to set the cursor location in<br />
the text and simply start typing. The text will appear in a commenting box. You may also cut-and-paste text<br />
from another file into the commenting box. Close the box by clicking on ‘x’ in the top right-hand corner. It<br />
can be deleted by right clicking on it and selecting ‘Delete’.<br />
• Replace text<br />
Click the ‘Text Edits’ button on the Commenting Toolbar. To highlight the text to be<br />
replaced, click and drag the cursor over the text. Then simply type in the replacement text. The replacement<br />
text will appear in a commenting box. You may also cut-and-paste text from another file into this box. To<br />
replace formatted text (an equation for example) please Attach a file (see below)<br />
• Remove text<br />
Click the ‘Text Edits’ button on the Commenting Toolbar. Click and drag over the text to be<br />
deleted. Then press the delete button on your keyboard. The text to be deleted will then be struck through.
HIGHLIGHT TEXT / MAKE A COMMENT<br />
Click on the ‘Highlight’ button on the Commenting Toolbar. Click and drag over the text. To make a<br />
comment, double click on the highlighted text and simply start typing.<br />
ATTACH A FILE<br />
Click on the ‘Attach a File’ button on the Commenting Toolbar. Click on the figure, table or formatted<br />
text to be replaced. A window will automatically open allowing you to attach the file. To make a comment, go to<br />
‘General’ and then ‘Description’ in the ‘Properties’ window. A graphic will appear indicating the insertion of a<br />
file.<br />
LEAVE A NOTE / COMMENT<br />
Click on the ‘Note Tool’ button on the Commenting Toolbar. Click to set the location of the note<br />
on the document and simply start typing. Do not use this feature to make text edits.<br />
REVIEW<br />
To review your changes, click on the ‘Show’ button on the Commenting Toolbar. Choose ‘Show<br />
Comments List’. Navigate by clicking on a correction in the list. Alternatively, double click on any mark-up to<br />
open the commenting box.<br />
UNDO / DELETE CHANGE<br />
To undo any changes made, use the right click button on your mouse (for PCs). Alternatively click on ‘Edit’ in<br />
the main Adobe menu and then ‘Undo’. You can also delete edits using the right click and selecting ‘Delete’.<br />
SEND YOUR ANNOTATED <strong>PDF</strong> FILE BACK TO ELSEVIER<br />
Save the annotations to your file and return as an e-mail attachment using the ‘reply’ button to the original mail.<br />
Do NOT use the ‘Send comments’ feature of the Commenting Toolbar. Please ensure that all corrections are sent<br />
back to us in one communication (including responses to the Author Query Form), as subsequent corrections<br />
will not be possible.<br />
Note: Comprehensive instructions are provided within your <strong>PDF</strong> file: to access these instructions please click on<br />
the Comments and Markup menu in the main tool bar, or click on Help.<br />
FUR<strong>THE</strong>R POINTS<br />
• Any (grey) halftones (photographs, micrographs, etc.) are best viewed on screen, for which they are<br />
optimized, and your local printer may not be able to output the greys correctly.<br />
• Colour artwork (if applicable): If you are unable to see any colour artwork, please check that the Display<br />
large images tick box under File-->Preferences--> General... is ticked. If you are still unable to view your<br />
artwork correctly, please contact Elsevier Author Support (authorsupport@elsevier.com).<br />
• If the <strong>PDF</strong> files contain colour images, and if you do have a local colour printer available, then it will be<br />
likely that you will not be able to correctly reproduce the colours on it, as local variations can occur.<br />
• If you print the <strong>PDF</strong> file attached, and notice some ‘non-standard’ output, please check if the problem is also<br />
present on screen. If the correct printer driver for your printer is not installed on your PC, the printed output<br />
will be distorted.