LDN UP3TM
LDN UP3TM
LDN UP3TM

You also want an ePaper? Increase the reach of your titles
YUMPU automatically turns print PDFs into web optimized ePapers that Google loves.
11 <strong>LDN</strong>UP3-IN 12<br />
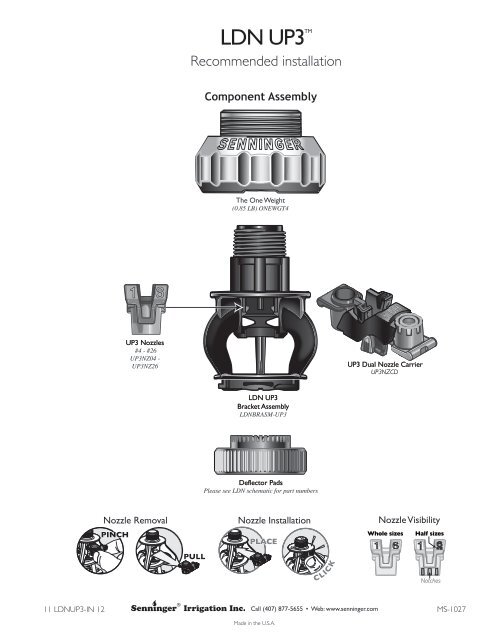
Nozzle Removal<br />
PINCH<br />
UP3 Nozzles<br />
#4 - #26<br />
UP3NZ04 -<br />
UP3NZ26<br />
®<br />
<strong>LDN</strong> UP3 TM<br />
Recommended installation<br />
PULL<br />
Component Assembly<br />
The One Weight<br />
(0.85 LB) ONEWGT4<br />
<strong>LDN</strong> UP3<br />
Bracket Assembly<br />
<strong>LDN</strong>BRASM-UP3<br />
Deflector Pads<br />
Please see <strong>LDN</strong> schematic for part numbers<br />
Nozzle Installation Nozzle Visibility<br />
PLACE<br />
C LIC K<br />
Call (407) 877-5655 • Web: www.senninger.com<br />
Made in the U.S.A.<br />
UP3 Dual Nozzle Carrier<br />
UP3NZCD<br />
Whole sizes Half sizes<br />
Notches<br />
MS-1027
<strong>LDN</strong> System Assembly<br />
Mounting<br />
1. The <strong>LDN</strong> can be mounted on rigid drops<br />
or flexible hose drops.<br />
2. When using flexible hose a weight is<br />
recommended.<br />
3. When using the threaded Senninger<br />
The One weight, use the internal<br />
fit technology to nest weight onto the base<br />
of the <strong>LDN</strong>.<br />
4. Conventional slip over weights can be used<br />
with the <strong>LDN</strong>.<br />
5. Mount the <strong>LDN</strong> no less than1.5 - 9 ft<br />
(0.46 - 2.74 m) above the ground.<br />
6. See Senninger Gooseneck brochure for<br />
additional mounting options.<br />
Bubbler Pad<br />
Assembly<br />
Make sure the large<br />
tick marks of the<br />
UP3 Bubbler Pad<br />
align with the <strong>LDN</strong><br />
UP3 Bracket legs<br />
before twisting to<br />
lock it in. The small<br />
tick mark aligns with<br />
the leg when locked.<br />
11 <strong>LDN</strong>UP3-IN 12<br />
Part-Circle<br />
Pad Assembly<br />
With the nozzle<br />
number in the<br />
bracket facing<br />
you, center the tab<br />
on the Part-Circle<br />
Pad behind the<br />
nozzle before<br />
twisting to lock<br />
it in.<br />
®<br />
Call (407) 877-5655 • Web: www.senninger.com<br />
Made in the U.S.A.<br />
Rigid<br />
Polyethylene<br />
Galvanize<br />
Steel<br />
System Design Criteria<br />
Nozzle sizes<br />
Mini Pad Single Pad Double Pad Triple Pad Part-Circle Pad Bubbler Pad<br />
Minimum #4 1/16" (1.59 mm) #10 5/32" (3.97 mm) #15 15/64" (5.95 mm) #20 5/16" (7.94 mm) #6 3/32" (2.38 mm) #4 1/16" (1.59 mm)<br />
Maximum* #9 9/64" (3.57 mm) #14 7/32" (5.56 mm) #19 19/64" (7.54 mm) #26 13/32" (10.32 mm) #18 9/32" (7.14 mm) #26 13/32" (10.32 mm)<br />
Flows<br />
Minimum 0.27 gpm (61 L/hr) 1.74 gpm (395 L/hr) 3.93 gpm (893 L/hr) 6.99 gpm (1588 L/hr) 0.62 gpm (141 L/hr) 0.27 gpm (61 L/hr)<br />
Maximum 2.56 gpm (581 L/hr) 6.25 gpm (1420 L/hr) 11.5 gpm (2619 L/hr) 21.2 gpm (4811 L/hr) 10.4 gpm (2351 L/hr) 21.2 gpm (4811 L/hr)<br />
Maximum Spacing**<br />
at 6 ft (1.8 m) ground clearance 7 ft (2.13 m) 7 ft (2.13 m) 7 ft (2.13 m) 7 ft (2.13 m) N/A (N/A)<br />
Pressure at the Nozzle<br />
Minimum ground<br />
clearance:<br />
1.5 - 9 ft<br />
(0.46 - 2.74 m)<br />
Minimum 6 psi (0.41 bar) 6 psi (0.41 bar) 6 psi (0.41 bar) 6 psi (0.41 bar) 6 psi (0.41 bar) 6 psi (0.41 bar)<br />
Maximum 20 psi (1.38 bar) 20 psi (1.38 bar) 20 psi (1.38 bar) 20 psi (1.38 bar) 20 psi (1.38 bar) 20 psi (1.38 bar)<br />
* It is recommended that larger nozzle sizes be used only on soils and slopes that can handle higher application rates.<br />
** For optimum performance Senninger recommends the use of maximum spacing for 1-2 spans only.<br />
Pads available in concave (blue), convex (green) and flat (black) in smooth, medium groove, and deep groove based on desired trajectory and throw.<br />
Flexible<br />
Hose<br />
Pressure Regulator Location<br />
1. Pressure regulators can be installed at the top of the drop, or near<br />
the applicator.<br />
2. Always follow your customized printout for proper pressure<br />
regulator placement.<br />
Important: To maintain product warranty and maximize drop component life, refer to the<br />
information and diagrams here.<br />
MS-1027