Configure your e-mail client using the native Exchange protocol
Configure your e-mail client using the native Exchange protocol
Configure your e-mail client using the native Exchange protocol

Create successful ePaper yourself
Turn your PDF publications into a flip-book with our unique Google optimized e-Paper software.
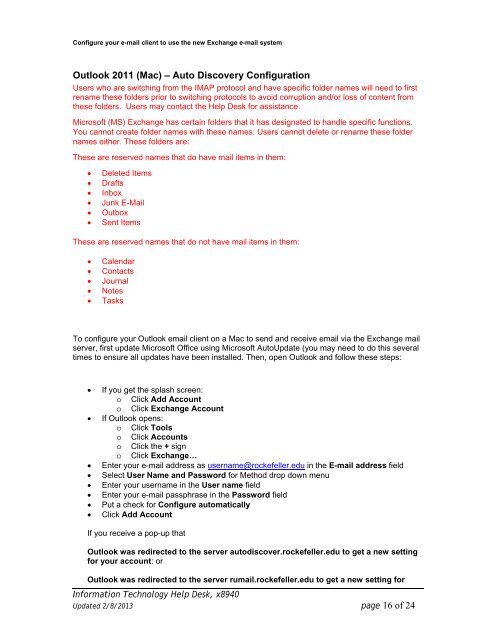
<strong>Configure</strong> <strong>your</strong> e-<strong>mail</strong> <strong>client</strong> to use <strong>the</strong> new <strong>Exchange</strong> e-<strong>mail</strong> system<br />
Outlook 2011 (Mac) – Auto Discovery Configuration<br />
Users who are switching from <strong>the</strong> IMAP <strong>protocol</strong> and have specific folder names will need to first<br />
rename <strong>the</strong>se folders prior to switching <strong>protocol</strong>s to avoid corruption and/or loss of content from<br />
<strong>the</strong>se folders. Users may contact <strong>the</strong> Help Desk for assistance.<br />
Microsoft (MS) <strong>Exchange</strong> has certain folders that it has designated to handle specific functions.<br />
You cannot create folder names with <strong>the</strong>se names. Users cannot delete or rename <strong>the</strong>se folder<br />
names ei<strong>the</strong>r. These folders are:<br />
These are reserved names that do have <strong>mail</strong> items in <strong>the</strong>m:<br />
Deleted Items<br />
Drafts<br />
Inbox<br />
Junk E-Mail<br />
Outbox<br />
Sent Items<br />
These are reserved names that do not have <strong>mail</strong> items in <strong>the</strong>m:<br />
Calendar<br />
Contacts<br />
Journal<br />
Notes<br />
Tasks<br />
To configure <strong>your</strong> Outlook e<strong>mail</strong> <strong>client</strong> on a Mac to send and receive e<strong>mail</strong> via <strong>the</strong> <strong>Exchange</strong> <strong>mail</strong><br />
server, first update Microsoft Office <strong>using</strong> Microsoft AutoUpdate (you may need to do this several<br />
times to ensure all updates have been installed. Then, open Outlook and follow <strong>the</strong>se steps:<br />
If you get <strong>the</strong> splash screen:<br />
o Click Add Account<br />
o Click <strong>Exchange</strong> Account<br />
If Outlook opens:<br />
o Click Tools<br />
o Click Accounts<br />
o Click <strong>the</strong> + sign<br />
o Click <strong>Exchange</strong>…<br />
Enter <strong>your</strong> e-<strong>mail</strong> address as username@rockefeller.edu in <strong>the</strong> E-<strong>mail</strong> address field<br />
Select User Name and Password for Method drop down menu<br />
Enter <strong>your</strong> username in <strong>the</strong> User name field<br />
Enter <strong>your</strong> e-<strong>mail</strong> passphrase in <strong>the</strong> Password field<br />
Put a check for <strong>Configure</strong> automatically<br />
Click Add Account<br />
If you receive a pop-up that<br />
Outlook was redirected to <strong>the</strong> server autodiscover.rockefeller.edu to get a new setting<br />
for <strong>your</strong> account: or<br />
Outlook was redirected to <strong>the</strong> server ru<strong>mail</strong>.rockefeller.edu to get a new setting for<br />
Information Technology Help Desk, x8940<br />
Updated 2/8/2013 page 16 of 24